
Continuous Integration and Deployment (CI/CD) of ASP.NET Core Application on Azure Web App using Jenkins – Day 2
5.00/5 (6 votes)
In this article, we’ll publish the ASP.NET Core application to Azure App Service and Configure Jenkins on Azure before we move on to next steps.
Theme
This article series will explain using Jenkins for CI and CD of an ASP.NET Core web application on the local development environment, publishing the web application to Azure Web App Service and configuring Jenkins on Azure for continuous integration and continuous deployment of the hosted application. GitHub will DevOps as a source control repository. We’ll create a pipeline using Jenkins that fetches the code from GitHub, builds the code, runs the tests and deploy the package. This will be a repetitive task on each commit to the code located on GitHub.
In the first article of the series, we learned about the concepts, terminology, technologies involved, installing Jenkins, creating ASP.NET Core application and continuous integration of ASP.NET Core application using Jenkins via two approaches, i.e., pipeline approach and free style project approach. In this article, we’ll publish the ASP.NET core application to Azure App Service and Configure Jenkins on Azure before we move on to next steps.
Roadmap
Following is the roadmap we would be following to completely learn end to end development and configurations of Continuous Integration and Deployment (CI/CD) of ASP.NET Core Application on Azure Web App using Jenkins.
- Day 1: Continuous Integration of ASP.NET Core Application using Jenkins
- Day 2: Publish the ASP.NET Core Application to Azure App Service and Configure Jenkins on Azure
- Day 3: Integrate Jenkins with Azure Active Directory and Service Principal
- Day 4: CI/CD of ASP.NET Core Application on Azure using Jenkins Azure Pipeline
Prerequisites
Go through the first article of the series before starting this article.
The following are the prerequisites for the developers to have on their machine before getting started.
- Visual Studio 2017/2019
- Dotnet 2.1 SDK installed
- Azure Subscription Free/Paid
- Java 1.5 or higher
- Git account
- Git for Windows
Publish ASP.NET Core Application to Azure App Service
We configured and tested Jenkins locally. It is time now to publish our web application to Azure using Azure Web App service and configure Jenkins there for continuous integration and deployment.
The role of Jenkins would be to fetch the code from GitHub on Azure, compile it and if successfully compiled, publish the changes to the deployed website. For this to happen, the application already needs to be provisioned on Azure App Service.
So, let’s first deploy the application to Azure and get it running on a public URL.
- Open the application’s solution file in Visual Studio. Right-click the Web project and click on Publish.

- On the next screen, select “App Service” and select the “Create New” option. Click on Publish.

- When you click on Publish, you’ll be asked to create an app service. Provide the required fields as shown in the following image.

- App Name: Name of the application. You can give any name of your choice.
- Subscription: Select the Azure subscription you own.
- Resource Group: You can use existing resource group or create a new one. I have created a new one and named it
JenkinsIntegrationRSG. - Hosting Plan: Create a new hosting plan here, give it a name. In this case, it is
JenkinsIntegrationHP, give it a location and since we are using it for sample application choose “Free” in the size. Click on OK.
Once all the details provided, click on “Create”. This will take some time to create the app service and deploy the application to that app service.

- Once deployed, you get the URL of the deployed application opened in the browser. As we see here, the application is deployed on Azure and has a public URL and the hostname we see here comes from the hosting machine on Azure.

- Verify the same on Azure Portal. Login to your Azure Portal and you can find the new resource created on the Dashboard with the name of the App Service that was provided while creating app service from Visual Studio. Navigate to that resource on the portal to check the resource group and URL. A resource group is the same we provided while publishing.

Configuring Jenkins on Azure
We’ll configure Jenkins server on Azure and integrate our application to the CI and CD.
Before you proceed, uninstall the Jenkins that is installed on your local machine and delete the Jenkins folder created on your Program Files.
Create Jenkins Server on Azure
We installed and made Jenkins running on a local development machine. Let’s see how we can configure it on Azure.
- On Azure Portal, create a new resource and in search options, search for Jenkins as shown below:

- Jenkins resource loads up from Azure Marketplace, click on Create to deploy a new Jenkins server on Azure.

- Provide the needed information on the form and click OK.

- Name: A meaningful name for your Jenkins server
- User name: Provide a user name that could be used as an admin user for Jenkins server machine.
- Authentication type: You can choose the SSH key or password. I chose Password, so provide a password that you can remember and confirm password as well.
- Subscription: Select your Azure subscription.
- Resource group: You can create a new or use an existing resource group. I have created a new named JenkinsConfigRSG.
- Location: Choose a location for the Jenkins server.
- Fill in the additional settings form.


- Size: Choose the size of the Jenkins server. I chose the smallest one for the demo purpose.
- VM disk type: Choose SSD.
- Virtual network: This is optional, leave it for now.
- Subnets: Configure subnets name and press OK.
- Public IP address: You can leave it as default or provide your own name.
- Domain name label: Provide a name that additionally will append the cloudapp URL to Jenkins VM. I gave it the name “
jenkinsintegration”. - Jenkins release type: Choose the desired release type. I chose LTS.
- JDK Type: Choose Zulu.
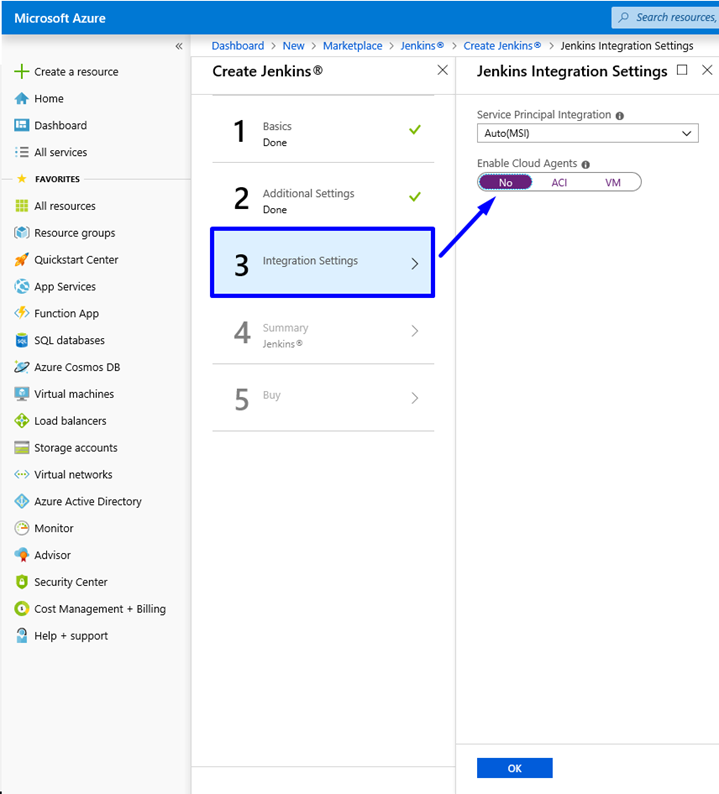
- In integration settings, choose no to enable cloud agents.
- Click OK to complete. On the Summary, verify details and click OK.
- On the Buy page, read the terms and click Create. It will take some time to create and deploy a Jenkins server.

Unlock Jenkins
Once the Jenkins is deployed, it is time to unlock it. It is a bit different on how we did locally on the development machine.
- On the portal, navigate to the newly created Jenkins resource group.

- On the resource group page, click on the newly created Jenkins virtual machine.

- We see that the operating system here is Linux as we deployed our Jenkins server on Linux and we’ll use Linux way to unlock Jenkins. Copy the DNS name of the VM.

- Open the browser on your machine and browse the copied DNS name. This will open a Jenkins page where you get the SSH string. Copy that string.

- Open the command prompt and in the copied SSH string, replace the “
username” part with the name of the Jenkins VM user name. In our case, it is “Jenkins”. We provided that in Basic settings while creating a Jenkins server. Now paste that modified string to the command prompt and press enter.
- This will ask you to provide the password for Jenkins VM. Enter the password that we provided while creating the Jenkins server and press enter. This will login to the Jenkins VM, i.e., the Linux machine and open an SSH session. We can now use the Linux commands on this terminal.
To unlock Jenkins, we would need an admin password from the installed Jenkins on Linux machine. Type the command “sudo cat /var/lib/jenkins/secrets/initialAdminPassword” to retrieve the initial admin password as shown below.
- Now on your local machine, again browse to the URL http://localhost:8080, this will show the unlock Jenkins screen, provide the retrieved password in the last step and unlock Jenkins. Click Continue.

- On getting started page, install suggested plugins, i.e., the default option.


- Provide details for creating an admin user.

This makes Jenkins up and running on the URL http://localhost:8080.
Conclusion
In this article, we learned how to publish an ASP.NET Core application to Azure App Service and configured Jenkins server on Azure. In the next article, we’ll learn about Azure Active Directory and Service Principal and integrate Jenkins with Azure Service Principal before we move on to CI/CD of ASP.NET Core application on Azure using Jenkins Azure Pipeline.
History
- 27th November, 2019: Initial version