
More Hugo Migration Tips
5.00/5 (2 votes)
This post continues my series about how I migrated from Medium to Hugo.
This post continues my series about how I migrated from Medium to Hugo. You can read the first part here:
In June 2019 I migrated my blog from a Medium hosted solution to a self-hosted static website using Hugo. This post describes the steps of my journey including creating custom embeds, adding a Content Security Policy, and how I configured my Azure Storage Static Website and set up continuous deployment from GitHub to publish my blog.
In this blog, I cover how I integrated advertising, included static images, hosted it on Azure storage static websites and built a continuous deployment pipeline with Azure Pipelines.
Road to Riches
I don’t expect to become independently wealthy from my blog. I invest a tremendous amount of time and energy writing, editing, and publishing content because I’m passionate about teaching. I want the content to remain free and I’m happy to earn a little income for my effort. Instead of hiding articles behind a paywall or annoying “subscribe now” pop-overs, I chose to take a less invasive approach. I’ve always used Amazon referral links when I link to products I’ve purchased and tried out. For the new blog, I decided to add Google AdSense. I use it in two places: search and a banner.
Integrating Search
Using Google AdSense for search solves a few problems for me. First, because the blog is a static website, there is no interactive search capability. Google provides a dynamic form that searches your domain, shows thumbnails (more on how I created thumbnails in a future article), and provides a fast “snap-in” experience. Second, it integrates ads so I have the opportunity to generate a modest amount of income (just to be transparent, what I earn in a month is enough to buy a meal or rent a few videos).
The search component has code for the search form and code for the results. I created two short codes. The first, gsearch.html is used to capture the query.
<script async src='https://cse.google.com/cse.js?cx=partner-pub-#######:#####'></script>
<div class="gcse-searchbox-only"></div>
<p> </p>
The second, gresults.html renders the results.
<script async src='https://cse.google.com/cse.js?cx=partner-pub-########:#####'></script>
<div class="gcse-searchresults-only"></div>
Under the content/static path I created search.md:
---
title: "Search Developer for Life"
author: "Jeremy Likness"
date: 2003-06-13T0000.000Z
lastmod: 2019-06-24T1010-07:00
description: "Search across blog posts."
aliases:
- "/search"
---
Enter your search terms below to find content on this blog.
{{<gsearch>}}
### Search Results
{{<gresults>}}
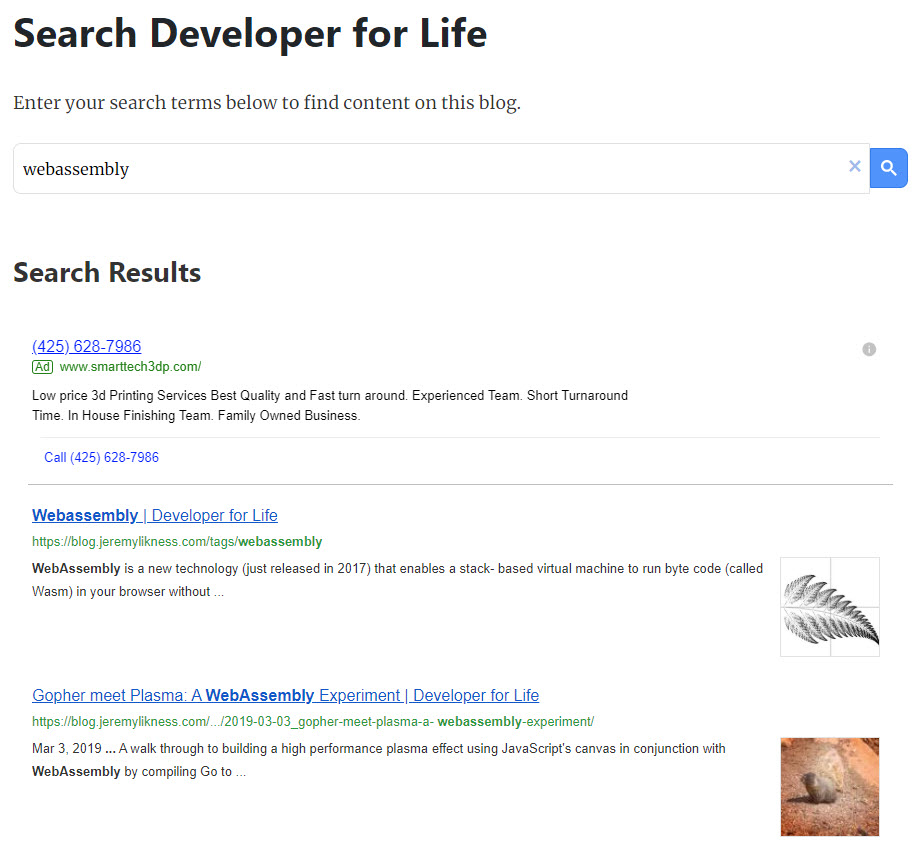
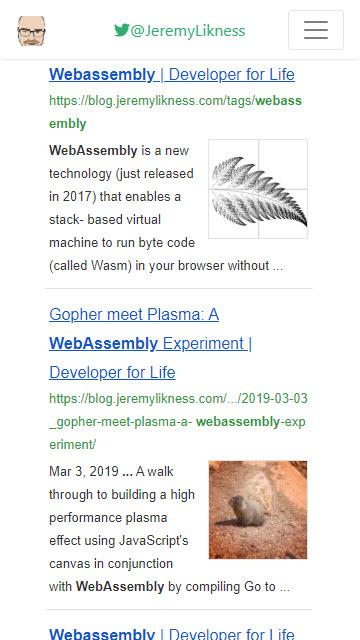
The resulting code is responsive. Here are the results for a WebAssembly search on a Galaxy S5:
That is all that I needed to complete my blog’s search experience!
Banner ad
I chose to go with a single banner ad for the rest. If you know anything about advertising, “above the fold” or a banner higher up usually performs better. I decided that I didn’t want a first impression to be an ad in your face, but rather the content you came looking for, so I placed it at the bottom of the article (and nope, no nag dialogs begging you to disable an ad blocker, either). Google has a responsive ad unit that auto-fits the provided space.
To make a reusable unit, I put a file named banner.html under layouts/partials/_shared. This way I can easily swap out the code if I choose to either remove it or go with a different advertisement. The partial just has the code Google generates to embed ads:
<script async src="https://pagead2.googlesyndication.com/pagead/js/adsbygoogle.js"></script>
<!-- Blog Below the Fold Display Ad -->
<ins class="adsbygoogle"
style="display:block"
data-ad-client="ca-pub-#######"
data-ad-slot="#####"
data-ad-format="auto"
data-full-width-responsive="true"></ins>
<script>
(adsbygoogle = window.adsbygoogle || []).push({});
</script>
I insert it at the bottom of the single.html template like this:
{{ if not .Params.noads }}
{{ partial "_shared/banner.html" }}
{{ end }}
I explain the noads (no ads) parameter and how I addressed privacy concerns after introducing ads in the next section.
Static Pages and Files
I had a bit of a learning curve for static resources. Ideally, several things like my “about page” would be on the root of the site at /about but I put it under content/static/about.md so it ends up generating a redirect from /about to /static/about. I later figured out there is a better approach but chose to leave the existing paths “as is.” When I implemented my privacy policy, I created an article at content/privacy/index.md. This creates a page at /privacy without any redirects. The front matter and article are written like any other entry. I can even reference it with my relative article short code:
This is the full privacy policy for Developer for Life. Learn exactly what services are used and what we track.
I did not give it tags, series, or a year so it doesn’t appear in taxonomies. I also introduced a noads setting so I could suppress showing advertisements on the privacy page by setting it to true in the front matter.
Other static resources include a global image for my signature, custom CSS, and an ads.txt file. These are all placed under /static directly (as opposed to content/static) and get built “as is” in the generated website.
Hosting on Azure
Hugo generates a static website. What better way to host it than using Azure storage static websites? Really there are two options I would consider. I’ve heard great things about Netlify, especially how easy it is to use and integrate. The deployment process for Netlify is built-in.
By choosing Azure storage, I knew I would need to build my own pipeline. Due to my role as a cloud advocate, I want to dogfood the services I talk about. I also considered containers, app services, even virtual machines but at the of the day there are three reasons I chose Azure storage:
- Cost
- Cost
- Cost
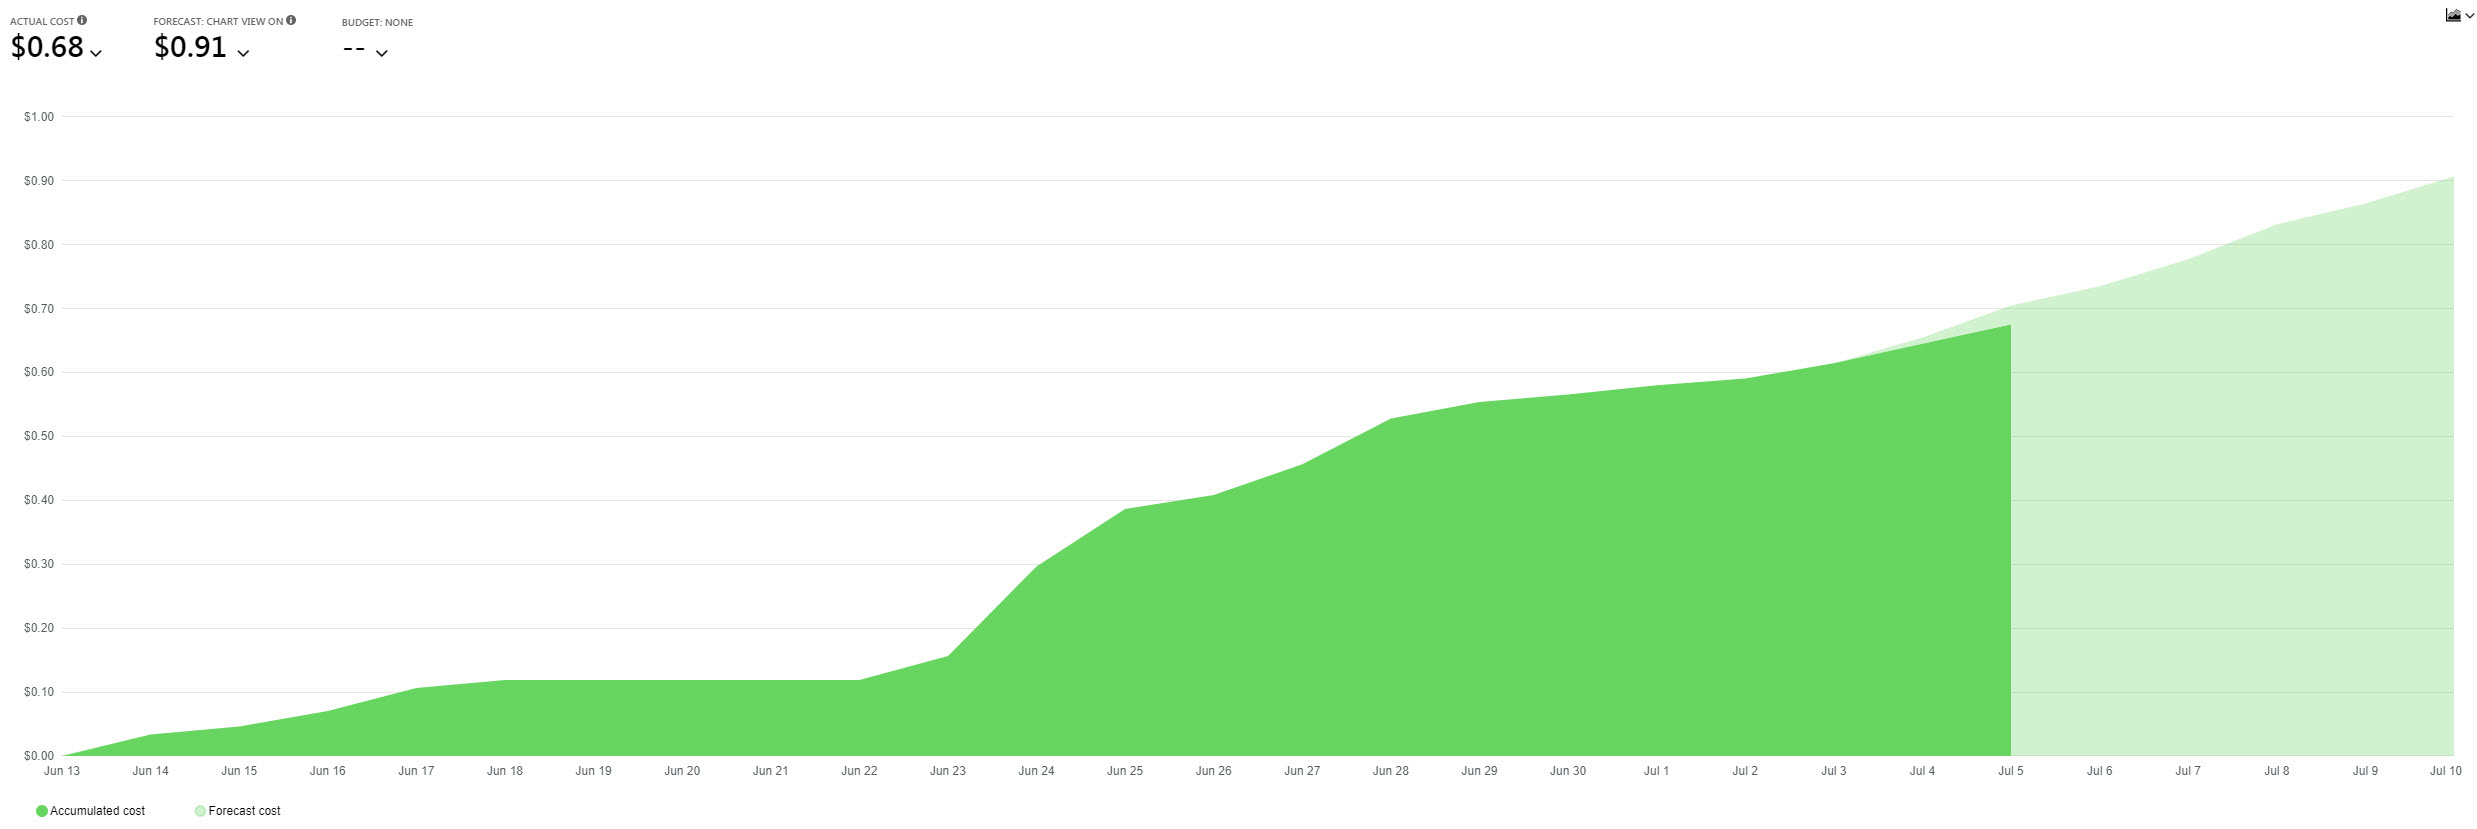
When I say cost, I mean low. How low? According to Google I have 7,500 monthly visitors and 15,000 monthly page views on average. The projected cost for this to me is … less than $1 U.S. Dollar monthly.
(You can clearly see the “surge” in cost when I uploaded my site for the first time.) This isn’t just a bucket to store things, either. I have it set up with Zone Redundant Storage that distributes files across three storage clusters in the region and provides 12 9’s of durability. It’s probably overkill because I keep the site in source control and can rebuild it from scratch at any time.
Configuring the site was easy. I simply created my account, turned on the static website feature, specified index.html as the default document and 404.html as my “not found” page, then uploaded the content. The service automatically provides an Azure-hosted domain and an SSL certificate, but I needed this to exist under my own custom domain, so I turned to Cloudflare for their free services.
Cloudflare
Cloudflare provides a variety of services, including protection from attacks, a free SSL certificate for your site, and an automatic cache. I already use Cloudflare for my legacy blog and link shortening tool, so I simply extended it to cover my new blog. I added a CNAME record to my DNS to alias the Azure storage endpoint and set up a secure connection. I also turned on a few features like cache and auto-minification of JavaScript and CSS.
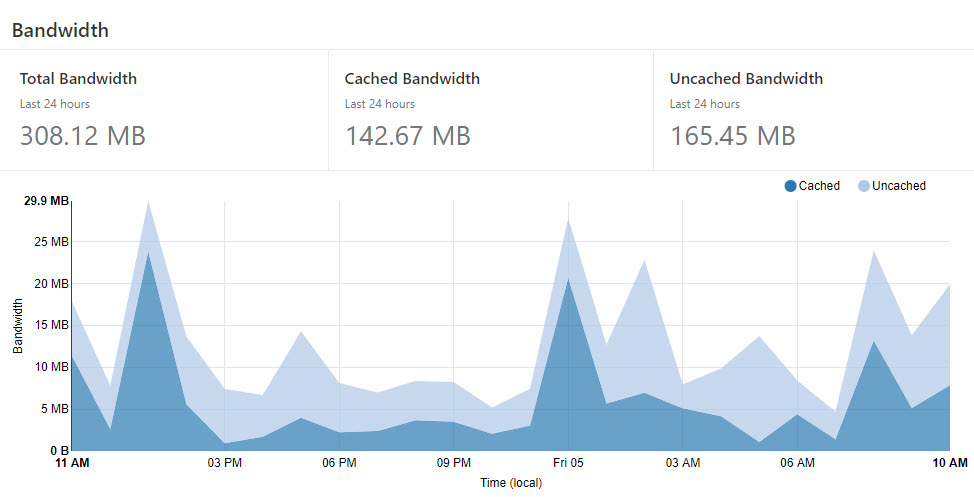
Over three gigabytes of data was served from cache over the last month resulting in lower storage costs for me and a faster user experience for you. I was so satisfied with the combination of storage and CloudFlare that I ended up moving my main domain over and will be canceling my hosting next billing cycle and saving ~$100 U.S. per year.
Breaking the Tether
What about my existing Medium presence? I write articles for other publications, so I did not want to delete my account or any stories. It turns out this approach “just works” for the stories on my blog. Previously, I’d set up a custom domain for my blog publication. Medium is aware of this, so any requests are directed to my blog. I preserved the original Medium links with aliases, so everything connects just fine. I’ve lost existing comments and no longer notify followers when I post new content, but most my traffic comes from search engines and other social media sites anyway. I suspect at some point in time if medium stops redirecting, I can go through and deactivate the old articles.
Azure Pipelines
My ideal workflow is to edit an article in GitHub, check it in, and once the draft flag is turned off, have it automatically deployed to the website. I achieve this in two phases: a build and a deploy.
The Build
Initially, I set up an Azure Pipelines build agent on Windows and used the Chocolatey to install Hugo, then generated the website. This process took several minutes with most of the time spent installing Hugo. A colleague of mine, Shayne Boyer, suggested I streamline the process by creating a Docker container.
I created this 🐳 Docker file:
FROM alpine:3.5 as build

ENV HUGO_VERSION 0.55.6
ENV HUGO_BINARY hugo_${HUGO_VERSION}_Linux-64bit.tar.gz

# Certificates
RUN apk update \
 && apk upgrade \
 && apk add --no-cache ca-certificates \
 && update-ca-certificates

# Install Hugo
RUN set -x && \
 apk add --update wget ca-certificates && \
 wget https://github.com/spf13/hugo/releases/download/v${HUGO_VERSION}/${HUGO_BINARY} && \
 tar xzf ${HUGO_BINARY} && \
 rm -r ${HUGO_BINARY} && \
 mv hugo /usr/bin
This builds the Hugo version specific to what I’m using. When I upgrade my local Hugo version, I’ll update the Docker file. To host the file, I created an Azure Container Registry (at a projected cost of about $1 more U.S. dollar per month for me, so we’re up to $2/month to operate my blog). I didn’t even have to build and upload the image. ACR supports Azure Container Registry Tasks that will build the image inside of Azure right from my local command line. With the image built and stored in the repo, I created this build pipeline:
trigger:
- master

pool:
 vmImage: 'ubuntu-16.04'

steps:

- task: DockerInstaller@0
 inputs:
 dockerVersion: '17.09.0-ce'
 displayName: 'Install Docker CLI'

- task: Docker@2
 inputs:
 containerRegistry: 'DeveloperforLifeRegistry'
 command: 'login'
 displayName: 'Login to registry'

- script: git submodule init
 workingDirectory: '$(Build.Repository.LocalPath)/themes/mediumish-gohugo-theme'
 displayName: 'Init theme'

- script: git submodule update
 workingDirectory: '$(Build.Repository.LocalPath)/themes/mediumish-gohugo-theme'
 displayName: 'Update theme'

- script: docker run --rm -v $(Build.Repository.LocalPath):/usr/site -w /usr/site developerforlife.azurecr.io/dev4lifehugo:v2 hugo
 workingDirectory: $(Build.Repository.LocalPath)
 displayName: 'Generate website'

- task: PublishBuildArtifacts@1
 inputs:
 PathtoPublish: '$(Build.Repository.LocalPath)/public'
 ArtifactName: 'blog'
 publishLocation: 'Container'
The steps are:
- Install the Docker CLI
- Login to the ACR (my image is secured so only I can access it)
- Pull down the theme files that are necessary to generate the website
- Run Hugo from inside the container, mounting the source files as
/usr/sitein the container - Create an artifact from the generated files
The entire process takes just minutes per deploy (going to a dedicated machine and using file comparisons I’m confident it could be trimmed down to seconds, but minutes are fine for me).
The Release
The artifact from the build then needs to get deployed to the Azure storage account. I do this using a release. I don’t have a QA or staging environment, so there is only one step:
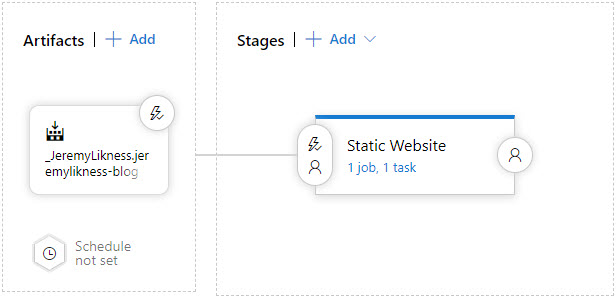
The only task is an Azure blob file copy task that uploads the artifact to blob storage in just a few seconds.
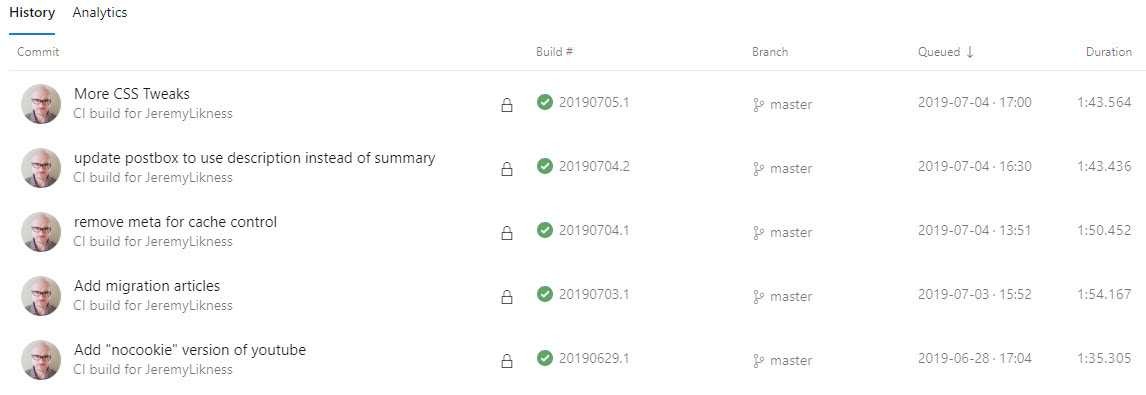
Now I can edit my article and templates and simply push changes to GitHub to trigger an automatic build and deployment.
Summary
The setup is great for me because I now I have my website under full source control, I can build it anytime and host it literally anywhere, and have features like cache and security all provided for me with minimal effort on my part.
That’s not the end of the story! In future posts I’ll cover how I created a Content Security Policy, the secret to generating thumbnails on the fly and how I created a preview short code for linking to other blog articles.
Regards,
