
Containerize ASP.NET Core Applications with Docker and Azure Kubernetes Services
4.96/5 (24 votes)
For this tutorial, we’ll create a simple ASP.NET Core web application, containerize it with Docker, then deploy it to an AKS cluster.
Introduction
There was an era of monolithic software applications where the whole application was packaged and deployed on a single server running as a single process. As we all know, with this model, a single point of failure could bring the entire application down.
The microservices architecture evolved to address this and other shortcomings of monolithic applications. Hosting microservices in containers solves some problems of deploying and managing microservice-based applications, and platforms like Docker make it easy to package applications in portable containers. Kubernetes orchestrates the deployment and management of the containerized applications.
Kubernetes was software you can download and deploy in a local environment, but most cloud hosting services provide built-in Kubernetes services that help you orchestrate cloud-hosted functions and microservices in their environment. In this article, we'll demonstrate how to orchestrate the deployment and scaling of an entire ASP.NET Core application in the cloud using Docker and Microsoft’s Azure Kubernetes Services (AKS).
Application Overview
For this tutorial, we’ll create a simple ASP.NET Core web application, containerize it with Docker, then deploy it to an AKS cluster. The logic of the application doesn’t matter here as we’ll just use it for the sake of having an application to deploy that can illustrate where it’s running as the deployment is scaled. The focus instead is on creating the containers and using Kubernetes to deploy the application to an AKS cluster. When the application is dockerized, we’ll create a local image of the application to test locally.
You’ll need a valid Azure account for the deployment, and we’ll be using the following applications on the development machine.
- Git for Windows
- .NET Core 2.1 or above
- Azure CLI
- Azure PowerShell
- Docker for Windows
Once Docker for Windows is installed and running, go to the settings and enable the checkbox for Kubernetes as shown below:

Or, Docker for Windows should be running in Linux container mode, otherwise, the Kubernetes option will not be shown in the settings.
After Azure CLI installation, run the following command (az --version) to make sure the CLI is up and running.

I created a simple ASP.NET Core application that you can clone or download from https://github.com/akhilmittal/Azure-Kubernetes-Service.
Once the project has been either cloned or downloaded and unzipped, execute the dotnet run command as shown below. This will run the server and tell on what port the server is listening for the application, i.e., http://localhost:5000.

Open a browser and navigate to the provided URL, typically http://localhost:5000. You’ll see it’s just a simple application showing the host or container in which the application is running. Currently, it runs on a development windows machine without a container and so it shows the name of the host machine, in this case 3593BH2.

Containerize the ASP.NET Core Application
Now we’ll use Docker to create a container for the ASP.NET Core application. I’ve already done some of the work in the sample download, so we don’t have to go through every step of creating the container.
Navigate to the root of the application directory to see the already created Docker file. This Docker file will be used to build the image.

The runtime image is built using the docker build command as shown below:
docker build . -t aks:local
Make sure that you are in the directory that contains a Docker file and then run the command. If you’re not familiar with the syntax, the dot indicates that the Docker file is located in the current directory and the -t switch allows you to specify the tag aks:local.
This will kickstart the build process.

Once the build completes, run the docker image list command. It lists a brand-new image called aks:local.
To test this image, run a container based on this image by using the docker run command:
docker run -d -p 5000:80 aks:local
The -d switch tells Docker to run this as a daemon process. The -p switch maps port 5000 on the host to local port 80 on the container.

Execute command docker ps to see the container up and running.

Now go to the browser and connect to http://localhost:5000.

We see the application now running under docker container as the hostname now shows the ID of the container here.
Delete the newly created test container by running:
docker container rm -f [container name]
For [container name], substitute the ID of the container as displayed in your browser or by running the docker ps command.
Deploy on a Local Kubernetes Cluster
Now, we’ll quickly deploy the application to a local Kubernetes cluster to illustrate the manual approach to orchestration with Kubernetes. This will provide a baseline to compare with Kubernetes orchestration with AKS.
There are two approaches to deploying an image on a local Kubernetes cluster: interactive and declarative.
When using the interactive approach, you specify all of the Kubernetes deployment and orchestration steps directly as commands with arguments. With the declarative approach, you specify details in a Kubernetes deployment manifest file and use that manifest as the parameters when running Kubernetes.
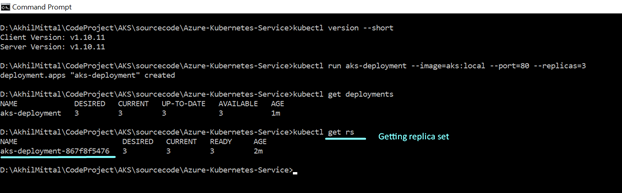
Let’s start with an interactive example by running the following command:
kubectl run aks-deployment --image=aks:local --port=80 --replicas=3
The key option here is --replicas, which we use to specify that three replicas are needed for the application. When command executed, a deployment is created where the desired state is set to three replicas. A replica set is created that ensures that there are always three replicas of the application running.
The scheduler schedules the pod deployment on the worker node, which commands the Docker engine running on the worker node to pull the image and then run in pods.

Once the application is deployed, create a service to expose this deployment.
kubectl expose deployment aks-deployment --type=NodePort
This creates the service. Verify it by running kubectl get service or kubectl get svc.

To connect to the service, launch the browser and connect to the localhost followed by the port number exposed on the node. Now I have opened three browsers and hit the same URL.

We see that the container hostname changes. That's because behind the servers, there are three pods, or containers, which the service is load balancing the request to.

Clean up the deployment and service by deleting them with the delete command.
kubectl delete deployment aks-deployment
Likewise, delete the service as well.
kubectl delete service aks-deployment
The declarative approach uses pre-configured options saved in a deployment manifest file. I included a YAML manifest file at the root of the application: aksdeploy.yml.
The file has two divisions. The first specifies how to create the deployment. The second specifies how to expose it as a service.
Open the file and change the number of replicas ("replicas:") to 3, and the image file name ("image:") to aks:local.

The following command creates the deployment and service using the configuration in aksdeploy.yml.
kubectl create -f .\aksdeploy.yml
Check the status of the service using kubectl get svc and then launch a browser to connect to the service. You should see the same result as the previous interactive demo, with requests spread across the available replicas.
Again, delete the deployment and the service, but this time by specifying the file name.
kubectl delete -f .\aksdeploy.yml
Docker Image and Azure Container Registry (ACR)
A key part of user containers is having them readily available in a registry. In this example, we’ll push our Docker image of the application to the Azure Container Registry.
We’ll use the Azure CLI. Log in to Azure using the az login command.
Create a resource group with the name as aksgroup and the location as australiaeast. (You can use your own location here as appropriate.)
az group create -n aksgroup -l australiaeast
Now create a container registry entry with the name learningaksacr, the resource group as aksgroup, the location as australiaeast (or your preferred location), and the sku as standard.
az acr create -n learningaksacr -g aksgroup --sku standard
Once the container registry is created, the image needs to be pushed. First, log in.
az acr login -n learningaksacr
After successful login, before pushing, tag the local image with the login server name of the container registry.
az acr list -o table
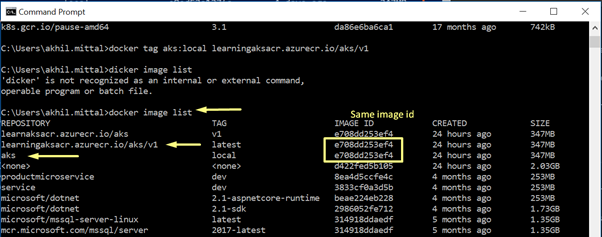
Copy the login server name and keep it handy. To list the Docker images available on this machine, we can use the docker image list command. We have the aks:local image, which needs to be tagged using the login server name.

Now, run the docker tag command. Specify the local image name, the new name (which is going to be the login server name), and the image name and the tag.
docker tag aks:local learningaksacr.azurecr.io/aks/v1
Verify this by docker image list command and we see the successfully tagged image. Both local and tagged image share the same image ID.
Now use the docker push command to push the tagged image to the registry.
docker push learningaksacr.azurecr.io/aks/v1:latest
This image can now be used or accessed by any other Docker machine or the AKS cluster can easily pull this image from the registry.
Deploying Azure Kubernetes Service (AKS) Cluster
We deployed the Kubernetes cluster locally, now it’s time to deploy to Azure using AKS. With AKS, a production-grade Kubernetes cluster could easily be provisioned.
Before proceeding, create a service principal, registering the application to Azure Active Directory (AD), and create an identity for it. The registered ID is required if the application will expose itself to other Azure services.
Create a service principal using the Azure CLI with the command:
az ad sp create-for-rbac --skip-assignment
Once created, you get the appID, displayName, URL, password, and tenant properties for the service principal. Keep this information for later reference.
Now grant the permissions to the service principal to pull the images from the ACR. I am using PowerShell window here.
Get the ACR resource ID ($acrId) using the az acr show command.
az acr show --name learningaksacr --resource-group aksgroup --query "id"
Then grant the reader role to the AKS cluster so that it can read the images stored in ACR by using the az role assignment create command.
az role assignment create --assignee [appID] --role Reader -- scope $acrId
Use the appID that was provided for the service principal, and the scope is set to the resource ID of the ACR, which was fetched from the az acr show command.
Now create our AKS cluster using the az aks create command. Provide a name and the resource-group. For the node-count, make it a single worker node. Use the generate-ssh-keys to generate the SSH public (and private) key files. Specify the service-principal and the client-secret, which is the application ID and the password copied earlier. Run the command.
az aks create `
>> --name learningakscluster `
>> --resource-group aksgroup
>> -- node-count 1 `
>> --generate-ssh-keys `
>> --service-principal [appID] `
>> --client-secret [password]
After the deployment is complete, and to connect to our AKS cluster from the client computer, use the kubectl command-line interface.
The .kube file located at the user’s location as shown in the following image contains the server setting set to a local server running on port 6445.

Get the credentials of our AKS cluster just deployed by using the az aks get-credentials command, specifying the name and the resource-group name.
Now, go back to the .kube\config and notice that server now reflects the AKS cluster running in Azure. To verify, execute the kubectl get nodes command. We can see a single node worker confirming the successful provisioning of our AKS cluster.
Deploying the ASP.NET Core Application to AKS
The cluster is all set for the application to be deployed into it now. Open the aksdeploy.yml file that we looked at earlier at the root of the application.
Currently, the image is referring to a local Docker image. Let’s change it to refer to the image we pushed to our Azure Container Registry. Instead of the "image:" property pointing to aks:local, change this to the image name on the server with the tag: learningaksacr.azurecr.io/aks/v1:latest.
Earlier, we deployed this application to the local cluster and used the service type as NodePort. Now that we're deploying those to a cloud service like Azure, we can change the "type:" property to LoadBalancer.

Save the file, then use the kubectl apply command for deployment.
kubectl apply -f .\aksdeploy.yml
This will create defined Kubernetes objects, which includes deployment and service. The service created exposes the application to the internet.
To monitor the progress of the deployment, use the kubectl get service command with the --watch argument. Initially, the external IP of the aks deployment service appears as pending. Once the external IP has changed from pending to an IP address, copy the IP.

To test your application, browse to the external IP address.

We can see our application running on a worker node within an AKS cluster.
Conclusion
Now you should understand how to containerize and deploy an ASP.NET Core application -- or any similar microservice application-- to Azure Kubernetes Services. We also explored the role of Azure Container Registry in the article.
While we took a detour to demonstrate deployment on a local system, hopefully, this illustrated how easy it is to scale a Kubernetes deployment either interactively or through declarative configuration through a manifest.
To learn more about using Kubernetes through Azure Kubernetes Services, start with the Introduction to Azure Kubernetes Services (AKS) in the Microsoft Azure documentation. You should be familiar with some of the steps after reading this article, but the documentation will walk you through additional options and scenarios.
All the Azure services are associated with a cost. Make sure you use those diligently and if not needed switch those off or clear them.
History
- 22nd July, 2019: Initial version