
Embedded IoT Databases with Actian Zen, Windows IoT Core and C#
0/5 (0 vote)
In this article, our focus will be installing Actian Zen Edge Server for IoT on an ARM-based Raspberry Pi running the Windows IoT Core operating system, capturing some simple time series data, writing it to the Zen database and retrieving data from the database.
Actian Zen is a suite of embedded database products that provides seamless integration and data portability with no ETL overhead among its many implementations.
These implementations range from full blown servers such as Windows and Linux, desktops, mobile devices, and IoT hardware based on Intel or ARM chipsets, including Windows IoT Core, Windows Nano Server, and Raspbian Linux.
In this article, our focus will be installing Actian Zen Edge Server for IoT on an ARM-based Raspberry Pi running the Windows IoT Core operating system, capturing some simple time series data, writing it to the Zen database and retrieving data from the database.
The Solution
Or sample solution uses a Raspberry Pi (ARM) devices running Windows IoT Core as a cost effective and capable IoT device.
Our sample solution is going to capture time series temperature data. The temperature system described in this use case would be only one of many data gathering processes possibly running on a real world device, so the data storage solution must be capable of storing pertinent data concurrently.
Running Zen directly on the device reduces as much integration programming as possible. ETL (extract, transform, load) processing tends to be brittle, error-prone and problematic when translating data between platforms.
Setting Up the Device
As mentioned earlier, our demonstration device is a Raspberry Pi running Windows IoT Core. We’ll set up Actian Zen on the device, then write a C# Universal Windows Platform (UWP) application to read sensor data and store it in the on-device Zen database.
The rest of this article assumes the following prerequisites:
- You have a Raspberry Pi with Windows IoT Core installed and running with a screen. If you need more information on getting set up see Setting up your device on the Windows Dev Center or Adafruit’s excellent Getting Started With Windows IoT Core on Raspberry Pi tutorial.
- You should be familiar with C# programming. You don’t need to be an expert since we’ll provide the code to run.
- You understand basic SQL commands like SELECT and INSERT.
Downloading Actian Zen for Windows IoT Core (ARM)
To download Actian Zen for Windows IoT Core, access the downloads page, and select the following in the drop down menus:
- Product: Actian Zen (PSQL)
- Release: v13 R2 Evaluation
- Platform: Windows IoT Core 32-bit
Click the Apply Filter button to retrieve the pertinent downloads.
Once retrieved, expand the Zen Edge v13 R2 Trial node, and download the Actian Zen Edge database v13 R2 Trial download for Windows IoT Core ARM 32-bit.
Installing Actian Zen Edge database on Windows IoT Core (ARM)
Boot up your device so that it is visible in the My Devices tab of the IoT Dashboard application. Right-click on your device, and select Copy IPv4 address.
Next, open an instance of Windows File Explorer, and in the location tab enter, using the IPv4 address you copied in place of < ipv4_address>:
\\< ipv4_address>\c$
When prompted, enter the administrator username and password that you assigned your Pi device when first setting up Windows IoT Core.
Once the network share is open in File Explorer, create a new folder called temp, and copy the zip file for Actian Zen Edge that you downloaded previously to the new temp directory on your Pi device. For simplicity, I renamed my zip file to install-zen.zip (but doing so is completely optional).
Return to the IoT Dashboard application, right-click your device and select Launch PowerShell. When prompted, enter your Pi administrator username and password once again to authenticate (it will take a few moments to connect).
At the PowerShell prompt, change directory to the root C folder by typing:
cd\
Next, we will extract the zip file by executing the following command (replace zip file name if necessary):
Expand-Archive -Path "C:\temp\install-zen.zip" -DestinationPath "C:\temp"
Now you can install the Actian Zen Edge database by executing the following command:
C:\temp\PSQL\Install-PSQL.ps1 server
You will see a bunch of output as the database engine is installed. A message will be shown once the installation is complete.
The final step is to enable Windows Firewall Rules. To do so, execute the following command:
& "C:\Program Files\Actian\PSQL\bin\Enable-PsqlFirewallRules.ps1" domain
Once again you will see a bunch of information output, then will be returned to the PowerShell prompt.
You can verify the database engine is running by executing the following command:
Get-Service -DisplayName "Actian PSQL*"
After you've ensured the database is up and running, feel free to close the PowerShell window.
Putting together the Hardware Solution
For demonstration purposes we need a temperature sensor that would generate the data we’re going to log. While the Raspberry Pi device includes some on-chip temperature sensors, they aren’t currently available directly through Windows IoT Core.
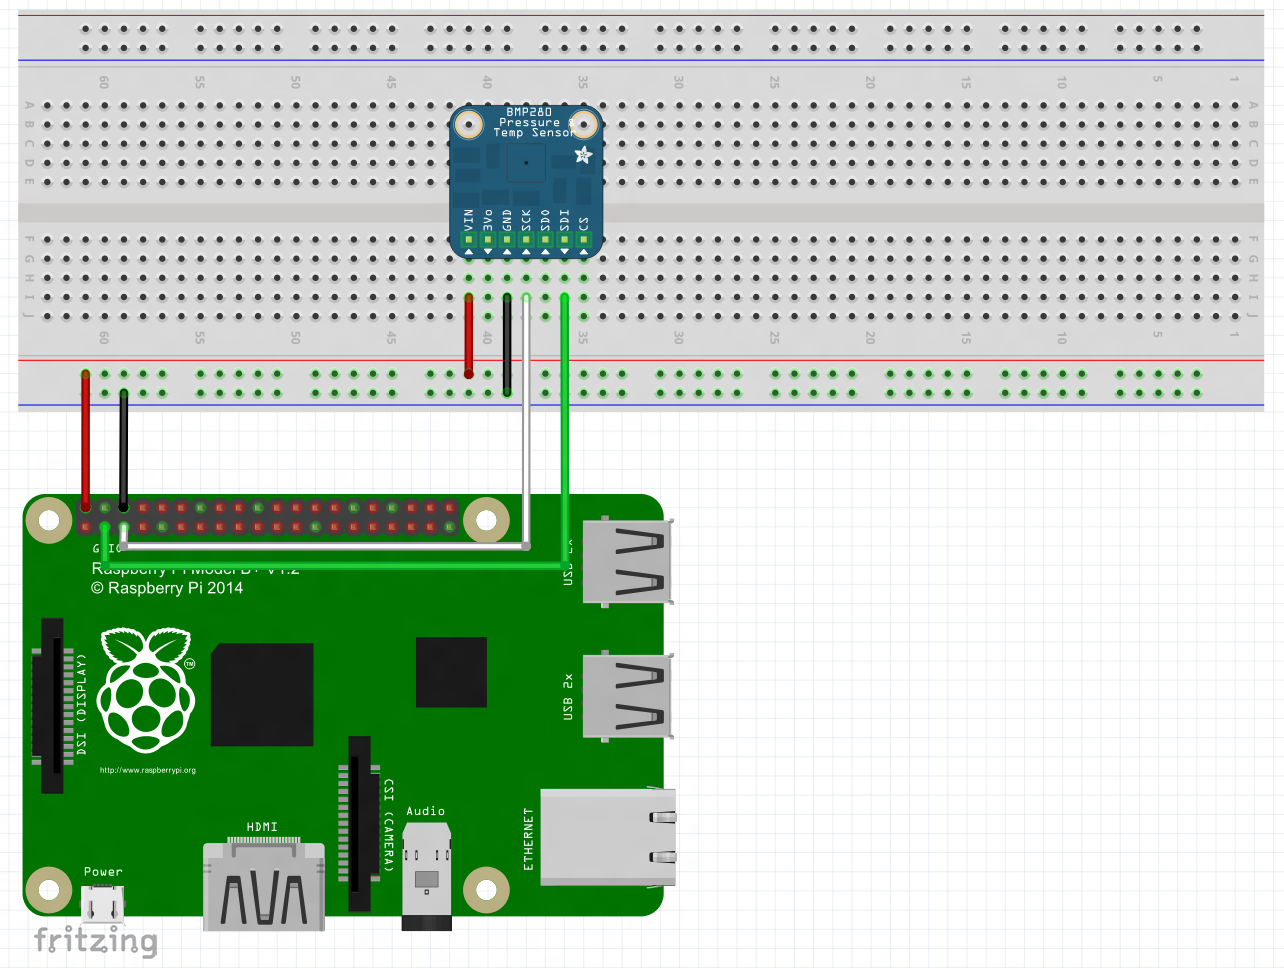
Instead, we’re going to use a simple off-the-shelf BMP280 temperature/pressure sensor that you can source through many of the same vendors that sell Raspberry Pi devices. For this article, I assembled the hardware according to the following schematic. Be sure to shut down the Raspberry Pi device and remove it from the power source for safety before preparing the hardware solution. (You may have to use an alternate ground pin depending on which one you used for your screen, refer to the pin out diagram if necessary)[image source]:
Downloading the ADO.NET SDK for .NET Standard
To interface with the Actian Zen database, we will need to download the appropriate ADO.NET SDK and create a NuGet package source for it.
Return to the downloads page and in the drop-down menus select:
- Product: Actian Zen (PSQL)
- Release: SDKs
- Platform: ADO.NET
Then click the Apply Filter button. Expand the ADO.NET node to view the associated downloads and download ADO.NET Data Provider for .NET Standard 2.0 for use with Zen v13 R2 (13.30).
Once the zip file containing the SDK is downloaded, extract it to a folder of your choice. Inside the extracted files there is a NuGet package that we will be using in our project. We will create a local Nuget package source to use this package.
Open Windows File Explorer and create a folder in your C:\ drive called localnuget. Copy the <extracted_file_location>\PSQL-SDK-AdoNetDataProvider4.3-NetStandard-13.30.034.000\PSQL-SDK-AdoNetDataProvider4.3-NetStandard-13.30.034.000\packages\netstandard2.0\Pervasive.Data.SqlClientStd.4.3.0.nupkg file to the localnuget folder that you've just created.
Open Visual Studio 2019 (the free Community Edition is fine), and select the Continue without code link.
Next, access the Tools -> NuGet Package Manager -> Package Manager Settings item.
Once the Options window is displayed, select Package Sources, then press the + (Add) button. For Name enter Local, and for Source enter C:\localnuget.
Developing the UWP Application
If you prefer to download the already completed solution, it can be found here.
In Visual Studio 2019, access the File menu and select New Project. In the search box, type uwp, then select the Blank App (Universal Windows) template and click the Next button.
In the “Configure your new project” screen, name the project TempPressure, then click the Create button.
Select at minimum the Windows 10 Fall Creators Update (10.0 Build 16299) or newer for the Minimum version item and press OK.
Once the project has been generated, it's time to add some NuGet packages. Right-click on the Project file and select Manage Nuget Packages. With the nuget.org package source selected, search for and install the System.Runtime.CompilerServices.Unsafe package.
With the nuget.org package source still selected, search for and install the LiveCharts.Uwp package.
Next change the package source to Local and clear the search box, select the Pervasive.Data.SqlClientStd item and install.
Let's add a new class to the project called BMP280.cs. Replace the contents of this file with the code found at this link. This code is a slightly modified version of a class created for Windows IoT Core by Adafruit to interact with the BMP280 sensor through I2C. I will not be walking through this code as it's not pertinent to the storage of data in the database. The code is documented inline if you want to review it.
Create another new class called Reading.cs. This class encapsulates the data captured for a single sensor reading from the BMP280 and is also representative of the data that we will be storing in the Zen database. (Code listing also available here)
using System;

namespace TempPressure
{
    public class Reading
    {
        public string DeviceName { get; set; }
        public double Temperature { get; set; }
        public double Pressure { get; set; }
        public double Altitude { get; set; }
        public DateTime ReadingTs { get; set; }
    }
}
We'll now create a new class called ActianZenDataSource.cs. This class is responsible for interacting with the database engine on the Raspberry Pi. For example purposes, we'll just use one of the existing databases installed with the database engine, DEMODATA.
In this class you'll find functions that Create and Drop the UWP_SensorReadings table, as well as record insertion and data retrieval code. Notice how the code utilizes familiar ANSI SQL syntax. The naming of the methods is self-explanatory and the code is also documented inline for clarity. (Code listing also available here)
using Pervasive.Data.SqlClient;
using System;
using System.Collections.Generic;
using System.Diagnostics;

namespace TempPressure
{
    public class ActianZenDataSource
    {

        private string _tableName = "UWP_SensorReadings";
        private PsqlConnection _conn = new PsqlConnection("Host=localhost;Port=1583;ServerDSN=DEMODATA;");
        private PsqlCommand _cmd = new PsqlCommand();

        private void _createTable()
        {
            if (!_tableExists())
            {
                var query = $@"CREATE TABLE {_tableName}(DeviceName varchar(50), Temperature double, Pressure double, Altitude double, ReadingTs datetime)";

                int recordsAffected = _executeNonQuery(query);
                Debug.WriteLine((recordsAffected == -1) ? "Table: '" + _tableName + "' Successfully Created !!\n" : string.Empty);

            }

        }

        public void DropTable()
        {
            if (_tableExists())
            {
                var query = $@"DROP TABLE {_tableName}";
                _executeNonQuery(query);
                if (_tableExists())
                {
                    Debug.WriteLine("Table not dropped\n");
                }
                else
                {
                    Debug.WriteLine("Table " + _tableName + " Successfully Dropped !!\n");
                }
            }
        }

        public void AddReading(Reading reading)
        {
            //Create Reading Record in database
            // **NOTE: SQL String is being generated for debug output reasons only,
            //          IN PRODUCTION UTILIZE named parameters using the PsqlParameter object
            int recordsAffected = 0;
            var query = $@"INSERT INTO {_tableName} VALUES ( '{ reading.DeviceName }',{ reading.Temperature }, { reading.Pressure }, {reading.Altitude}, '{ reading.ReadingTs.ToString("yyyy-MM-dd HH:mm:ss") }'  )";
            if (!_tableExists())
            {
                this._createTable();
            }

            recordsAffected = _executeNonQuery(query);
            Debug.WriteLine("\nRecords Affected: " + recordsAffected + "\n\n");
        }

        public List<Reading> GetReadings()
        {
            var query = $"SELECT * FROM {_tableName}";
            PsqlDataReader rdr = null;
            string logText = string.Empty;
            List<Reading> retValue = new List<Reading>();

            if (_tableExists())
            {
                try
                {
                    if ((_conn.State != System.Data.ConnectionState.Open))
                    {
                        _conn.Open();
                    }
                    _cmd.Connection = _conn;
                    _cmd.CommandText = query;

                    logText = "Query Executed : " + query + "\n\n";
                    rdr = _cmd.ExecuteReader();
                    int rowCount = 0;

                    while (rdr.Read())
                    {
                        Reading rdg = new Reading();

                        rdg.DeviceName = rdr.GetString(0);
                        rdg.Temperature = rdr.GetDouble(1);
                        rdg.Pressure = rdr.GetDouble(2);
                        rdg.Altitude = rdr.GetDouble(3);
                        rdg.ReadingTs = rdr.GetDateTime(4);

                        retValue.Add(rdg);
                        rowCount++;
                    }
                    logText += "Total Rows :" + rowCount;
                }
                catch (Exception ex)
                {
                    logText = logText + "\nQuery execution failed with exception: " + ex.Message;
                }
                finally
                {
                    _conn.Close();
                }
                Debug.WriteLine(logText);
            }
            else
            {
                Debug.WriteLine("Table does not exist.");
            }

            return retValue;
        }


        private int _executeNonQuery(string query)
        {
            int rowsAffected = 0;
            var logText = string.Empty;
            try
            {
                if ((_conn.State != System.Data.ConnectionState.Open))
                {
                    _conn.Open();
                    Debug.WriteLine("Connection Opened: ");
                }
                _cmd.Connection = _conn;
                _cmd.CommandText = query;

                logText = "Query Executed : " + query + "\n\n";
                rowsAffected = _cmd.ExecuteNonQuery();

            }
            catch (Exception ex)
            {
                logText = logText + "Query execution failed with exception: " + ex.Message;
            }
            finally
            {
                _conn.Close();
            }
            Debug.WriteLine(logText);
            return rowsAffected;
        }

        private bool _tableExists()
        {
            bool result = false;
            int count = 0;
            try
            {
                if ((_conn.State != System.Data.ConnectionState.Open))
                {
                    _conn.Open();
                    Debug.WriteLine("Connection Opened: ");
                }
                _cmd.Connection = _conn;
                _cmd.CommandText = $"select count(*) from X$File where Xf$Name = '{_tableName}'";

                count = (int)_cmd.ExecuteScalar();
                result = (count >= 1);

            }
            catch (Exception ex)
            {
                Debug.WriteLine("**** Exception : " + ex.Message + " ****");
            }
            finally
            {
                _conn.Close();
            }
            return result;
        }
    }
}
Let's now define the user interface for the application. Open MainPage.xaml, and replace the markup with the following (also available here):
<Page
    x:Class="TempPressure.MainPage"
    xmlns="http://schemas.microsoft.com/winfx/2006/xaml/presentation"
    xmlns:x="http://schemas.microsoft.com/winfx/2006/xaml"
    xmlns:d="http://schemas.microsoft.com/expression/blend/2008"
    xmlns:mc="http://schemas.openxmlformats.org/markup-compatibility/2006"
    xmlns:lvc="using:LiveCharts.Uwp"
    mc:Ignorable="d"
    Background="{ThemeResource ApplicationPageBackgroundThemeBrush}">

    <Grid>
        <Grid.RowDefinitions>
            <RowDefinition />
            <RowDefinition />
            <RowDefinition />
        </Grid.RowDefinitions>
        <Grid.ColumnDefinitions>
            <ColumnDefinition />
            <ColumnDefinition />
            <ColumnDefinition />
        </Grid.ColumnDefinitions>

        <Button x:Name="btnCollectReadings" Width="250" Height="250" Click="BtnCollectReadings_Click" Grid.Column="0" Grid.Row="0">Collect 10 Readings</Button>
        <Button x:Name="btnRefreshReadings" Width="250" Height="250" Grid.Row="0" Grid.Column="1" Click="BtnRefreshReadings_Click">Refresh Readings</Button>
        <Button x:Name="btnDropTable" Width="250" Height="250" Grid.Row="0" Grid.Column="2" Click="BtnDropTable_Click">Drop Table</Button>
        <ListBox x:Name="lstReadings" Grid.ColumnSpan="3" Grid.Row="1" Grid.Column="0" ItemsSource="{Binding Readings}"  >
            <ListBox.ItemTemplate>
                <DataTemplate>
                    <Border>
                        <StackPanel Orientation="Vertical">
                            <TextBlock Text="{Binding DeviceName}"></TextBlock>
                            <StackPanel Orientation="Horizontal">
                                <TextBlock Text="Temperature (C): "></TextBlock>
                                <TextBlock Text="{Binding Temperature}"></TextBlock>
                            </StackPanel>
                            <StackPanel Orientation="Horizontal">
                                <TextBlock Text="Pressure (Pa): "></TextBlock>
                                <TextBlock Text="{Binding Pressure}"></TextBlock>
                            </StackPanel>
                            <StackPanel Orientation="Horizontal">
                                <TextBlock Text="Altitude (m): "></TextBlock>
                                <TextBlock Text="{Binding Altitude}"></TextBlock>
                            </StackPanel>
                            <StackPanel Orientation="Horizontal">
                                <TextBlock Text="Timestamp: "></TextBlock>
                                <TextBlock Text="{Binding ReadingTs}"></TextBlock>
                            </StackPanel>
                        </StackPanel>
                    </Border>
                </DataTemplate>
            </ListBox.ItemTemplate>

        </ListBox>
        <lvc:CartesianChart Series="{Binding Series}" Grid.ColumnSpan="3" Grid.Row="2" Grid.Column="0">
            <lvc:CartesianChart.AxisX>
                <lvc:Axis LabelFormatter="{Binding LabelFormatter}"></lvc:Axis>
            </lvc:CartesianChart.AxisX>
        </lvc:CartesianChart>
    </Grid>
</Page>
Open MainPage.xaml.cs implementation class and replace the code with the following (also found here):
using LiveCharts;
using LiveCharts.Configurations;
using LiveCharts.Uwp;
using System;
using System.Collections.ObjectModel;
using System.Diagnostics;
using System.Threading.Tasks;
using Windows.UI.Xaml;
using Windows.UI.Xaml.Controls;
using Windows.UI.Xaml.Navigation;

namespace TempPressure
{
    /// <summary>
    /// Control Screen for reading and displaying temperature data
    /// </summary>
    public sealed partial class MainPage : Page
    {
        private BMP280 _bmp280;
        private ActianZenDataSource _ds;
        private string _deviceName;
        public ObservableCollection<Reading> Readings { get; set; }

        //chart items
        public SeriesCollection Series { get; set; }
        public Func<double, string> LabelFormatter { get; set; }

        public MainPage()
        {
            this.InitializeComponent();

        }

        //This method will be called by the application framework when the page is first loaded
        protected override async void OnNavigatedTo(NavigationEventArgs navArgs)
        {
            try
            {

                //initialize public properties
                //Create a new object for our barometric sensor class
                _bmp280 = new BMP280();
                //Initialize the sensor
                await _bmp280.Initialize();

                _ds = new ActianZenDataSource();
                _deviceName = "CPI3";
                Readings = new ObservableCollection<Reading>();

                //initialize series configuration and label formatting for the chart
                var chartConfig = Mappers.Xy<Reading>()
                    .X(model => (double)model.ReadingTs.Ticks)
                    .Y(model => model.Temperature);
                Series = new SeriesCollection(chartConfig);
                LabelFormatter = value => new System.DateTime((long)value).ToString("hh:mm:ss tt");

                this.DataContext = this;
            }
            catch(Exception ex)
            {
                Debug.WriteLine(ex.Message);
            }
        }

        private async void BtnCollectReadings_Click(object sender, RoutedEventArgs e)
        {
                try
                {

                    //Create variables to store the sensor data: temperature, pressure and altitude.
                    //Initialize them to 0.
                    double temp = 0;
                    double pressure = 0;
                    double altitude = 0;

                    //Create a constant for pressure at sea level.
                    //This is based on your local sea level pressure (Unit: Hectopascal)
                    //visit https://www.weather.gov/ and input zip code to obtain the barometer value
                    const double seaLevelPressure = 1013.5;

                    //Read 10 samples of the data at an interval of 1 second
                    for (int i = 0; i < 10; i++)
                    {
                        temp = await _bmp280.ReadTemperature();
                        pressure = await _bmp280.ReadPressure();
                        altitude = await _bmp280.ReadAltitude(seaLevelPressure);

                        //Write the values to your debug console
                        Debug.WriteLine("Temperature: " + temp.ToString() + " deg C");
                        Debug.WriteLine("Pressure: " + pressure.ToString() + " Pa");
                        Debug.WriteLine("Altitude: " + altitude.ToString() + " m");

                        //add the reading to the Actian table
                        _ds.AddReading(new Reading()
                        {
                            DeviceName = _deviceName,
                            Temperature = temp,
                            Pressure = pressure,
                            Altitude = altitude,
                            ReadingTs = DateTime.Now
                        });

                        await Task.Delay(1000);
                    }
            }
            catch (Exception ex)
            {
                Debug.WriteLine(ex.Message);
            }
        }

        private void BtnRefreshReadings_Click(object sender, RoutedEventArgs e)
        {

            //update list and chart with values retrieved from the Actian database

            Readings.Clear();
            Series.Clear();

            var chartValues = new ChartValues<Reading>();
            var readings =  _ds.GetReadings();
            readings.ForEach((read) => {
                Readings.Add(read);
                chartValues.Add(read);
            });

            Series.Add(new LineSeries() { Values = chartValues });
        }

        private void BtnDropTable_Click(object sender, RoutedEventArgs e)
        {
            //clean up - remove readings table from the database
            _ds.DropTable();
        }
    }

}
This page (and its implementation) presents three buttons:
- Collect 10 Readings (with code-behind handler
BtnCollectReadings_Click) will obtain 10 readings from the sensor at 1 second intervals. - Refresh Readings (with code-behind handler
BtnRefreshReadings_Click) will query all sensor data currently stored in the Zen database in theUWP_SensorReadingstable - this will in turn populate a textual listing of data (lstReadings), as well as a line chart (lvc:CartesianChartelement) depicting the values read from the sensor over time. - Drop Table (with code-behind handler
BtnDropTable_Click) will completely remove theUWP_SensorReadingstable and all data associated with it.
Run the Application
Now it is time to run the application on the Raspberry Pi device. Select ARM as the target CPU and Remote Machine (select the Raspberry Pi device from the automatically generated list or manually enter the IP address of the device to connect to it).
Press F5 to deploy the application to the Raspberry Pi (the first deployment of an application always takes a little while longer).
Once loaded, press the Collect 10 Readings button and observe the Debug Output window in Visual Studio to see the readings obtained from the sensor (and subsequently stored in the Zen database). You should see a series of 10 readings similar to the following:
Temperature: 23.8488803863525 deg C
Pressure: 98287.984375 Pa
Altitude: 258.046339692289 m
Connection Opened:
Connection Opened:
Query Executed : INSERT INTO UWP_SensorReadings VALUES ( 'CPI3',23.8488803863525, 98287.984375, 258.046339692289, '2019-04-25 03:18:07' )
Records Affected: 1
Now press the Refresh Readings button and scroll through the list data, and observe the rendered chart.
Once you are done looking at the data, feel free to press the Drop Table button to remove the UWP_SensorReadings table from the DEMODATA database.