
Beginning Java ME: A Simple Mandelbrot Viewer
4.85/5 (8 votes)
Renders the Mandelbrot Set on your mobile device, with panning and zooming
Introduction
Version 3.0 of the Java ME SDK from Sun makes it very easy to start developing Java applications for mobile devices. The SDK comes with a full-fledged (and surprisingly usable) IDE, as well as a suite of emulators and example applications, all of which allows you to pick up and start writing your own apps in no time. I've always wanted to develop a few small applications that I could run from my phone, so I thought this might be a good time to start.
My first idea was to develop a very basic Mandelbrot set renderer and zoomer. Sure, it's not very "useful," but it's definitely pretty, and you'll know that you'll always have one of the defining symbols of modern mathematics right at your fingertips.
And, of course, it's an awesome way to pick up chicks at the bar or dance club. I mean, come on, flash 'em the old Mandelbrot set, and they'll be all over you, am I right? Anyone?
Just as a refresher, the Mandelbrot set is plotted by iterating through the complex quadratic polynomial zn+1 = zn2 + c, where c is each "pixel" within the range of the complex plane we want to plot. If the sequence is bounded for a given c (within a certain number of iterations), the point is considered part of the Mandelbrot set, and the pixel is colored black. If the sequence is unbounded for a given c, the color of the pixel is determined by how "fast" the sequence diverges. The more iterations we take for our calculation, the more "precise" the set's boundary will be.
Here are some fundamental requirements for the application:
- Render the Mandelbrot set using a predefined color palette
- Allow the user to "move" the drawing by pressing the L, R, U, and D keys
- Allow the user to "zoom" in and out of the Set by pressing, say, the 1 and 3 keys
- Allow the user to decrease/increase iterations by pressing, oh I don't know, the 7 and 9 keys, respectively
Creating a New Project
Now that we have some requirements, let's get down to business. We'll create a brand new project in the Java ME SDK, and we'll call it something original, like Mandelbrot:
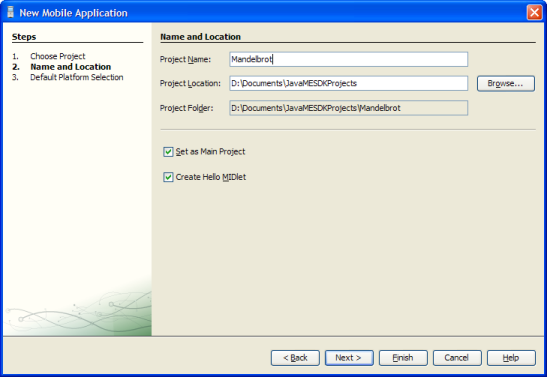
Using all of the defaults for the purposes of this project is just fine. The SDK should generate a project that targets CLDC 1.1 (Connected Limited Device Configuration) and MIDP 2.0 (Mobile Information Device Profile). It will also automatically create a MIDlet class that represents our new application.
The automatically-generated class descends from the base MIDlet class, and implements the CommandListener interface, which enables our app to "listen" to commands that we can assign to buttons on your phone. The class will be called something like HelloMIDlet, but we can easily rename it to something more pertinent like MandelbrotApp, and erase the "hello world" code so we have a totally clean class.
Theoretically, however, in addition to a class that extends MIDlet, we'll also need a class that extends the base class Canvas (we'll call it MandelbrotCanvas), so that we can perform any kind of graphics operations we need. This class will also be responsible for capturing keystrokes from the phone's keypad (this is different from capturing "commands" which the MIDlet class does).
The Code
Let's first go over the MandelbrotApp class. Here are the first few lines of the class, followed by some explanation:
public class MandelbrotApp extends MIDlet implements CommandListener {
    private Display myDisplay;
    private MandelbrotCanvas myCanvas;
    private Command exit = new Command ("Exit", Command.EXIT, 1);
    private Command about = new Command ("About", Command.ITEM, 2);

    private int[] colorPalette;
    private int[] scanlineBuffer;
    private int screenWidth = 0, screenHeight = 0;

    public float rangex1 = -2F, rangex2 = 0.5F, rangey1 = -1.4F, rangey2 = 1.4F;
    public int numIterations = 24;

    public MandelbrotApp () {
        super ();

        myDisplay = Display.getDisplay (this);
        myCanvas = new MandelbrotCanvas (this);
        myCanvas.setCommandListener (this);
        myCanvas.addCommand (exit);
        myCanvas.addCommand(about);

        scanlineBuffer = null;
        colorPalette = new int[256];

        for(int i=0; i<64; i++)
            colorPalette[i] = (((i * 4) << 8) | ((63 - i) * 4));
        for(int i=64; i<128; i++)
            colorPalette[i] = ((((i - 64) * 4) << 16) | (((127 - i) * 4) << 8));
        for(int i=128; i<192; i++)
            colorPalette[i] = (((255) << 16) | ((i - 128) * 4));
        for(int i=192; i<256; i++)
            colorPalette[i] = ((((255 - i) * 4) << 16) | (255));
    }
In the above code, we perform some initialization of things we'll use later on. First we create an instance of our canvas object (MandelbrotCanvas), and assign two commands ("exit" and "about") to the canvas. This means that when the canvas becomes visible, these two commands will become available from the two top buttons of your handset's keypad. Also, by setting the canvas' CommandListener to this, we're saying that this class will handle the commands issued while the canvas is displayed. The variables rangex1, rangex2, rangey1, and rangey2 represent the initial boundaries for our Mandelbrot calculation. By manipulating these variables, we can pan and zoom in and out of the image.
We also define a color palette that we'll use when rendering the Mandelbrot set. The color palette contains 256 entries, and is simply a gradient of colors from red, to green, to blue, and back to red. Additionally, we define a variable called scanlineBuffer which will actually contain the screen contents before they're painted onto the screen. We leave this initialized to null, because we'll dynamically allocate this buffer the first time our paint event is called.
Next, we'll create a function that actually renders the Mandelbrot set onto our screen buffer. This function uses the standard Mandelbrot algorithm without any fancy attempts at optimization, so it may be slower for some phones than others (on some phones it will be god-awful slow; sorry!).
    public void RenderMandelbrot(){
        if((myCanvas.getWidth() != screenWidth) ||
		(myCanvas.getHeight() != screenHeight)){
            screenWidth = myCanvas.getWidth();
            screenHeight = myCanvas.getHeight();
            scanlineBuffer = new int[screenWidth * screenHeight];
        }

        float bmpWidth = (float)screenWidth;
        float bmpHeight = (float)screenHeight;

        float x, y, xsquare, ysquare, dx, dy, bail = 4, j, p;
        int i, mul, col;
        int xpos, ypos;
        float[] q = null;

        if(screenWidth > screenHeight) q = new float[screenWidth + 1];
        else q = new float[screenHeight + 1];

        mul = 255 / numIterations;
        dx = (rangex2 - rangex1) / bmpWidth;
        dy = (rangey2 - rangey1) / bmpHeight;

        q[0] = rangey2;
        for(i=1; i < q.length; i++) q[i] = q[i - 1] - dy;
        xpos = 0; ypos = 0;

        for(p = rangex1; p <= rangex2; p += dx){
            i = 0;
            for(j = rangey1; j <= rangey2; j += dy){
                x = 0; y = 0; xsquare = 0; ysquare = 0; col = 1;
                while(true){
                    if(col > numIterations){
                        scanlineBuffer[ypos*screenWidth + xpos] = 0;
                        break;
                    }
                    if((xsquare + ysquare) > bail){
                        scanlineBuffer[ypos*screenWidth + xpos] =
					colorPalette[(col*mul)%255];
                        break;
                    }
                    xsquare = x * x;
                    ysquare = y * y;
                    y *= x;
                    y += (y + q[i]);
                    x = xsquare - ysquare + p;
                    col++;
                }
                i++;
                ypos++;
                if(ypos >= screenHeight) break;
            }
            myCanvas.repaint();
            myCanvas.serviceRepaints();
            xpos++;
            if(xpos >= screenWidth) break;
            ypos = 0;
        }
    }
Notice in the above function that, inside the outer loop, we force a repaint of the canvas, so that the user gets a sense of the graphic actually being drawn in real time. If we didn't do this, the app would be totally unresponsive until all of the image is rendered.
When the app is started, the following function is called, where we set the canvas to be the currently-displayed object, and call the Mandelbrot rendering function:
    public void startApp () throws MIDletStateChangeException {
        myDisplay.setCurrent (myCanvas);
        RenderMandelbrot();
    }
Another point of interest in this class is the paint handler. This function actually gets called from the Canvas class (see lower), but I put the paint code in this class for convenience.
public void paint (Graphics g) {
g.drawRGB(scanlineBuffer, 0, screenWidth, 0, 0, screenWidth, screenHeight, false);
g.setColor(0xFFFFFF);
int fontHeight = g.getFont().getHeight();
int strY = 4;
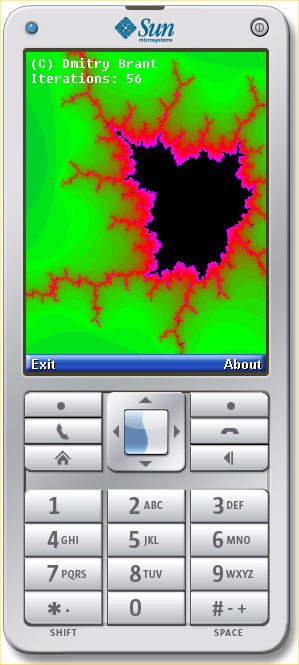
g.drawString("(C) Dmitry Brant", 4, strY, 0); strY += fontHeight;
g.drawString("Iterations: " + Integer.toString(numIterations),
4, strY, 0); strY += fontHeight;
}
In the above function, all we do is draw our screen buffer to the screen, then write some text over the image, which includes a little copyright message and the current number of iterations used in the Mandelbrot calculation. Note that we dynamically get the height of the phone's font (and adjust accordingly), since the font varies greatly between different phone models.
The other interesting function in this class is the command handler. This function will be called when either the "Exit" or "About" commands are pressed while our app is running. If "Exit" is pressed, we'll destroy the application. If "About" is pressed, we'll display a simple Alert message:
    public void commandAction (Command cmd, Displayable disp) {
        if (cmd == exit) {
            destroyApp (true);
        }
        else if(cmd == about){
            Alert alert = new Alert ("About...");
            alert.setType (AlertType.INFO);
            alert.setTimeout (Alert.FOREVER);
            alert.setString ("Copyright 2009 Dmitry Brant.\nhttp://dmitrybrant.com");
            myDisplay.setCurrent (alert);
        }
    }
Finally, let's have a quick look at the MandelbrotCanvas class:
class MandelbrotCanvas extends Canvas {
    MandelbrotApp myApp;

    MandelbrotCanvas (MandelbrotApp mandelTestlet) {
        myApp = mandelTestlet;
    }

    void init () {
    }

    void destroy () {
    }

    protected void paint (Graphics g) {
        myApp.paint (g);
    }

    protected void keyPressed (int key) {
        int action = getGameAction (key);

        float xScale = (myApp.rangex2 - myApp.rangex1);
        float yScale = (myApp.rangey2 - myApp.rangey1);

        boolean gotAction = true, gotKey = true;
        switch (action) {
        case LEFT:
            myApp.rangex1 += (xScale / 16.0F);
            myApp.rangex2 += (xScale / 16.0F);
            break;
        case RIGHT:
            myApp.rangex1 -= (xScale / 16.0F);
            myApp.rangex2 -= (xScale / 16.0F);
            break;
        case UP:
            myApp.rangey1 -= (yScale / 16.0F);
            myApp.rangey2 -= (yScale / 16.0F);
            break;
        case DOWN:
            myApp.rangey1 += (yScale / 16.0F);
            myApp.rangey2 += (yScale / 16.0F);
            break;
        case FIRE:
        default:
            gotAction = false;
        }

        if(!gotAction){
            switch (key){
            case KEY_NUM1:
                myApp.rangex1 -= (xScale / 4.0F);
                myApp.rangex2 += (xScale / 4.0F);
                myApp.rangey1 -= (yScale / 4.0F);
                myApp.rangey2 += (yScale / 4.0F);
                break;
            case KEY_NUM3:
                myApp.rangex1 += (xScale / 4.0F);
                myApp.rangex2 -= (xScale / 4.0F);
                myApp.rangey1 += (yScale / 4.0F);
                myApp.rangey2 -= (yScale / 4.0F);
                break;
            case KEY_NUM7:
                myApp.numIterations-=4;
		if(myApp.numIterations < 2) myApp.numIterations = 2;
                break;
            case KEY_NUM9:
                myApp.numIterations+=4;
                break;
            default:
                gotKey = false;
            }
        }

        if(gotAction || gotKey)
            myApp.RenderMandelbrot();
    }
The only relevant functions in the above class are the paint function, which is called automatically whenever the screen needs repainting, and the keyPressed function, which gets called when the user presses any of the keys on the keypad.
Notice how pressing the Up/Down/Left/Right buttons causes the x- and y-ranges to be panned to simulate the effect of scrolling, and the "1" and "3" keys have the effect of zooming. Keys "7" and "9" are also programmed to decrease and increase the number of iterations by 4. After any key is pressed, the graphic is redrawn due to RenderMandelbrot() being called again.
Testing the App
That's about all there is to it. The next step is to test how the app works. If we run the app from the IDE of the Java ME SDK, it automatically launches a default emulator and loads the app onto it:
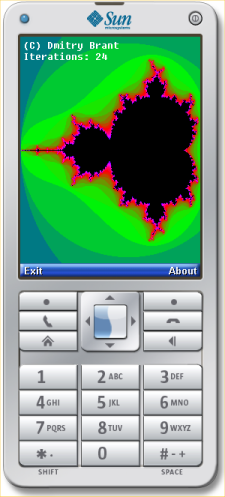
Seems to work fine on the emulator! Now how about getting it onto an actual phone? Building the app produces two files: a .JAR file, which is the actual app, and a .JAD file, which is a text file that contains certain descriptions about the app (such as the author, copyright, and URL). But what do we do with these files?
Loading a Java app onto a phone can be done in a few different ways:
- Download from the Web
- Download over Bluetooth
- Download with Java App Loader (Motorola phones only)
- Load from a memory card
- Hack right into the phone
I'm fortunate enough to have a Motorola RAZR V3xx, which has a microSD slot. I was amazed how easy it was to get it up and running on this phone. Here's all that's required to install a Java app onto this phone (and probably similar Motorola models that accept a microSD card):
- With the microSD card in the phone, connect a USB cable from your computer to the phone (it will map as a disk drive)
- Copy your app's .JAR and .JAD files to the /mobile/kjava directory
- Disconnect the USB cable from the phone
- On the phone, go to Menu -> My Stuff -> Games & Apps -> [Install New], and select your app from the list
- That's it! The app will now be installed on the phone!
Installing over the Web
If you don't have a phone that lets you install apps from a microSD card, you can download the app from the Web using your phone. This is, of course, only if your phone has an active account and supports Web access. You'll also probably be paying a few cents for the data transfer, depending on the wireless plan you purchased from your carrier. Oh, and of course, your phone must support CLDC 1.1 (1.0 doesn't have floating-point support), and MIDP 2.0, which most modern phones do.
Now then, if you want to load an app that you wrote onto your phone over the Web, you need to have access to a web server where you can place your app to be downloaded. For my example, I'll use my web server, dmitrybrant.com, and I'll put the app in a subdirectory, like so:
http://dmitrybrant.com/jme/Mandelbrot.jad
I put both the .JAR and .JAD files in the "jme" subdirectory. To download the app, you only need to link to the .JAD file. But wait! There's one more crucial step to take before our app can be downloaded from a phone. We need to edit the .htaccess file in this directory, and add the proper MIME types for our files:
AddType text/vnd.sun.j2me.app-descriptor jad
AddType application/java-archive jar
Once this is done, we can try downloading the app to our phone. After a minute of fat-fingering the URL, agreeing to install an unsigned app, and waiting for it to finish installing... lo and behold:
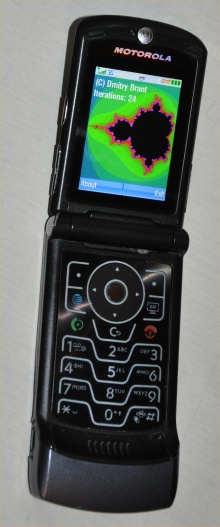
For the record, the above screen took about 20 seconds to draw on my V3xx. Your phone may be significantly slower (or faster, but probably not). So be prepared to wait a bit for the drawing to complete. Or go ahead and optimize the code to use integer-only math! (Let me know if you do!)
History
- 14th July 1009: Initial revision