
AISpeech API ASDK Tutorial–A spoken English assessment application
In this tutorial, we will work through how to create a spoken English assessment Flex application using AISpeech API and their ASSDK (ActionScript SDK).
Introduction
In this tutorial, we will work through how to create a spoken English assessment Flex application using AISpeech API and their ASSDK (ActionScript SDK). The source code of this demo sits on github.
Background
Ask AI Speech Ltd (mail to api@aispeech.com) for a developer account, application ID, secret key and a release version of AISpeech API ASSDK (AISpeechLib.swc).
Note that this ASSDK supports ActionScript 3.0 only. Version for ActionScript 2.0 is also available but just ask.
Headset or microphone is necessary for the demo application.
Target
We are building a spoken English assessment application. It is a Flex application. The application allows user to read a sentence in English. It then records user’s speech, and shows score of each word, respectively. The higher the score is, the better pronunciation the user has done.
Score chart panel
Updated: Flex BarChart view component refuses to show the value
of the duplicated items on its vertical axis. For example, if the reference text
is “I have done what I have to do”, this score chart will not show the score of
the second “I” and “have”. Thanks James from Little Bridge reported this. I am
thinking of another better view component for this demo.
We start from a score chart panel, which looks like to following:

Figure 1 Score char panel
Using FlexBuilder. New a Flex project. The source code for the score panel is the following:
<!– score panel –>
<s:Panel title=’Scores’ width=’600' height=’100%’ color="0×000000" borderAlpha="0.15">
    <s:layout>
        <s:HorizontalLayout paddingLeft="10" paddingRight="10" paddingTop="10" paddingBottom="10"/>
    </s:layout>
    <mx:BarChart id="scoreBar" height="100%" color="0×323232" showDataTips="true" dataProvider="{_scores}">
        <mx:verticalAxis>
            <mx:CategoryAxis categoryField="Word" />
        </mx:verticalAxis>
        <mx:horizontalAxis>
            <mx:LinearAxis maximum="100" minimum="0" />
        </mx:horizontalAxis>
        <mx:series>
            <mx:BarSeries yField="Word" xField="Score" displayName="Score" />
        </mx:series>
    </mx:BarChart>
</s:Panel>
The score panel uses the Flex BarChart component. Its data provider
(_scores) is defined as the following (in <fx:script>
section)
<fx:Script>
    <![CDATA[
        import mx.collections.ArrayCollection;
        // parsed score results to show in the result chart
        // each item is like {Word: 'I', Score: '80'}
        [Bindable] private var _scores:ArrayCollection = new ArrayCollection();
        private function init():void
        {
            _scores.addItem({Word:'piano', Score:'67'});
            _scores.addItem({Word:'play', Score:'34'});
            _scores.addItem({Word:'to', Score:'90'});
            _scores.addItem({Word:'want', Score:'30'});
            _scores.addItem({Word:'I', Score:'80'});
        }
    ]]>
</fx:Script>
Set Application’s creationComplete callback to init() method, where we hard code
some score items. The application now should show the score chart as Figure 1.
The other controls
We then add two buttons (start and stop) and a text area field (with id
txtRefText). Using HGroup and VGroup to layout components. The
final application layout would like the following:

Figure 2 Application layout
Import AISpeech API SDK
Add AISpeechLib.swc to the project’s building path. (in Flash Builder, Project –> Properties –> Flex build Path –> Library path –> Add SWC…)
In the <fx:script> section, add the following variables:
private static const RECORDERLIB_PARAMS:Object = {
    appKey:"your application ID",
    secretKey:"your secret key",
    serverList:["rtmp://demo.aispeech.com:443/v2.0/aistream"]  // release 2.0
};
private var _coreRequesterParams:Object = {
    refText:"past", // this to be updated for each core request
    scoreType:100,  // ask score in grade 100
    rank:100,
    coreType:"en.sent.score",  // request the English-Senetence core
    userId:"xxxxxx",
    applicationId:"your application ID"  // application ID again
};
private var _recorderLib:RecorderLib; // the recorder.
Note that, RecorderLib belongs to com.aispeech.RecorderLib. Import this
namespace if the IDE does not do this for your automatically.
Update the aforementioned init() method to initialise the
RecorderLib instance. (We’ve removed those codes setting example score items
from the init() method)
private function init():void
{
    // init RecorderLib instance
    _recorderLib = new RecorderLib();
    _recorderLib.init(RECORDERLIB_PARAMS);
}
Run the project. The application will prompt a dialogue asking for user’s permission for the application to access the microphone device, as the following.

Figure 3 Dialogue asking for user’s permission
It is safe to click the Allow radio button, and also check the Remember. If
you’ve checked the Remember, this prompt won’t show up next time you run the
application. Feel free to leave the Remember unchecked as this prompt is a nice
indicator that the RecorderLib instance has been loaded successfully.
Record user’s speech
Record user’s speech is as simple as calling RecorderLib’s startRecord() method.
This methods requires one parameter, as shown in the following code:
private function startRecord():void
{
    _coreRequesterParams.refText = txtRefText.text;
    var recorderParams:Object =
        {
            serverParam:_coreRequesterParams,
            recordLength:5000 // ms
        };
    _recorderLib.startRecord(recorderParams);
}

Blocks of code should be set as style "Formatted"
		like this:
While starting recording, we first update
_coreRequesterParams’ refText value by user’s input
(txtRefText.text). Then we set a
recorderParams variable, which contains two properties:
serverParam is the updated _coreRequestParams, while recordLength is set as 5000
ms. The record will automatically stops in 5 seconds.
Set the Start button’s click callback to startRecord() method. Run the
project. Click the Start button. If you hear a “ding”, it means the recording
works well now.
The following code stops recording manually. Add this to the Stop button’s click callback to make it work.
_recorderLib.stopRecord();Till now, it seems nothing happens while recording user’s speech. Before we dive into catching and parsing API’s response, we first playback our record.
Add another button labeled “Start Replay” (I’ve now renamed the other two buttons to “Start Record” and “Stop Record”, respectively.) Set it’s click callback to
_recorderLib.startReplay({}); RecorderLib:startReplay() method ask for one parameter. We send in an empty object to ask to play back the most recent record.
Run the program. Click the Start Record button first. Speak to microphone for about 5 seconds after hearing “ding”. Then click the Start Replay button to hear the playback. I hope everything work fine till now.
Catch API’s response
It’s time for a bit work flow of AISpeech API. The SDK send the audio data of user’s speech incrementally to one of API’s node. API analyses the audio data and return the scores to SDK. The application listens to RecorderLib’s certain events to catch those responses. SDK and API exchanges several signals and data while recording user’s speech. But in this demo, we catch and parse only the final score result (which is usually captured after the recording stops.)
To catch the final score result returned by API, we need listen to RecorderLib’s CoreRequesterEvent.RESULT. In the init() method, before calling RecorderLib::init() method, we add the following line:
_recorderLib.addEventListener(CoreRequesterEvent.RESULT, coreRequesterEventHandler);Import com.aispeech.events.CoreRequesterEvent if the IDE does not do this for you.
We then implement the coreRequesterEventHandler method as the following:
private function coreRequesterEventHandler(event:CoreRequesterEvent):void
{
    var strResult:String = new JSONEncoder(event.data).getString();
    Alert.show(strResult);
}
Import com.adobe.serialization.json.JSONEncoder and mx.controls.Alert if the IDE does not do this for you.
It is clear that, API returns results in event.data, which is in turn an ActionScript object in key-value format. For displaying purpose, we convert it to a JSON string, and show it using Alert.show method. It looks like the following figure:

Figure 4 Show all API returns
It shows huge amount of information, which means API returns fairly rich evaluation results. Data structure of API returns is well defined, but the online document is only in Chinese at time of this article written. For this demo, we will only parse the score of each word for demonstration purpose.
Parse the score of each word
Put a break point in the coreRequesterEventHandler method, we will look into the API return using Flash Builder debugger.
As shown in Figure 5, event.data object has a “result” field, which has a “details” array object. Each element of the “details” array corresponds to a word in the reference text, which is, in this case “I want to play piano.”. So, we see the “details” array contains five elements (five words).
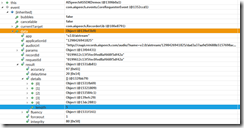
Figure 5 Data structure of the API return
Each element of the “details” array has a char field, and a
score field, as shown in Figure 6. We are interested in these
two.

Figure 6 Data structure of the “details” array element
So the logic is simple: we extract char and score from each element the “details”array, then add these results to the ArrayCollection _scores we’ve defined. Since _scores binds to the score chart, the chart will automatically update upon the API results received.
Two implementation details: firstly, we want to clean _scores before adding new results; secondly, we add in result in a reversing order so to make words list along chart’s vertical axis from top to bottom.
The codes are:
private function coreRequesterEventHandler(event:CoreRequesterEvent):void
{
    _scores.removeAll();
    var details:Array = event.data.result.details;
    var len:int = details.length;
    for (var i:int = len - 1; i >=0; i --)
    {
        _scores.addItem({Word:details[i].char, Score:details[i].score});
    }
}
The finishing application will look like:

Figure 7 The finishing application
Conclusion
That’s all for this demo.
But there are further details using AISpeech API ASSDK, such as handling exceptions and working with the other speech cores (e.g. speech recognition). Note that, this demo involves NO exception handling at all. So, while following this tutorial, if you encounter any issue, please feel free to leave a comment.
I am asking AI Speech Ltd for an English version online documents.
The source code of this demo sits on github.
For more information about AISpeech API, feel free to visit blog.aispeech.com
Thanks for reading.
History
This is the first edition of this article.