
Creating Custom VSIX Project Templates using an EMGU Example
A complete guide to creating deployable Custom Project Templates
EMGU VSIX Project Templates (V2.3)
Example Project used Within Article
Example VSIX Project Template
Introduction
The following tutorial explains how to generate your own custom Microsoft project templates. A custom template can save large amounts of time if your projects are complex and based upon custom dynamic link libraries and many external components. While the following tutorial is based upon using C# and EMGU, all the processors remain true and can be ported over to generating your own projects.

This tutorial is designed so that user can export the projects among a community or work colleagues with ease. Custom project templates can be made in 2008, however exporting them requires installation in specific folders. This can change between users and VS 2010 solves this issue by introducing VSIX project templates.
Pre-Requisites and Assumed Knowledge
Unfortunately, to generate a custom template, you will need Visual Studio 2010, with Service Pack 1 and the SP1 SDK. Service Pack 1 is available here, VS 2010 SP1. The SP1 SDK is available here, VS 2010 SP1 SDK
Ensure you restart Visual Studio after installation so that you can use the extension properly.
It is assumed that a reader is comfortable within the C# environment, can create their own project. Understands how to import files and what dynamic link libraries are used for. While some of this will be covered, it won’t contain enough detail for a complete novice.
Project Templates
So What is a Project Template
A project template is what you see when you start a new project in Visual Studio. It is an empty project in effect, that contains all the pre-requisites you require to start creating an application. Take a standard Windows Form, how does VS know to put a new form with code behind in your project, link that as the start up form and even call it Form1. Well, it uses a template, this is the case over many different applications, Word, Excel and even your phone will have templates for items such as multimedia messages and texts.
So Why Should You Use a Project Template?
Templates save us time, save time and we save money. Does this mean you should create one for everything you create? No... a project template is a tool and as such should only be used when necessary. EMGU is used within this example for the reason that using a project template is ideal. It is a complex project that requires many different external components, including custom DLLs.
So Why Should You Use a Project Template?
Let’s imagine you develop a custom DLL for your company say for advertisements and your company has a logo with a default About Box and set icon, a fair assumption. Now imagine that your company adopts your DLL and every individual who develops any program for your company now uses it, along with your company logo, about box and icon. This means that for every program they create, the first thing they must do is reference your DLL and then import the logo into their project. Then import the About Box existing form into their project. A complex system already and prone to mistakes.
Now with a custom project template, when a user creates a new project, they use the custom template and all this is done for them. While I’m sure you’d like to imagine your bosses will thank you so much offer you a promotion and a big pay rise, let’s face it, this won’t happen, but at least you will have benefited mankind and maybe prevented some of your colleagues from throwing themselves/or computers out the window.
The First Step – Do the Dirty Work
Now to create the project template, you must first create the project. There is one vital step for creating your custom projects and this is in the use of custom DLLs. So don’t just skim through this section.
Adding DLL References
Now project templates will not include externally referenced DLL. It will include any file you include within the project however. So create a folder in project explorer and add your DLLs to this folder as existing items. In this example, they will be placed in a folder called Lib, the required DLLs are:
- Emgu.CV.dll
- Emgu.CV.GPU.dll
- Emgu.CV.ML.dl
- Emgu.CV.UI.dll
- Emgu.Util.dll

Your solution explorer will now look something like this:
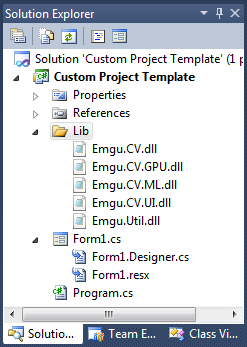
The folder is not needed but it keeps things neat. Now reference the copied DLLs within your projects as you would normally, using browse ...project folder.../DLL/mydllfile.dll.

You will be able to check later to make sure you followed this step correctly.
Adding Additional Files
Add images and additional files or forms as you would within a normal project. You can use directory structures as we did with the DLL files to keep things neat. In the EMGU example, the OpenCV wrapped libraries are required directly within the bin directory. Don’t forget to set properties such as Copy Always... as these will be copied to your project template. In the example, only two addition files are need to support basic image processing techniques.
- opencv_core***.dll
- opencv_imgproc***.dll
Note: *** is the version number

Form Design
You must first layout your form the way you wish in this case, a simple picture box is to be placed on the form in which when the program starts and image is to be drawn and displayed inside it. Not very adventurous, but you can have as many controls and in the case of EMGU, the designs of which a user may develop is endless.

The Code Behind
The code behind is also added to the project template so if you have a method that is always used but an additional class is not needed, then include it, similarly if you’ve added classes, why not put the code behind to invoke them. In our case, we are only going to use a simple Hello World type of code. It creates a new image and writes EMGU in the centre, this is then displayed. All this does is test that the application is working and the rest is up to the user.
//EMGU
using Emgu.CV;
using Emgu.Util;
using Emgu.CV.Structure;
using Emgu.CV.CvEnum;
.....

public Form1()
        {
            InitializeComponent();

            //Test
            Image<Bgr, Byte> img = new Image<Bgr,
            byte>(400, 400, new Bgr(0, 0, 0)); //Create an image of 400x200 of Black color
            MCvFont f = new MCvFont(FONT.CV_FONT_HERSHEY_TRIPLEX, 1.2, 1.2); //Create the font
            img.Draw("EMGUcv", ref f, new System.Drawing.Point(135, 180),
            new Bgr(0, 255, 0)); //Draw "Hello, world." on the image using the specific font
            pictureBox1.Image = img.ToBitmap();
        }
Now you have your project, run it and test it, fix any bugs as you want your project template to be running as soon as it is opened.

Creating the Project Template
Creating a project template is made incredibly simple, just left click File=>Export Template. If you have not saved your changes, you will be prompted to do so before continuing. We want to do things properly so we are not exporting our project as a vsix just yet.

The Export Template Wizard will now appear we want to export the whole Project Template so just select Next >.

You can now set up the template details such as:
- Template Name
- Template Description
- Icon Image
- Preview Image
You can leave these blank, however you may find you want to add your own else some default ones are used that are less desirable. It also makes thing more desirable. In this example, we will use an EMGU icon and a screen shot that was prepared earlier. If need be, you can select cancel at this point, gather your items and repeat the last few steps.
Once you have selected your item, ensure you deselect the “Automatically import the template into Visual Studio” checkbox. We will test that we can use the project later but if you forget, skip to “Installing and Uninstalling on a Client Machine” section to remove the project.

The template will be saved in a default location as a zip file, you can see that there are several templates that were made for the EMGU template project release. The default directory will open automatically in Windows explorer but should you close it, they are located here: \Documents\Visual Studio 2010\My Exported Templates.
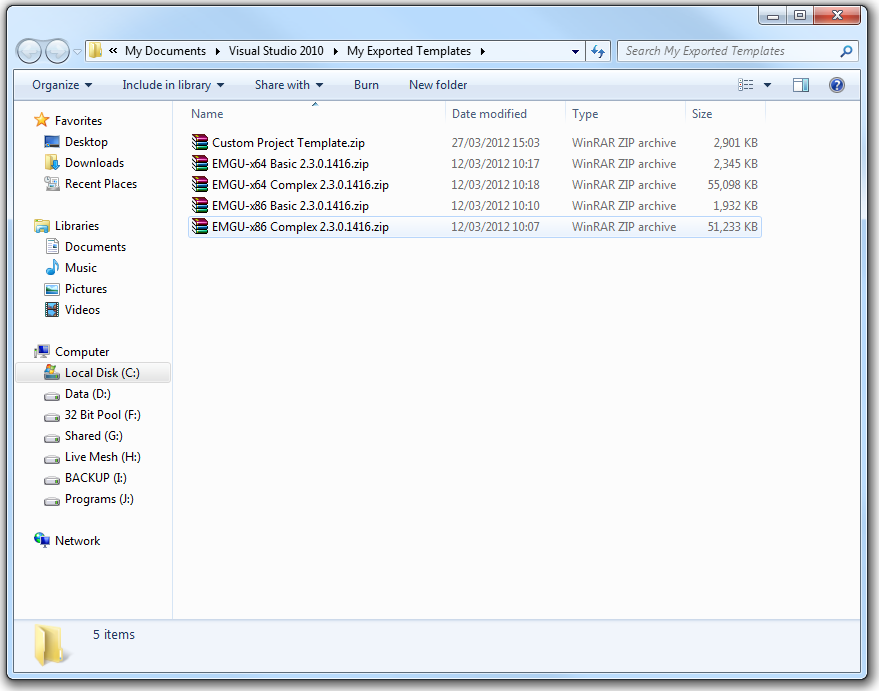
You can explorer the project folder using an appropriate tool to ensure all your files have transferred correctly. Repeat this process for multiple templates as required until you have all your required templates.

Creating the VSIX Export Template
Now that we have our project template, we are going to create a VSIX project so in VS, select New Project. Look for the Sub-Contents of Extensibility, you should see a VSIX project option as shown below:

If you do not see this project type, make sure you have installed Microsoft Visual Studio Service 1 SDK, links are under the “Pre-Requisites” heading.
When your VSIX project opens, you will be instantly presented with the source extension manifest file. Fill in the basic Fields such as Product Name, Author, Version and Description. The ID will have a long string of random characters leave these as they are a unique identifier but you can edit the text pre-ceding them.

You now need to select the editions your project template will work with, this is vital, the default will be the version you are using. You may want to limit the use to just Professional version of VS or allow multiple languages to use the template.

We are now at the stage of adding the content to out VSIX project, our project template. Left click the “Add Content” button and a pop up will appear to guide you through. Select the contents type as a “Project Template”.

Then select File and navigate to your custom project template .zip file we generated in the last section.

Now if we have several project templates we will want to create the all under a sub-directory for a New project creation. To do this, enter the name you wish to use in the Add to subfolder field. If you wish to add the custom project template to the root directory and leave it blank. If you want to do both, then you will need to add two identical project files one with no sub-folder set and with the sub-folder you desire. In this example, a Custom Project sub-folder will be used.

You will now see your project file within the Solution Explorer window. You can always reorganise the structure of you VSIX project here.

Continue adding your project templates as required until you have the structure you would like. Once complete, it is time to build the solution, so select menu item Build=>Build Solution or press F6.

Navigate to the Bin directory if your project, you will now see within it a .vsix project file. If you want to view inside the file, rename the extension to .zip, you can arrange directories here as well but this is where errors can occur. The VSIX file is all you need, so copy and paste this to the desktop and now an installation test can be carried out

Installing and Un-Installing on a Client Machine
Installing
To install the VSIX project on a machine, ensure that VS 2010 is installed and exited. You can install the VSIX template with VS still open, however it won’t appear until you close and restart VS. You will be presented with an Installation wizard asking which version of VS to install the templates projects to, select the appropriate ones and click Install. If you have generated all the files correctly, a success message will be shown:

Now re-open VS and select new project navigate to your chosen sub-directory if you used one or look down the list of available templates and you should see your nested happily within them.

Un-Installing
Now if you have just done a test project and you want to remove the template, it is extremely simple. Select menu option Tool=>Extension Manager.

The Extension Manager will appear showing all your extensions such as your custom template projects. Simply select the extension and select the Uninstall button. A prompt will appear to make sure you wish to uninstall it, simply click Yes. No restart of VS is required.

History
- [1] 12/03/2012: Beta Release of EMGU project templates
- [2] 27/032012: Official Release and article published