
WIX for Install DataBase
4.92/5 (14 votes)
WIXDataBase
Introduction
The deployment phase can be chaotic if you do not have installers that automate the installation process. When installing database scripts the issue is more complex, generally tend to be delivered files *.sql. Some of these scripts must be manually modified to suit the environment in which they are executed. In this paper we will see how to installers using WiX and Visual Studio .NET to create an installer *.MSI to automate the deployment of SQL Server database scripts.
Install Application Using WIX
- WiX code is "OPEN SOURCE" and free to use. It is a toolkit Windows Installer XML, some of the features are:
- You can create executable Setup.exe, installer *.msi, merge modules *.msm and service pack *.msp.
- Tool that can be used from command line or from Visual Studio .NET
- Includes extensions for installing IIS Web sites, create database SQL Server.
- Download and install prerequisites in runtime like .NET Framework
- You can create code in languages like C#, VB and C++. Forms can be developed with WiX or with any of these languages.
Prerequisites
Install WIX 3.6 Beta
Before you start downloading and installing WiX 3.6 Beta, if when reading the document there is a version, I recommend you use it, since this is a beta version and for 2012 is expected to go the new.
Solution of Database
Previously it was created a database solution SQL Server Management Studio. The scripts contain variables which are replaced by data supplied by the user to run the installer. The solution database is located in the path:
\WixTutor\Script\Wix.DBScript\Wix.DBScript.ssmssln
- $(DATABASE_NAME): Name of database
- $(DATABASE_PATH_PRIMARY): path main file database *.mdf.
- $(DATABASE_PATH_LOG): path log file *.ldf.
Create WIX Application in Visual Studio .NET
At the end finds references to manuals and tutors to work with WiX. WiX installer includes a help in CHM format. This document describes how to create an installer database using Visual Studio .Net 2010.
Create WIX Project
- Open Visual Studio .Net 2010 (If you have a lower version the process is similar)
- Clic in menu File, New, Project
- On the left select the template "Windows Installer XML"
- In central panel select template "Setup project"
- Write in text box Name: WixDataBase.Setup
- Select path install in text box Location, in this sample path is: \WixTutor\Fuentes
- Press OK

REFERENCES IN WIX PROJECT
Add the following references to the project, the assemblies are in a path similar to:
C:\Archivos de programa\Windows Installer XML v3.6\bin\
| Name | File |
| WixNetFxExtension | WixNetFxExtension.dll |
| WixUIExtension | WixUIExtension.dll |
| WixUtilExtension | WixUtilExtension.dll |
Namespaces
In the product XML file, you can add the namespaces:
<p class="MsoNormal" align="left" style="text-align: left; text-autospace: none">
    <Wix xmlns="http://schemas.microsoft.com/wix/2006/wi"

    xmlns:util="http://schemas.microsoft.com/wix/UtilExtension"

    xmlns:netfx="http://schemas.microsoft.com/wix/NetFxExtension">
Includes
All configuration of the installer can be written in the file Product.wxs. To improve maintenance create separate files and add reference in the main file Product.wxs. In the project we added the following types of files:
| Type file | Description | Sample |
| WiX File | Wix file fragments that can be referenced from other files *. WXS. When referencing a property of a fragment includes the entire contents of the *. WXS | Components.wxs |
| WiX Include | The entire contents of the include file is inserted into another file. | Variables.wxi |
| WiX Localitation | Set text to locate specific elements of a culture. | Loc_es.wxl |
The complete list WiX file types can be found at: http://wix.sourceforge.net/manual-wix3/files.htm
GUID
To identify a product, components and other elements using a GUID, this code can be generated automatically by the system, but is preferable to generate identifiers to avoid conflicts with other applications and installers to perform next version or service pack.
The GUID can be created in Visual Studio .Net from the Tools menu, "Create GUID". WiX allows writing with brakes or without brakes.
Guid="{7501E95A-59E5-41B7-86D6-A5D0910356FC}"
Guid="7501E95A-59E5-41B7-86D6-A5D0910356FC"
Variables
Variables used to set attributes. WiX project includes variables that reference VS .Net, the list of variables can be found at:
http://wix.sourceforge.net/manual-wix3/votive_project_references.htm
Among the list of variables are the product metadata, the GUID identifier (these must be modified for each different product), the path where the files to be installed, in our case the database scripts. The variables used in the project are on file Variables.wxi
<?xml version="1.0" encoding="iso-8859-1"?>
<Include>
  <?define ProductId = "{EAE3B0D1-5711-4CB0-BDB0-B49EC0CFE5FA}" ?>
  <?define ProductName = "WixDataBase.Setup" ?>
  <?define ProductVersion = "1.0.0.0" ?>
</Include>
As the variables were created in a block Include, in the *.WXS required to use a variable to add the following line:
<Wix xmlns="http://schemas.microsoft.com/wix/2006/wi" ... >
  <?include $(var.ProjectDir)\Includes\Variables.wxi ?>
</Wix>
Propertys
Properties can be used to: retrieve user information, set properties of the product, define prerequisites as Microsoft Framework version, change the background of the dialogues etc. The value of a property can be written in the system register (to be consulted in a subsequent installation), recovered from a path on disk, read from a configuration file or set in a CustomAction in WiX created on managed code.
Tables
In this example we use a table to define the installation paths of database files:
<CustomTable Id="TABLE_DATABASE_PATHS">
  <Column Id="Name" Type="string" PrimaryKey="yes"/>
  <Column Id="Description" Type="string"/>
  <Column Id="Path" Type="string" Nullable="yes"/>

  <Row>
    <Data Column="Name">DATABASE_PATH_PRIMARY</Data>
    <Data Column="Description">!(loc.Database_Path_Primary)</Data>
    <Data Column="Path"></Data>
  </Row>
  <Row>
    <Data Column="Name">DATABASE_PATH_LOG</Data>
    <Data Column="Description">!(loc.Database_Path_Log)</Data>
    <Data Column="Path"></Data>
  </Row>
</CustomTable>
<EnsureTable Id="TABLE_DATABASE_PATHS"/>
Conditions
A condition can be used to evaluate prerequisites for instance that the user has administrative permissions on the local machine, framework, etc. The condition has a message attribute, which is presented to the user when the condition is evaluated as false. The conditions are found in the file: Conditions.wxs.
<Condition Message="!(loc.ValidationDotNet)">
<br>  <![CDATA[Installed OR (NETFRAMEWORK30 OR NETFRAMEWORK35 OR NETFRAMEWORK40CLIENT OR NETFRAMEWORK40FULL)]]>

</Condition>
Custom Actions
Actions are tasks to be executed when a condition evaluates to true, the actions can be created with managed code. The custom actions are on file: CustomAction.wxs.
Windows Installer contains a set of predefined actions: http://msdn.microsoft.com/en-us/library/Aa372023
The execution sequence of actions is set in section: <InstallExecuteSequence>
AppSearch
LaunchConditions
ValidateProductID
CostInitialize
FileCost
CostFinalize
InstallValidate
InstallInitialize
ProcessComponents
UnpublishFeatures
RemoveShortcuts
RemoveFiles
InstallFiles
CreateShortcuts
RegisterUser
RegisterProduct
PublishFeatures
PublishProduct
InstallFinalize
RemoveExistingProducts
The execution sequence can be found at the Orca application: http://wix.tramontana.co.hu/tutorial/events-and-actions/queueing-up
Components to be Installed
WiX has tools for tasks such as creation of *. WXS with the list of files to be installed:
http://wix.sourceforge.net/manual-wix3/AllTools.htmhttp://wix.sourceforge.net/manual-wix3/heat.htm
In this project we use Harvest Tool (Heat), this command line utility generates the list of component using a disk path or the path of a Visual Studio .Net.
To facilitate the process created a batch file:\WixTutor\Fuente\WixDataBase.Setup\WixDataBase.Setup\Bats\Wix_Components.bat
@ECHO off
"%WIX%bin\heat.exe" dir "D:\Hugo\Proyectos\WixTutor\Script\Wix.DBScript" -cg CG_General -out Components_Dir.wxs -dr INSTALLLOCATION -gg -var var.SourceItemsDir -template product
"%WIX%bin\heat.exe" project "D:\Hugo\Proyectos\WixTutor\Fuente\WixDataBase.Setup\WixDataBase.CustomAction\WixDataBase.CustomAction.csproj" -pog Binaries -pog Documents -pog Satellites -cg CG_General -out Components_Project.wxs -dr INSTALLLOCATION -gg -var var.SourceItemsDir -template product
ECHO Presione una tecla para terminar ...
PAUSE
@ECHO on
In the batch file is a% WIX% environment variable generated by the WiX installer. In the batch file replace the routes by which routes have the solution database created with SQL Server Management Studo.
Double clicking on the batch file creates two files: Components_Project.wxs and Components_Dir.wxs
The following links explain how to create components:
Create directory without installing files:
http://wix.tramontana.co.hu/tutorial/com-expression-syntax-miscellanea/creating-directories
You can use the system directory to install the components:
http://msdn.microsoft.com/en-us/library/aa372057.aspx
Heat.exe tool generates a file, make changes to have more clear the directory structure and presentation of the user feactures. Among the changes will be replaced element codes, using a standard appointment, the components are in the file: Components.wxs.
Sample directory tree:
<Directory Id="TARGETDIR" Name="SourceDir">
  <Directory Id="$(var.PlatformProgramFilesFolder)">
    <Directory Id="INSTALLLOCATION" Name="$(var.ProgramFileFolderName)" >
      <Directory Id="D_Wix.DBScript" Name="Wix.DBScript">
        <Directory Id="D_A01Wix.CreateDB" Name="A01Wix.CreateDB" />
        <Directory Id="D_A02Wix.Audit.DB" Name="A02Wix.Audit.DB" />
        <Directory Id="D_B01Wix.Data" Name="B01Wix.Data" />
        <Directory Id="D_C01Wix.Security" Name="C01Wix.Security" />
        <Directory Id="D_D01Wix.SQLAgent" Name="D01Wix.SQLAgent" />
      </Directory>
    </Directory>
  </Directory>
  <Directory Id="ProgramMenuFolder">
    <Directory Id="D_AppShortcut" Name="$(var.ProgramFileFolderName)" />
  </Directory>
</Directory>
Sample components:<ComponentGroup Id="CG_A01Wix.CreateDB">
<Component Id="cmp8ED399792B183E6A39CDE32ED8BC95F9" Directory="D_A01Wix.CreateDB" Guid="{835F8A93-8280-4A88-B34C-DE731D1D6F44}">
<File Id="fil25044444B3C75610A43228F06F2B92B5" KeyPath="yes" Source="$(var.SourceItemsDir)\A01Wix.CreateDB\A01Wix.CreateDB.ssmssqlproj" />
</Component>
<Component Id="cmpC71BE0DCE33A3995A07ED8CDFB9A4F81" Directory="D_A01Wix.CreateDB" Guid="{BB80C594-9F48-4C99-A936-31A704C1F2A8}">
<File Id="filCA369E782AB7B12498A20FC9C89FB7B4" KeyPath="yes" Source="$(var.SourceItemsDir)\A01Wix.CreateDB\Wix_01CreateDB.sql" />
</Component>
<Component Id="cmp93BF8C538A6DD6C305F1653FA928DC30" Directory="D_A01Wix.CreateDB" Guid="{0A6B283C-547D-486F-A8E4-C58628EFA31A}">
<File Id="fil410E66D681B6D7C677FE038E251CD31C" KeyPath="yes" Source="$(var.SourceItemsDir)\A01Wix.CreateDB\Wix_02Schema.sql" />
</Component>
</ComponentGroup>
Sample features:<Feature Id="F_A01Wix.CreateDB"
Title="!(loc.F_A01Wix.CreateDB.Title)"
Level="1"
Description="!(loc.F_A01Wix.CreateDB.Description)"
ConfigurableDirectory="INSTALLLOCATION"
AllowAdvertise="no">
<ComponentGroupRef Id="CG_A01Wix.CreateDB" />
<ComponentGroupRef Id="CG_A02Wix.Audit.DB" />
<ComponentGroupRef Id="CG_B01Wix.Data" />
<ComponentGroupRef Id="CG_C01Wix.Security" />
</Feature>
The features have a Level property, where zero indicates that it is installed, is equal to 1 when the feature is presented to the user as active by default. When the user having to make a feature to be installed set a higher value, say 100, and add a property like this indicates that tick default features with level less than or equal to 3:
<Property Id="INSTALLLEVEL">3</Property>
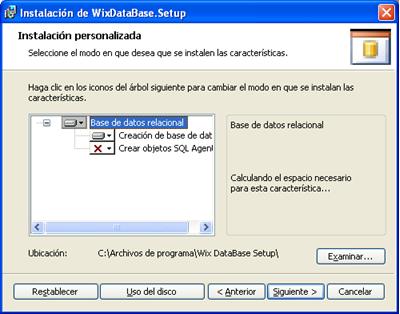
5.6 WIZARDS AND DIALOGS
To use WiX dialogs must add a reference to the assemblies of WiX. By default WiX sequence organizes dialogues and wizards. These wizards can be used only to add a reference to the product:
<UIRef Id="WixUI_Mondo" />• WixUI_Mondo
• WixUI_FeatureTree
• WixUI_InstallDir
• WixUI_Minimal
• WixUI_Advanced
To modify the license file, icons, wallpaper and banners were set the following properties:
<!-- 493 x 312 pixels-->
<br><WixVariable Id="WixUIDialogBmp" Value="$(var.ProjectDir)\Imag\DialogBmp.bmp" />

<!-- 493 x 58 pixels-->

<WixVariable Id="WixUIBannerBmp" Value="$(var.ProjectDir)\Imag\BannerBmp.bmp" />
To change the execution sequence or customize the dialogues were copied files from the original sources of WiX. To avoid conflicts were renamed the dialogues and assistants, for example, was changed WixUI2_Mondo WixUI_Mondo. In the project you can find items copied and modified on the path:
\WixTutor\Fuente\WixDataBase.Setup\WixDataBase.Setup\Dialogs\WixDialogs
WiX files in the source files in a path similar to the following:
\wix36-sources\src\ext\UIExtension\wixlib\
Also found in the following path: http://wix.cvs.sourceforge.net/viewvc/wix/wix/src/ext/UIExtension/wixlib/
To prompt the user for data to run database scripts were created WiX dialogs. To request the installation paths created a Windows form in the class library project containing custom actions in managed code.
<Wix xmlns="http://schemas.microsoft.com/wix/2006/wi"><br>  <?include $(var.ProjectDir)\Includes\Variables.wxi ?>

   <Fragment>

     <UI>

       <Dialog Id="DatabaseServerDlg" />

       <Dialog Id="DatabaseSQLAgentDlg" />

       <Dialog Id="DatabaseProxyDlg" />

     </UI>

  </Fragment>

</Wix>

Location
The installer can display messages in multiple languages, for it creates a folder structure and organize the files location. The location of the talks can be copied from the source WiX:
\wix36-sources\src\ext\UIExtension\wixlib\
Or in ths link: http://wix.cvs.sourceforge.net/viewvc/wix/wix/src/ext/UIExtension/wixlib/
When build, is generda a folder for each location, to compile for a single culture in the project properties window WixDataBase.Setup on page Buid, type culture in the text box "Cultures to build".
Custom Actions amd Forms .NET
In Visual Studio .Net create tasks to be run by the installer how: install Windows services, Web services, run database scripts, Power Shell, etc. We also create more complex forms than those made with WiX.
To add custom actions do the following:
- A right-click on the panel "Solution Explorer" and select Add, "New Project".
- Select left template "Windows Installer XML", select right "C# Custom Action Project".
- Write in text box Name: WixDataBase.CustomAction
- Press OK.
- Add the following references to the project:
- System.Data
- System.Drawing
- System.Transactions
- System.Windows.Forms
- Cree public class and add static methods decorated with the attribute [CustomAction]. You can create methods organized in separate classes, the class name does not matter, WiX is responsible for finding the appropriate method.
- In the WiX project add a reference to the library added:

In the WiX project in the file CustomAction.wxs actions to be executed are declared as follows:
<CustomAction Id="CA_DataBaseTestConnection" BinaryKey="BIN_CustomAction" DllEntry="TestSqlConnection" Execute="immediate" Impersonate="yes" Return="ignore" />
The CustomAction Execute has an important property which can take values like:
| Valor | Description |
| Immediate | Execute in sequence of user face |
| Deferred | Execute in sequence of execution face |

Sequence of Execution
The execution sequence of the dialogue is defined in the file: WixUI3_Mondo.wxs
<UI Id="WixUI3_Mondo">
<br>  <Publish Dialog="UI2WelcomeDlg" Control="Next" Event="NewDialog" Value="UI2LicenseAgreementDlg">NOT Installed AND NOT PATCH</Publish>

</UI>
This sniper indicate what to do after pressing the Next button of UI2WelcomeDlg dialogue, show UI2LicenseAgreementDlg dialogue, has added a condition stating that the dialogue is presented only if the product is installed and is not a service pack.
To use this sequence in the file Product.wxs, a reference is added:
<UIRef Id="WixUI3_Mondo" />
The installation process has two phases, sequence of user and sequence of execution. In the sequence of user dialogues are presented for the user to set the implementation options, and in the implementation phase tasks are executed.
<InstallUISequence>
<br>  <Show Dialog="UI2ExitDlg" OnExit="success" />

</InstallUISequence>


<InstallExecuteSequence>

  <Custom Action="CA_DataBaseSwhowPathInstall" Before="InstallFinalize">

    <![CDATA[DATABASE_EXECUTESCRIPTS = "1" AND (NOT INSTALLED OR UPGRADINGPRODUCTCODE OR NOT (REMOVE="ALL"))]]>

  </Custom>

</InstallExecuteSequence>
The Product
Product.wxs file is the heart of the installer contains pointers to separate files, and sets the location code to display the messages, instead of writing directly the values we use variables, properties and location to set the values.
Build and Debug
Build
You may receive errors when compiling ICE## these are errors generated by Windows Install, for example the following error is presented to modify the WiX.
ICE20: Standard Dialog: 'FilesInUse' not found
To fix do the following:
- Open properties windows of project WixDataBase.Setup
- Select page "Tool Settings"
- Write in text box "Supress specif ICE validation": ICE20

When compiling creates a folder for each location, which contains the installation files: *.msi.
Debug custom actions
For debugging you must compile and run the installer WixDataBase.Setup.msi, add temporary dialogues for the installer to stop before starting a task on the managed code from Visual Studio in menu Debug, "Attach to process" attach the process: msiexec.exe y rundll32.exe.
MessageBox.Show("ExecuteSQLScripts: For debug in VS .Net, in menu Debug, 'Attach to process' attacha process: msiexec.exe y rundll32.exe.",
"DEBUG: ExecuteSQLScripts", MessageBoxButtons.OK, MessageBoxIcon.Information);
To debug see: http://blog.torresdal.net/CommentView,guid,BFEBE347-AD82-4C76-A96E-1C22AA39EFC9.aspx
Installation, Removal and Add Features
To install double click the file WixDataBase.Setup.msi to modify the window installation, use Add / Remove Programs Control Panel in Windows.
Points of Interest
The installers that came with Visual Studio .Net have limitations on the creation of custom dialogs. WiX create XML dialogs or using languages like Visual Studio .NET.
WiX is a good tool for the deployment phase, no cost and is flexible. Allows customization of install and combined with managed code Visual Studio .Net. You can also create service pack.
A progress bar is presented with the progress of the database scripts installed.
A disadvantage WiX has difficulty in passing data between custom actions to meet this difficulty can write code to back and pass variables between different custom actions, you can also use the system registry to pass information, but this is tedious.
Annexes
- Main page WiX: http://wix.sourceforge.net/index.html
- Download WiX: http://wix.codeplex.com/
- Edit XML for WiX: http://wixedit.sourceforge.net/
- Extensions WiX: http://msiext.codeplex.com/
- Tutorial: http://wix.tramontana.co.hu/
- Manual: http://wix.sourceforge.net/manual-wix3/main.htm
- Tips: http://www.stackprinter.com/export?service=stackoverflow&question=471424&printer=false&linktohome=true
- Integration with VS .Net (Votive): http://wix.sourceforge.net/votive.html
- Create Web application with WiX: http://blogs.planetsoftware.com.au/paul/archive/2011/02/05/using-wix-3.5-with-visual-studio-2010.aspx
- Wix - questions answers: http://www.codingquestion.info/wix/5/taglist
- How To: Run the Installed Application After Setup: http://wix.sourceforge.net/manual-wix3/run_program_after_install.htm
- From MSI to WiX: http://blogs.technet.com/b/alexshev/archive/2008/02/10/from-msi-to-wix.aspx
- From MSI to WiX, Part 25 - Installable Items - Updating XML files using XmlFile: http://blogs.technet.com/b/alexshev/archive/2009/05/27/from-msi-to-wix-part-25-installable-items-updating-xml-files-using-xmlfile.aspx
- Create custom actions with code .Net: http://community.saasgrid.com/developers/b/team/archive/2011/02/17/wix-managed-custom-actions-openfiledialog-example.aspx
- wixcustomaction.aspx
- Use Orca for edit file Windows Installer: http://support.microsoft.com/kb/255905/es
History
Version 1.0.0. Creation date: 2012-02-13