
Writing Code Templates for Third-Party Controls in Iron Speed Designer
1.00/5 (1 vote)
The goal of using Code Templates in Iron Speed Designer is all about saving time! Integrate your favorite third-party control into your Iron Speed Designer application.
Introduction
Architecture is the key to success in most, if not all, software development projects today. Any tool we use to improve the quality and ease of our work will be warmly received in just about any development environment.
The goal of using Code Templates in Iron Speed Designer is all about saving time (and trouble). Most third-party controls we need are used the same way. The code template technology in Iron Speed Designer V4.0 gives us that and more.
Background
Many Microsoft Visual Studio .NET developers routinely use third-party controls both to enhance the look and feel of their application(s) and to quickly provide a way to support a required business process.
In previous versions of the Iron Speed Designer, we used to use third-party controls in the same manual way. Using them in an Iron Speed Designer project required an intimate knowledge of HTML, Visual Basic .NET or C#, and of course, knowledge about the third-party control itself, including methods and properties.
I have long been a believer that less is more. In this case, the less manual work I have to do, the better job I will do, and certainly a better quality product that I can deliver to my clients.
I bet that you don't often stop to think about the complexity behind a textbox or drop down control that you put onto a form. Most of the work is already built for us by Visual Studio. Just have a closer look at the code-behind page, and you will see how apparent this is. The same should apply to third-party controls, especially when working with Iron Speed Designer, which abstracts the low level tedious nature of coding for us.
Even in Visual Studio today, you still have to wire up your third-party controls manually. And while you get pretty good at it after doing it 20 or 30 or 100 times, it is the same mechanics almost every time. Some of us build wrapper classes to help out, but developing a set of coherent classes takes time, and still requires implementation into your Iron Speed Designer project manually.
This article walks you through the process of creating a code template for a third-party control. Although we will be implementing a code template for a Data Dynamics ActiveReports web viewer control, by the end of this article, you should be able to create your own code template for your favorite third-party control.
Iron Speed Designer V4.0 ships with code templates for Infragistics and other third-party controls. You can certainly pick any one of these code templates to use as a basis for your own template. If you wanted to build a code template for ABC grid control, it would make sense to choose one of the existing code templates already built and tested for another grid control. The semantics required for one grid control would not be so different for another.
Getting Started
In order for this article to be useful, you will need to install Iron Speed Designer Version 4.0 Enterprise Edition. You should have Visual Studio installed as well.
I remind many of my clients that using the Iron Speed Designer without Visual Studio when writing code is much like biking with one eye shut. Visual Studio provides debugging capabilities and Intellisense, just to mention two features. It really opens up both eyes to building and testing applications.
Toolbox Directory
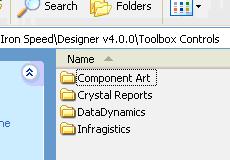
All code templates are stored in the ...\Program Files\Iron Speed 4.0\ToolBox Controls folder. Each third-party control has its own folder. When you open the Iron Speed Designer V4.0 folder, you will see something like this:

Opening this folder gives us something like this:
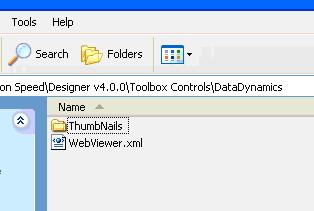
So, you can see that each folder houses a different third-party control. Opening the Data Dynamics folder shows me the components of that code template:
Although you can certainly copy the contents of one code template folder and rename it to your own, I think a better way to start is to create your own folder for ABC control, then copy over one XML file to get started. You would also create a folder to store the thumbnail image(s) that will identify your control in the Iron Speed Designer toolbox.
By creating your own folder, you are also creating your own area in the Iron Speed Designer toolbox.
Code Template XML File
Every code template is written using XML, and each code template has its own XML file. You can create as many different code templates for your third-party control suite as you want or need.
The construct of an Iron Speed Designer code template XML is quite straightforward; there are five (5) main areas:
- Identification Area
- Styles Area
- Substitutions/Variables Area
- HTML Area
- Code Area
See a sample below of the XML construct:

Identification Area
The Identification area (header area) has five pieces of information that must be identified:
- Control Name
- Version
- Provider
- Tool Description
- Type
<ControlName>DataDynamicsWebViewer</ControlName>
The control name of the control must be entered. This uniquely identifies the code template you have built.
<Version>1.0</Version>
The version should be entered as well. This will allow users to clearly differentiate between the version you created yesterday, and the masterpiece you will create tomorrow.
<Provider>Provided by Milestone Software.</Provider>
Here is where you get to put your stamp on it. This identifies who built it, and who to go to for support when it doesn't work as your users think it should.
<ToolDescription>ActiveReports WebViewer</ToolDescription>
The description that you put here tells anyone looking at this code template what the intended purpose is. You can see below how I have formatted the Tool Description for my Code Template to display in the Iron Speed Designer toolbox:
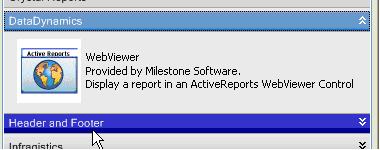
Displayed as a result of typing:
Styles Area

These style references are required so that your third-party control and resultant output are framed within the design theme that you selected for this application.
Because the Styles construct is so big, you may wish to move this entire section to the end of the XML file. Just remember to start selecting at <Styles> and end with selecting all of </Styles>. You can place the Styles section just after the </Customizations> section at the bottom of the XML file.
Substitutions Area
<Substitutions></Substitutions>
This area is where you add prompts for Iron Speed Designer to ask questions. Iron Speed Designer needs to know more about your third-party control before it can implement it into your application.
You do this by adding variables for Iron Speed Designer to use with your Code Template. As always, you will use one of the predefined pairings; in this example, I am using the <variable></variable> pair to name my control.
<Variable>
          <Name>MyWebViewer</Name>
          <Description>The name of the instance of this control>
There are a number of variables that I can specify to have Iron Speed Designer prompt for. These include:
| Variable Name | Description |
Button |
shows all the gen:buttons in the current ASPX page |
ColumnType |
shows all possible column types: Boolean, image, integer, character, etc. |
Control |
shows all controls in the current ASPX page |
FieldLabel |
shows all field labels in the current ASPX page |
FieldName |
shows all fieldnames from a database table |
FieldValue |
shows all field values in the current ASPX page |
Filter |
shows all filters in the current ASPX page |
DropDownList |
shows all dropdowns in the current ASPX page |
Table |
shows all table controls in the current ASPX page |
TableName |
shows all tables in a database |
ListItem |
allows you to specify any list of items |
CrystalReportsClass |
shows all Crystal Reports classes in the current application |
RecordControl |
shows all Record controls in the current ASPX page |
TableControl |
shows all Table controls in the current ASPX page |
RecordControlClass |
shows names of all the Record control classes in the current ASPX page |
TableControlClass |
shows names of all the Table control classes in the current ASPX page |
File |
allows you to browse and pick a file |
ResourceValue |
allows you to get a value from the resource file |
The first thing I want to do is prompt the user for the location of an ActiveReports report file (*.rpx). See the XML segment for a variable below:
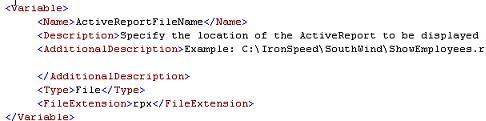
In the example above, we identify five pieces of information needed for Iron Speed Designer to help us select a file.
- Variable Name
- Description
- Additional Description
- Type
- File Extension
With this information in hand, Iron Speed Designer can present the following to us when configuring the third-party control after having placed the control onto a web page in the Design tab:
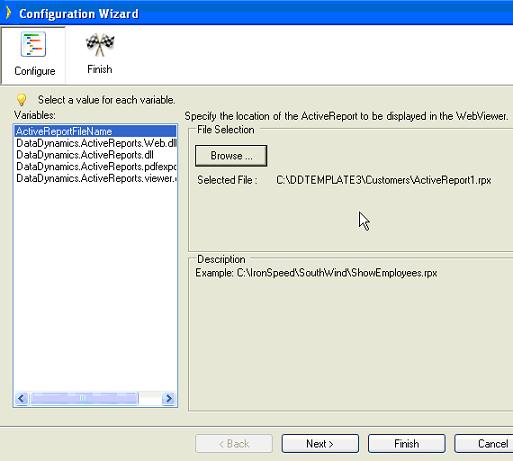
You can see, the first variable has the name ActiveReportFileName. It is asking us to specify the location of an existing ActiveReports report file. In the Description area, I have provided a description to use as an example.
When I click the Browse button, I see that the File Select dialog limits the display to files with an *.rpx extension as shown below:

<Variable></Variable>
Next, we tell Iron Speed Designer (and by default Visual Studio) about any DLLs that your third-party control uses.
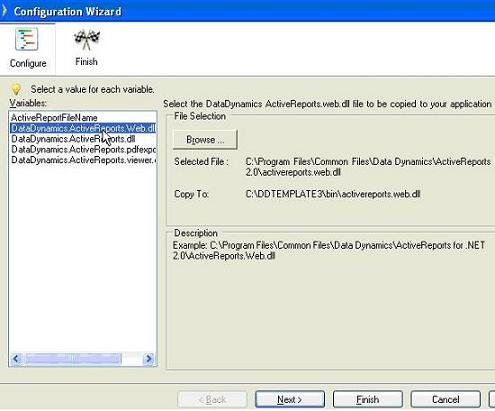
The example below shows how I created a prompt asking the user to locate and select a particular DLL required for an ActiveReports report:

Note: you will need to create one of these <variable> </variable> XML pairings for each DLL that your control needs.
Fortunately, Iron Speed Designer remembers the DLLs you select the first time you run this code template, so you will not be faced with the prospect of having to select these every time you use the template in future. The selections are still there to be overwritten, if need be.
The picture below shows the code template remembering my previously selected DLL files:
Remember that the DLLs you select are version specific. When you upgrade to a different version of your control, you will have to change your code template and DLL selections. I will discuss this in more detail later.
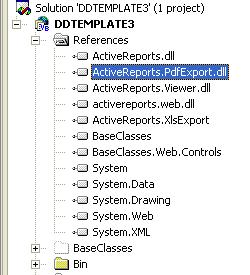
With this code template for ActiveReports, I required references to four different files; that is why there are four <variable> </variable> pairs.
Below is the References section in Visual Studio after running the Configuration Wizard. Note: I compiled my Iron Speed Designer application first.
<AdditionalDescription></AdditionalDescription>
Here, you will put information that would be helpful to the user. In this case, I have put an example of the type of file that I want the user to select. You could easily add whatever other text message you want here.
<Type>File</Type>
This tells Iron Speed Designer that you want to select a file. This reference triggers the Browse dialog to appear.
And, last but not least...
<FileExtension>rpx</FileExtension>
Because I don't want users to select a file that is incorrect for the third-party control that I am using, I make sure they only select ActiveReports report files.
HTML Area
The HTML Area is where we place any Register directives or HTML markup required to display our third-party control.
This area consists of two parts, the first being where we place the required DLL Register directives, and the second where we insert HTML directly into our layout page.
<Type>HTMLDeclare</Type>
Every ASP.NET page that contains a third-party control needs to know about your page. This has to do with the stateless nature of a web page. For this code template, I need to let the ASP.NET page know about the web viewer control that I am going to insert into my Iron Speed Designer layout page (remembering, of course, that Iron Speed Designer will generate the ASP.NET page for me based upon the contents of the layout page).

Note the <code> </code> pair, and nested within this pair is a <content></content> pair.
Any references that you need should be put here. However, not all of our references have to be put here as Iron Speed Designer will add the DLLs selected above in our variable declaration area into the Visual Studio project references area. How do I know which references are required? I suggest that DLLs directly corresponding to the control itself should have a reference here. Other DLLs used indirectly will probably not be required.
I can tell you while I was building this template I did not, at first, include the reference above. When I ran the code template, it caused an exception, which was thrown at the point in the HTML that my control was referenced. So, experience dictated that I needed to register my DLL with the page.
<Type>Insert</Type>
Now that I have registered my DLL with the page, I want to actually insert some HTML into the layout page.
All of the HTML I want to insert into my layout page must be put within the "<![CDATA[" and "]]>" pairing.
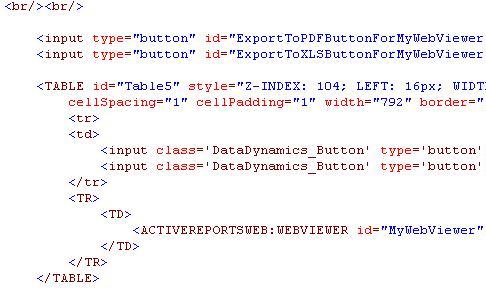
I decided that not only did I want to insert an ActiveReports web viewer control but it would also be beneficial to expose some additional capabilities of ActiveReports. So, I added two buttons, the first to save the displayed report as a PDF file, and the second button to allow the data behind the report to be saved as an Excel spreadsheet. The picture below shows the HTML for both the button and the web viewer control:

Note: The button names have been suffixed with the name of my web viewer control variable declaration, which will get translated at run-time by Iron Speed Designer.
Here's what the HTML page in Iron Speed Designer shows after I have completed the Customization Wizard:
Code Area
The Code area is where we put the actual Visual Basic or C# code required to support our control. All of the code specified here will be put into the page's safe class.
There are two sections to this area. The <Type>Declare</Type> area is used for declaring controls that will be used on this page, and the <Type>Sub</Type> area is where I will place the code I have written for this control.
<Type>Declare</Type>
In this template, I have my ActiveReports web viewer control referenced along with the two buttons I am using for the additional functionality (export to PDF and Excel).
Again, all of our "data" is stored within the "<![CDATA[" and "]]>" pairing.
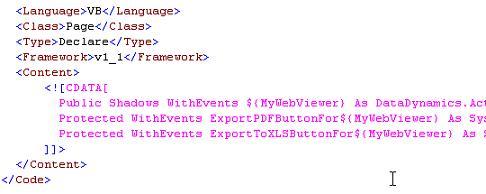
I, again, use the variable declaration to properly and uniquely identify both the web viewer control and my two buttons.
<Type>Sub</Type>
The code area is there so that the appropriate code can get inserted into the safe class area for this page. Here, we have to write any required supporting code to get our third-party control working the way we need. Depending upon the standards in your development environment, you may choose to write code for both .NET Framework 1.1 and 2.0 and/or C# and Visual Basic .NET.
Because this code template could be used by any combination of the above, I wrote and tested code to support all of these choices.
For this article, I have chosen to illustrate this area using the .NET Framework 1.1 and Visual Basic .NET combination.
Again, all of our "data" is stored within the "<![CDATA[" and "]]>" pairing.
Note: It is very important that you only put one function or subroutine within each <Type>Sub</Type> pairing. Iron Speed Designer needs it this way to correctly insert each subroutine or function.
Let's examine the code that I have in the Page Load event for this page:
Private Sub ${MyWebViewer}_Page_Load(ByVal sender As Object, _
            ByVal e As System.EventArgs) Handles MyBase.Load

    If (Not Me.IsPostBack) Then
        Dim rpt As New DataDynamics.ActiveReports.ActiveReport
        Dim strFileName as String = "${ActiveReportFileName}"

        '
        ' Lets get the relative path of our ActiveReports file ( .rpx )
        '
        If (Not System.IO.Path.IsPathRooted(strfileName)) Then
                ' If file path is relative, change it to absolute path.
                strFileName = Me.MapPath(strFileName)
        End If

        '
        ' Now try loading it, if an error occurs report it
        '
        Try

                If Not IsNothing(Me.${MyWebViewer}) Then
                    rpt.LoadLayout(strFileName)
                    ${MyWebViewer}.ClearCachedReport()
                    ${MyWebViewer}.Report = rpt
                    MyWebViewer.Report.Run()
                Else
                    BaseClasses.Utils.MiscUtils.RegisterJScriptAlert(Me.Page, _
                                "ex1", "${MyWebViewer}
                    has no value")
                End If

        Catch ex As Exception
        BaseClasses.Utils.MiscUtils.RegisterJScriptAlert(Me.Page, "ex", ex.Message)
        End Try
End If

End Sub
If the formatting doesn't look as good as it does in Visual Studio, that's because it doesn't! I don't have the luxury of automatic code formatting when working with XML files.
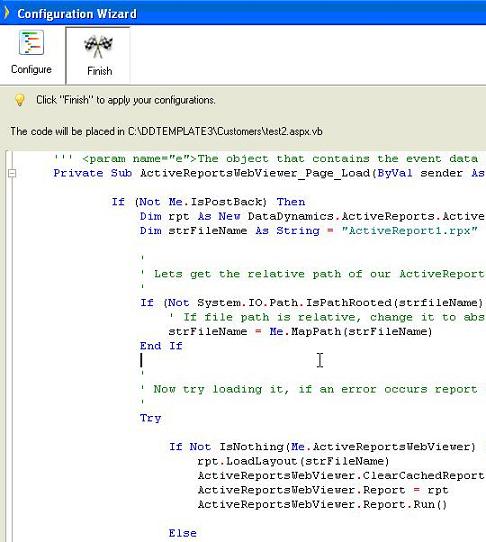
Note the use of the ${MyWebViewer} variable. This value will be populated by Iron Speed Designer before the code is actually placed into the safe class. See the Finish Page below which previews the code that will be inserted:
You can see that ${MyWebViewer} has been replaced by the value MyWebViewer, and the variable ${ActiveReportFileName} has been replaced with the name of the report we selected earlier: ActiveReport1.rpx.
Clicking Finish inserts our code into the safe class. Let's compile and build our application so that we can see what it looks like.
In order to build this code template, I built a simple application that uses the SQL Server Southwind database. You can download this sample application from here.
When I run the application, I see the following:
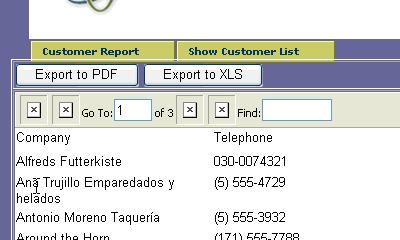
My two buttons have appeared and so has some data for my report. By no means polished, it does however show success for our new code template.
Testing and Debugging
While developing my code template, I kept a copy of Iron Speed Designer open, in order to test the process of dragging and dropping my template onto a layout page. In fact, I created numerous pages, trying various scenarios within my code template.
I kept Visual Studio open as well. I did this for two reasons, the first to be able to edit my XML code template on the fly, and also to compile the application once my custom code has been inserted by the Configuration Wizard. Visual Studio shows me with a list of errors, and I can navigate to each one by clicking on the error.
When Visual Studio reported an error, I corrected it there, then copied and pasted my changed code over into my XML code template file. I saved the XML file, then went back to Iron Speed Designer and deleted my code template object. I then started the process over again. Eventually, I got the code template to the point where it would insert a web viewer object, two HTML buttons, and all of the requisite code needed to support these objects.
Things to Watch Out For
Variable Naming
Make sure that your variables are named properly. During testing, I decided to change the name of my web viewer control in my XML code template file, but neglected to change all of the references elsewhere in the file. Needless to say, the operation of my code template came to a screeching halt.
Variable Name Length
It appears that making a variable name too long causes errors in Visual Studio 2003. I changed a variable from MyWebViewer to ActiveReportsWebViewer and then my project would no longer compile as I started getting errors in the Handles ExportToPDFButtonForMyWebViewer.ServerClick portion of a function call. I changed the name back and all was fine again.
Syntax Errors
XML files are not pretty to work with, but using a proper XML editor can provide color coding and auto-completion to help you out. Visual Studio has an option for validating your XML file to make sure these errors don't get in the way:

Validate your schema here...
Required DLLs are present
I realized early on that some of my code wasn't compiling properly, and I finally realized that one of the DLLs was missing. This entailed going back to the <variable> section of my XML code template file and adding another selection for my users to make. Once done, my code compiled fine.
Multiple controls on one page
This code template is designed to add only one web viewer control per page. If you need to have more than one on the same page, you can certainly run the Configuration Wizard again; however, you will have to rename the second instance everywhere else. This includes the web viewer control, the buttons etc. You will also have to duplicate some of the code in the Page_Load event so that each control gets attributed properly. Other functions, like the Downloadfile routine, can remain unique.
Conclusion
As I stated in the beginning of this article, the goal of writing a code template is to make life easier. Once written, it will trivialize the implementation of third-party controls into Iron Speed Designer applications.
I hope that you can take this example and soar to new heights using your favorite third-party control. Even better yet, share it with others so that we can all benefit together, and create even more eye-popping and attention-getting web applications.