
Working with Configuration Files (app.config) in C++/CLI
4.58/5 (21 votes)
Oct 24, 2007
7 min read
184876
3438
The purpose of this article is to present some utilization of configuration files in a Windows Forms application with C++/CLI.
1. Introduction
This article presents some uses of the configuration file. Using C++/CLI, you will learn how to use the app.config file and how to use sections or create custom sections.
2. Background
This article applies to Windows Forms applications and will use the configuration file app.config. Many concepts can also be used with ASP.NET and the web.config file, but there's more possibility with ASP.NET and here we'll see only a part of the configuration files. We'll use the following C++/CLI properties: the indexation operator, inheritance and override. Be sure to know a little about this topic before beginning. I've decided to write this article with C++/CLI, but a C# user can follow this tutorial too. The syntax is quite similar...
3. Configuration Files
Configuration files are XML files that contain our EXE configuration. It can be a connection string, param values, web services URLs, user preferences, custom controls, etc... This file has to be located in the same directory as the EXE file. Why use a configuration file? To avoid hard-coded values. Imagine we want to use a web service URL in our application. If we change the URL, it can be nice if we don't have to rebuild the application in order to avoid using registry and having to grant user permissions. Data can be strongly-typed with such a file and the .NET Framework has many classes and methods to access it easily. XML is human-readable, although binary files can be un-understandable. XML files are hand-modifiable without a complex system to update values.
4. Begin with Visual C++/CLI
4.1. Visual C++ Configuration
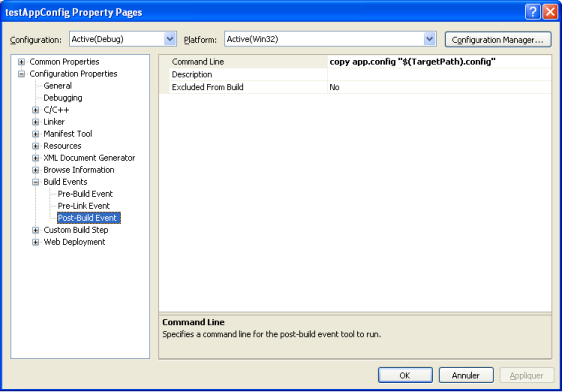
Visual C++ doesn't know about configuration files management. If we want to use them, the values will be empty. This is because Visual C++ doesn't automatically copy the app.config file in the output directory (debug, for example). We have to do it manually or use post-build events. Go to project properties -> configuration properties -> build events -> post build event and change the command line with:
copy app.config "$(TargetPath).config"
4.2. Reference
Don't forget to add the System.Configuration reference. Right click on project -> references -> add new references.

4.3. Easy Reading Example with AppSettings Section
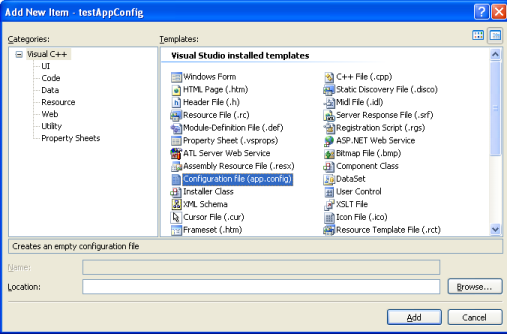
First, we have to create the configuration file app.config. Right click on project -> add -> new item -> configuration file.
The easiest way to begin is to work with the appSettings section, managed by the ConfigurationManager class. In this section, as the name suggests, you can set the application properties. We use a key/value pair to store information. In the file, set the keys/values like this:
<configuration>
  <appSettings>
    <add key="name" value="pyright"/>
    <add key="firstname" value="nico"/>
  </appSettings>
</configuration>
To access the values, we use the following code:
String ^name = Configuration::ConfigurationManager::AppSettings["name"];
String ^firstName =
    Configuration::ConfigurationManager::AppSettings["firstname"];
Console::WriteLine("My name's {0} {1}", firstName, name);
We use the ConfigurationManager::AppSettings object that is a mapping of this particular section. We can use a numerical index, too, to access a value. However, with the string index, it's clearer to me:
String ^name = Configuration::ConfigurationManager::AppSettings[0];
It is possible to iterate on all values in the section:
for each(String ^aValue in ConfigurationManager::AppSettings)
{
    Console::WriteLine("User: {0} - {1}",
        aValue, ConfigurationManager::AppSettings[aValue]);
}
5. Another Simple Example with a Predefined Type: ConnectionStrings
ConnectionString is a predefined type of database connection string. We can store the provider name, the connection string, the database name, etc...
5.1. App.config
<configuration>
  <connectionStrings>
    <add name="MyConnection" providerName="System.Data.SqlClient"
        connectionString="Data Source=localhost;
        Initial Catalog=MyCatalog; Integrated Security=true"/>
    <add name="MyConnection2" providerName="System.Data.SqlClient"
        connectionString="Data Source=localhost;
        Initial Catalog=MyCatalog; Integrated Security=true"/>
  </connectionStrings>
</configuration>
5.2. Code
In a same way, we use the specialized object ConfigurationManager::ConnectionStrings to access this section.
ConnectionStringSettings ^con =
    ConfigurationManager::ConnectionStrings["MyConnection"];
Console::WriteLine("{0} ; {1}", con->Name, con->ConnectionString);
We can iterate on every connection string:
for each(
 ConnectionStringSettings ^aValue in ConfigurationManager::ConnectionStrings)
{
    Console::WriteLine("{0} ; {1}", aValue->Name, aValue->ConnectionString);
}
6. Create Our own Section from a Predefined Type
It is possible to create your own section from a predefined type. For example, to create a section similar to the appSettings one, which uses a key/value pair, we can use the DictionarySectionHandler handler. Many predefined types exist, which we'll see here.
6.1. Dictionarysectionhandler
Dictionarysectionhandler is a class that gives us the configuration information as a key/value pair. It implements the IConfigSectionHandler interface. Why should I use a Dictionarysectionhandler section instead of the appsettings section that uses the same key/value pair system? The purpose of making a particular section is to semantically order this app.config file, to logically cut this file instead of having everything in the same section.
To illustrate the fact that we can have some custom sections in the same configuration file, this example will contain an instance of Dictionarysectionhandler and the next one too: NameValueSectionHandler, which also uses a key/value pair. Why two different handlers if each one gives us information as a key value pair? We'll see the answer in the next chapter...
<configuration>
  <configSections>
    <sectionGroup name="MyGroup">
      <section name="MySectionOne"
          type="System.Configuration.NameValueSectionHandler" />
      <section name="MySectionTwo"
          type="System.Configuration.DictionarySectionHandler" />
    </sectionGroup>
  </configSections>
  <MyGroup>
    <MySectionOne>
      <add key="key1" value="value1" />
      <add key="key2" value="value2" />
      <add key="key3" value="value3" />
    </MySectionOne>
    <MySectionTwo>
      <add key="id1" value="value4" />
      <add key="id2" value="value5" />
      <add key="id3" value="value6" />
    </MySectionTwo>
  </MyGroup>
</configuration>
To get the custom section, we'll use the GetSection method with the name of the section as a parameter. We'll get a Hashtable object, in the case of the Dictionarysectionhandler, and we'll get the value of a key as follows:
Hashtable ^section =
    (Hashtable^)System::Configuration::ConfigurationManager::GetSection(
    "MyGroup/MySectionTwo");
Console::WriteLine(section["id2"]);
We can always iterate on all elements:
for each(DictionaryEntry ^d in section)
{
    Console::WriteLine("{0} ; {1}", d->Key, d->Value);
}
6.2. NameValueSectionHandler
So, this is the difference between Dictionarysectionhandler and NameValueSectionHandler. Each one gives us the configuration information as a key/value pair. The difference consists of the return object that contains the configuration information. Here, we'll get a specialized collection, NameValueCollection. We can access an element:
NameValueCollection ^section =
    (NameValueCollection^)ConfigurationManager::GetSection(
    "MyGroup/MySectionOne");
Console::WriteLine(section["key1"]);
...and iterate on our values:
for each(String ^aKey in section)
{
    Console::WriteLine("{0} ; {1}", aKey, section[aKey]);
}
Then you have to decide which object you want to work with. NB: When there are many sections, we can group them using a section group and can access it with the URL MyGroup/MySection.
6.3. SingleTagSectionHandler
The third handler allows managing configuration sections that are XML-formed. The advantage is that we are not limited with the number of attributes and names of the section. The .NET Framework is able to find our key names, but the section can appear only one time in the file.
<configuration>
  <configSections>
    <section name="sampleSection"
        type="System.Configuration.SingleTagSectionHandler" />
  </configSections>
  <sampleSection myAttribute="Value1"
      anotherAttribute="second value" whatIWant="with my configs"/>
</configuration>
The sample code:
Hashtable ^section =
    (Hashtable^)ConfigurationManager::GetSection("sampleSection");
Console::WriteLine(section["myAttribute"]);
And our for each:
for each(DictionaryEntry ^d in section)
{
    Console::WriteLine("{0} ; {1}", d->Key, d->Value);
}
NB: Here, there's no section group. We can directly access the section with its name by using GetSection.
7. Update
It can be useful to update the configuration file from our application. Let's take our first example:
<configuration>
  <appSettings>
    <add key="name" value="pyright"/>
    <add key="firstName" value="nico"/>
  </appSettings>
</configuration>
Look at how to do this:
String ^name = ConfigurationSettings::AppSettings["name"];
String ^firstName = ConfigurationSettings::AppSettings["firstName"];
Console::WriteLine("{0} - {1}", firstName, name);

System::Configuration::Configuration ^config =
    ConfigurationManager::OpenExeConfiguration(
    ConfigurationUserLevel::None);
config->AppSettings->Settings->Remove("firstName");
config->AppSettings->Settings->Add("firstName", "New firstName");
config->Save(ConfigurationSaveMode::Modified);
ConfigurationManager::RefreshSection("appSettings");

firstName = ConfigurationSettings::AppSettings["firstName"];
Console::WriteLine("{0} - {1}", firstName, name);
You can check your app.config file, the one that is in the same directory as the EXE file (debug by default). You'll see that the new value is updated, but not the one that is in the solution directory. This is because it's Visual C++ that copies the app.config file in the EXE file directory.
8. Custom Section with Types
8.1. Simple Section that Inherits from ConfigurationSection
One way to create a custom section is to inherit from the ConfigurationSection class. We can now add attributes by creating properties and using the ConfigurationProperty attribute to set our property to an XML attribute. Then to read such a configuration file:
<configuration>
  <configSections>
    <section name="MySection"
        type="testAppConfig.MySection, testAppConfig" />
  </configSections>
  <MySection name="pyright" firstname="nico"/>
</configuration>
...we'll use:
using namespace System;
using namespace System::Configuration;

namespace testAppConfig
{
ref class MySection: ConfigurationSection
{
public:
    [ConfigurationProperty("name", IsRequired = true)]
    property String ^name
    {
        String ^ get() { return (String ^)this["name"]; }
        void set(String ^value) { this["nale"] = value; }
    }

    [ConfigurationProperty("firstname", IsRequired = true)]
    property String ^firstname
    {
        String ^ get() { return (String^)this["firstname"]; }
        void set(String ^value) { this["firstname"] = value; }
    }
};
}

using namespace testAppConfig;

int main(array<System::String ^> ^args)
{
    MySection ^section =
        (MySection^)ConfigurationManager::GetSection("MySection");
    Console::WriteLine("{0} ; {1}", section->name, section->firstname);

    return 0;
}
In the app.config file, we have seen the section type: type="testAppConfig.MySection, testAppConfig". This is the name of the class that has to manage the section and, just as before, the name of the namespace. That is simply to set a namespace; this is not always the case in a console application.
8.2. Simple Section with XML Nodes that Implements IConfigurationSectionHandler
Another way to create a custom section is to implement the IConfigurationSectionHandler interface. That implies overriding the Create method which will have to de-serialize the section. We'll have a configuration file like this:
<configuration>
  <configSections>
    <section name="MySection"
        type="testAppConfig.MySectionHandler, testAppConfig" />
  </configSections>
  <MySection type="testAppConfig.MySection, testAppConfig">
    <Name>Nico</Name>
    <FirstName>pyright</FirstName>
  </MySection>
</configuration>
We can again see the section type that goes with the class. We just have to define the section class now with the properties that will be the XML nodes.
using namespace System;
using namespace System::Xml;
using namespace System::Xml::Serialization;
using namespace System::Configuration;

namespace testAppConfig
{
    public ref class MySection
    {
    public:
        property String ^Name;
        property String ^FirstName;
    };

    ref class MySectionHandler: IConfigurationSectionHandler
    {
    public:
        virtual Object^ Create(Object^ parent,
            Object ^configContext, XmlNode ^section)
        {
            XmlSerializer ^xs = gcnew XmlSerializer(MySection::typeid);
            XmlNodeReader ^xnr = gcnew XmlNodeReader(section);
            return xs->Deserialize(xnr);
        }
    };
}

using namespace testAppConfig;

int main(array<System::String ^> ^args)
{
    MySection^ mySection =
        (MySection^)ConfigurationManager::GetSection("MySection");
    Console::WriteLine("{0} ; {1}", mySection->Name, mySection->FirstName);
    return 0;
}
8.3. Section with Collections
In these two custom section examples, we can see each time that we can only set one element. It could be interesting in some cases to have a custom section that can contain some elements, like this:
<configuration>
  <configSections>
    <section name="MySection"
        type="testAppConfig.MySection, testAppConfig" />
  </configSections>
  <MySection>
    <mysection name="nico" firstname="pyright"/>
    <mysection name="CLI" firstname="C++"/>
  </MySection>
</configuration>
Ok, I stop now for everyone who thinks that we can use a NameValueSectionHandler section here. They are right of course, but here, the purpose is to make a section that has more than one key/value pair. Our custom section contains 2 attributes, but it can contain more! We'll use ConfigurationPropertyCollection. We have to create some element -- here, the class whose name is ListElement and that overrides ConfigurationElement -- which will be contained in a collection of elements (here, the class ListsElementCollection, which inherits from ConfigurationElementCollection). We also have to create a section that will use these elements (here, the class MySection that inherits from ConfigurationSection). The source code is:
using namespace System;
using namespace System::Configuration;

namespace testAppConfig
{
    ref class ListElement: ConfigurationElement
    {
    private:
        static ConfigurationPropertyCollection ^_proprietes;
        static ConfigurationProperty ^_name;
        static ConfigurationProperty ^_firstname;

    public:
        static ListElement()
        {
            _name = gcnew ConfigurationProperty("name",
                String::typeid, nullptr,
                ConfigurationPropertyOptions::IsKey);
            _firstname = gcnew ConfigurationProperty("firstname",
                String::typeid, nullptr,
                ConfigurationPropertyOptions::IsRequired);
            _proprietes = gcnew ConfigurationPropertyCollection();
            _proprietes->Add(_name);
            _proprietes->Add(_firstname);
        }

        property String ^Name
        {
            String ^ get() { return (String^)this[_name]; }
            void set(String ^value) { this[_name] = value; }
        }

        property String ^FirstName
        {
            String ^ get() { return (String^)this[_firstname]; }
            void set(String ^value) { this[_firstname] = value; }
        }

    protected:
        property virtual ConfigurationPropertyCollection^ Properties
        {
            ConfigurationPropertyCollection^get() override {
                return _proprietes; }
        }
    };

    ref class ListsElementCollection: ConfigurationElementCollection
    {
    protected:
        property virtual String^ ElementName
        {
            String^ get() override { return gcnew String("mysection"); }
        }
        property virtual ConfigurationPropertyCollection^ Properties
        {
            ConfigurationPropertyCollection ^get() override {
                return gcnew ConfigurationPropertyCollection(); }
        }
        virtual ConfigurationElement^ CreateNewElement() override
        {
            return gcnew ListElement();
        }
        virtual Object^ GetElementKey(ConfigurationElement^ element) override
        {
            if (element != nullptr)
                return ((ListElement^)element)->Name;
            else
                return nullptr;
        }

    public:
        property virtual ConfigurationElementCollectionType CollectionType
        {
            ConfigurationElementCollectionType get() override {
                return ConfigurationElementCollectionType::BasicMap; }
        }

        property ListElement^ default[int]
        {
            ListElement^ get(int index) {
                return (ListElement^)BaseGet(index); }
            void set(int index, ListElement^ value)
            {
                if (BaseGet(index) != nullptr)
                {
                    BaseRemoveAt(index);
                }
                BaseAdd(index, value);
            }
        }

        property ListElement^ default[String^]
        {
            ListElement ^get(String^ name) new {
                return (ListElement^)BaseGet(name); }
        }

        void Add(ListElement^ item)
        {
            BaseAdd(item);
        }

        void Remove(ListElement^ item)
        {
            BaseRemove(item);
        }

        void RemoveAt(int index)
        {
            BaseRemoveAt(index);
        }

        void Clear()
        {
            BaseClear();
        }
    };

ref class MySection: ConfigurationSection
{
private:
    static ConfigurationPropertyCollection ^_proprietes;
    static ConfigurationProperty ^_lists;

public:
    static MySection()
    {
        _lists = gcnew ConfigurationProperty("",
            ListsElementCollection::typeid, nullptr,
            ConfigurationPropertyOptions::IsRequired |
            ConfigurationPropertyOptions::IsDefaultCollection);
        _proprietes = gcnew ConfigurationPropertyCollection();
        _proprietes->Add(_lists);
    }

    property ListsElementCollection^ Lists
    {
        ListsElementCollection^ get() {
            return (ListsElementCollection^)this[_lists]; }
    }

    property virtual ListElement^ default[String ^]
    {
        ListElement^ get (String ^name) { return Lists[name]; }
    }

protected:
    property virtual ConfigurationPropertyCollection ^Properties
    {
        ConfigurationPropertyCollection^get() override {
            return _proprietes; }
    }
};


}

using namespace testAppConfig;

int main(array<System::String ^> ^args)
{
    MySection ^ section =
        (MySection^)ConfigurationManager::GetSection("MySection");
    ListElement^ element1 = section["nico"];
    Console::WriteLine("{0} ; {1}", element1->Name, element1->FirstName);

    ListElement^ element2 = section["CLI"];
    Console::WriteLine("{0} ; {1}", element2->Name, element2->FirstName);

    return 0;
}
We get the section as usual, using GetSection. Afterwards, we use the ListElement objects of our section.
9. Conclusion
I hope this tutorial on configuration sections will help you to better understand this way of application configuration. NB: I've used many strings because of the examples of name and first name, but it's possible to strongly type the values and use an int, for example, to store the age. This is one of the interesting points of the section compared to the old INI files. If you see an error in this article, in the source code or for any other information, leave me a comment.
History
- 25 October, 2007 -- Original version posted