
Relatively Simple 3 Equal-Height Columns CSS Liquid Layout
4.85/5 (48 votes)
This article tries to explain a new approach to the annoying issue of obtaining a three (or even more) equal-height columns liquid layout with the usage of CSS and (X)HTML only. My own solution avoids faux-columnS and super-padding tricks (and so problems caused by those methods).
Introduction
Preface
It's one of the most annoying problems when facing to the creation of (X)HTML CSS-based layouts, and all web developers know it: the 3 equal-height columns layout. The best solution so far was (or still is if you dislike my solution) the faux-column method, which uses background images to simulate columns. The problem is that I'm working on a large project which should be the more 'flexible', and the faux-column method isn't the best example of flexibility.
My solution tries to satisfy flexibility while allowing the usage of 2 up to 3, 4 or even more equal-height columns with background colors specified only through background-color CSS property.
Note: I had to change some article styles to have it work with the Code Project website, because the site is not XHTML compliant, but I left the code in the examples as it should be for XHTML pages, because this solution was meant to work only with XHTML and I don't support HTML requests (like "this doesn't work in my HTML 3.0 website" etc.).
Advantages and Disadvantages
Like every solution, mine has advantages and disadvantages. As always it's all about what you get and what you lose in getting it.
Advantages
- Very flexible liquid layout which allows you to use mixed dimensions (for example, a pixel-fixed left column and a percentage-fixed right one)
- Elastic center column which resizes when needed
- No faux columns (no need for images)
- Only XHTML and CSS are used, no scripts and no conditional comments
- Works with all modern browsers (IE 6/7, Firefox 2, Mozilla 1.7, Opera 9.1, Safari 1.3.2, NN 8.1.3 partially - see Notes, NN 9)
Disadvantages
- Markup is a bit heavy using some extra
divs - CSS also is a bit heavy using 3 hacks and 2 fixes
- [update: fixed in NN 9] There's an unsolved problem with Netscape when in a Firefox-like behavior (see Notes)
- Probably others
The Method
Relative and Overflow
Having three vertical columns with the center one elastic is very trivial in HTML. It's all about putting three divs near each other and floating them. To make those columns appear of the same height, however, we have to make their backgrounds appear of the same height. A key feature of the HTML language is that each container (mainly each element) has a default transparent background thus making it possible to have a (theorically) infinite amount of overlapping layers with the latter having the same background as the first one (if no subsequent background-color is set).
So the problem of having three equal-height columns just comes down in obtaining, in some way, a view separated in 3 stripes of the same height upon which we put the 3 divs which actually contain the columns.
When thinking about a way to obtain this "3-stripes-view," I started thinking about what I needed first: that is, a way to make HTML elements to have the same height, regardless of which is higher. As we know, this is possible by using block-level elements inside each other. So, what need is to put divs, each inside one another, and move them to obtain our three stripes "view." Then we can put, as I said, our three real (that is, physical) columns. This is possible using CSS properties's position: relative (which allows us to shift the child divs) and overflow: hidden (which allows us to hide those portions of child divs which otherwise would overflow the parent space).
Let's see how the whole thing works:
Here we have some examples which explain step by step, and in detail of how key concepts work. Each example includes 2 divs, one with a blue-like background (div.parent-box) and the other with a yellow-like background (div.child-box). Those divs represent what we're going to do later to create page-wide columns. The blue div is the container box while the yellow one is the contained box. Near the example box there's a table which shows CSS properties set for the elements respectively. I only put in there the most important elements and removed those added only to make things appear more clear (like the borders).
The first one is an empty example. That is, the two simple parent and child divs:

The second example introduces the concept of relativeness:

The following example instead shows what happens when the overflow property of the parent is set to overflow: hidden. As you can see, the child box is cut off where the parent one outlines end:

More Relative and Overflow
Now that we've seen how the base concepts work, let's make it all a bit more complicated, using 3 divs (those that will be our page-wide columns at the end).
As seen before we can create a 'stripe' (that is, a column background) simply by setting the parent background color to the color we want for that stripe and then shifting the child box of an amount equal to the width we want for the stripe/column.
When adding 3 stripes though, when we shift the first child, the second child will obviously shift too (we can call this second child the "grandson," being the child of the child of the parent). Since we have to shift the grandson from the right (to create a right stripe) we need to make the grandson left margin overlap the parent right margin (should we call it the grandfather?). This way we'll be able to put a relative shift from the right equal to the width of the right column we want.
The best way to make those margins overlap is to reset the position of the child, that is, to make the left margins overlap and then add a margin-left of 100%. We're going to do this using an additional container between the child and the grandson, applying those styles to this new container, which will be called reset-box. After this we'll have the grandson left margin overlap the "grandfather" right margin. Now all we need is to right-shift the grandson to be the width we want for the right column.
The last thing to do is to adjust the content position. In fact, all the contents now lay where the grandson box does. Simply applying the same method as before, we add an additional container between the grandson and the contents, calling it content-box. Then we relatively left-shift it the amount of the right column and we set its left-margin to -100% (note the minus), thus making its left margin overlap the left margin of the original parent (the grandfather).
The following example shows the result of the above speculation. The width chosen for the left column is 40px while the right column's width is 25%. Look at the mark-up and new styles very carefully to understand where the above width values go, and how the whole thing works:

The following example shows the same example as above (Example 4) but with the parent blue-like box CSS property overflow set to overflow: visible thus making the contained boxes fully visible. Also, I put in some margins to make things more clear.

The following example shows the same example as above (Example 4) but with the parent blue-like box width set to a higher value: width: 400px. Note that changing the width of the layout required only the change of a single CSS value for the main container. Note also that because we chose a fixed width of 25% for the right column, this also changed its size accordingly.

Let's Put Two Cols
Now that we've looked at how the key concepts work, let's make a first example with two columns. It will have about the same structure of first three two-stripes examples, but in addition its contents will be floated to create the physical structure of the two columns.
From now on we're going to change names (and CSS classes) through which we'll be referring to container divs in the future. The reason for this change is that from now on we'll be talking about columns (also physical ones) so stripe divs (those divs we use to create columns backgrounds) will be called as the column they're the background of, apart from the main container (the one which contains everything else), which will be called, strangely enough, main-box.
The following example shows a two columns example. Note that as always, for clarity, I didn't put any border style in the CSS code table cell although the main-box container div got a dark-red solid one:


Border is There
As I mentioned above, everything becomes a bit more tricky when adding the border. Although there are no changes when adding external borders — you simply have to set respective borders in the main-box container (border-left for the left border of the left column, top-border for the top border and so on) — problems arise when you try to add borders between columns.
The reason is that when you put a border in a container, the border of the child of the container won't overlap the border of the parent. Instead, it will be put just next to it. So, when relatively shifting our child divs, their position will be further moved by an amount equal to the previous border size.
The following example is about the same of Example 5 (I used the same textual contents too) but with a border added between the two columns. This is possible by setting the right-box container border-left CSS property. I put a large border (10px) to highlight the problem:

As you can see the layout is all moved to the right by the same size as the width of the border. So, the only thing we need to do is reset the final position of the whole layout from the right, the same amount as the left border width said above (10px). In addition, we need to put a padding-left of the same dimension in the right div to avoid the latter overlapping the border.
The following example is about the same of Example 5.1 but with the two changes mentioned above, to adjust the layout with the border:

The Three of Them
Now that all the key concepts have been discussed, we can introduce our first complete example with the infamous three columns.
The following example shows our final, 3 equal-height columns structure. As you can see from the mark-up code below, the right-box changed its name to center-box because it became the center of our layout (the new green-like right column inserted). Apart from changing name, the CSS styles remained unchanged. Also note that in the example below (Example 6) the width settings are 25% for the left column and 40px for the right one, with the center column filling the remaining space:

The following is the same of Example 6, apart from the wider main-box container. I increased its width to show how the layout is flexible and can adapt itself to the space it is put in. I left the same textual contents within the columns to highlight the difference:

As you can see, having increased the width of the whole layout, the left column width also increased accordingly because it was set to 25%; instead, and the right column width remained untouched because it was pixel-fixed at 40px. Also, as you can easily see, the center column (which is elastic) filled the remaining space and because of the more horizontal space available, its height decreased thus no more being the highest column. In fact now the highest column is the right one, and as you can see, all the backgrounds are of the same height.
The Code
The Markup
I already mentioned in the disadvantages sections, that the markup contains 3-4 divs above the norm (the exact number depends on your usual layout style) and this can be unacceptable by some people. As an extenuation I can say that the number of divs can be (probably) reduced working around borders and containers needed to reset the positions (also because of borders). Anyway those 3 extra divs are not a big problem to me, tried hard to find a way to reduce their quantity.
This is the (X)HTML markup:
<div class="main-box">

  <div class="center-box">
  <div class="reset-box">
  <div class="right-box">
    <div class="content-box clearfix">

      <div class="left">
      </div>
      <div class="right">
      </div>
      <div class="center heightfix">

      </div>
    </div>
  </div>
  </div>
  </div>
</div>
The Style
Below is the clean and ready-to-use CSS code for a working layout. Although the code can seem tricky, after a careful reading and if you understood the method used (explained in section 2 - The Method) I think it will be trivial to realize what you need to change to have your own layout. For example, if you wanted to increase the width of columns or change the background color and such.
So, this is the CSS code:
div.main-box {
position: relative;
width: 500px;
overflow: hidden;
background: #D0E1E1;
border: solid 1px #993333;
}
div.center-box {
position: relative;
width: 100%;
left: 25%;
background: #FFFFCC;
border-left: solid 1px #993333;
}
div.reset-box {
position: relative;
width: 100%;
left: 100%;
margin-left: -25%;
}
div.right-box {
position: relative;
width: 100%;
margin-left: -40px;
background: #D0EEC0;
border-left: solid 1px #993333;
left: -2px;
}
div.content-box {
position: relative;
width: 100%;
margin-left: -100%;
left: 40px;
}
div.left {
float:left;
width:25%;
}
div.right {
float: right;
width: 40px;
text-align: center;
text-transform: uppercase;
}
div.center {
margin-left: 25%;
margin-right: 40px;
padding-left: 1px;
padding-right: 1px;
}
* html div.center {
height:1%;
margin:0;
}
* html div.left {
margin-right:-3px;
}
* html div.right {
margin-left:-3px;
}
.clearfix:after {
content: ".";
display: block;
height: 0px;
clear: both;
visibility: hidden;
}
.heightfix:before {
content: '.';
display: block;
visibility: hidden;
height: 0;
}
Examples
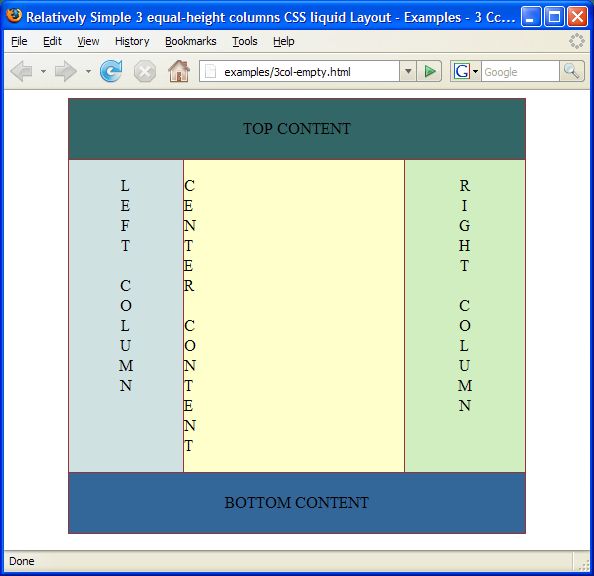
Three Columns Empty
The next one is a complete example with three columns plus a header and a footer. There are no contents in there, just some <br⁄> to make the layout grow in height. Widths here are 25% for the left column and 120px for the right one, while the whole layout width is 80%.

Three Columns and Content
See the following example for more details/information.

Three Columns, Content and Border
The following is a real-world hypothetical sample layout. I added contents and styles to make it look like a general (ugly?) website would look like. In the next code table I removed real contents and replaced them with placeholders to save space. Look at the working example source code if you want to look at the contents for more information. Also, I removed from the style code all those styles that are not related directly to the three columns layout needs. All the CSS code you'll see in the next table is contained in a ready-to-use CSS file named threecol.css which you can retrive from the links at the bottom of the table itself. This file, as I said, is ready to be used in your own pages and contains also detailed descriptions (in CSS comments) which exaplain what values are meant for what purpose (again), so that you can easily change them to have your own custom layout.

Four Columns
In the following example I'll try to use my method to create a layout with 4 columns. Although probably not so useful (at least not like the 3 cols one) this layout can be handy to learn better how the whole method works.

Five Columns?
This last example is for teaching purposes only. I don't think someone would ever need such a thing.

Notes
Layout Issues
As always this solution has problems too. Until now I didn't find any problems apart from those with Netscape Navigator. I found a total of 3 issues with this browser, and solved the first two of them. The third one remains unsolved but I actually think there's a solution to this one too because of the particularity of the issue.
The Netscape Problem(s) -- Fixed with NN 9
As I mentioned above, with Netscape Browser (v 8.1.3) used with the option "Display like Firefox" enabled, when the whole layout is lower in height that the display area, the #main-box container will show a 1px of its background on the right. A solution to this is simply put an overflow: scroll for the html tag. You can see this in the style.css file used in all the 3 columns examples.
In addition there's another little problem (with Netscape, still, but used with the option "Display like IE") for which I found a solution. The problem comes up when you use named anchors inside the #left-box, #center-box or #right-box columns. That is, when you click on the link pointing to the named anchor, the browser jumps back to the clicked anchor. To solve this, simply set a tabindex attribute for the named anchor with the value of 0 as you can see in the working sample I provided above.
The unsolved issue also concerns named anchors. This behavior is a bit similar to the one of the super-padding, apart from showing up only on Netscape and being less painful. In fact, when you have named anchors in your page, and you click on a link which points to the named anchor, it works without problems. The problem shows up only if you push the refresh button (having the named anchor selected in the url, for example http://somesite.com/somefile.html#mylink). Instead, if you push the GO button near the url, the browser displays the page correctly. I know it's a bit weird, but fortunately it is also ignorable because of its weirdness.
Note: The above issues are grayed because they've been solved with the new version of Netscape Navigator (Version 9.0) so I think now they're not important any more.
The More Columns than I Could
If you really understood my method, it shouldn't be difficult to guess how to add more columns. Although I think none will ever need more than 4 or 5 columns, for which I already provided examples, you could like to try some complex layout with 10 columns (for example) to wonder how flexible the method is or for teaching purposes.
As you should have learned reading the article, the layout base concept is to relatively shift and unshift (reset) the position. So when you make a change (a movement of a container), you need somewhere a way to reset that change (that is, to cancel the movement). So, theorically speaking, you need two values (margin-left and left) which let you move two different containers (not the same one, otherwise you completely hide the change). One container to add the column, and an additional transparent (one that doesn't cover the layout with its colors) container to adjust the layout positions. In conclusion, if you remove the center, which is not really a column but a filler, the real columns you have require one value for themselves and another one in some other container to restore the position. In addition you need an additional value to reset the space used by left-borders, which you can put in the last container used and another one for right borders if you have more than 1 right column.
I made a calculation, which is probably wrong, to obtain the number of containers needed in addition to the usual ones when the layout has more than 3 columns. As I said, I'm sure it's wrong/inexact, but gives a general idea on how many containers you need for a given number of columns: you have to double the total number of real columns (that is, the layout columns less 1, the center) and add 1. For example, for 4-columns layout, you need ((4-1)*2)+1 = 7 containers; for 5-columns layout you need ((5-1)*2)+1 = 9 containers and so on.