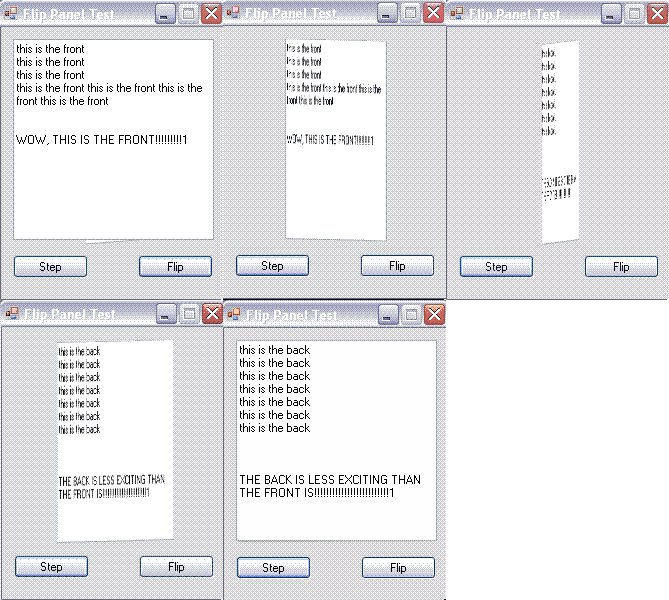
A Panel control that you can flip over
3.84/5 (9 votes)
This article shows how to create a 3D style effect using only GDI+ image manipulations

Introduction
I bought a MacBook Pro a while ago, and I found that there are a lot of interesting visual effects used in the software that comes pre-loaded. One of these I really liked was in the Dashboard application, where you can click on an area of a window and it flips over to show you the available settings for the applet. In an application I'm working on, I thought it'd look good to have a Panel control that I can add a control to and have it flip over to show a control I've added to the back.
Background
My first approach to implementing this idea was to use WPF since it has 3D built in. However, the sample code I found for putting standard controls on a 3D surface really didn't give the image quality I was looking for. So, I decided to go with my own implementation using only GDI+.
How to Use the Code
The code is pretty simple to use in your application. Here is the code I used in the sample application to set up the FlipPanel:
// Add a TextBox to the front
TextBox t1 = new TextBox();
t1.Multiline = true;
t1.Size = new Size(201, 201);
t1.Text = "this is the front";
flipPanel1.Front = t1;
// Add a TextBox to the back
TextBox t2 = new TextBox();
t2.Multiline = true;
t2.Size = new Size(201, 201);
t2.Text = "this is the back";
flipPanel1.Back = t2;
// Set the animation speed
flipPanel1.TimerInterval = 5;
Then, you can just call flipPanel1.Flip() to initiate a flip action.
How it Works
The basic method that this code uses is as follows:
- Paint the front and back controls to separate bitmaps
- Calculate the shading for each vertical line of the forward-facing image (UPDATE! This doesn't really create the effect I want! )
- Draw the forward-facing image to the screen, using the overloaded
Graphics.DrawImage()that can skew images. I use this method to automatically calculate a simple perspective effect.
Let's Get Some Perspective
Thanks to the suggestion of mcstarSatx, I realized that what really gives the impression of 3D is perspective! Not shading so much! I think I was hung up on shading because of some research I did in school about shape from shading algorithms. In any case, I added some code to do a simple perspective effect, and it looks an order of magnitude better. I left in the option of using shading, but it really doesn't add much to the visual effect besides slowing it down...
So, let's figure out how perspective works. If you take a sheet of paper, hold it up in front of your face (orthogonally), all four corners look like they're essentially the same distance from you. Now, turn the paper 45 degrees from your face. Where are those same four corners? The ones farther away from you look like they're farther away! They don't look much darker! That's why I was a blockhead for thinking shading was the most important factor in creating a 3D effect.
A Simple Way to Create Perspective
Perspective transforms really aren't the easiest to calculate, especially when you're constrained to only use GDI+. So, to get something working quickly, since I've got other things to do, I decided to just use a simple shear operation, which you even get for free from Graphics.DrawImage(). First, in addition to state variables which represent the x values of the left and right corners, I keep track of a variable that represents the y value of the top of the control. Then, during each time step of the animation, I can just increment or decrement that value to create an image shear.
PointF[] destPoints = { new PointF(m_X1, 0),
new PointF(m_X2, m_Y1),
new PointF(m_X1, this.Height) };
// m_Y1 is the variable that determines the perspective
e.Graphics.DrawImage(m_PageA, destPoints);
The Secret Formula
I left the option of using shading in the code, but it's not that useful. I'll leave this part of the article intact in case anybody is ever interested.
The most difficult part of writing this control was getting the animation to look even remotely realistic. In my first approach, I didn't use any shading, and just animated a skew of the image to approximate a rotation in 3D. This worked OK, but really wasn't believeable. So, I decided to do some trigonometry and figure out how to shade the image as it rotated.

As you can see from the figure, it's really not that complicated of a formula. From the diagram, y represents the factor I use for shading, and it's calculated from x and theta, as: y = x * Math.Tan(theta).
So, after I figure out what value to use for shading, how do I do the shading? It's pretty simple. The first thing to realize is that instead of doing anything complicated using colors, I'm actually just using y as an alpha value. That way, I really don't have to worry about what's underneath the shading layer. Since I'm flipping the image along the vertical (y) axis, I know that the shading value for every horizontal point along the same vertical axis will be the same, so I use Graphics.DrawLine() to draw a line over the image using the alpha value I've calculated. I put pretty many comments in the code, so if you read that you should be able to understand what's going on.
