
WPFDialogs
4.85/5 (20 votes)
How to Inherit From Custom Window and Create a dialog that returns a value using WPF and MVVM
Table of Contents
Window: Inherit From Custom Window
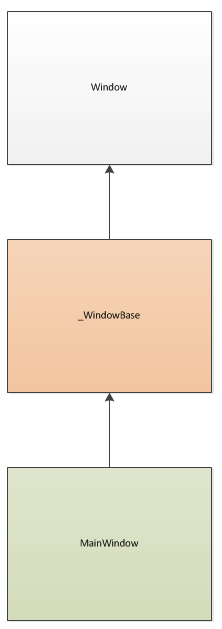
When you add a Window, Page, or UserControl to a WPF project, the default inheritance is used. You are provided with a window that inherits from WPF’s Window class:

Because of this default inheritance, there’s no easy way to add a method, property, or event that all new windows can use.
This tutorial will walk you through a few simple steps to subclassing a window. The goal will be to create a window base class that we can subclass all other windows from:
First create a WPF Application, calling it SubclassWindow. Add an abstract class, calling it _WindowBase. This class will serve as the base for all other windows.
using System;
using System.Windows;

namespace SubclassWindow
{
    public abstract class _WindowBase : Window
    {
    }
}
Next, open your MainWindow’s XAML and modify it as such:
<src:_WindowBase x:Class="SubclassWindow. MainWindow"
                 xmlns="http://schemas.microsoft.com/winfx/2006/xaml/presentation"
                 xmlns:x="http://schemas.microsoft.com/winfx/2006/xaml"
                 xmlns:src="clr-namespace:SubclassWindow"
                 Title="WindowsApplication1" Height="300" Width="300"  >

    <Grid>
    </Grid>

</src:_WindowBase>
In the above XAML, the first change was to add a new namespace tag to define where the base class is located:
xmlns:src="clr-namespace:SubclassWindow"
Next, we changed the <Window> tag as follows:
<src:_WindowBase x:Class="SubclassWindow. MainWindow"
.
.
.
</src:_WindowBase>
Note that this change indicates in the XAML that this window is based of _WindowBase, instead of Window.
Finally, in MainWindow’s code behind, change the code as follows:
public partial class MainWindow : _WindowBase
{
    public MainWindow()
    {
        InitializeComponent();
    }
}
The only change here is the _WindowBase.
Note that if _WindowBase resides in another application, you will need to add the assembly keyword to the src tag:
xmlns:src="clr-namespace:SubclassWindow;assembly=the_assembly"
Finally, to subclass a user control or page, be sure to remove the Title tag from the XAML.
That’s it. Now you can subclass any window off of _WindowBase and access all its members.
Create a Dialog that Returns a Value using WPF and MVVM
Purpose
The goal of this example is to return multiple user selections from a WPF dialog designed using the Model-View-ViewModel pattern. This tutorial assumes you have a basic understanding of MVVM. For more information on MVVM, see this and this:
This tutorial also assumes that you have read Window: Inherit From Custom Window.
For this example, we will create a dialog that will return both a Title as a string and Age as an int:

Overview
A dialog designed using WPF and MVVM contains multiple parts, as shown in figure 2.
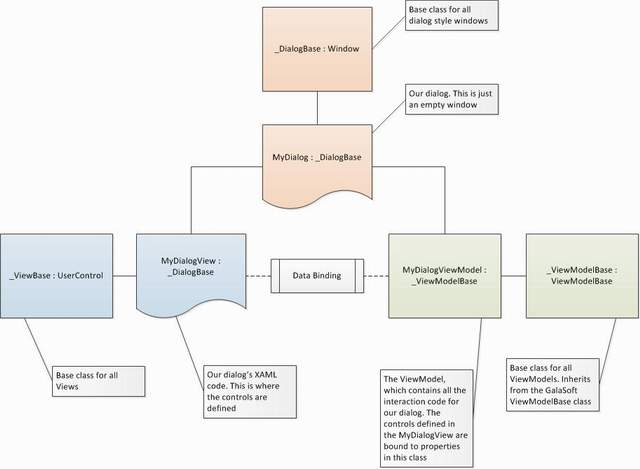
The number of components shown in Figure 2 can be a little overwhelming, but consider that each major component is based off a base class. This is to facilitate proper design and will make it easier later to add additional dialogs.
To begin, let’s create some folders in the project to hold all the parts. After the folders are in place, we’ll start adding the components to them.

The DialogOptions Class
In order to return multiple values from the dialog, we need to create a class that can hold all the data. Create the following class in the Classes folder. Note that I have removed the Classes folder name from the namespace. This is a matter of preference, but I find it easier to work with the project components if the folder names are not specified.
namespace MVVMDialogWithReturnProperty
{
    public class DialogOptions
    {
        public string Title { get; set; }
        public int Age { get; set; }
    }
}
The Dialog
Since the dialog base class is crucial to our design, we go through it step by step. First, in the Windows folder, add a class called _DialogBase and derive it from WPF’s window class:
public class _DialogBase : Window
{
}
After you have created the base class, we need to make it generic so it can return any type of value.
public class _DialogBase
Next add a DependencyProperty that can be bound to a property of type T. Remember that T will be the type we want returned from the dialog. It could be an int, a string, or in this case, an instance of our DialogOptions class we just created. Let’s call this property RetValDP since it’s the return dependency property.
public class _DialogBase<T> : Window where T : new()
{
    public static readonly DependencyProperty RetValDP =
        DependencyProperty.Register("RetVal", typeof(T),
	typeof(_DialogBase<T>), new FrameworkPropertyMetadata());
}
Next add a property called RetVal which will hold a reference to the type we’re returning.
public class _DialogBase<T> : Window where T : new()
{
    // Create a dependency property to hold the dialog's return value
    public static readonly DependencyProperty RetValDP =
        DependencyProperty.Register("RetVal", typeof(T),
		typeof(_DialogBase<T>), new FrameworkPropertyMetadata());

    public T RetVal
    {
        get { return (T)GetValue(RetValDP); }
        set { SetValue(RetValDP, value); }
    }
}
Lastly, in the constructor, initialize the RetVal to whatever type we’re returning, and set the WindowStyle and ResizeMode properties so that our dialog will look and behave like a true modal dialog.
public _DialogBase()
{
    RetVal = new T();

    // Set the window up like a dialog
    WindowStyle = WindowStyle.SingleBorderWindow;
    ResizeMode = ResizeMode.NoResize;
}
Skipping ahead a bit, the last thing we’ll do in this tutorial is test our work by doing the following:
MyDialog dialog = new MyDialog();
dialog.ShowDialog();

if (dialog.RetVal != null)
{
    string name = dialog.RetVal.Title;
    int age = dialog.RetVal.Age;
}
You can see from this test how we will use the RetVal property.
The completed _DialogBase class code should look like this:
public class _DialogBase<T> : Window where T : new()
{
    public static readonly DependencyProperty RetValDP =
        DependencyProperty.Register("RetVal", typeof(T),
	typeof(_DialogBase<T>), new FrameworkPropertyMetadata());

    public T RetVal
    {
        get { return (T)GetValue(RetValDP); }
        set { SetValue(RetValDP, value); }
    }

    public _DialogBase()
    {
        RetVal = new T();

        WindowStyle = WindowStyle.SingleBorderWindow;
        ResizeMode = ResizeMode.NoResize;
    }
}
Subclassing the DialogBase Class
Now that the dialog base class is created, we need to subclass it into a working dialog. Create a WPF window called MyDialog in the Windows folder.
To make the _DialogBase class able to return an instance of our DialogOptions class, we need to specify the type that will be returned in the RetVal property we created in the code above. To do this, modify the _DialogBase XAML and the code behind, as follows:
<src:_DialogBase x:Class="MVVMDialogWithReturnProperty.MyDialog"
                 x:TypeArguments="src:DialogOptions"
                 xmlns="http://schemas.microsoft.com/winfx/2006/xaml/presentation"
                 xmlns:x="http://schemas.microsoft.com/winfx/2006/xaml"
                 xmlns:src="clr-namespace:MVVMDialogWithReturnProperty"
                 xmlns:MyDialogViewNS="clr-namespace:MVVMDialogWithReturnProperty"
                 Title="My Dialog"
                 Height="331"
                 Width="518">


    <Grid>
    </Grid>

</src:_DialogBase>
Notice that our window is based off of _DialogBase, and we have added the TypeArguments tag, in bold above. Since we’re in the MyDialog class, it’s ok to specify that we want DialogOptions returned because DialogOptions is the class returning the values for this particular dialog. The code behind also needs to know the return type:
using System;
namespace MVVMDialogWithReturnProperty
{
public partial class MyDialog : _DialogBase
Notice here again that we have specified the DialogOption type as the base type. This works in conjunction with the tag in the XAML to tell the dialog what type to return. At this point, RetVal in the _DialogBase is now of type DialogOptions.
There are two other things to note in the C# code. First we set the window’s DataContext to a new instance of the ViewModel:
DataContext = new MyDialogViewModel();
And then we bind the Dependency Property RetValDP to the ViewModel’s property Options property, which is of type Options.
SetBinding(RetValDP, "Options");
RetValDP is the DependencyProperty we defined in the _DialogBase class. Options is a property we’re going to define in the ViewMode.
It’s important to note at this point that the binding is done after the DataContext is set and here in the C# because in the XAML during InitializeComponent the RetValDP and Option properties are not available. These become available to the form after the DataContext is set.
The ViewModel
In the MVVM pattern, the ViewModel is the class where we will place our C# code and becomes the data context for the dialog. This class will have a property of type DialogOptions called Options, as well as properties for both the Title and the Age data items.
Again, we will start by creating a base class:
using System;

namespace MVVMDialogWithReturnProperty
{
    public partial class MyDialog : _DialogBase<DialogOptions>
    {
        public MyDialog()
        {
            InitializeComponent();

            DataContext = new MyDialogViewModel();

            SetBinding(RetValDP, "Options");
        }
    }
}
Notice the reference to the GalaSoft MVVMLight toolkit. Our class inherits from the ViewModelBase class in the toolkit. You can read about it here http://blog.galasoft.ch/Default.aspx. The ViewModelBase class provides us with two features that will make our work easier – the RaisePropertyChanged event and Commanding. By creating the above base class, we can leverage the GalaSoft toolkit and still have a place to extend our ViewModel classes.
Next we create the ViewModel for our dialog, the MyDialogViewModel. We’ll do this class in two steps. We’ll do the first step now and come back to the second step later when we discuss Commands. First define the properties we discussed above:
using System;

namespace MVVMDialogWithReturnProperty
{
    public class MyDialogViewModel : _ViewModelBase
    {
        private DialogOptions _Options = new DialogOptions();
        public DialogOptions Options
        {
            get { return _Options; }
            set
            {
                _Options = value;
                RaisePropertyChanged("Options");
            }
        }

        private string _Title = string.Empty;
        public string Title
        {
            get { return _Title; }
            set
            {
                _Title = value;
                RaisePropertyChanged("Title");
            }
        }

        private int _Age = 0;
        public int Age
        {
            get { return _Age; }
            set
            {
                _Age = value;
                RaisePropertyChanged("Age");
            }
        }

    }
}
Now that our viewmodel has properties to hold the Title and Age, as well as the return object, DialogOptions, let’s design the view. Note that the call to RaisePropertyChanged allows the View to be notified when changes to the properties occur. This means that if you make a change to the Title property in the ViewModel, and it’s bound to a UI element in the View, the UI element will reflect the change. To code your own notifications, you can do this instead.
The View
The view is defined as a WPF UserControl and is the UI component of our dialog. As when subclassing the window above, use this technique to create _ViewBase and MyDialogView in the Views folder. After you finish creating the classes, you should have this base class in the Views folder:
using System;
using System.Windows.Controls;

namespace MVVMDialogWithReturnProperty
{
    public class _ViewBase : UserControl
    {
    }
}
Note that this class inherits from UserControl. It does not contain any methods or properties. It is simply a base class for all views. You could design views without basing them off a base usercontrol, but this class allows us to be consistent in our design and provides a place to extend all views later if we need to.
After your _ViewBase and MyDialogView classes are done, add this to the XAML of the MyDialogView:
<UserControl.Resources>
    <Style TargetType="Button">
        <Setter Property="Width" Value="75"/>
        <Setter Property="Height" Value="30"/>
        <Setter Property="Margin" Value="2"/>
        <Setter Property="FontFamily" Value="Verdana"/>
        <Setter Property="FontSize" Value="11px"/>
    </Style>
</UserControl.Resources>

<Grid Margin="5">

    <DockPanel LastChildFill="True">

        <!--Lower Button Panel-->
        <StackPanel Orientation="Horizontal"
                HorizontalAlignment="Right"
                DockPanel.Dock="Bottom">

            <!--Save Button-->
            <Button Name="cmdSave"
                    Command="{Binding SaveCommand}"
                    Content="Save">
            </Button>

            <!--Cancel Button-->
            <Button Name="cmdCancel"
                    Command="{Binding CancelCommand}"
                    Content="Cancel">
            </Button>

        </StackPanel>

        <Grid>

            <Grid.RowDefinitions>
                <RowDefinition Height="Auto"></RowDefinition>
                <RowDefinition></RowDefinition>
            </Grid.RowDefinitions>

            <Grid Margin="5,5,5,5" Grid.Row="1">

                <Grid.ColumnDefinitions>
                    <ColumnDefinition Width="120"></ColumnDefinition>
                    <ColumnDefinition Width="*"></ColumnDefinition>
                </Grid.ColumnDefinitions>
                <Grid.RowDefinitions>
                    <RowDefinition Height="Auto"></RowDefinition>
                    <RowDefinition Height="Auto"></RowDefinition>
                    <RowDefinition Height="Auto"></RowDefinition>
                </Grid.RowDefinitions>

                <Label Name="lblTitle"
                        Content="Title:"
                        FontFamily="Arial"
                        Grid.Column="0"
                        Grid.Row="0"
                        HorizontalAlignment="Right"
                        FontSize="14"/>
                <TextBox Name="txtTitle"
                        Margin="5,2,5,2"
                        Text="{Binding Path=Title, Mode=TwoWay}"
                        Grid.Column="2"
                        Grid.Row="0"
                        VerticalAlignment="Top"
                        FontSize="12"/>

                <!-- User Name-->
                <Label Name="lblAge"
                        Content="Age:"
                        FontFamily="Arial"
                        Grid.Column="0"
                        Grid.Row="1"
                        HorizontalAlignment="Right"
                        FontSize="14"/>
                <TextBox Name="txtAge"
                        Margin="5,2,5,2"
                        Text="{Binding Path=Age, Mode=TwoWay}"
                        Grid.Column="1"
                        Grid.Row="1"
                        VerticalAlignment="Top"
                        FontSize="12"/>

            </Grid>

        </Grid>

    </DockPanel>

</Grid>
Note that the goal of this tutorial was not to design the most pleasing UI, so it’s very simple and not very pretty. There will be no changes to the view’s code behind. Two things to note in this XAML are the field bindings to Title and Age and the button’s references to commands. First we’ll discuss the bindings and later we’ll discuss the Commands.
Since the dialog’s data context will be the MyDialogViewModel we created above, the XAML can bind to the matching properties on it.

Once the DataContext is set and the bindings are set, changes made to the Title or Age elements in the UI are reflected in the ViewModel properties and changes to the Title or Age properties in the ViewModel are reflected in the UI elements.
All we have at this point is a UserControl that is bound to a ViewModel. We need to put the control on the dialog. Open the MyDialog.xaml file and modify it as below:
<src:_DialogBase x:Class="MVVMDialogWithReturnProperty.MyDialog"
                 x:TypeArguments="src:DialogOptions"
                 xmlns="http://schemas.microsoft.com/winfx/2006/xaml/presentation"
                 xmlns:x="http://schemas.microsoft.com/winfx/2006/xaml"
                 xmlns:src="clr-namespace:MVVMDialogWithReturnProperty"
                 xmlns:MyDialogViewNS="clr-namespace:MVVMDialogWithReturnProperty"
                 Title="My Dialog"
                 Height="331"
                 Width="518">


    <Grid>

        <MyDialogViewNS:MyDialogView/>

    </Grid>

</src:_DialogBase>
The only change here was the addition of:
<MyDialogViewNS:MyDialogView/>
This adds the View to the window. Once added, you should see the UI components from the MyDialogView control appear in the designer.
Commands
Now that our ViewModel can receive the UI values, we need to do something with the data. When the user clicks the Save button, we want to write the values to the DialogOptions class. When the user clicks the Cancel button, we want to close the dialog with no further action.
Since we’re using the MVVM pattern, we want to place C# code in the viewmodel whenever possible. Since the buttons are defined in XAML in the view and the code is going in the viewmodel, we need a way to handle the button click. If we simply assigned an event handler to the buttons, the event definitions would by default be in the view’s code behind, not in the view model.
To make this work, we can implement the ICommand interface. For an overview of ICommand, see http://msdn.microsoft.com/en-us/library/system.windows.input.icommand.aspx. Also see http://msdn.microsoft.com/en-us/library/ms752308.aspx.
The ICommand interface is very simple. It contains only three members, two of which we’ll make use of here. To handle the button’s click, we need to first add a reference to System.Windows.Input and add a using statement for it. Next we’ll go into the ViewModel and define a command property for each button, as follows:
private ICommand saveCommand = null;
public ICommand SaveCommand
{
    get
    {
        if (saveCommand == null)
            saveCommand = new RelayCommand(SaveExecuted, SaveCanExecute);

        return saveCommand;
    }
}
Do the same for the Cancel button.
The ICommand interface exposes two methods, SaveExecuted and SaveCanExecute. SaveCanExecute methods return a bool and is where you place logic to determine if the button should be enabled. The SaveExecuted method is where to handle the mouse click. C# uses the value returned from the SaveCanExecute method to automatically enable or disable the button. Because of this, you can use this same command for a menu bars, buttons, and a context menu all at the same time – and only have code in one place to handle the command. Any object connected to the command is automatically enabled or disabled as defined by the login you write in the SaveCanExecute method.
You will notice the use of the RelayCommand. The RelayCommand is defined in the GalaSoft toolkit, discussed earlier, and implements and extends the ICommand interface. You should already have a reference to it and a using statement. If not, add them now.
Once you have the two properties defined as above, add the method definitions:
public bool CancelCanExecute()
{
    return true;
}
public void CancelExecuted()
{
    Options = null;
    Messenger.Default.Send(WindowMessages.CloseWindow);
}

public bool SaveCanExecute()
{
    return (Title != string.Empty && Age > 0);
}
public void SaveExecuted()
{
    _Options.Title = _Title;
    _Options.Age = _Age;

    Messenger.Default.Send(WindowMessages.CloseWindow);
}
Remember that each property makes a call to its associated CanExecute method. For the Cancel button, we return true because we always want it enabled so the user can exit the dialog at any time. But for the Save button, we only want it enabled if the properties on the dialog are filled in via the UI. Once we attach these two properties to the buttons, the CanExecute methods will be called by the UI at various points to determine when the buttons should be enabled.
The SaveExecuted stores the Title and Age property values, bound to the UI elements, to the instance of the DialogOptions class stored in the Options property. The CancelExecuted clears out the Options property. Both methods them make a Messenger call, described in the next section.
To attach the command properties to the UI, go the XAML for the MyDialogView class and add the following:
<!--Save Button-->
<Button Name="cmdSave"
        Command="{Binding SaveCommand}"
        Content="Save">
</Button>

<!--Cancel Button-->
<Button Name="cmdCancel"
        Command="{Binding CancelCommand}"
        Content="Cancel">
</Button>
Notice that we have now added code to the XAML to bind the buttons to the command properties on our viewmodel. That’s all we need to do. From this point on, when the CanExecute methods return false, the button bound to it will be disabled.
Messaging
Now that our buttons are wired up, let’s look at the Message reference in the SaveExecuted and CancelExecuted methods. What we need now is a way for our viewmodel to tell the dialog that it’s time to close the dialog. We can handle this using the GalaSoft messaging class. There are two steps needed to make this work:
- Make a message call
- Receive the message somewhere
Since we already made the message calls in the SaveExecuted and CancelExecuted methods, let's add some code to MyDialog’s code behind to receive the call:
namespace MVVMDialogWithReturnProperty
{
    public partial class MyDialog : _DialogBase<DialogOptions>
    {
        public MyDialog()
        {
            InitializeComponent();

            DataContext = new MyDialogViewModel();

            Messenger.Default.Register<WindowMessages>(this, _RecieveMessage);

            SetBinding(RetValDP, "Options");
        }

        private void _RecieveMessage(WindowMessages Message)
        {
            if (Message == WindowMessages.CloseWindow)
            {
                Close();
            }
        }
    }
}
In this section, we added two things:
- We added the call to Register after we set the data context. This tells the Messenger class that this dialog can receive messages of type
WindowMessagesin the method_ReceiveMessage.
Be sure to create the enum WindowMessages in the Enums folder as follows:
public enum WindowMessages
{
    CloseWindow
}
Using this technique, you can pass any type of message between two objects.
Finally
Let’s run it and see what happens. Open the MainWindow’s code behind and add the following after the InitializeComponent call:
MyDialog dialog = new MyDialog();
dialog.ShowDialog();

if (dialog.RetVal != null)
{
    string name = dialog.RetVal.Title;
    int age = dialog.RetVal.Age;
}
Place a breakpoint on the if statement and run it. Enter some data into the dialog’s fields. The Save button should become enabled. Clicking the Save button will cause the data to be stored to the Options property and the window to close. Step into the if statement and your data will be there.
Summary
Admittedly, this is a lot of code. But that’s also the reason for the three base classes we created in the beginning. Future dialogs created from them will require a lot less code and make it easier and faster to create modal dialogs in WPF/MVVM that return complex values.
History
- 22nd November, 2010: Initial version