
Using Thinger.io Server on an UP Squared Board
This article demonstrates how to use Thinger.io on an UP Squared board running the Ubuntu operating system.
Introduction
Thinger.io* is an online cloud platform for the Internet of Things (IoT), allowing many devices to integrate with the Thinger.io cloud. It provides real-time data processing and displaying. Visit the Thinger.io site for detailed information. This article demonstrates how to use Thinger.io on an UP Squared* board running the Ubuntu* operating system. It will read the real-time light sensor value and display it in a time series chart. If the light sensor indicates it’s getting dark, it will send an email notification. The UP Squared board is a low-power and high performance platform ideal for IoT applications. The UP Squared board is based on either the Intel® Celeron® processor (N3350) or Pentium® processor (N4200). For more information, visit the UP Squared home page.

Hardware Requirements
The hardware components used in this project are listed below:
- UP Squared, Grove Pi board and sensor kit
- A monitor with an HDMI interface
- USB keyboard and mouse
- A VGA or HDMI cable
- A network connection with Internet access or WiFi kit for UP Squared

Software Requirements
The software requirements used in this project are listed below:
- For the UP Squared* Grove* IoT Development Kit, an Ubuntu 16.04 Server Image is installed in the UP Squared board. To upgrade or refresh, follow UP Squared Grove IoT Development Kit Ubuntu 16.04 Server Image.
- If the installed Ubuntu doesn’t have the right kernel for UP Squared, follow the Install Ubuntu Kernel instructions below to verify and update the kernel for the UP Squared to gain access to the GPIO pins.
Install Ubuntu* Kernel
The default kernel in the Ubuntu Core doesn’t allow access to the GPIO pins. Install the required kernel below to gain access to the GPIO pins.
- Before updating the kernel, use the following command to check whether you have the right kernel for UP Squared.
uname -srv
- The kernel for UP Squared should look like this:
Linux 4.10.0-42-generic #5000~upboard9-Ubuntu SMP Tue Dec 12 11:46:16 UTC 2017
- Add the repository:
sudo add-apt-repository ppa:ubilinux/up
- Update the repository list:
sudo apt update
- Remove all the generic installed kernel:
sudo apt-get autoremove -purge ‘linux-.*generic’
- Install the kernel for UP Squared:
sudo apt-get install linux-image-generic-hwe-16.04-upboard
- Reboot:
sudo reboot
- Verify that the kernel was installed:
uname -srv
Set Up Thinger.io* on UP Squared*
Upgrade the system:
sudo apt-get update
sudo apt-get upgrade
Download latest version of the Thinger.io Linux Client and build and run it:
git clone https://github.com/thinger-io/Linux-Client.git
cd Linux-Client/src
chmod +x run.sh
./run.sh
Download and Build MRAA and UPM libraries
UPM is a library that allows you to interface with sensors and actuators. MRAA is a GPIO library that provides easy connections to IO pins on the UP Squared and other boards on Linux.
MRAA library
git clone https://github.com/intel-iot-devkit/mraa.git
mkdir mraa/build
cd mraa/build
cmake .. -DBUILDSWIGNODE=OFF
make
make install
UPM library
git clone https://github.com/intel-iot-devkit/upm.git
mkdir upm/build
cd upm/build
cmake .. -DCMAKE-INSTALL_PREFIX:PATH=/usr -DBUILDEXAMPLES=ON -DBUILDSQIGPYTHON=OFF -DBUILDSWIGNODE=OFF
make
sudo make install
By default, the MRAA and UPM libraries and includes will be installed in /usr/local. If you prefer them to be installed in a different directory, for example /usr, then use option -DCMAKE-INSTALL_PREFIX:PATH=/usr for the cmake as below. This example will use the default directory /usr/local.
cmake .. -DCMAKE-INSTALL_PREFIX:PATH=/usr -DBUILDEXAMPLES=ON -DBUILDSQIGPYTHON=OFF -DBUILDSWIGNODE=OFF
Create a New Thinger.io* Device
Thinger.io allows multiple devices to connect to the Thinger.io cloud. Visit thinger.io console to create a free account if you don’t have one. Then navigate to Devices on the left panel of the Thinger.io console to add a new device.

Fill out Device ID and Device description. For the credentials field, either fill out a value or click on Generate Random Credentials for a random credentials value. Make a note of the credentials value for later when it’s time to connect the device into the Thinger.io server in Code Example 3: Thinger.io instance. Then, click the Add Device button to add the new device.
Once your first device is successfully added into Thinger.io, it should show 1/2 devices as below. The maximum is two devices for free accounts.

Once your first device is successfully added into Thinger.io, it should show 1/2 devices as shown below. The maximum is two devices for free accounts.

Set Up Thinger.io Endpoint
Endpoints are pre-defined channels that the device uses to send email, SMS, or others to the services that consume your device data. Navigate to Endpoints on the left panel, then click on Add Endpoints to add the new endpoint.

Fill out all of the required fields to define the endpoint. Below is an example of a light sensor endpoint. Then click on Add Endpoint in the bottom of the Add Endpoint window to register the endpoint.

Update main.cpp to Interface with the Grove* Sensor
Edit main.cpp to interface with the light sensor. If the light sensor indicates it’s getting dark, it will send an email to notify.
cd src
vi main.cpp
Add this line into main.cpp to interface with Grove shield.
mraa.addSubplatform(mraa.GROVEPI, "0 ")
Connect the light sensor to the analog pin A1.
// Light sensor is connected to the analog A1
#define OFFSET 512
Light *light_sensor = new Light(OFFSET + 1);
Initialize the Thinger.io instance using the UP Squared device information.
#define USER_ID          		"your_thinger.io_user_id"
#define DEVICE_ID       		"your_upsquared_device_id"
#define DEVICE_CREDENTIAL	"your_thinger.io_credential" // From Figure 3: Add device window above

// Initialize Thinger.io instance for UP Squared
Thinger_device thing(USER_ID, DEVICE_ID, DEVICE_CREDENTIAL);
Once the endpoint is registered, the device can invoke call_endpoint() and pass in the endpoint identifier to send an email to the email address which was defined in Figure 5: Add new endpoint window above.
thing.call_endpoint("light_is_dim");
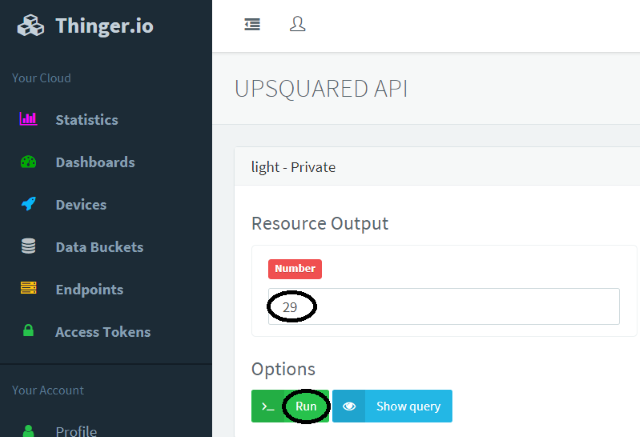
The pson inline function will assign the light sensor value to the light private variable and its value will be displayed on the api windows as shown in Figure 8: UP Squared API window.
thing["light"] >> [](pson& out) {
    out = light_value;
    };
Read the light sensor value from the analog pin A1 and stream it to the Thinger.io server. If the light indicates it is getting dark, call the Endpoint to send the email.
int light_value = 0;  // global variable for the pson inline below
while(1) {
    thing.handle();
    light_value = light_sensor->value();
    thing["light"] >> [](pson& out) {
    out = light_value;
    };

    // It is getting dark, send email
    if (light_value < 10) {
        thing.call_endpoint("light_is_dim");
    }
    std::cout << "light_sensor = " << light_sensor->value() << endl;
    thing.stream(thing["light"]);
}
You should receive an email from no-reply@thinger.io with a predefined subject and body when the light sensor indicates that it’s getting dark.
Compile and Execute
Edit the make file to include the dependency libraries
cd Linux-Client
cd build/CMakefiles/thinger.dir
vi flags.make
Add I/usr/local/include/upm -I/usr/local/include -I/usr/local/include/upm -L/usr/local/lib -lupm-light -lupmc-light -lmraa -lupm-utilities -lupmc-utilities into the CXX_FLAGS. The updated flags.make should look like:
# CMAKE generated file: DO NOT EDIT!
# Generated by "Unix Makefiles" Generator, CMake Version 3.5

# compile CXX with /usr/bin/c++
CXX_FLAGS =  -std=c++11 -I/usr/local/include/upm -I/usr/local/include -I/usr/local/include/upm -L/usr/local/lib -lupm-light -lupmc-light -lmraa -lupm-utilities -lupmc-utilities -O3 -DNDEBUG

CXX_DEFINES = -DDAEMON=0 -DOPEN_SSL=1

CXX_INCLUDES =
Recompile the updated main.cpp
cd ~/Linux-Client/build
make thinger
Execute the updated Thinger.io. Note that you need to be root user to access the GPIOs, so be sure to include "sudo". To run the updated main.cpp, type the following command in a terminal:
sudo ./thinger
View Sensor Real Time Value
From the Thinger.io console, navigate to Devices on the left panel, select UpSquared device, then click on View API.

Then, click on View API. The real time light sensor will be displayed on the UpSquared API window. To refresh the real time light sensor value, click on Run.
Time Series Chart
To view the real-time light sensor values in the time series chart, navigate to panel on the left, then click on Dashboards. Then click on Add Dashboard, fill out all the fields and then click to create a new dashboard.

Once the new dashboard is successfully created, click on Dashboards on the left panel again to view the newly added dashboard then click on it.

Slide the button on the top right corner to the right and then click on the Add Widget button.

Select Time Series Chart.

Fill out all the required fields then click on the Save button.

The real-time light sensor time series chart will look like the one below.

Example Sketch
#include "mraa.hpp"
#include "upm/light.hpp"
#include "thinger/thinger.h"
#include "upm_utilities.h"
#include

#define USER_ID             		"nnle"
#define DEVICE_ID          	 	"UpSquared"
#define DEVICE_CREDENTIAL   	"tJU5a1VBBYBG"
#define OFFSET              		512

using namespace mraa;
using namespace upm;
using namespace std;

// Global variable for pson inline below
int light_value = 0;

int main(int argc, char *argv[])
{
    unsigned int aPinLight;
    Platform platform = getPlatformType();
    if(platform == INTEL_UP2) {
aPinLight = 1 + OFFSET;  // A1
    }
    else {
cout << "Error: Unrecognize board.\n";
	return 1;
    }

    // Interface with Grove shield
    addSubplatform(GROVEPI, "0");

    // Light sensor is connected to the analog pin A1
    Light *light_sensor = new Light(aPinLight);

    // Initialize Thinger.io instance for UP Squared
    thinger_device thing(USER_ID, DEVICE_ID, DEVICE_CREDENTIAL);

    while(1) {
    	thing.handle();
 	light_value = light_sensor->value();
    	thing["light"] >> [](pson& out) {
 	out = light_value;
         	};

	if (light_value < 10) {
    	    thing.call_endpoint("light_is_dim");
    	}
        	cout << "light_sensor = " << light_sensor->value() << endl;
 	thing.stream(thing["light"]);
    }

    thing.start();
    return 0;
}
Summary
Thinger.io provides services for building IoT applications. It allows you to connect and manage devices and visualize sensor data in real-time. You can also expand your project with multiples sensors, multiple IoT devices and communicate between devices.