
Building Docker Intuition
5.00/5 (3 votes)
This short tutorial aims to inculcate in the reader's mind a meaningful intuition to get around known Docker misconceptions.
Introduction
This short tutorial is not meant to train the reader on known docker commands, but rather to inculcate in the reader's mind a meaningful intuition to get around known Docker misconceptions. When dealing with Docker, we are probably referring to the Docker daemon, but when we are using it, we are actually using a Docker client. Yet, I have seen that many users are unaware that there are these two parties in play out there, a client (command line proxying REST json calls), and a server (docker daemon). This confusion is strengthened by the fact that both parties most likely reside on the same machine, hence, there is no physical separation between the two.
Workshop Phases
- Check if your Linux host is up
- Client calibration
- Understand where you are? Are you aware where you are operating? Are you inside the docker container or the host? (a dreamer inside a dream)

If you a pre Hyper-V Windows machine, know that you would need to bring up your Linux kernel through a VirtualBox image (pre-Windows 2010), otherwise, you can rely on the Hyper-V service. The Hyper-V service will launch your Linux image without any hustle. This tutorial is based on the virtual box and the default boot2docker distribution that comes with it. Remember your Docker daemon is installed on that boot2docker Linux installation.
1. Check If Your Linux Host Is Up
Run:
docker-machine ls
2. Client Calibration
I prefer to call this phase client calibration. Why? Well, your Docker command line client does not know to which Docker daemon to point to. You are aware that you have to communicate with the daemon to get your commands through, right? The way to do that is to find what the connection coordinates of your daemon are. You could also communicate with a Docker daemon residing on a different machine on your network.
Run:
docker-machine env
It will spit out something like:
SET DOCKER_TLS_VERIFY=1
SET DOCKER_HOST=tcp://192.168.99.100:2376
SET DOCKER_CERT_PATH=C:\Users\myuser\.docker\machine\machines\
SET DOCKER_MACHINE_NAME=default
SET COMPOSE_CONVERT_WINDOWS_PATHS=true
REM Run this command to configure your shell:
REM     @FOR /f "tokens=*" %i IN ('docker-machine env') DO @%i
Play It Safe By Avoiding Proxy Issues
As you can see, your daemon is identified by an IP address 192.168.99.100. What could happen is that if you are behind a proxy, the requests to your daemon will hit the proxy, but the proxy is unaware of your newly issued IP address. This IP is created ad-hoc locally only on your machine. Hence, you need a way to bypass the proxy when issuing requests to a host located on your own machine.
Run:
docker-machine env --no-proxy
Output:
SET DOCKER_TLS_VERIFY=1
SET DOCKER_HOST=tcp://192.168.99.100:2376
SET DOCKER_CERT_PATH=C:\Users\myuser\.docker\machine\machines\default
SET DOCKER_MACHINE_NAME=default
SET COMPOSE_CONVERT_WINDOWS_PATHS=true
SET no_proxy=192.168.99.100, .eu.int
REM Run this command to configure your shell:
REM     @FOR /f "tokens=*" %i IN ('docker-machine env --no-proxy') DO @%i
To point your Docker client to your Docker daemon, run the last line of the previous listing, but without the REM comment sign:
@FOR /f "tokens=*" %i IN ('docker-machine env --no-proxy') DO @%i
Now that you are pointing to the right daemon, let's see what containers are instantiated in the Docker daemon. Being instantiated doesn't necessarily mean they are also running, they could well be in EXITED state. Be aware that a docker container follows a state lifecycle.
Run:
docker ps -a
To show you the locally available images:
docker image ls
3. Understand Where You Are? Are You Aware Where You Are Operating? Are You Inside the Docker Container, the Host, or on the Docker Client? (A Dreamer Inside a Dream)
I have noticed that it is very easy for a Docker user to get confused about what his exact role is and what he is supposed to do and act on.
For a starter, let's log into the host box and snoop around:
docker-machine ssh
You probably ask yourself how come you have just logged gracefully to the machine with no credentials. Well, the work has been done on your behalf, you have the private key available under your DOCKER_CERT_PATH (see above when executing docker-machine env).
You will now be able to see the Docker daemon in a listening state on port 2376.
netstat -nat | grep LISTEN
Let's Review the Process Signals and Why They Are Important. Experiments
If you are not a Linux savvy user, you probably do not know that you can pass to your Linux process three signals, Ctrl-C (SIGINT), Ctrl-\ (SIGQUIT), and Ctrl-Z (SIGSTP). Now the docker architecture allows you to access this Linux feature when running your docker instance. You have probably stumbled on the already frequent -i and -t switches when running a docker run command. What do they mean. The -i switch means you are gaining access to standard input of the remote docker process. Yet, you cannot push any data unless you have a console available to your client docker, that's where the -t comes into play. Let's experiment this:
Experiment 1: Standard Input Available but Nothing Being Heard in Your Docker Instance
Run:
docker run -i tomcat:latest
While your tomcat standard output console will start flooding, try to launch the keyboard combination - Ctrl C. The process was interrupted, but did it really reach the remote process?
Run:
docker ps -a
You will see the following:
CONTAINER ID   IMAGE            COMMAND              CREATED        STATUS
d154269f742a   tomcat:latest    "catalina.sh run"    1 minute ago   Up 1 minute
As you can see, the docker instance did not pick up on this signal, it is still up.
Experiment 2: Standard Input Available, Signal Does Go Through to Your Docker Instance
Run:
docker run -it tomcat:latest
While your tomcat standard output console will start flooding, try to launch the keyboard combination - Ctrl C. The process was interrupted, but did it really reach the remote process?
Run:
docker ps -a
You will see the following:
CONTAINER ID   IMAGE            COMMAND              CREATED        STATUS
d154269f742a   tomcat:latest    "catalina.sh run"    1 minute ago   Exited
In this case, the docker instance did receive the signal, subsequently got interrupted, and an exit status showed up.
Here is a breakup of the decision tree of the signals (figure 3).

If you launch your instance in the background and still want to gain access to the STDOUT, you can use:
docker logs -f instance-name
Now that we are done with the signals overview, let's move on to another topic, the physical changes that your image goes through, the so called "layering" process.
How about the changes made to your container and image. If you are eager to inspect the commands that led your image to its last saved state, run:
docker history image-id
To render prettier the history listing:
docker history --no-trunc image-id  | tac | tr -s ' ' | cut -d " " -f 5- |
sed 's,^/bin/sh -c #(nop) ,,g' | sed 's,^/bin/sh -c,RUN,g' | sed 's, && ,\n  & ,g' |
sed 's,\s*[0-9]*[\.]*[0-9]*[kMG]*B\s*$,,g' | head -n -1
Create Some Interaction between the Docker Client and the Docker Instance
Now let's showcase a command that involves the Docker client side. Here is the copy command. You can copy a file from either the container to your local client machine:
docker cp [container]:/pathtofile localpathtofile
or vice-versa:
docker cp localpathflie [container]:/pathtofile
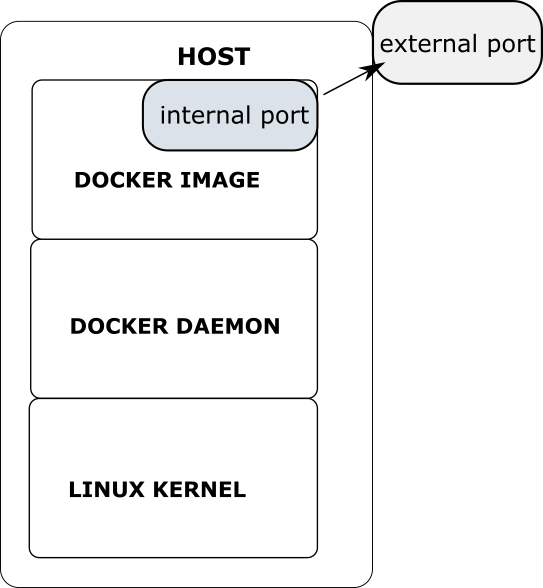
Now let's provide an example of a command that bridges between the host and the daemon. Typically, we would like to get two things from our docker daemon: communication access to our new service, and file system access, right?
In this example, we would like to mount a volume for an instance of Tomcat and share it. We would also like to access the docker instance port, namely, the regular Tomcat port 8080. We will create a corresponding Linux host port on port 8888. Remember we cannot reach the docker instance when we are acting as a docker client. We can only reach the Linux host, that's why we are making these two services available to the Linux host.
As for sharing a common directory, make sure to create on your Linux host a directory named - /home/hostVolume. In case you are launching a VirtualBox boot2docker image, there is an additional step, you will have to also mount a local directory on your Windows machine by adding an entry in:
VirtualBox->Your boot2docker image->Settings->Shared Folders->Adds new shared folder
Now, place some files inside. Run the following command which will bridge between the ports and also share the file directories in one go:
docker run -it -d -v /home/hostVolume:/home/dockerVolume --publish 8888:8080
                                                         --name tomcatInstance tomcat:latest
Now let's peek into our shared file directory. You are going to tap into your docker instance by typing into your shell:
docker exec -it tomcatInstance bash
cd /home/dockerVolume
Commit an Existing Running Instance
In case you want to persist the state of an existing instance:
docker commit [container-identifier] [image]
Export Your Images / Containers
When it comes down to the option of exporting your image, you have two options available. Careful, each exporting scheme has its own unique importing scheme. You cannot mix the two.
So the two are:
- Either export the whole versioning history of the image, but you will end up with a heavier image. On top of that, you are referencing an image and not a running container:
docker save [image name] > /path to your tar/name.tar
To import it back:
docker load /path to your tar/name.tar
- or export a running container, by flattening its history and thus reducing its size:
docker export [container id] > /path to your tar/name.tar
To import it back:
cat /path to your tar/name.tar | docker import - [name]
History
- 4th February, 2020: Initial version