
Displaying Data And Handling Events In Angular
2.00/5 (1 vote)
Here We'll learn different binding approaches like class binding, style binding and property binding. We'll see how to display the data in the view and handle any event in the DOM.
Introduction
Today we’ll learn how to display the data in views, how to apply the styles and classes on DOM elements dynamically. We’ll format the data using pipes, we’ll build the custom pipes. We’ll handle the events raised from the DOM elements. But before getting started if you’ve not prior knowledge of Building Blocks of Angular and Typescript then you should start your journey with Angular from here.
- Introduction of Angular and How to Setup Environment in Visual Studio Code – Part 1
- Novice To Ninja With Typescript - Part 2
- Building Blocks of Angular - Part 3
Table of Content
So in this article we will cover a lot of things.
- Property Binding
- Attribute Binding
- DOM vs HTML
- Adding Bootstrap
- Class Binding
- Style Binding
- Event Binding
- Event Filtering
- Template Variable
- 2 way Binding
- Pipes
- Custom Pipes
- What We Have Learned
- Conclusion
Property Binding
So earlier we’ve already learned about string interpolation is the double curly braces syntax used to display data.
@Component({
    selector: 'courses',
    template: `
    <h2> {{ name }} </h2>
    <img src="{{ image }}" />
    `
})

export class CoursesComponent {
    name = "Usama";
    image = "http://www.gstatic.com/webp/gallery/1.jpg";
}
Now this string interpolation is nothing but just a syntactical sugar behind the scene when Angular compiles the template, it translates these interpolations into property binding.
Now let’s rewrite the img with property binding syntax instead of using string interpolation. So,
@Component({
    selector: 'courses',
    template: `
    <h2> {{ name }} </h2>                 // 1<sup>st</sup> Statement
    <img src="{{ image }}" />             // 2<sup>nd</sup> Statement

    <img [src]=”image” />                 // Compiled Version of 2<sup>nd</sup> Statement
    `
})
This is how it compiles the string interpolation under the hood. Note that we don’t have double curly braces here. So when we use the data in string interpolation, angular automatically compiles it into Angular compiled syntax.
And with this whenever the image field value changes src attribute of this image automatically updated.
Now you might be wondering about whether to use String Interpolation or Original Syntax of Angular???
Well Interpolation works well to add dynamic values between any element where we use text like headings, div, section, text etc. In the above example if we use property binding syntax with h2 heading. We need to keep in mind how we write the statements with property binding syntax.
<h2 [textContent]=”name”></h2>
And Obviously this syntax is more longer and more noisy, So we recommend to use string interpolation wherever we want text in html elements. In other cases like in img, property binding syntax is shorter. We can also use string interpolation as well in img case, but property binding syntax is more cleaner and shorter.
Keep in mind, Property Binding Syntax only works in one way (component to DOM). So if we make any changes in component class properties then it automatically changes the DOM but any changes in the DOM won’t reflected back in the component.
In simple words, if we fill the fields in form then the values you enter can’t change the values of component properties, but if there is any changes occur in component fields then the DOM (form input fields) automatically updated according to it.
Attribute Binding
We’ve seen property binding concept, now let’s explore the concept of attribute binding. Now our template code is,
@Component({
    selector: 'courses',
    template: `
        <table>
            <tr>
                <td [colspan]="colSpan"></td>
            </tr>
        </table>
    `
})

export class CoursesComponent {
    colSpan = 5;
}
Now save the file and run the application. Here you’ll see the blank white screen which means something not right there and there might be some error, now open the console of browser.

Now to understand this error, first of all we need to understand the difference of DOM (Document Object Model) and HTML.
DOM vs HTML
DOM is a model of objects that represents the structure of the document, it essentially a tree of objects in memory.

HTML on the other hand is the markup language that we use to represent DOM in text. So when your browser parses an HTML document, it creates a tree of objects in memory that we referred to as the DOM (above picture). We can also create these tree of objects programmatically using vanila javascript. We don’t necessarily need HTML but using HTML is far simpler.
Important Point is most of the attributes of HTML elements have one to one mapping to properties of DOM object.

There are however few exceptions i.e. we’ve HTML attributes that don’t have representation in the DOM like colspan.
That’s why when we parse this template html markup of our component and create an actual DOM object for this td, the DOM object doesn’t have a property called colspan that’s why we get this error. So, colspan is unknown property for td in DOM.
Also we’ve properties in DOM that don’t have the representation in html i.e.
<h1 [textContent]=”name”></h1>
This [textContent] is the property of DOM object and in html we don’t have such an attribute. Now when using property binding, you should keep in mind that you’re actually binding to a property of DOM object not an attribute of HTML element. In 99% of cases, HTML attributes and DOM properties have 1 to 1 mapping but we’ve few exceptions here in there. So here we’re dealing with colspan attribute, if you wanna bind this attribute of the td element, you need slightly different syntax.
@Component({
    selector: 'courses',
    template: `
        <table>
            <tr>
                <td [attr.colspan]="colSpan"></td>
            </tr>
        </table>
    `
})

export class CoursesComponent {
    colSpan = 5;
}
We just use,
attr.colspan
In this way, you’re telling Angular that we’re targeting colspan attribute of an html element.
And now we don’t have any more errors in browser console.
Adding Bootstrap
Yes it is a very common question how to add the Bootstrap in Angular Project. Bootstrap is actually HTML, CSS, Javascript Framework which makes the modern look and feel in the web applications. It also helps the design to make it responsive. You can learn Bootstrap from here.
Now open Visual Studio Code Terminal and use npm to install the Bootstrap.
Statement: npm install bootstrap - -save
We add dash dash save (- - without space) flag here.
What it does, it first download bootstrap and stores it into node_modules folder but the save flag also adds bootstrap as a dependency in a package.json
You might be thinking about that the commands are case insensitive, that is not the case here. You’ve to name the package as it is mentioned in npmjs. Search in the search bar and when you find your package here, watch how to write the command in npm to install this package.

And then enter and next here is the procedure

Here you’ll get an idea how to install the package with npm. But if you’re trying wrong spellings or any letter is capital then you’ll face errors.

And even you’ll get an idea how to resolve it.
Let’s come to the point, Now our bootstrap 3 version has been installed.
Statement: npm install bootstrap@3.3.7 - -save

Now open the package.json. Here in the list of dependencies, we’ve the entry of bootstrap with version number.
"bootstrap": "^3.3.7",
But what does this (^) carot character means? This version consists of 3 numbers
major.minor.path
This carot character means that we can use the most recent major version. So we can use version 3.4, 3.5, 3.9 but if there is newer major version 4.0 or 5.0, we’re not gonna install that. We can upgrade to the most recent major version in this case, version 3.
What is the Benefit of Adding Entry In Package.Json?
When we check our application code to a source control management tool like git, we’re not gonna check in the node_modules folder. Node_Modules folder has tens of files which takes fair amount of space on the disk. So by listing all the dependencies inside package.json, anyone who can checkout this code from the source control repository. He can simply go to the terminal and install the packages with the help of this file.
Now we’ve downloaded bootstrap, and now we need to import its stylesheet into our styles.css. Open src > styles.css file, this is where we add global styles for our application. Here we gonna css import statement and add the path of bootstrap css file relative from node_modules folder.

dist for distributable. So we need to import this boostrap.css in our styles.css file.
@import "~bootstrap/dist/css/bootstrap.css";
And save the file. Now open the courses.component.ts and write the code as
@Component({
    selector: 'courses',
    template: `
        <button class="btn btn-primary">Save</button>
    `
})
And then run the application
Npm Command: ng serve
And it shows me this screen in browser.

Now let’s make it something right in the browser. Add some padding in styles.css
@import "~bootstrap/dist/css/bootstrap.css";
body{
    padding: 20px;
}
And save the file and after saving the file, here is the browser view.

And now it is much better.
Class Binding
Sometimes we need to add the additional classes based on some conditions i.e. we want to apply the active class on button element based on the state of underlying component, we use variation of property binding for that. So let’s start with property binding.
<button class="btn btn-primary" [class.active]>Save</button>
[Class.NameOfTargetClass] Now bind this with the field property in a component class.
@Component({
    selector: 'courses',
    template: `
        <button class="btn btn-primary" [class.active]="isActive">Save</button>
    `
})

export class CoursesComponent {
    isActive = true;
}
Save the file and back to the browser. Right click on Save Button and Inspect it,

Look here we’ve 3 classes. And if we change the value of isActive false in CoursesComponent and save the file
export class CoursesComponent {
    isActive = false;
}
Now we’ve 2 classes there.
We referred to this syntax is Class Binding.
[Class.NameOfTargetClass]=”Property”
Now let me clearify, we separate this class binding to the actual class attribute because we wanna add btn btn-primary classes all the time on the button. And the 3rd one is for dynamic case, if property true then it adds on otherwise it removes that’s why both of these attributes are separate.
Style Binding
We also have style binding which is again a variation of property binding but very similar to class binding. So back to our example, if we wanna apply some inline styles to this button based on some condition. We can write something like this,
[style.AnyPropertyOfStyleObjectInDOM]
For complete stuff of all the properties of DOM Style Object, search on Google (DOM style object properties) and you’ll see the first link of w3schools.
Now we wanna set this expression against any condition.
@Component({
    selector: 'courses',
    template: `
        <button [style.backgroundColor]="isActive ? 'blue' : 'white'">Save</button>
    `
})

export class CoursesComponent {
    isActive = false;
}
This is what we call styles binding.
Event Binding
We’ve learned a lot about property binding and its variations like class binding, attribute binding, style binding to add something in the DOM display data. In Angular, we also have event binding which we use to handle events raised from the DOM like keystrokes, mouse movements, clicks and so on. So here we’ve again simple button. And we’ll handle the click event of this button.
So here, now instead of using square brackets [] we use parenthesis () and here we add the name of the event and then we bind this to a method in our component.
import { Component } from '@angular/core';
import { CoursesService } from './courses.service';

@Component({
    selector: 'courses',
    template: `
        <button (click)="onClick()">Save</button>
    `
})

export class CoursesComponent {

    onClick() {
        console.log("Button was Clicked");
    }

}
Now click the button and you’ll see the message in the console.

Now sometimes we need to get access to the event object that was raised in the event handler i.e. with mouse movements, the event object will tell us the x and y position. If you want to get access to that event object, we need to add that as the parameter in the component method.
@Component({
    selector: 'courses',
    template: `
        <button (click)="onClick($event)">Save</button>
    `
})

export class CoursesComponent {

    onClick($event) {
        console.log("Button was Clicked");
    }

}
This $event object is something known to the Angular. In this case, we’re dealing with DOM object that’s the button. So this $event object will represent standard DOM event which we’ve seen in Javascript and JQuery.
Now let’s log this event.
export class CoursesComponent {

    onClick($event) {
        console.log("Button was Clicked", $event);
    }

}
And here is the values of standard DOM event object including many properties.
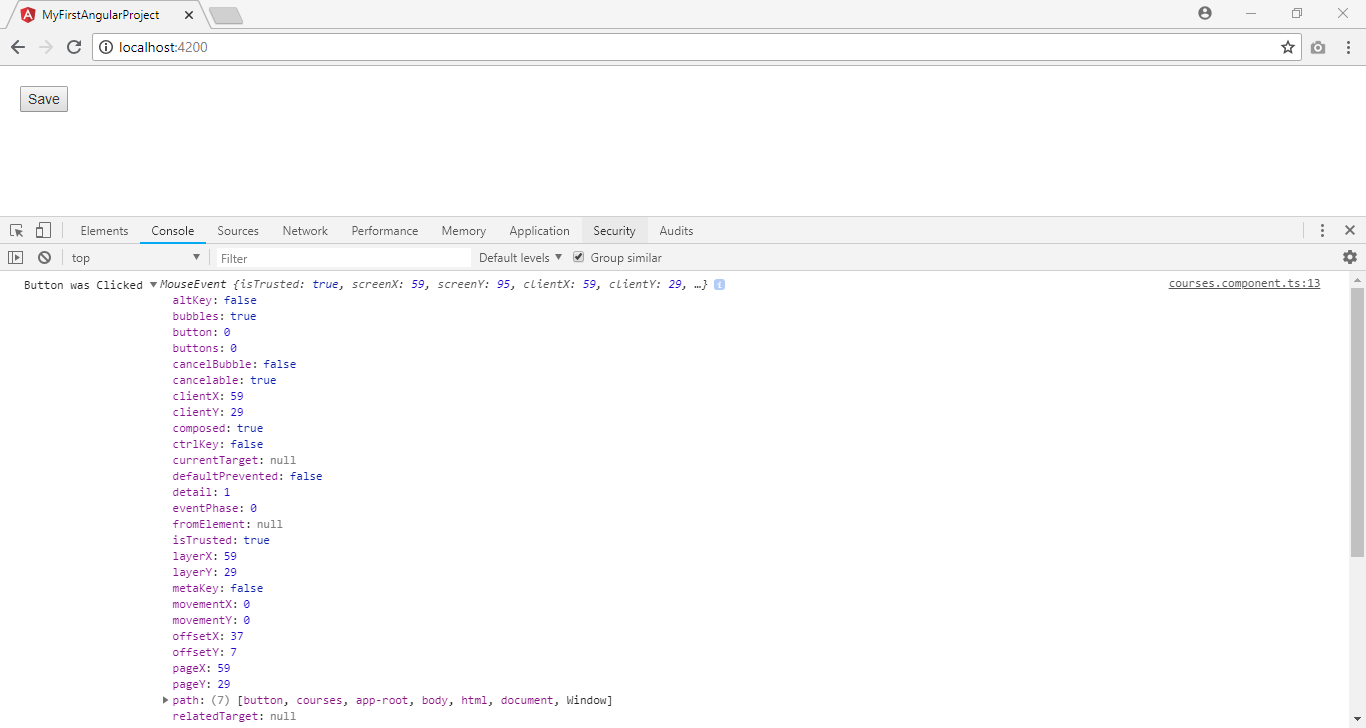
All the DOM events, all of the DOM tree unless handler along the way prevents further bubbling. This is just the standard event propagation mechanism in DOM, its not specific to Angular.
For example, wrap the button into the div and in this div wrap the click event and bind it, and log the message.
import { Component } from '@angular/core';
import { CoursesService } from './courses.service';

@Component({
    selector: 'courses',
    template: `
        <div (click)="onDivClicked()">
            <button (click)="onClick($event)">Save</button>
        </div>
    `
})

export class CoursesComponent {

    onClick($event) {
        console.log("Button was Clicked", $event);
    }

    onDivClicked(){
        console.log("Salam Muhammad!");
    }

}
Now save the file and click the button in the browser. Here you’ll see the 2 messages.

First message is for button event and the 2nd message is for div. This is what we call Event Bubbling.

Event bubbles up the DOM Tree. So to extend this example, we’ve another div or another element that contained this div and we handle the click event on that element, the event object will bubble up and hit the target handler.
How can we stop Event Bubbling?
export class CoursesComponent {

    onClick($event) {
        $event.stopPropagation();
        console.log("Button was Clicked", $event);
    }

    onDivClicked(){
        console.log("Salam Muhammad!");
    }

}
Again this is the standard method we’ve seen in Vanilla Javascript. This method is not gonna hit 2nd handler. Now save and try it.

Event Filtering
In Angular, we’ve this concept called Event Filtering. So here we’ve an input. Let’s say we handle the key of event, here we’ll use parenthesis as well.
@Component({
    selector: 'courses',
    template: `
        <input (keyup)="onKeyUp($event)" />
    `
})

export class CoursesComponent {

    onKeyUp($event){
    }

}
Here let’s say we wanna submit the form or perform some action only when the user press enter button.
export class CoursesComponent {

    onKeyUp($event){
        if ($event.keyCode === 13) {
            console.log("Enter Was Pressed");
        }
    }

}
This is the traditional way of doing this. But in Angular we’ve the better way to implement the exact same features. So we can apply the filters when handling the events.
import { Component } from '@angular/core';
import { CoursesService } from './courses.service';

@Component({
    selector: 'courses',
    template: `
        <input (keyup.enter)="onKeyUp()" />
    `
})

export class CoursesComponent {

    onKeyUp(){
        console.log("Enter Was Pressed");
    }

}
Now this onKeyUp method will only call when we only press the enter. And now we don’t any need to pass the event to the component function. And now it is much cleaner, let’s try it

Template Variables
Now continue with last example, let’s imagine we get the value that we typed into the input field. How can we do this?
There are 2 ways.
- One way is to use the event object
@Component({
    selector: 'courses',
    template: `
        <input (keyup.enter)="onKeyUp($event)" />
    `
})

export class CoursesComponent {

    onKeyUp($event){
        console.log($event.target.value);
    }

}
$event is the standard event object in DOM. It has a target property that references the input field and then we can get the value.
Now try this and here is the result

- In Angular, we’ve another way to solve the same problem. Instead of passing $event object around. We can declare the variable in template that references this input field.
@Component({
    selector: 'courses',
    template: `
        <input #username (keyup.enter)="onKeyUp(username.value)" />
    `
})

export class CoursesComponent {

    onKeyUp(username){
        console.log(username);
    }

}
So this technique makes our code clean. And in lots of cases we use template variables. And now it is working the same as before.
Two Way Binding
In the last example we are using username as parameter, but this approach is not so good. In OOP, we’ve objects we pass objects here and there. Because objects encapsulates data and some behavior. So if the object has all the data it needs, we don’t have to pass the parameters around. The last example we’ve implement is what we say Procedural Programming. We write this kind of code 30 years ago when we was don’t have OOP.
Imagine if we’ve field here in Component class then we don’t have to pass the parameter in the method.
export class CoursesComponent {
    username;
    onKeyUp(){
        console.log(this.username);
    }
}
And now it is much cleaner, easier to read, understand and maintain. Also if we going back to the definition of component in Angular, remember component encapsulates the data, logic and html markup behind of view. Here username field is used to encapsulates the data, and onKeyUp() method is the logic behind the view. And ofcourse, here we also have html template.
We’ve already learnt about property binding, so we can bind the value property of this input object in the DOM to this username field.
@Component({
    selector: 'courses',
    template: `
        <input [value]="username" (keyup.enter)="onKeyUp()" />
    `
})
And if we initialize the username with value.
export class CoursesComponent {
    username = "Usama Shahid";

    onKeyUp(){
        console.log(this.username);
    }

}
Now when we load the page, username input will be popup with this value.

But if we change the value here and press enter, it didn’t show you the changed value on the console.

Because of property binding, in property binding the direction of the binding is from component to view. So if the value in component field username changes in some point of time in future, the view will be notified and input field will automatically be updated.
Now we need slightly different binding, 2 way binding (from component to view and from view to component)
@Component({
    selector: 'courses',
    template: `
        <input [value]="username" (keyup.enter)="username = $event.target.value; onKeyUp()" />
    `
})
The value of event binding, we can write any expression like we write here. So here we’ve 2 statements. 1 for setting the username and other one is to call the function. Now let’s try this code

So with this implementation we’ve 2 way binding and this is the thing we may need in every application. We should not write all this repetitive code, for this purpose Angular has special syntax for implementing 2 way binding.
So instead of property binding syntax we use 2 way binding syntax. And here we bind ngModel. Now what is ngModel? Our input DOM object doesn’t have the property called ngModel, this is what Angular adds in this DOM object. We’ve already seen ngFor directive, which is used to manipulate the DOM and here we’re using another directive for 2 way data binding. So this implementation we’ve here is encapsulated in a generic way inside a directive called ngModel. And for this we don’t have to repeat our code everytime.
import { Component } from '@angular/core';
import { CoursesService } from './courses.service';

@Component({
    selector: 'courses',
    template: `
        <input [value]="username" (keyup.enter)="username = $event.target.value; onKeyUp()" />
        <input [(ngModel)]="username" (keyup.enter)="onKeyUp()" />
    `
})

export class CoursesComponent {
    username = "Usama Shahid";

    onKeyUp(){
        console.log(this.username);
    }

}
You can see the 2nd line is more cleaner and shorter than before. These 2 statements are just for the demo. Remove the first line and save the file and run the program. And here we got the error in the browser.

And it is already familiar error. So basically our input object doesn’t have the property called ngModel, something that Angular adds here. But why are we getting this error?
Angular framework consists of several different modules, in every module we’ve bunch of building blocks that are highly related. We’ve components, directives, pipes and these are highly related to each other. Not every application needs all the module in angular because when you bring all these modules, increase the code size. So this ngModel directive is defined in one of the modules called forms. And by default, it isn’t imported into the application. So if you use ngModel or you build any kind of form, you need to explicitly import this module.
Now open app.module.ts and here we’ve imports array which has BrowserModule is the built-in module of Angular, it brings some features which almost every browser application needs. Here we need to add FormsModule in import array
@NgModule({
  declarations: [
    AppComponent,
    CoursesComponent
  ],

  imports: [
    BrowserModule,
    FormsModule
  ],

  providers: [],
  bootstrap: [AppComponent]
})

export class AppModule { }
And import this statement as well here.
import { FormsModule } from "@angular/forms";
Now take a look on results and you’ll see our 2 way binding is working as it was working before.
Pipes
Another building block in Angular is Pipe. We use pipes to format data i.e. we’ve bunch of built-in pipes like.
- Uppercase
- Lowercase
- Decimal
- Currency
- Percent
We can create our own custom pipes, we’ll learn it later on. But first of all let’s see these built-in pipes in action. Here we’ve variables in template html.
@Component({
    selector: 'courses',
    template: `
        {{ courses.title }} <br />
        {{ courses.students }} <br />
        {{ courses.rating | number }} <br />
        {{ courses.price }} <br />
        {{ courses.releaseDate }} <br />
    `
})

export class CoursesComponent {
    courses = {
        title: "Object Oriented Programming",
        rating: 4.9785,
        students: 10000,
        price: 195.123,
        releaseDate: new Date(2018, 6, 16)
    }
}
Now how can we use the pipes to format our data.
Let’s start with title, suppose we wanna display it in uppercase. Apply the pipe operator and write the name of the pipe,

We can also chain multiple pipes here. The working scenario of multiple pipe statement is let’s suppose, this is the statement.
{{ courses.title | uppercase | lowercase }}
Now lowercase pipe will apply on the result of (courses.title | uppercase) this section.
Now look 10000 digit, to make it more readable we place the comma after every 3 digit like we do in decimal numbers. So here we’ll apply decimal pipe. The keyword of this decimal pipe is number, even though the actual class in number is called decimal pipe.
{{ courses.students | number }} <br />

Now the 3rd number is 4.979. Now with this number or decimal pipe, we’ve control over the integer digits as well as the number of digits after decimal point. So the syntax is,
{{ templatevariable | number:’NumberOfIntegerDigits.NumberOfMinDigits-NumberOfMaxDigits’ }}
{{ courses.rating | number:'1.1-2' }} <br />
And it shows us the result with round off the values.

Look it has also round off our value.
Now we’ve price property, and we need to format it with currency pipe.
{{ courses.price | currency }} <br />

Now if I want to apply multiple arguments in currency pipe, suppose we want to make it Australian Dollars And Show its symbol
{{ courses.price | currency:'AUD':true }} <br />
And here is the result of this statement.

And if we want to limit the total number of integers and decimals after fraction minimum and maximum number of digits.
{{ courses.price | currency:'AUD':true:'3.1-2' }} <br />
The purpose of these samples is just to aware you about different arguments of currency pipe.
And Finally we got releasedate. If you see the above image, you’ll know it is not so much readable for human. So here we need to apply date pipe
{{ templatevariable | date:’FormatOfDate’ }}
And if you want to see all the formats related to DatePipe. Open the Angular.io and search for DatePipe
Here you’ll know that it is defined in @angular/common library. And our project has this by default. And is defined in CommonModule, we haven’t see CommonModule before. We’ve only seen BrowserModule but when you import BrowserModule, it also brings in CommonModule. CommonModule has bunch of artifacts that all application whether there are browser application or not, required. Here in this page you’ll see all the formats available to you.
In AngularJS (1.x), we had 2 pipes or 2 filters more accurately for sorting and filtering data.
- orderBy
- filter
In Angular 2, we don’t have pipes due to some reasons. Because in Angular terms, these are expensive operations. That’s why Angular Team decide to drop these filters in Angular onward versions. That’s why they are not present now in current versions.
Custom Pipes
Here we’ll create the custom pipe which can summarize the text from a huge content. Here is our demo code,
@Component({
    selector: 'courses',
    template: `
        {{ text }}
    `
})

export class CoursesComponent {
    text = `
    Lorem Ipsum is simply dummy text of the printing and typesetting industry. Lorem Ipsum has been the industry's standard dummy text ever since the 1500s, when an unknown printer took a galley of type and scrambled it to make a type specimen book. It has survived not only five centuries, but also the leap into electronic typesetting, remaining essentially unchanged.
    `
}
Now let’s create the pipe named ‘summary’
{{ text | summary }}
Now generate the new file in app folder named ‘summary.pipe.ts’. Now in this file, we need to import couple of types from Angular.
1st one is Pipe Decorator function and the 2nd one is PipeTransform which is an interface that defines the shape of all pipes in Angular.
Now like other conventions of component and services, export the SummaryPipe class and here we need to implement PipeTransform interface.

Look it’s a compilation error because we’ve to implement the interface in class. But we don’t know the interface body. So come on to the Angular.io and search for PipeTransform and this is how PipeTransform interface is defined.
![]()
Now we need to follow this signature here in our class. Transform method should have 2 parameters one is value which is of type any and the other one is args which would be any type of array. And then finally we need to apply Pipe Decorator function here on the class and initialize the name property and fill the name property with the keyword that we have applied component template place.
import { Pipe, PipeTransform } from '@angular/core';

@Pipe({
    name: 'summary'
})

export class SummaryPipe implements PipeTransform {

    transform(value: any, args?: any) {
    }

}
And our component template code is
{{ text | summary }}
Now in export class, we’ll implement very basic summarizing algorithm with some basic validations.
export class SummaryPipe implements PipeTransform {

    transform(value: any, args?: any) {
        if (!value)
            return null;
    }

}
We already know that any type can be anything, if you want intellisense in VS Code then change the type to string.
And here is our code,
import { Pipe, PipeTransform } from '@angular/core';

@Pipe({
    name: 'summary'
})

export class SummaryPipe implements PipeTransform {

    transform(value: string, args?: any) {
        if (!value)
            return null;

        return value.substr(0, 50) + '...';
    }

}
Now save the file and run the application. But here you’ll see the blank screen with Pipe ‘summary’ not define Error in console. As we’re creating a custom pipe, so obviously we need to register it in app module as well. So open the app.module.ts and register the SummaryPipe in app module declarations. Declarations block is all about registering components and pipes. And auto import plugin automatically adds the reference of SummaryPipe.
  declarations: [
    AppComponent,
    CoursesComponent,
    SummaryPipe
  ],
Here is the code, if you’ve not installed auto import or VS Code. Then you can manually add the reference.
import { SummaryPipe } from './summary.pipe';
Now save the app module file and then again add a little space bar in SummaryPipe file to run the webpack for SummaryPipe file as well to generate the right compiled version of application. It’s the basic concept, libraries comes first and then the code written by us. Similarly, if you’ve compiled your code first but don’t include the libraries and then after adding libraries. Don’t expect the right compiled version has been generated, unless you libraries comes first and then our code.

Now let’s take it to the next level, back in the component I wanna be able to supply the argument here.
@Component({
    selector: 'courses',
    template: `
        {{ text | summary }}
    `
})
Let’s apply number of characters with summary.
{{ text | summary:10 }}
To implement this, let’s go to the SummaryPipe. And for more understandability, change the name of parameter and its type.
export class SummaryPipe implements PipeTransform {

    transform(value: string, limit?: number) {
        if (!value)
            return null;

        let actualLimit = limit ? limit : 50;
        return value.substr(0, actualLimit) + '...';
    }
}
Now run the application.

And it is working successfully. Now you might want more parameters in custom pipe then don’t worry just add the parameters in transform method and use them in the body later on.
transform(value: string, limit?: number, anotherValue?: string, name?: string)
{

}
What we’ve Learn
Now let’s build something on the basis of what we have learned in this complete article.
Task 1
You might have ever query your problems on Google and most of the time we get the stackoverflow results. In each question of stackoverflow, there is a feature to make any question featured.

Let’s build this star feature in Angular. How can we do it?
As we already discussed we use components for reusability purpose. Where we need this feature, we just call this specific component again and again. Let’s come to solution.
First of all let’s create the component with Angular CLI.
PS C:\Users\Ami Jan\Dummy> cd ./MyDummyProject/
PS C:\Users\Ami Jan\Dummy\MyDummyProject> ng g c star
Now open star.component.ts. As we’re changing the state of any question so bit/boolean datatype comes into our minds where we just make something true false or 0 1. So let’s make the boolean variable in star.component.ts
export class StarComponent implements OnInit {

  isFavorite: boolean;

  constructor() { }

  ngOnInit() {
  }

}
When we build the component through Angular CLI then boilerplate code contains the component selector as ‘app-NameofComponent’. Actually it helps to reduce the clash when we are using 3rd party libraries in Angular. But as we’re doing just for practice. So there is no issue if you remove app- prefix in the component selector.
@Component({
  selector: 'star',
  templateUrl: './star.component.html',
  styleUrls: ['./star.component.css']
})
Now save the component file and open its html file. If you open the bootstrap 3 site, here you’ll see the glyphicons in component section. Although they’re obsolete now in bootstrap 4 but if you’re using bootstrap 3 then you can easily use these glyphicons still now. And here we’ve star glyphicons so let’s use these glyphicon classes in our component html.
<span class="glyphicon"
      [class.glyphicon-star]="isFavorite"
      [class.glyphicon-star-empty]="!isFavorite"
></span>
Look here we’re using Property binding syntax to bind the isFavorite variable of star component. We’re already know that property binding just works in 1 way from component to view. So here we also event binding syntax to change the value of component variable as well and when the isFavorite variable updates its value then we can execute our both class binding properties successfully, if isFavorite is false then glyphicon-star-empty class attaches with html element if it is true then obviously glyphicon-star comes into the picture.
<span class="glyphicon"
      [class.glyphicon-star]="isFavorite"
      [class.glyphicon-star-empty]="!isFavorite"
      (click)="onClick()"
></span>
And now our star.component.ts code is
export class StarComponent implements OnInit {

  isFavorite: boolean;

  constructor() { }

  ngOnInit() {
  }

  onClick() {
    this.isFavorite = !this.isFavorite;
  }

}
Here our onClick() function updates the value on click event. If isFavorite was true then it becomes false and if it is false then it will become true. Now it is the time to consume our star component. So let’s open app.component.html and place the star component selector there.
<star></star>
Now save all the files and observe the results there. And yes it is working successfully as we expects.
2
Now let’s make something new by using custom pipes. Let’s make an input textbox where we write something and it prints as it is on the screen below to the textbox. But in the complete sentence we print our propositions in the lowercase and the remaining text will be capitalize each word.

Open app.component.html and paste the code,
<input type="text" [(ngModel)]="title" >

<br/>

{{ title }}
This is how we echo the code on the screen. You might be thinking that why I don’t make an extra component here. Because here we’re just displaying the data which we input in the textbox there is not any extra operation. Also make sure that you’ve imported the FormsModule in app.module.ts because ngModel is define in FormsModule. Now open the app.component.ts
import { Component } from '@angular/core';

@Component({
  selector: 'app-root',
  templateUrl: './app.component.html',
  styleUrls: ['./app.component.css']
})

export class AppComponent {
  title: string;
}
Here we define title variable which is of type string. Now we want to create a custom pipe where we code to format the data. So,
PS C:\Users\Ami Jan\Dummy\MyDummyProject> ng g p title-case
And here is our pipe code.
import { Pipe, PipeTransform } from '@angular/core';

@Pipe({
  name: 'titleCase'
})

export class TitleCasePipe implements PipeTransform {

  transform(value: string): any {
    if (!value)
      return null;

    let prepositions = [
      'of',
      'the'
    ];

    let words = value.split(' ');

    for (let i = 0; i < words.length; i++) {
      if (i > 0 && prepositions.includes(words[i].toLowerCase()))
        words[i] = words[i].toLowerCase();
      else
        words[i] = words[i].substr(0, 1).toUpperCase() + words[i].substr(1).toLowerCase();
    }

    return words.join(' ');
  }
}
English language has more that 40 prepositions but here we’re just dealing the things just for the learning and testing purpose. Let me elaborate you the code line by line.
    let prepositions = [
      'of',
      'the'
    ];
So this is the list of prepositions which we check in our complete sentence.
let words = value.split(' ');
split function actually returns an array of characters. In split function we provide the character where you’re breaking our sentence. As we’ve many whitespaces in a sentence so the sentence breaks into words and all the words comes into words variable in the form of array.
for (let i = 0; i < words.length; i++) {
      if (i > 0 && prepositions.includes(words[i].toLowerCase()))
        words[i] = words[i].toLowerCase();
      else
        words[i] = words[i].substr(0, 1).toUpperCase() + words[i].substr(1).toLowerCase();
}
And here we loop on the array elements length and check if propositions contains the word which we’ve in the counter of the loop (words[i]) then we make these words lowercase and assign it back to the position of element of array. And if the words doesn’t belongs to preposition array, we make its first letter uppercase and remaining letter lowercase. One more thing we’re not applying these changes of words if it is the starting of sentence so we use i > 0 to exclude this s
And now it is the time to apply the pipe on the element.
{{ title | titleCase }}
Now save all the files and test the program. And yes now it is working successfully. It is printing the complete words of sentence in capitalize except proposition words.
Conclusion
Here we’ve learnt a lot of things, we’ve seen different variation approaches of data binding even how we can bind classes, attributes, properties, style and events. We’ve learned how to add the package in the application and how to filter the events in the application. We’ve seen different programming approaches like procedural and Object Oriented. We’ve seen how to enable 2 way binding and how to format the data with pipes. And if in some situations we need to develop custom pipe. Then we’ve also develop a custom pipe as well. The most interesting concept of DOM vs HTML. Honestly speaking when I was writing it, personally I was enjoying this concept a lot. Event Bubbling is also so much useful, you should have a knowledge about it. This is how Javscript family languages work under the hood. Now we’ve a lot of experience with the things to display the data on the screen and how things works.