
Automating Code Deployment with Github and Azure
3.50/5 (6 votes)
Automating code deployment with Github and Azure
Today, we are going to learn how to deploy an ASP.NET Core application in Azure automatically from a Github repository.

Requirements
- Git installed + GitHub account
- Visual Studio 2015 Update 4 or higher (DotNet Core installed)
- Azure Subscription (create a free Azure account)
Creating an ASP.NET Core Application
Let's create a simple ASP.NET Core app using Visual Studio so we can deploy it in Azure.
- Open Visual Studio and go to File -> New Project -> Visual C# -> Web, then choose ASP.NET Core application (.Net Core Framework).

- Choose the Web Application template.

- Let's make some changes in Index.chtml file (Views/Home/Index.cshtml):

Uploading the Project to GitHub
Now let's create a new GitHub repository to upload our project.
- Go to Github and create a new repository

- Open the command line and go to the project directory
- Type
git init - Then,
git add .to add all the project files git commit -m "First commit"git remote add originhttps://github.com/saibimajdi/GithubAzure.git (change it to your repository)git push -u origin master
Now our project has been uploaded to GitHub. You can refresh the repository page to check if the project has been uploaded successfully.
Creating Azure Web Application
Now we should create an Azure Web Application to host our project.
- Go to http://portal.azure.com and create a new Azure Web App.

- Now let's give it a name and fill out the form and click the Create button.

- Wait until Azure completes the creation of our application.
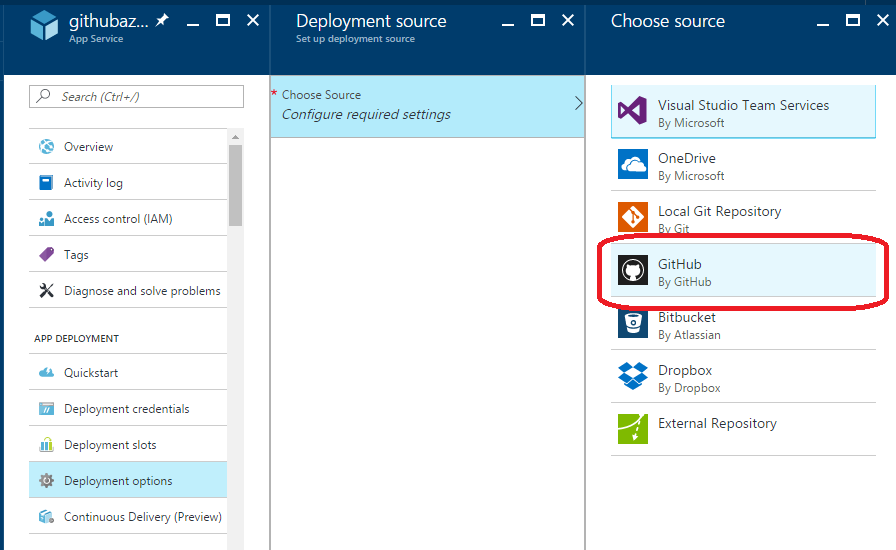
- Go to Deployment Options.

- Choose Github as a source, you can choose any other source such as One Drive, Dropbox or Bitbucket.
- Authorize Azure to use your Github account by entering your Github account credentials.

- Choose the project repository

- Choose the branch, in this case, we have only one branch (master):

- Now Azure is building your project to deploy it.

-

Voilà, our application has been deployed in Azure automatically from our Github repository, every time we make new commit to our repository, Azure will take the latest version from the master branch and deploy it.

Check out the video to understand more about automating code deployment with Github and Azure.
That's all for this article! I wish that you have learned something new. Feel free to contact me if there are any questions.