
Basic Setup of Fluent NHibernate
4.75/5 (4 votes)
Setup nhibernate and fluent mapping for an ASP.NET project
Introduction
What is ORM and NHibernate?
An ORM (Object-Relational Mapping) is a tool that provide a mechanism to map between your database table to OOP class and vice versa. That enables you to query and manipulate data from a database using an object paradigm. NHibernate is an open source ORM developed for C#. The following picture shows an abstract/high level overview of an ORM.
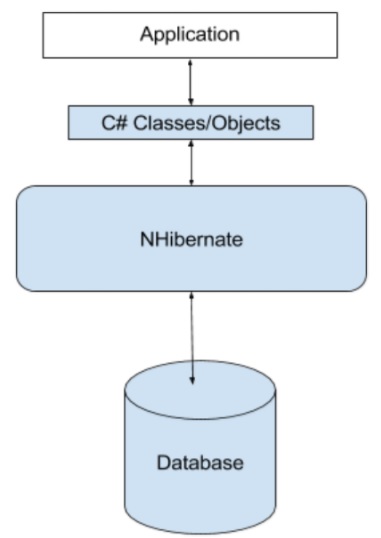
It's a library written in your language that encapsulates the code needed to manipulate the data, so you don't use SQL anymore, but directly an object of your language.
This article will give all that you need to get and modify data into a SQL database using NHibernate.
Step 1: Create the Database and Table
First, you need to create a database named "NHibernateDemo" in your local SQL DB. Then execute the following SQL-script to create a table named "Customer" and populate some data in it.
-- create a table name Customer
CREATE TABLE Customer(
    Id int IDENTITY(1,1) NOT NULL Primary Key,
    Name varchar(50) NULL,
    Email varchar(50) Null
    )

-- Populate some rows

Insert into Customer
values('Adam Hanter', 'a.hanter@abc.com'),
      ('Mark Moris', 'm.moris@abc.com')
Step 2: Create a Console App (.NET Framework) using Visual Studio
Open Visual Studio, then go to File->New->Project
It will open up the following dialog, then select the Console App and name your project and save it.

When the project is being created, it requires to install Nhibernate and Fluent. These can easily be done using Nuget package.
Right click on your solution/project, then Manage Nuget Packages for your solution.
In the search box, put NHibernate, then install it. Do the same for FluentNHibernate.
Once the NHibernate and Fluent libraries are added, your projects are ready to use its features.
Step 3: Create Your Entities/Classes
public class Customer
    {
        public virtual int Id {get; set;}
        public virtual string Name {get; set;}
        public virtual string Email{get; set;}
    }
Remember to add virtual keyword to your property, that is used by NHibernate that will create proxy at runtime to allow lazy load and whole branch of other stuffs.
Step 4: Create the Mapping (Entities to DB Tables)
Now you have to create a mapping entity for every entity/class created before that represents the heart of NHibernate. Any future change that happens on the entity should change the mapping too. For this mapping, Fluent is used here.
public class CustomerMapping : ClassMap<Customer>
    {
        public CustomerMapping()
        {
            Id(x => x.Id).GeneratedBy.Native();
            Map(x => x.Name);
            Map(x => x.Email);
        }
    }
Native() is used to support for auto generated key by the SQL Server.
Step 5: Create the NHibernate Configuration
    class NHibernateHelper
    {
        private const string CurrentSessionKey = "nhibernate.current_session";
        private static readonly ISessionFactory _sessionFactory;
        static NHibernateHelper()
        {
            _sessionFactory = FluentConfigure();
        }
        public static ISession GetCurrentSession()
        {
            return _sessionFactory.OpenSession();
        }
        public static void CloseSession()
        {
            _sessionFactory.Close();
        }
        public static void CloseSessionFactory()
        {
            if (_sessionFactory != null)
            {
                _sessionFactory.Close();
            }
        }

        public static ISessionFactory FluentConfigure()
        {
            return Fluently.Configure()
                //which database
                .Database(
                    MsSqlConfiguration.MsSql2012
                        .ConnectionString(
                            cs => cs.FromConnectionStringWithKey
                                  ("DBConnection")) //connection string from app.config
                                                    //.ShowSql()
                        )
                //2nd level cache
                .Cache(
                    c => c.UseQueryCache()
                        .UseSecondLevelCache()
                        .ProviderClass<NHibernate.Cache.HashtableCacheProvider>())
                //find/set the mappings
                //.Mappings(m => m.FluentMappings.AddFromAssemblyOf<CustomerMapping>())
                .Mappings(m => m.FluentMappings.AddFromAssembly(Assembly.GetExecutingAssembly()))
                .BuildSessionFactory();
        }
    }
Added the following section in the App.config file.
<hibernate-configuration xmlns="urn:nhibernate-configuration-2.2">
    <session-factory>
      <property name="dialect">NHibernate.Dialect.MsSql2012Dialect</property>
      <property name="connection.connection_string">
        Server=.;initial catalog=NHibernateDemo;Integrated Security=True
      </property>
      <mapping assembly="NhibernateDemo1" />
    </session-factory>
  </hibernate-configuration>
  <connectionStrings>
    <add name="DBConnection" connectionString="Server=.;Database=NHibernateDemo;
     Integrated Security=True;" providerName="System.Data.SqlClient" />
  </connectionStrings>
Step 6: Read and Write to the DB Table
class Program
    {
        static void Main(string[] args)
        {
            DisplayAllCustomers();

            //Add new Customer
            AddNewCustomer();
            Console.WriteLine("After adding new customer..");
            DisplayAllCustomers();

            Console.WriteLine("Press Enter to exit..");
            Console.ReadLine();
        }

        static void AddNewCustomer()
        {
            Customer cus = new Customer()
            {
                Name = "New Customer",
                Email = "n.customer@abc.com"
            };

            ISession session = NHibernateHelper.GetCurrentSession();
            try
            {
                using (ITransaction tx = session.BeginTransaction())
                {
                    session.Save(cus);
                    tx.Commit();
                }
            }
            finally
            {
                NHibernateHelper.CloseSession();
            }
        }
        static void DisplayAllCustomers()
        {
            ISession session = NHibernateHelper.GetCurrentSession();
            try
            {
                using (ITransaction tx = session.BeginTransaction())
                {
                    var customers = from customer in session.Query<Customer>()
                        select customer;

                    foreach (var f in customers)
                    {
                        Console.WriteLine("{0} {1} {2}", f.Id, f.Name, f.Email);
                    }
                    tx.Commit();
                }
            }
            finally
            {
                NHibernateHelper.CloseSession();
            }
        }
    }
Hope this article will give you the fundamentals of Fluent NHibernate. In my next article, I will discuss more about the relationship between tables and how to map them in Mapping. I would also discuss about Repository pattern and Unit Of Work pattern and how to use those with NHibernate.