Continuous Testing Components in Angular 5
Jan 26, 2018
7 min read
Javascript
AngularJs
by Manjunath Matathamana
Contributor
Just like its predecessors, Angular 5 was developed with testability in mind. Angular and the projects created using Angular CLI support two different types of testing out of the box. They are:
- Unit testing using Jasmine and Karma
- Functional testing (End-to-End testing) using Protractor
The difference between the two is that unit tests are used to test the logic of the components and services in isolation whereas end-to-end tests ensure that the application is functional in terms of user interactions simulated on a browser.
In this tutorial, I am going to introduce you to two popular frameworks for writing unit tests in Angular -- Karma and Jasmine.
Unit Testing in Angular Using Karma and Jasmine
Jasmine is an open source, behavior-driven testing framework whereas Karma is a test runner that sets the environment for continuously testing your application. Angular is no short of alternatives such as Jest, or Mocha for unit testing your application. Jest, for instance, is optimized and performs better than Karma. However, the performance benefits won’t be evident unless you are running a very large application. Jasmine and Karma are well documented because they are officially supported by the Angular team.
In addition to Karma and Jasmine, Angular has a library to create a test environment for your application. The library, popularly known as Angular testing utilities, comprises of API for classes such as TestBed and ComponentFixtures and other helper functions for running asynchronous tests.
Let’s get started.
Configuring Jasmine and Karma
Create a new project if you haven’t already. Here’s the directory structure of a newly created Angular 5 project.
.
+-- e2e
¦   +-- app.e2e-spec.ts
¦   +-- app.po.ts
¦   +-- tsconfig.e2e.json
+-- karma.conf.js
+-- package.json
+-- package-lock.json
+-- protractor.conf.js
+-- README.md
+-- src
¦   +-- app
¦   ¦   +-- app.component.css
¦   ¦   +-- app.component.html
¦   ¦   +-- app.component.spec.ts
¦   ¦   +-- app.component.ts
¦   ¦   +-- app.module.ts
¦   +-- assets
¦   +-- environments
¦   ¦   +-- environment.prod.ts
¦   ¦   +-- environment.ts
¦   +-- favicon.ico
¦   +-- index.html
¦   +-- main.ts
¦   +-- polyfills.ts
¦   +-- styles.css
¦   +-- test.ts
¦   +-- tsconfig.app.json
¦   +-- tsconfig.spec.json
¦   +-- typings.d.ts
+-- tsconfig.json
+-- tslint.json
If you’re going to run end-to-end tests, you should look out for the e2e directory. For unit tests, each component generates a .spec.ts file similar to that of app.component.spec.ts. Jasmine tests are called specs and all the test specs should be located in the src/app directory.
As a best practice, I'd suggest keeping the spec file close to its original component. This helps you keep track of things when the application grows. For instance, when you have hundreds of components, managing the specs can get out of hand. There are many ways that you can organize tests and components, but that's beyond the scope of this tutorial.
Another file that you should look out for is karma.conf.js. Karma test runner uses this to configure how it runs the tests and many other things. Let’s have a look at it.
// Karma configuration file, see link for more information
// https://karma-runner.github.io/1.0/config/configuration-file.html

module.exports = function (config) {
  config.set({
    basePath: '',
    frameworks: ['jasmine', '@angular/cli'],
    plugins: [
      require('karma-jasmine'),
      require('karma-chrome-launcher'),
      require('karma-jasmine-html-reporter'),
      require('karma-coverage-istanbul-reporter'),
      require('@angular/cli/plugins/karma')
    ],
    client:{
      clearContext: false // leave Jasmine Spec Runner output visible in browser
    },
    coverageIstanbulReporter: {
      reports: [ 'html', 'lcovonly' ],
      fixWebpackSourcePaths: true
    },
    angularCli: {
      environment: 'dev'
    },
    reporters: ['progress', 'kjhtml'],
    port: 9876,
    colors: true,
    logLevel: config.LOG_INFO,
    autoWatch: true,
    browsers: ['Chrome'],
    singleRun: false
  });
};
Although Chrome is the default browser for executing tests, I prefer to run my tests on the headless version of Chrome. It’s faster that way and you can work everything out within the terminal. To use Chrome Headless, you might have to install Puppeteer library first.
$ npm install puppeteer --save-devNow add the ChromeHeadless into the Karma configuration.
// karma.conf.js

process.env.CHROME_BIN = require('puppeteer').executablePath()

module.exports = function(config) {
  config.set({
    browsers: ['ChromeHeadless']
  })
}
You can also use this space to tie your application with a third party tool such as Sealights for automation testing or Jenkins for continuous integration.
Setting Up Code Coverage Reports in Karma
Code coverage tests describe how well your unit tests exercise your codebase. Code coverage gives you a measure of the degree of source code that gets executed when the tests are being performed. The higher percentage of code coverage means that you’ve covered almost all parts of the Angular project. Karma has a plug in for generating code coverage reports using Istanbul.
To set up a report for code coverage, follow the steps below:
- Install the
karma-coverageplug in.TEXTnpm install karma-coverage --save-dev - Add the module to the list of plugins in karma.config.js.
JSCRIPT
plugins: [ ... require('karma-coverage') ], - Include the files that you want to test into the
preprocessorobject. Since we want to primarily test the source code of components, I am going to include only those files that are necessary.JSCRIPTpreprocessors: { // source files, that you wanna generate coverage for // do not include tests or libraries // (these files will be instrumented by Istanbul) 'src/**/*.ts': ['coverage'] }, - Add ‘
coverage’ to thereportersarray.JSCRIPTreporters: ['progress', 'kjhtml', 'coverage'], - To generate the code coverage reports, run the following command:
TEXT
ng test --watch=false --code-coverage
A new directory will be created called coverage/ with an index.html file. Open that up in a browser, and you will find the coverage reports for your application.
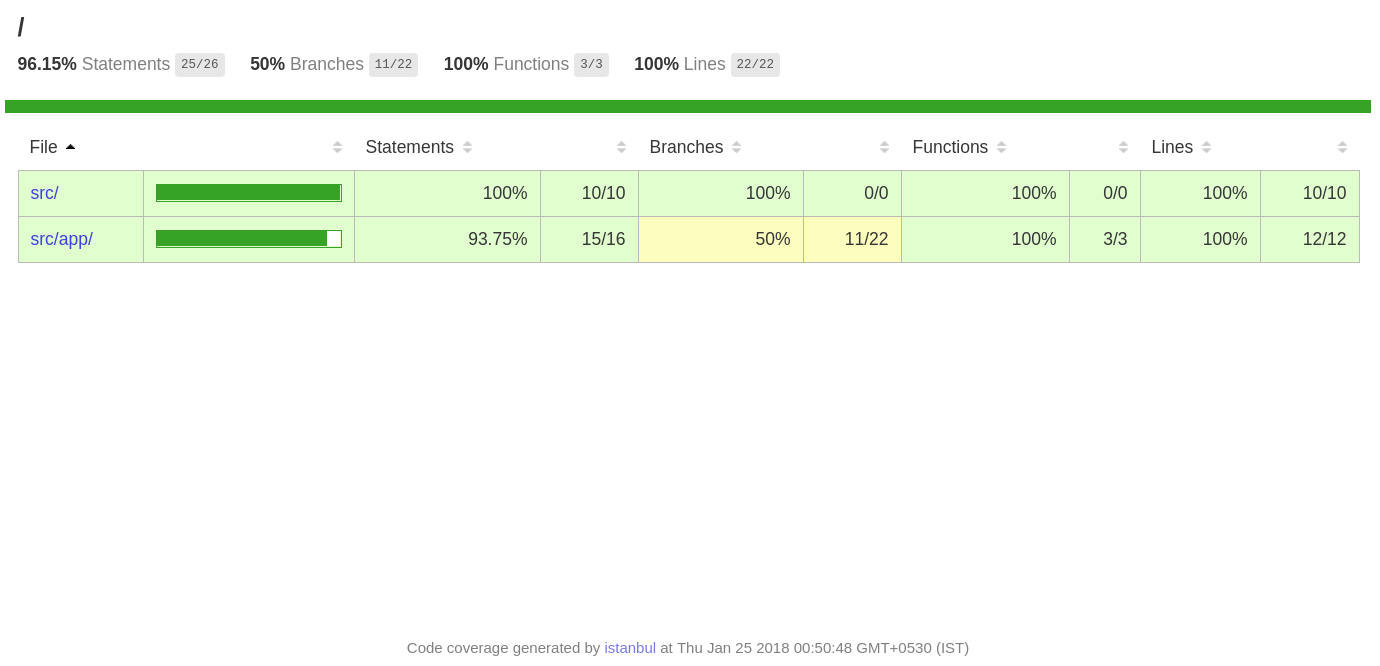
For more details on code coverage metrics, see this article.
Testing Angular Components—Basics
Create a new component and add something like this below:
import { Component } from '@angular/core';
@Component({
  selector: 'app-demo',
  template: '<h1>{{title}}</h1>'
})
export classDemoComponent {
  title = 'Testing Demo';
}
The corresponding tests for the DemoComponent should go into the demo.component.spec.ts.
Here is what the test suite needs to do:
- Load the component.
- Check whether the template has an
h1. - Verify that the
titleproperty makes its way to the template.
Describing Test Specs using Jasmine Framework
Each test suite has a describe block that tests a particular part of the application. You can use the first parameter to provide a meaningful title for the test suite. The second parameter accepts a function which is the actual test that we want to run.
describe('DemoComponent', () => {
// To be implemented
});
You can nest describe blocks one inside the other. This helps you divide the application into smaller units and each unit gets a describe block of its own.
describe('DemoComponent', () => {
  describe('Header'), () => {
  });

  describe('Footer'), () => {
  });
});
But the actual tests are executed inside an it block.
describe('DemoComponent', () => {
   it('should be true', () => {
     expect(true).toBeTruthy();
   });
 }
We’ve used an expectation function to match two values. The expect() function accepts a parameter called the actual value and is then chained to some matcher function. Although this might not make much sense right now, wouldn’t it be useful if we could do something like this?
it('should have a title', () => {
expect(component.title).toBeTruthy();
});
There’s another global function called beforeEach() that you should know of. Imagine that you have multiple it() blocks inside a single describe function. If you need to configure something before each test, you can use the beforeEach() method.
describe('DemoComponent', () => {

    beforeEach( () => {
       /* Before Each block */
     });

    it('should have a title'), () => {

    });

    it('should have the text'), () => {

    });
});
This helps to DRY up duplicate code because the beforeEach is called before each test is executed. There is another function called afterEach that gets executed after a particular test is executed.
The test specs are now readable and easy to understand even for someone without any background in testing. The structure and syntax described here are part of the Jasmine test framework. You can go through their documentation to understand Jasmine framework better.
Angular Testing Utilities
Moving forward, we need to test the DemoComponent. The obvious question is, how do we interact with the Angular environment? To make things easier, Angular provides a test utilities library that comprises of certain useful classes and functions. You can leverage the power of this library to simulate an Angular environment for the test suites.
Import the essentials from the Test utilities library.
import { async, ComponentFixture, TestBed } from '@angular/core/testing';The TestBed creates a test environment for your Angular application. In other words, you can create a NgModule class and configure it to simulate the actual AppModule that we need to test. TestBed has a configureTestingModule method that accepts a metadata object and you can use this metaobject to declare the component and other modules that we need to test.
   beforeEach(async(() => {
    TestBed.configureTestingModule({
      declarations: [ DemoComponent ]
    })
    .compileComponents();
  }));
The async() is part of the Angular testing utilities that we had imported earlier. We’ve used the async() function as an argument to beforeEach(). The async() function helps to run the code in an asynchronous fashion so that the code inside it is run asynchronously. The compileComponents() needs to fetch the template and the CSS from the disk and this is an asynchronous activity which is the reason why we’ve used async().
Now we need to extract an instance of the DemoComponent from the TestBed so that we can use it in our tests. To get an instance of a component, you can use the TestBed.createComponent(DemoComponent) method. It returns a component fixture and you can use this fixture to access the component instance.
 beforeEach(() => {
    fixture = TestBed.createComponent(SignupComponent);
    component = fixture.componentInstance;

    /*Debug element */
    de = fixture.debugElement.query(By.css('h1'));
    /* H1 element */
    el = de.nativeElement;

    fixture.detectChanges();
  });
Since TestBed doesn’t automatically trigger change detection, the component properties are pushed into the template only when you run fixture.detectChanges().
Now, add the following tests to verify the following test cases:
- The template should have a heading.
- The heading should be Demo Component.
- Changes in the
component.titleshould be reflected in the template.
Here’s the code for the tests:
it('should have a title', () => {
expect(el).toBeTruthy();
});

it('should display original title', () => {
  fixture.detectChanges();
  expect(el.textContent).toContain(comp.title);
});

it('should display a different test title', () => {
  comp.title = 'Test Title';
  fixture.detectChanges();
  expect(el.textContent).toContain('Test Title');
});
That’s it! If you’ve done everything right, all your test should pass.
Summary
Testing your application from the very beginning and continuously testing it until the end helps you ensure that your code is safe for production. In this tutorial, I’ve introduced you to the basics concepts of testing in Angular using Karma and Jasmine. Karma is configurable and you can change the browser, set up custom reports for code coverage and many other things. Finally, we wrote a few tests for a demo component.
I hope you’ve enjoyed the tutorial. Let me know your thoughts through the comments.
License
This article, along with any associated source code and files, is licensed under The Code Project Open License (CPOL)