
Creating SharePoint Framework Client Web Part and solving the challenges with _RequestDigest Token value using React
5.00/5 (1 vote)
This article shows how React can be used in SharePoint framework to solve the challenges posed by _RequestDigest when perform a POST operation in SharePoint.
Recently I decided to add React and Angular to my portfolio for developing solutions for SharePoint. I'm starting with React and it has been an interesting journey so far. I started with React because Angular 2.x/4.x which is a major leap from Angular 1.x seems to have a few challenges integrating with SharePoint framework as Andrew Connell explains here. Though these challenges are being addressed with the roll out of Angluar 5 as seen in another of Andrew Connell post: Solve the SharePoint Framework + Angular Challenge with Angular 5.0 Elements. But as for me, I have decided to wait until Angular 5 is stable for SharePoint framework so that my learning can be seamless.
In this post I will be sharing what I have learnt in my few days of using React in SharePoint framework to build client web part. If you are considering learning React to work with SharePoint framework, these are some of the key concepts you will first need to understand to get started:
- State
- Props (Properties)
- setState
- Constructor
- Event hanlers
- componentDidMount
I will not go into the theoretical definitions of these key keywords, but I will summarize my understanding of them and explain how they flow into each other. I will provide links at the end of these article for you to read more if interested.
State- generally, state is like variable, you can declare its datatype and you can initialize it. You declare its datatype in an interface and initialize it in the constructor. Note: In React, you don't have to write a separate interface to declare the datatype but in SharePoint framework you have to. Getting confused? Don't worry, I will explain this better with an example later.
Props- props simply stands for properties. In React, they are used to pass data down to child components and they are fixed unlike state that can be updated. We will see an example later.
setState- This is like a method or function that is called to set the state of an object. So if you need to update your variables, you do that with setState. Updates can come from input elements on the page or from any datasource.
Constructor- as stated above, constructor is where you initialize your state. The constructor is also often used to bind event handlers to the class instance.
Event handlers- These are triggers like onChange, OnSubmit etc
componentDidMount- This method gets executed after a component has been rendered or mounted. This is a good place to call a remote endpoint e.g making a Resful call via ajax request. It is also a good place to implement subscription. Our example will give show each of these in action. Note that there are also other methods like componentWillMount(), componentWillUnmount() etc. that we can work with.
Another thing you may want to learn is stylesheet development with sass/scss to style your react forms. As a developer, that may not be your interest. The good news is you can use regular CSS to style your form. If you are interested in converting it to scss format, you can use this online generator to do that.
Enough stories! Let us go straight to our example. In this example, we want to create a simple contact Us form to demonstrate how React can be used to address the challenges posed by _RequestDigest to retrieve request digest token.
The number one challenge I faced while developing the web part was trying to use $('#_REQUESTDIGEST).val() to retrieve the token value, but this threw my entire lines of code into red underlines, document.getElementById('_REQUESTDIGEST).value that has worked for me in the past did not work either.
The second problem is that the request digest token that is issued is valid for 30 minutes by default. 30 minutes should be enough to complete most forms. But what if you have a longer form or let's say your users may want to leave the form open and do some other things, that means if they don't get to complete the form within 30 minutes they will get error 403 forbidden because the token would have expired, and they will loose all the information they have entered. This will generate a lot of complaints from your users and you don't want that. So in this example, I will use React to solve these two problems. Note: This second challenge has been addressed in SharePoint framework with SPHttpClient as explained here. But the article does not provide enough explanation on how to use it. If you know how to or if there is an article with examples on the usage kindly share it in the comment section.
Let's start by creating a working folder called spfx in the root of our C drive
- Open command line and change directory to your C drive i.e. c:\>
- Type md spfx and change directory to the folder using cd spfx
- At the prompt, type yo @microsoft/sharepoint
- Follow the screenshot below to complete scaffolding your solution files

- When the scaffolding completes you will see a successful congratulations message like this

- On the command prompt, type npm install jquery --save and npm install @types/jquery --save one after the other. This installs jquery library and its typings in our solution
- Type code . to open your solution in Visual studio code
- Lets un-bundle our jquery library by externalizing it. Go to config and open config.json
- Modify the external section as follows

- Go to src > webparts > reactTester > components and open ReactTester.tsx
- In the import section at the top of the page, type import * as jQuery from 'jquery'
Now all is set for our contact us form. Firstly, lets define an interface for our state. We will call this IRequestState. Add the code below just above ReactTester class i.e. export default class ReactTester extends React.Component...

Here we declared five variables in this interface, namely: name, email, subject, message and formDigestValue. FormDigestvalue is the variable that will store our request digest token. Note: you could create a separate file for the interface and import it into the ReactTester.tsx file.
The next thing is to create a constructor and initialize our state. Add the constructor just below export default class ReactTester extends React.Component<ireacttesterprops> and modify the class as follows
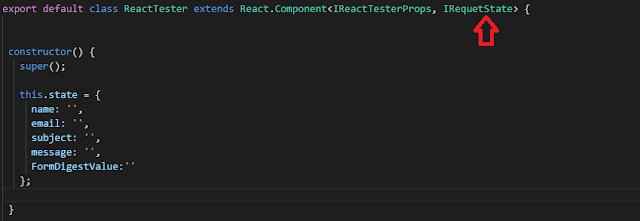
Notice how I have added IRequestState as parameter to the class - see the red arrow. If you don't do that you will see red underline in the constructor. Also note that I did not pass props as parameter to my constructor or super, this is because I don't require props to access any data in my constructor at this point.
Before creating event handlers, lets design our Contact Us form. We will call it Contact IT Department
Copy the code below and modify public render method in ReactTester.tsx as follows
public render(): React.ReactElement<IReactTesterProps> {
   return (

     <form >
     <h1>Contact IT Department</h1>
     <fieldset className={styles.formGroup}>
       <label htmlFor='formName' title='Full Name:' >Full Name:</label>

       <input id='formName' className='form-input' name='name' type='text' ref='formName' required onChange={this.handleChange} value={this.state.name} />
     </fieldset>

     <fieldset className={styles.formGroup}>
     <label htmlFor='formName' title='Full Name:' >Email:</label>
       <input id='formEmail' className='form-input' name='email' type='email' required onChange={this.handleChange} value={this.state.email} />
     </fieldset>

     <fieldset className={styles.formGroup}>
     <label htmlFor='formName' title='subject:' >subject:</label>

       <input id='formSubject' className='form-input' name='subject' type='text' required onChange={this.handleChange} value={this.state.subject} />
     </fieldset>

     <fieldset className={styles.formGroup}>
     <label htmlFor='formName' title='Full Name:' >Message:</label>

       <textarea id='formMessage' className='form-textarea' name='message' required onChange={this.handleChange}></textarea>
     </fieldset>

     <div className={styles.formGroup}>
       <input id='formButton' className={styles.btn} type='submit' placeholder='Send message' />
     </div>
   </form>

   );
 }
Then open ReactTester.module.scss. Replace its content with the styles below
// Variables
$color-grey: #eee;
$color-grey-light: #f5f5f5;
$color-primary: #ffab00;
$radius: 3px;

// Function
@function remy($value, $base: 16px) {
  @return ($value / $base) * 1rem;
}

// Mixins
@mixin transition($prop: all, $duration: .25s, $timing: cubic-bezier(.4,0,1,1)) {
  transition: $prop $duration $timing;
}

html {
  box-sizing: border-box;
  font-size: 16px;
}

*,
*:after,
*:before {
  box-sizing: border-box;
}

body {
  font: 100% 'Roboto', arial, sans-serif;
  background: $color-grey-light;
}

form {
  padding: remy(32px);
  margin-top: 2rem;
  margin-right: auto;
  margin-left: auto;
  max-width: remy(500px);
  background-color: #fff;
  border-radius: $radius;
  box-shadow: 0 15px 35px rgba(50,50,93,.1),0 5px 15px rgba(0,0,0,.07);
}

h1 {
  margin-top: 0;
  margin-bottom: 3.236rem;
  text-align: center;
  font-size: 1.618rem;
}

.formGroup {
  padding: 0;
  border: 0;

  & + & {
    margin-top: 1rem;
  }
}

label {
  display: inline-block;
  margin-bottom: .5rem;
  font-size: .75rem;
  text-transform: uppercase;
  touch-action: manipulation;
}

input,
textarea {
  display: block;
  padding: .5rem .75rem;
  width: 100%;
  font-size: 1rem;
  line-height: 1.25;
  color: #55595c;
  background-color: #fff;
  background-image: none;
  background-clip: padding-box;
  border-top: 0;
  border-right: 0;
  border-bottom: 1px solid $color-grey;
  border-left: 0;
  border-radius: $radius;
  @include transition;

  &:focus {
    outline: 0;
    border-bottom-color: $color-primary;
  }
}

textarea {
  resize: vertical;
}

.btn {
  display: inline-block;
  padding: .75rem 1rem;
  margin-top: 1.618rem;
  font-weight: 400;
  text-align: center;
  text-transform: uppercase;
  color: #fff;
  vertical-align: middle;
  white-space: nowrap;
  background-color: $color-primary;
  border: 1px solid transparent;
  box-shadow: 0 15px 35px rgba(50,50,93,.1),0 5px 15px rgba(0,0,0,.07);
  cursor: pointer;
  user-select: none;
  @include transition;

  &:focus,
  &:hover {
    background-color: lighten($color-primary, 13%);
    box-shadow: 0 18px 35px rgba(50,50,93,.1),0 8px 15px rgba(0,0,0,.07);
  }

  &:focus {
    outline: 0;
  }
}
Lets view the form. Save your changes and go to view on visual studio code, click Integrated terminal. In the Integrated terminal widow, type gulp build to build your solution. Then gulp serve to launch local workbench and add your web part. If all is fine your form should look like this

One thing you might want to do is fetching the current user details, full name and email so they don't have to type them in. Let's try to do that.
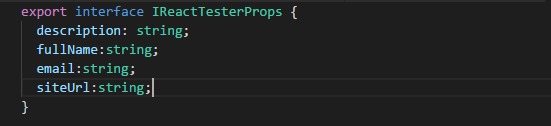
Open IReactTesterProps.ts and update as thus:
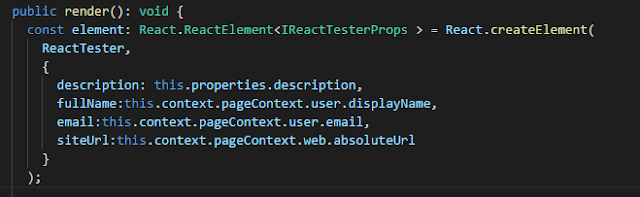
Then go to ReactTesterWebPart.ts and modify the public render() method as follows
To be able to access these properties from our ReactTester.tsx file, we will need to update our constructor by setting default values for name and email variables in the state initialization. Modify the constructor as follows
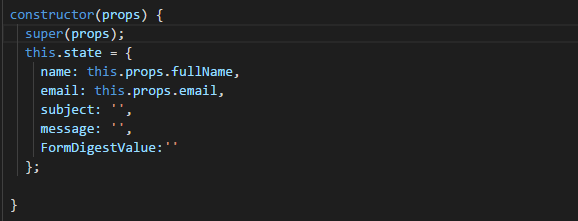
Note that I have now passed props as parameter to my constructor and super. This is because I now require props in my constructor. If you remember from my explanation above, I explained that props is used to pass data down to child components. This is an example of such. If don't add props as a parameter in your constructor, your web part will disappear and you will get the following similar error when you inspect your page in the browser. You can test it by removing props and try to load the web part. Note: As already mentioned, you don't have to add props if you won't need it in the constructor.

To test this, save your changes, this will automatically refresh your workbench. You should now see your form with user details

Before we go further in our code, lets create the custom list where the form will submit data to. In your SharePoint online, create a custom list and call it ContactList. Create the following fields-- type is single line of text for Full Name, Email and Subject and multiple line of text for Message. Note: I renamed the Title field to Full Name.

Now that we have created our list, lets go back to the code. Lets first create a method to get request digest token. Copy the code below and paste just below the constructor
private getAccessToken()
 {

     jQuery.ajax({
         url: this.props.siteUrl+"/_api/contextinfo",
         type: "POST",
         headers:{'Accept': 'application/json; odata=verbose;', "Content-Type": "application/json;odata=verbose",
        },
         success: (resultData)=> {

           this.setState({
             FormDigestValue: resultData.d.GetContextWebInformation.FormDigestValue
           });
         },
         error : (jqXHR, textStatus, errorThrown) =>{
         }
     });
 }
Explanation: I made a POST ajax request to _api/contextinfo, set the header and then pass the result data into the FormDigestValue variable using setState i.e setState({FormDigestvalue: resultData.d.GetContextWebInformation.FormDigestValue}). Request digest token is generated by and stored on FormDigestValue field. You can also retrieve other fields such as FormDigestTimeoutseconds, field storing the timeout session in case you want to manipulate timeout session in your code. But I will use a different approach for this. If you have fiddler, you can see more when you make a request to _api/contextinfo. You will see something like this
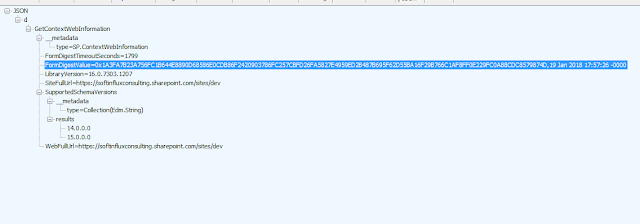
Hint: notice the JSON result...it cascades from d > GetContextWebInformation >FormDigestValue. This is the reason why the result data is set as resultData.d.GetContextWebInformation.FormDigestValue. If you want to retrieve FormDigestTimeoutseconds for instance, it will be resultData.d.GetContextWebInformation.FormDigestTimeoutseconds.
Next, lets create our event handlers, handleChange and handleSubmit and bind them in the constructor. Copy the code below and paste it below getAccessToken method:
private handleChange = (e) => {
   let newState = {};

   newState[e.target.name] = e.target.value;

   this.setState(newState);
 }
 private handleSubmit  (e) {
  e.preventDefault();

  let requestData = {
    __metadata:
    {
        type: "SP.Data.ContactListListItem"
    },
    Title: this.state.name,
    Email: this.state.email,
    Subject: this.state.subject,
    Message: this.state.message

  };
  if (requestData.Title.length < 1 || requestData.Email.length < 1 || requestData.Subject.length < 1 || requestData.Message.length < 1) {
    return false;
  }

  jQuery.ajax({
    url:this.props.siteUrl+ "/_api/web/lists/getByTitle('ContactList')/items",
      type: "POST",
      data: JSON.stringify(requestData),
      headers:
      {
          "Accept": "application/json;odata=verbose",
          "Content-Type": "application/json;odata=verbose",
          "X-RequestDigest": this.state.FormDigestValue,
          "IF-MATCH": "*",
          "X-HTTP-Method": "POST"
      },
      success:(data, status, xhr) =>
      {
         alert("Submitted successfully");
      },
      error: (xhr, status, error)=>
      {
         alert(JSON.stringify(xhr.responseText));
      }
  });

  this.setState({
    name: '',
    email: '',
    subject: '',
    message: ''
  });
}
Explanation: In this code block, I created a reusable handler (i.e. handleChange) to handle changes to the form input elements using target value. In the handleSubmit handler, I made an ajax POST request to our contact list (ContactList) that we created earlier, set X-RequestDigest in the header to FormDigestValue to retrieve the request digest token. Note: If you try to use ('#_REQUESTDIGEST).val() here it won't work. I then reset the form fields back to empty strings using setState.
Now update the constructor by adding the following lines after this.state={....}; code block but before the closing brace for the constructor:
this.handleSubmit=this.handleSubmit.bind(this);

this.handleChange=this.handleChange.bind(this);
We do this to bind our handlers to their respective class instance. p;p;
Still in Reacttester.tsx file, update the form element in the public render with onSubmit attribute as follows
<form onSubmit={this.handleSubmit}>
     <h1>Contact IT Department</h1>
     <fieldset className={styles.formGroup}>
       <label htmlFor='formName' title='Full Name:' >Full Name:</label>
        ....
        ......
        .....
        .
        .

   </form>
With this you are done. If you deploy the web part, it will work fine. But there is a challenge; as mentioned earlier, the request digest token expires after 30 minutes, and what if this is a long form and users may need to do some other things in between while filling the form. A scenario like this can elongate the filling process. The challenge is that the form will timeout while users are still completing the form; and when they try to submit they get error 403 forbidden. To address this challenge, we will use componentDidMount() method to subscribe to our getAccessToken method.
Lets create a variable called timerID i.e. var timerID. Put this just above export default class ReactTester....
Then copy and paste the lines of code below under handleSubmit method
public componentDidMount() {
   this.getAccessToken();
   timerID=setInterval(
     () =>this.getAccessToken(),1770000);
}
public componentWillUnmount()
{
 clearInterval(timerID);

}
Explanation: In the componentDidMount method, I first called getAccessToken method to generate the initial request digest token which expires in 30 minutes. I then used setInterval to subscribe to getAccessToken method again, but delay the execution for about 29 minutes (i.e. 1770000 milliseconds) , this ensures that I get a new token before the initial value expires. This repeats every 29 minutes and the result is stored in timerID variable.
Lastly I implemented conmponentWillUnmount() method to clear the timer. This is necessary to avoid performance issue. This simply says, clear the timer when component unmounts i.e. when you navigate away from the component.
With this you are good to go. Your entire code should look like this:
import * as React from 'react';
import styles from './ReactTester.module.scss';
import { IReactTesterProps } from './IReactTesterProps';
import { escape } from '@microsoft/sp-lodash-subset';
import * as jQuery from 'jquery';

export interface IRequetState{
   name: string;
     email: string;
     subject: string;
     message: string;
     FormDigestValue:string;
 }

 var timerID;
export default class ReactTester extends React.Component<IReactTesterProps, IRequetState> {


 constructor(props) {
   super(props);
   this.state = {
     name: this.props.fullName,
     email: this.props.email,
     subject: '',
     message: '',
     FormDigestValue:''
   };
   this.handleSubmit=this.handleSubmit.bind(this);
   this.handleChange=this.handleChange.bind(this);
 }
 private getAccessToken()
 {

     jQuery.ajax({
         url: this.props.siteUrl+"/_api/contextinfo",
         type: "POST",
         headers:{'Accept': 'application/json; odata=verbose;', "Content-Type": "application/json;odata=verbose",
        },
         success: (resultData)=> {

           this.setState({
             FormDigestValue: resultData.d.GetContextWebInformation.FormDigestValue
           });
         },
         error : (jqXHR, textStatus, errorThrown) =>{
         }
     });
 }
 private handleChange = (e) => {
   let newState = {};

   newState[e.target.name] = e.target.value;

   this.setState(newState);
 }
 private handleSubmit  (e) {
  e.preventDefault();

  let requestData = {
    __metadata:
    {
        type: "SP.Data.ContactListListItem"
    },
    Title: this.state.name,
    Email: this.state.email,
    Subject: this.state.subject,
    Message: this.state.message

  };
  if (requestData.Title.length < 1 || requestData.Email.length < 1 || requestData.Subject.length < 1 || requestData.Message.length < 1) {
    return false;
  }

  jQuery.ajax({
    url:this.props.siteUrl+ "/_api/web/lists/getByTitle('ContactList')/items",
      type: "POST",
      data: JSON.stringify(requestData),
      headers:
      {
          "Accept": "application/json;odata=verbose",
          "Content-Type": "application/json;odata=verbose",
          "X-RequestDigest": this.state.FormDigestValue,
          "IF-MATCH": "*",
          "X-HTTP-Method": "POST"
      },
      success:(data, status, xhr) =>
      {
         alert("Submitted successfully");
      },
      error: (xhr, status, error)=>
      {
         alert(JSON.stringify(xhr.responseText));
      }
  });

  this.setState({
    name: '',
    email: '',
    subject: '',
    message: ''
  });
}
 public componentDidMount() {
   this.getAccessToken();
   timerID=setInterval(
     () =>this.getAccessToken(),300000);
}
public componentWillUnmount()
{
 clearInterval(timerID);

}

 public render(): React.ReactElement<IReactTesterProps> {
   return (

     <form onSubmit={this.handleSubmit}>
     <h1>Contact IT Department</h1>
     <fieldset className={styles.formGroup}>
       <label htmlFor='formName' title='Full Name:' >Full Name:</label>

       <input id='formName' className='form-input' name='name' type='text' ref='formName' required onChange={this.handleChange} value={this.state.name} />
     </fieldset>

     <fieldset className={styles.formGroup}>
     <label htmlFor='formName' title='Full Name:' >Email:</label>
       <input id='formEmail' className='form-input' name='email' type='email' required onChange={this.handleChange} value={this.state.email} />
     </fieldset>

     <fieldset className={styles.formGroup}>
     <label htmlFor='formName' title='subject:' >subject:</label>

       <input id='formSubject' className='form-input' name='subject' type='text' required onChange={this.handleChange} value={this.state.subject} />
     </fieldset>

     <fieldset className={styles.formGroup}>
     <label htmlFor='formName' title='Full Name:' >Message:</label>

       <textarea id='formMessage' className='form-textarea' name='message' required onChange={this.handleChange}></textarea>
     </fieldset>

     <div className={styles.formGroup}>
       <input id='formButton' className={styles.btn} type='submit' placeholder='Send message' />
     </div>
   </form>

   );
 }
}
To test your solution, save all your changes. This should automatically refresh your workbench if you still have gulp serve running. Otherwise, run gulp serve again from the Integrated terminal.
Now go your SharePoint developer site, and navigate to workbench by appending _layouts/15/workbench.aspx to you site name. click the plus + sign to add your web part. Your web part should automatically retrieve your name and email. See the screenshot below:

Complete the rest of the form and hit the submit button. If everything works fine, you should get an alert message that your form was submitted successfully.
Note: You can change the timer to test how componentDidMount helps to refresh the token. Try changing it to 5 minutes i.e. 3000 milliseconds and use fiddler to monitor the changes.
I hope you will find information contained in this post useful. Please do leave me a comment if you see anything you want me to correct or explain better. Thanks for reading.