
How to extract overlapped polygons and calculate the overlapped area and write an API for it?
5.00/5 (6 votes)
extract overlapped polygons and calculate the overlapped area and write an API for it

Introduction
Nowadays, the most systems are enabled with the spatial components which let the users to see the location of objects in a GIS environment in addition to attribute data and generate a GIS-based report. Today organization managers need in addition to the usual reports, at GIS-Base reports. These reports show a good vision to the managers for making right decisions.
Background
To make this article useful, You should be familiar with the following concepts and software.
GIS, WPS, ARC Map, Esri JavaScript, API, Jquery, IIS, SQL Server, TSql, Visual Studio
Using the code
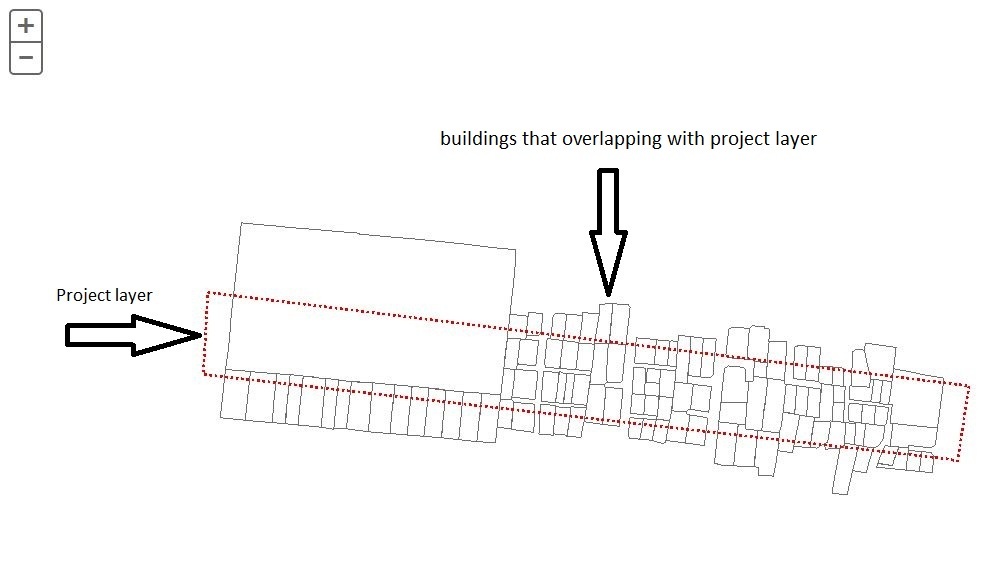
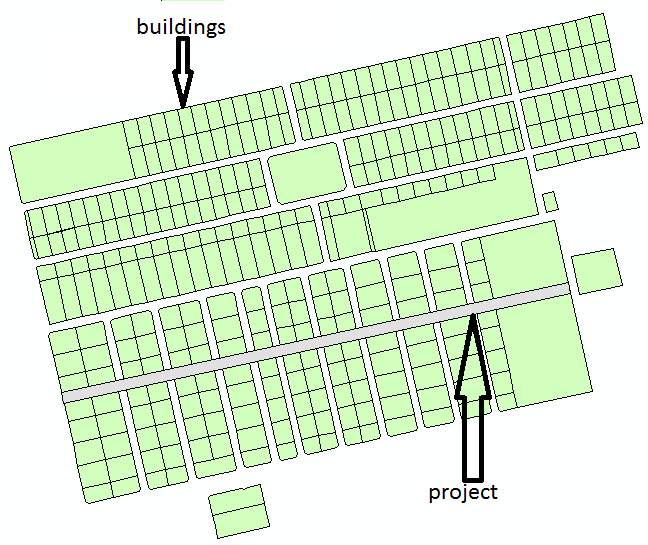
Assume a new street is going to be constructed in your neighborhood in your city. The new street intersects with many buildings that should be destroyed. To do so, at first the municipality should design the boundary of this street and check the buildings which are completely subject to destruction or may be destructed partly in order to buy the housed from their owners or prepare a new place for their occupants. In this case, we can consider the new street boundary a big polygon and the intersected buildings or parcels as small polygons.
This project effects on buildings that overlapping with it. Now, project manager ask you a Web API that implement this scenario.
Solution
- Step 1 : Create Database in ArcMap
On ArcMap click CTRL+F then in Search window type Create Enterprise Geodatabase. Choose first item. A window it’s shown.

Fill all field. You can choose SqlServer, Oracle or PostgreSQL in Database platform. I choose SqlServer. Instance field is for IP address server and Database is Geodatabase name will be created on SqlServer. Enter sa and sde password and enter in Authorization File path of license. In my case this path is “C:\Program Files (x86)\ESRI\License10.2\sysgen\keycodes”.
At the end click OK. A GeoDataBase will be created in SqlServer.
Another way to create Geo database this’s use SqlServer (you can use another DBMS). Open Microsoft SqlServer and create database. I naming this database “GeoDB”

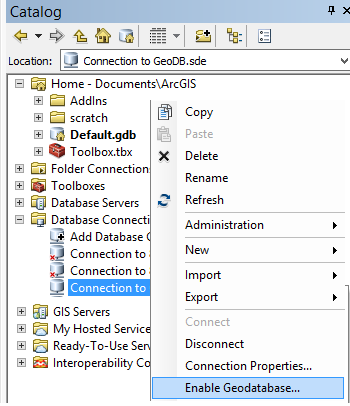
In ArcGIS select Option Enable Geodatabase. With this action some object like table and store procedure and function create by ArcGIS in GeoDB for management Geodatabase.
I don’t offer this way at all.
- Step 2 : Create feature class in ArcGIS
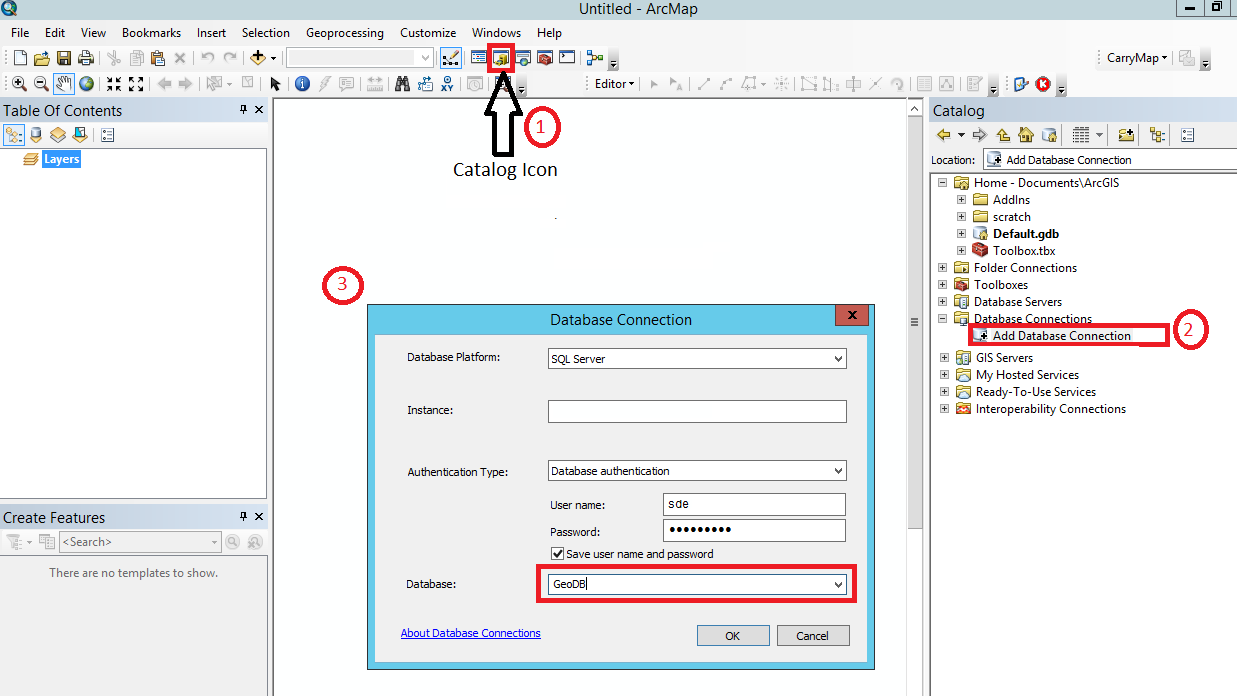
Open ArcGIS (I use 10.2.2 version) and then click on the catalog icon in standard toolbar.
If you can’t see catalog icon right click on menu bar then select Standard sub menu.
In the Database connections group in catalog, double click on Add Database connections.
A popup window (Database Connection) appears. In this window enter user and pass for connect to database you create in SqlServer (GeoDB).
A connection added to Database connection group in catalog window. I renamed this connection to “Connection to GeoDB”.
Right click on “Connection to GeoDB” and select New and then select Feather Dataset.
A window with name New Feather Class appears.
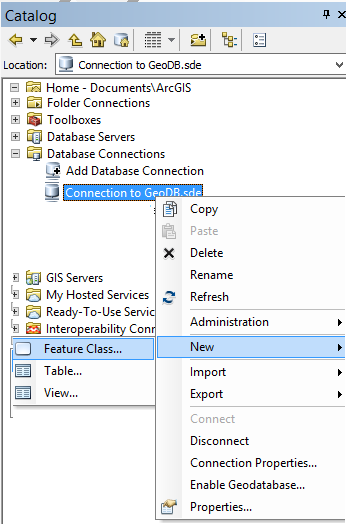
Right click on “Connection to GeoDB” and select New and then select Feather Class.
A window with name New Feather Class appears.
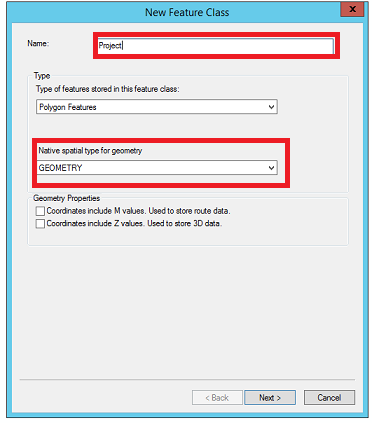
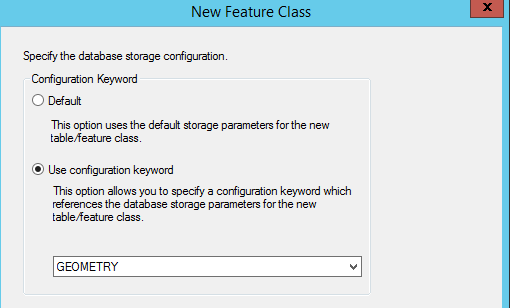
A window Appears. Enter feature dataset Name and click Next and Finish. I enter “city”for feature dataset. In the city feature dataset right click and select New and feature class. In window that appears enter Project as name for feature class and then click next. In next step select “Use configuration keyword” and in combo box select “GEOMETRY”. If you ignore this point data in geodatabase store as “int” not “GEOMETRY”. In next step enter attribute to add to Project feature class. By default ArcGIS add two attribute. Named is OBJECTID and SHAPE. I add another attribute. Its name is “ProjectName”. At the end click finish.
Notice that every feather class in ArcGIS map to a table in database and every attribute in feather class map to field in table.
Feather dataset use for grouping feather classes.
Like above add tow feature class. First that’s name is “Building” and second is “BuildingsOnTtheWay”.
So we have three layer (Feather class)
| Feather Layer (Layer or Table in db) | Description | Attribute (Field) |
| Project | This layer specifies projects of city | OBJECTID |
| SHAPE | ||
| ProjectName | ||
| Building | This layer specifies Buildings of city | OBJECTID |
| SHAPE | ||
| BuildingName | ||
| BuildingsOnTtheWay | Result of wps service (I explain this service in the following) | OBJECTID |
| SHAPE | ||
| Area | ||
| OnTtheWayArea |
- Step 3 : Add polygon to layers(Project, Building)
In ArcMap, in Catalog window (1) drag and drop Project Layer and Building Layer to Table Of Content (2) window.
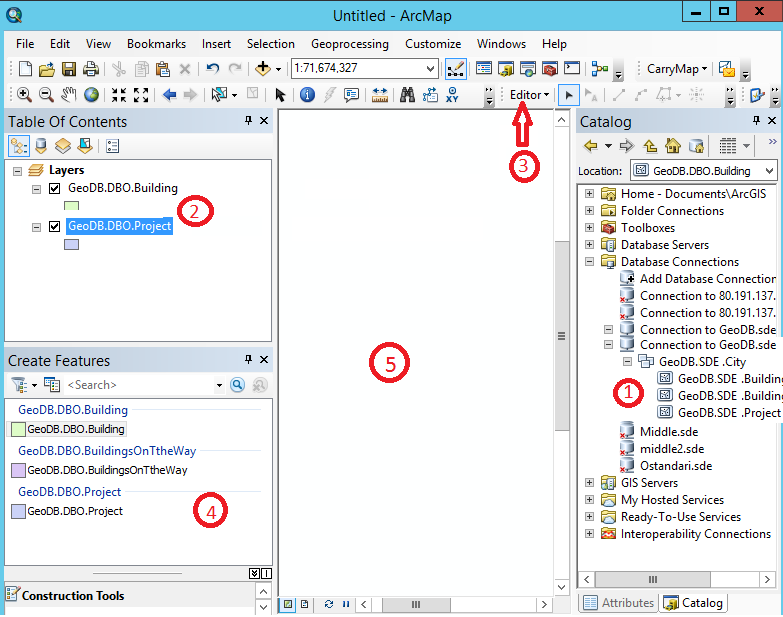
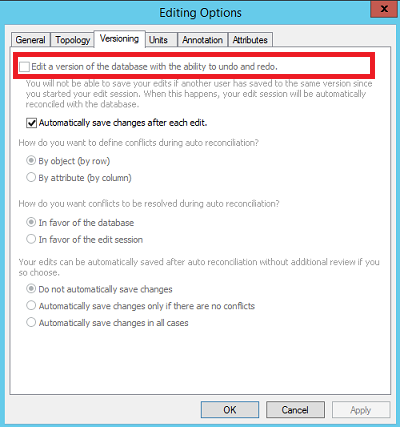
Click on Editor (3) and select option Menu. Take tice sign from “Edit a version of the database with the ability to undo and redo” in Versioning tab and then click ok.
One more time click on Editor (3) and select Start Edit. In the Create Feather (4) window select Building feature class.
If you don’t see Create Feature window, follow this path
Editor->Editing’s Windows->Create Feather
In middle window (5) start drawing polygons. This polygons specifies the scope of the Buildings in city.
- Step 4 : Write TSQL Select to extract overlapped polygons and calculate the overlapped area of these buildings
Microsoft SqlServer has a method named is STIntersects. This function get a shape field and return overlapped polygons.
delete BUILDINGSONTTHEWAY

declare @PeojectShape geometry
select @PeojectShape=p.SHAPE from PROJECT p where p.OBJECTID = 412

Insert BUILDINGSONTTHEWAY(OBJECTID, SHAPE,TotalArea,OnTtheWayArea)
       select ROW_NUMBER() over (order by objectid) ObjectID, b.SHAPE,b.SHAPE.STArea() TotalArea,  @PeojectShape.STIntersection(SHAPE).STArea() asOnTtheWayArea
       from dbo.BUILDING b where b.SHAPE.STIntersects(@PeojectShape)=1
You see the result below when you run sql select.

Create procedure and put this select into it. I naming this procedure sp_ReturnPolygon.
You can complete OGC Methods on Geometry Instances in Microsoft Website.
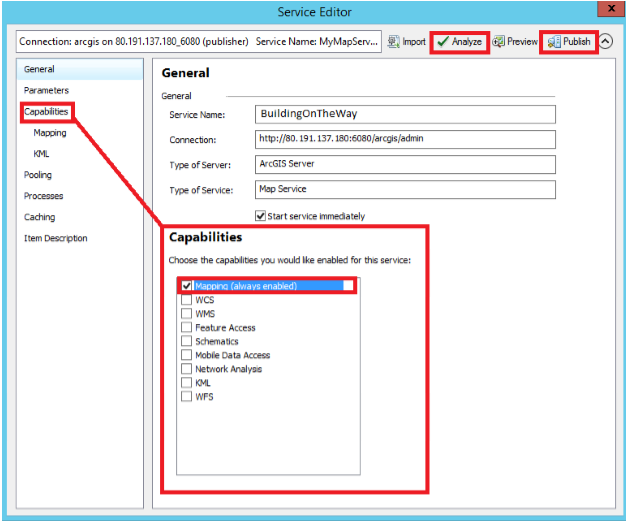
- Step 5 : Publish a WFS service on ArcGIS sever
In ArcMap, in Catalog window drag and drop Project Layer and BuildingsOnTtheWay Layer to Table Of Content window. Follow this path File/Share As/Service.
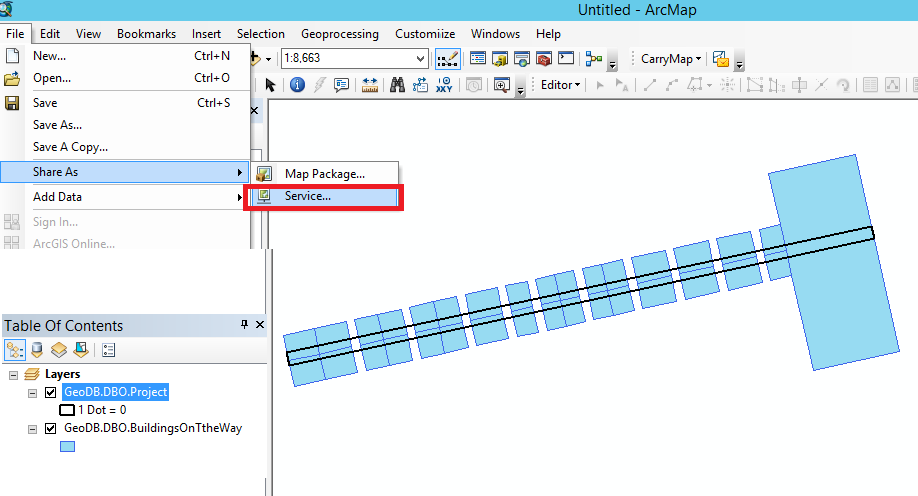
A window appear. Chose publish a service (1) and click Next. Click browse button (2) and select Publish GIS Service (3). Click Next and enter connection property (4). Click Finish and enter name for folder (5). I enter MainService for folder Name. Click Continue (6).
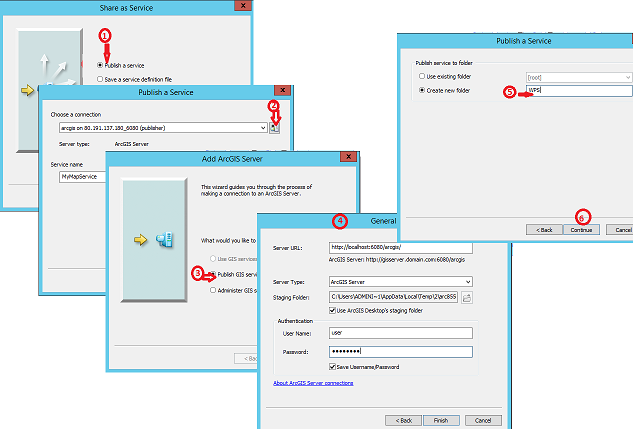
Select Capabilities on the right hand side and check out Mapping and WFS. Click Analyzes. If you did not any error or high warning, then click Publish.
I explain about solve error or high warning in next article.
This is address of WFS service:
http://localhost:6080/arcgis/rest/services/MainService/BuildingOnTheWay/MapServer.
- Step 6 : write an API
Open Visual Studio 2015. Select File/New/Project. A window appear.
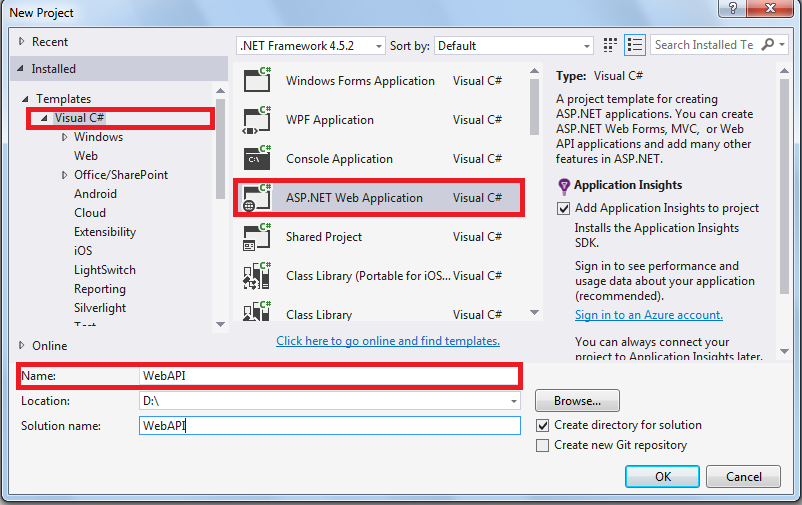
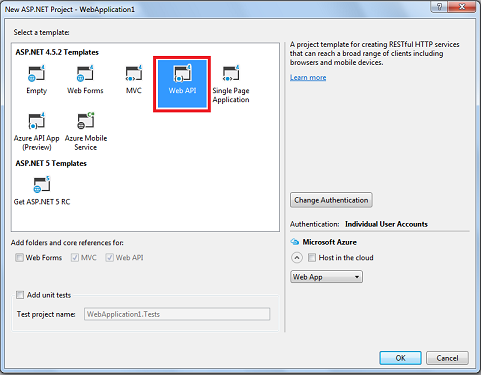
In New Project window select Visual C#/ASP.NET Web Application. Enter WebAPI for Name. Click OK. Another window appear, select Web API then click OK.
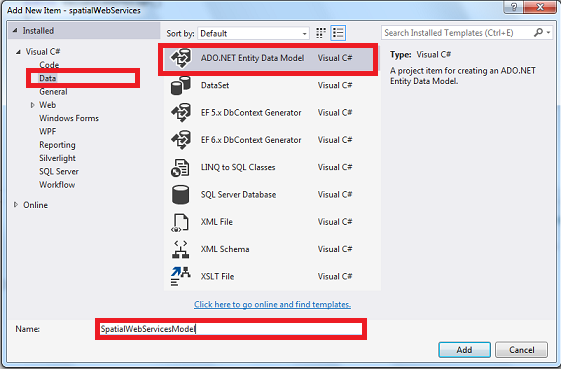
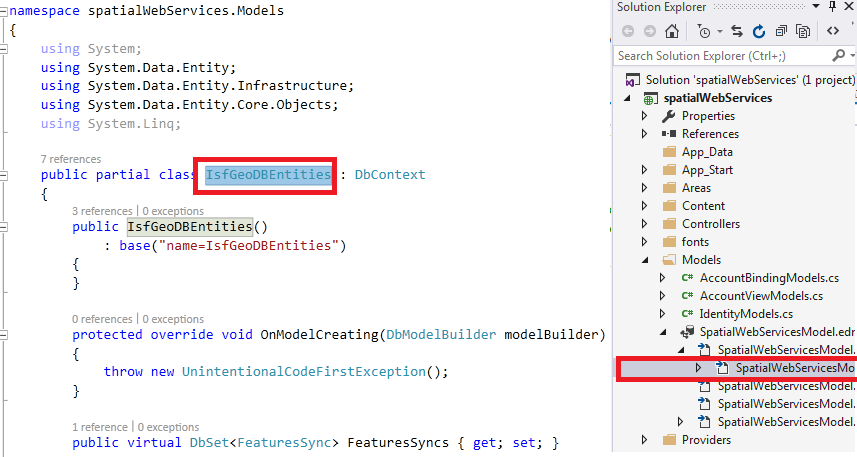
In Solution Explorer write click on Models folder and select Add/New Item. In the window that appears select Data/ADO.NET Entity Data Model. Complete the Name field with SpatialWebServicesModel. Click OK.
Write click on middle window and select Update Model from Database.
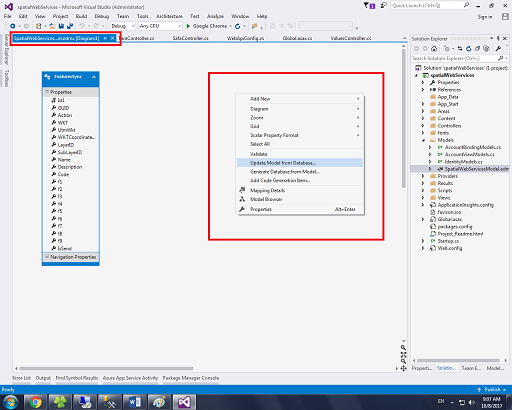
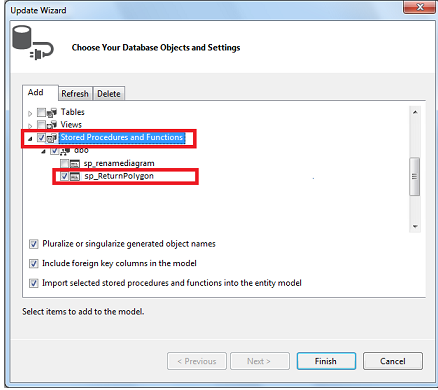
Create a connection to database and select a procedure (sp_ReturnPolygon) that you created in Step 4. Click Finish and Save all change.
In Solution Explorer select Controller folder, write click and select Add/Controller.
Select Web API 2 Controller – Empty. Click Add.
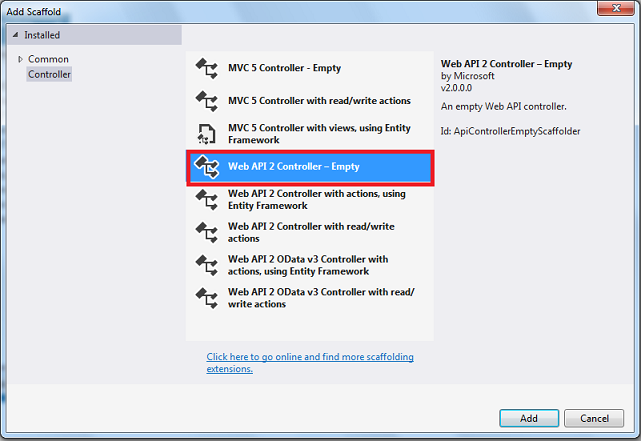
Leave controller name (DefaultController) on next window and click OK.
You have a function map to procedure (sp_ReturnPolygon) in Database. By default the function name equal with procedure name. Now we have to write a Web API and call sp_ReturnPolygon function.
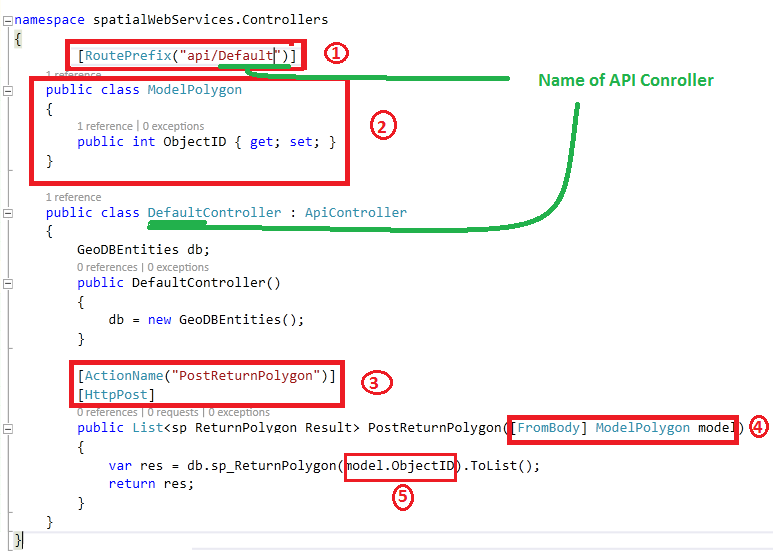
So Write this Code in DefaultController.
GeoDBEntities db;
        public DefaultController()
        {
            db = new GeoDBEntities();
        }

        [HttpGet]
        public List<sp_ReturnPolygon_Result> IsPointWithinPolygon()
        {
            var res = db.sp_ReturnPolygon().ToList();
            return res;

        }
Please pay attention Web API in .NET accept only model (class). So if your function (sp_ReturnPolygon) has a parameter and type of API is Post, you must first create a class and set a property for it, then pass this class to API method and inside API method pass Class property to sp_ReturnPolygon function.
Look at below picture
- Step 7 : Publish Web API on IIS
In Solution Explorer right click on project name and select Publish.
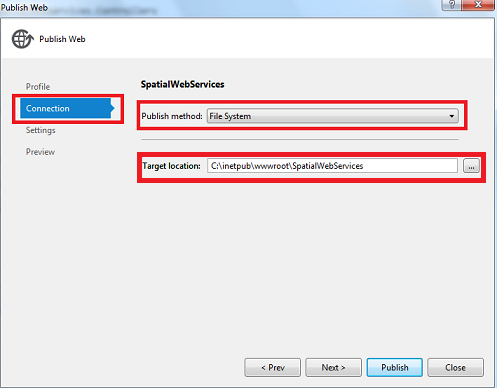
On the right hand side select Connection and then select File System from combo box. Select Target location and at the end click Publish.
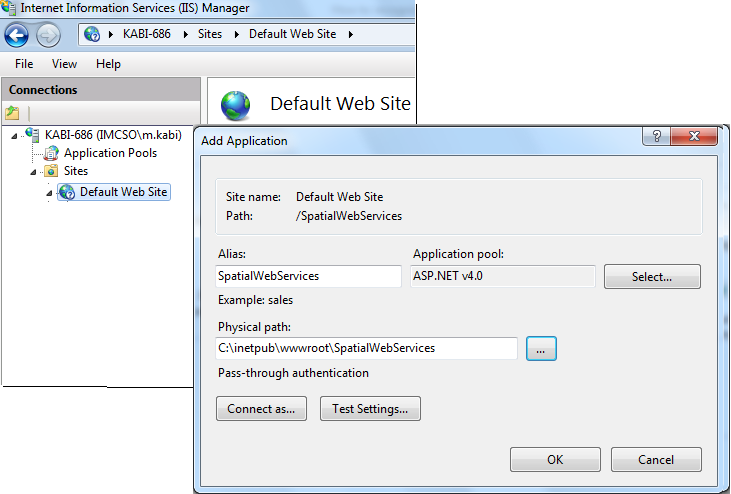
Open IIS (in windows 7, 8, 10 type IIS on search box at start button)
Right click on Default Web Site and select Add Application. In New window fill Alias textbox. With browse button, select the folder where the project has been published. Select Application pool “ASP.Net v4.0”.At the end click OK.
- Step 8 : Use Web API and WFS Service
Open Notepad++ and right below code.
    $(document).ready(function () {
        $.ajax({
            type: "POST",
            url: 'http://localhost/SpatialWebServices/PostReturnPolygon',
            contentType: "application/json; charset=utf-8",
            data: JSON.stringify({ 'objectID': 412 }),
            success: function (res) {
                //In the result is attributes
                //
                var urlWFS = 'http://localhost:6080/arcgis/rest/services/MainService/BuildingOnTheWay/MapServer'
                var map = new esri.Map(nameDivMap);
                var layer = new esri.layers.ArcGISDynamicMapServiceLayer(urlWFS);
                map.addLayer(layer);
            },
            error: function (e) {
                console.log(e.error);
            }
        });

    });
Save as HTML and run html file with browser.
I will be glad to have your feedback