
Continuous Integration using TeamCity & Docker for ASP.NET Core
5.00/5 (3 votes)
How to use Docker and TeamCity to implement continuous integration for ASP.NET Core applications. Continue reading...
Note: Please read the previous posts before continuing with this one, I discuss the basics of Docker and show how to deploy a simple and multiple applications using Docker. In this post, I will use the code from first post and demonstrate continuous integration with TeamCity.
Problem
How to use Docker and TeamCity to implement continuous integration for ASP.NET Core applications.
Solution
First, we need to setup TeamCity. Since I like Docker, I’ll setup TeamCity within Docker too, using the below docker-compose.yml, just run docker-compose up from the path where this compose file is located:
version: '3.1'

services:
    teamcity:
        image: jetbrains/teamcity-server:2017.1.4
        volumes:
            - teamcity-server-datadir:/data/teamcity_server/datadir
            - teamcity-server-logs:/opt/teamcity/logs
        ports:
            - 8111:8111
    teamcity-agent:
        image: jetbrains/teamcity-agent:2017.1.4
        volumes:
            - /var/run/docker.sock:/var/run/docker.sock
        environment:
            SERVER_URL: http://teamcity:8111

volumes:
    teamcity-server-datadir:
    teamcity-server-logs:
This will pull images and start TeamCity on localhost:8111, go through the simple steps to configure TeamCity.
Once TeamCity is running, configure an Agent. Click the “Agents” link (top menu), go to Unauthorized, click on the agent from a list and click Authorize Agent button:

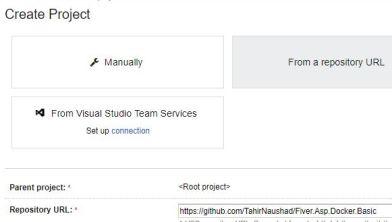
Next, create a new project by clicking Projects link (top menu):

Choose “From a repository URL” and paste the link to your repository:
Type name for your build configuration, I’ve left as default:

Next, you’ll be asked to configure build steps, click the link “configure build steps manually”:

Next, choose “Command Line” as Runner Type and add custom script that uses Docker to build images:

Note: This assumes that the Dockerfile is in the root of solution folder. See the source code on GitHub for reference.
Save and click Run button on top-right to test the build step:

Once the build is complete, you could view the logs:

Run docker images command to view the image created by TeamCity:

Run a container based on this image:
docker run --rm -it -p 8080:80 naushadt25/fiver:ci-1
Browse to http://localhost:8080/api/movies to test the application.
Now, make changes to your application and commit. TeamCity will kick off a new build:

And once the build is complete, you’ll have another image:

You now have multiple versions of your applications to test, run and deploy. Below, I ran the two versions on two different ports:


When I was playing with this, I accidentally broke tests for my application and TeamCity didn’t build (as a result, no image was created):

With very little effort, we are able to package multiple versions of our application, thanks to Docker.
Note: For more complex scenarios, you could use a docker-compose.yml to run your applications rather than docker run command.