
Getting Started with ASP.NET Core and Angular4 using WEB API
4.90/5 (6 votes)
In this article, let’s see how to get started with ASP.NET Core and using Web API.
Introduction
In this article, let’s see how to get started with ASP.NET Core and using Web API.

Prerequisites
Make sure you have installed all the prerequisites in your computer. If not, then download and install all, one by one.
- First, download and install Visual Studio 2017 from this link.
- Download and install .NET Core 1.0.1.
- Download and install Node.js v4.0 or above. I have installed V6.11.2 (Download link).
First download and install Visual Studio 2017.

Select depend on your need and install the Visual Studio 2017 on your computer. If you have already installed Visual Studio 2017, then skip this part.

Once installed, you can open the Visual Studio 2017 to create your first ASP.NET Core and Angular4 application.

Using the Code
Create a Database and Table
We will be using our SQL Server database for our WEB API and EF. First, we create a database named StudentsDB and a table as StudentMaster. Here is the SQL script to create Database table and sample record insert query in our table. Run the below query in your local SQL server to create Database and Table to be used in our project.
USE MASTER
GO

-- 1) Check for the Database Exists .If the database is exist then drop and create new DB
IF EXISTS (SELECT [name] FROM sys.databases WHERE [name] = 'StudentsDB' )
DROP DATABASE StudentsDB
GO

CREATE DATABASE StudentsDB
GO

USE StudentsDB
GO

-- 1) //////////// StudentMasters

IF EXISTS ( SELECT [name] FROM sys.tables WHERE [name] = 'StudentMasters' )
DROP TABLE StudentMasters
GO

CREATE TABLE [dbo].[StudentMasters](
        [StdID] INT IDENTITY PRIMARY KEY,
        [StdName] [varchar](100) NOT NULL,
        [Email]  [varchar](100) NOT NULL,
        [Phone]  [varchar](20) NOT NULL,
        [Address]  [varchar](200) NOT NULL
)

-- insert sample data to Student Master table
INSERT INTO [StudentMasters]   ([StdName],[Email],[Phone],[Address])
     VALUES ('Shanu','syedshanumcain@gmail.com','01030550007','Madurai,India')

INSERT INTO [StudentMasters]   ([StdName],[Email],[Phone],[Address])
     VALUES ('Afraz','Afraz@afrazmail.com','01030550006','Madurai,India')

INSERT INTO [StudentMasters]   ([StdName],[Email],[Phone],[Address])
     VALUES ('Afreen','Afreen@afreenmail.com','01030550005','Madurai,India')


     select * from [StudentMasters]
Now it’s time to create our first ASP.NET Core and Angular4 application.
Step 1 - Create an ASP.NET Core Empty Project
After installing all the prerequisites listed above, click Start >> Programs >> Visual Studio 2017 >> Visual Studio 2017 on your desktop. Click New >> Project. Select Web >> ASP.NET Core Angular 2 Starter. Enter your project name and click OK.

Select Empty Project and click OK, if you have installed ASP.NET Core 2.0, then you can chose ASP.NET Core 2.0.

After creating ASP.NET Core Angular 2 application, wait for a few seconds. You can see the empty project was created successfully.

Step 2 – Enable MVC and StaticFiles
Since we have created as the empty project, now we need to enable our project to work with WEB API and also to run the html files for displaying the Angular result, we need to enable the StaticFiles. For this, right click on your project and click edit your project.csproj.

We can see our csproj file will be opened for edit.
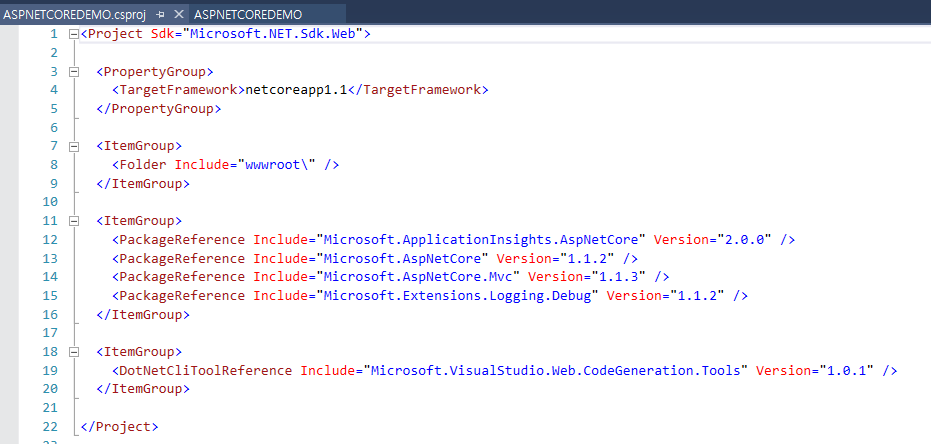
Now add this 2 below code part for enabling the MVC and StaticFile Packages to our project.
<PackageReference Include="Microsoft.AspNetCore.Mvc" Version="1.1.2" />
    <PackageReference Include="Microsoft.AspNetCore.StaticFiles" Version="1.1.1" />
Now your code part will look like below:

Save the csproj file. After saving, all the dependency will be installed to our project for working with WEB API.
Step 3 - Work with Database Connections
Adding Connection String
To add the connection string with our SQL connection, open the “appsettings.json” file. Yes this is a JSON file and this file looks like the below image by default.

In this appsettings.json file, add our connection string:
"ConnectionStrings": {
    "DefaultConnection": "Server=YOURDBSERVER;Database=StudentsDB;
     user id=SQLID;password=SQLPWD;Trusted_Connection=True;MultipleActiveResultSets=true;"
  },
Note change the SQL connection string as per your local connection.

The next step is we create a folder named “Data” to create our model and DBContext and Model class.

Create Model Class for Student
We can create a model by adding a new class file in our Data folder. Right click the Data folder and click Add>Click Class. Enter the class name as StudentMasters and click Add.

Now in this class, we first create property variable, add student. We will be using this in our WEB API controller.
using System;
using System.Collections.Generic;
using System.Linq;
using System.Threading.Tasks;
using System.ComponentModel.DataAnnotations;

namespace Angular2ASPCORE.Data
{
    public class StudentMasters
    {
  [Key]
  public int StdID { get; set; }

  [Required]
  [Display(Name = "Name")]
  public string StdName { get; set; }

  [Required]
  [Display(Name = "Email")]
  public string Email { get; set; }

  [Required]
  [Display(Name = "Phone")]
  public string Phone { get; set; }

  public string Address { get; set; }
 }
}
Create Database Context
DBContext is Entity Framework Class for establishing connection to database
We can create a DBContext class by adding a new class file in our Data Folder. Right click Data folder and click Add>Click Class. Enter the class name as ASPNETCOREContext and click Add.

In this class, we inherit DbContext and created Dbset for our students table.
 public class ASPNETCOREContext : DbContext
 {
  public ASPNETCOREContext(DbContextOptions<ASPNETCOREContext> options)
   : base(options)
  {
  }

  public DbSet<StudentMasters> StudentMasters { get; set; }
 }
Step 4 - Edit Startup.cs File
Open the Startup.cs file
Now in Startup.cs file, we need add the MVC DbContext to Service and also to set the default open HTML page like below:
public void ConfigureServices(IServiceCollection services)
        {
   services.AddMvc();

services.AddDbContext<ASPNETCOREContext>(options =>
      options.UseSqlServer(Configuration.GetConnectionString("ASPNETCOREContext")));
  }

        // This method gets called by the runtime.
        // Use this method to configure the HTTP request pipeline.
        public void Configure(IApplicationBuilder app, IHostingEnvironment env,
                              ILoggerFactory loggerFactory)
        {
   app.Use(async (context, next) => {
    await next();
    if (context.Response.StatusCode == 404 &&
     !Path.HasExtension(context.Request.Path.Value) &&
     !context.Request.Path.Value.StartsWith("/api/"))
    {
     context.Request.Path = “index.html";
     await next();
    }
   });
   app.UseMvcWithDefaultRoute();
   app.UseDefaultFiles();
   app.UseStaticFiles();
  }
Step 5 - Create Web API
To create our WEB API Controller, right click project folder. Click Add and click New Item.

Select ASP.NET Core >Select Web API Controller Class and click Add:

As we all know, Web API is a simple and easy way to build HTTP Services for Browsers and Mobiles.
Web API has the following four methods as Get/Post/Put and Delete.
Getis to request for the data. (Select)Postis to create a data. (Insert)Putis to update the data.Deleteis to delete data.
Here in this demo, we are using only the Get method so we can delete all other methods of PUT/POST and Delete from the controller class and in Get method, we return the string values like below:
Get Method(Select Operation)
Get method is to request single item or list of items from our selected database. Here, we will get all student information from StudentMasters Table.
 [Produces("application/json")]
 [Route("api/StudentMastersAPI")]
 public class StudentMastersAPIController : Controller
    {
  private readonly ASPNETCOREContext _context;

  public StudentMastersAPIController(ASPNETCOREContext context)
  {
   _context = context;
  }

  // GET: api/StudentMastersAPI
  [HttpGet]
  public IEnumerable<StudentMasters> GetStudentMasters()
  {
   return _context.StudentMasters;
  }
 }
}
To test Get method, we can run our project and copy the get method api path, here we can see our API path for get is api/StudentMastersAPI.
Run the program and paste the above API path to test our output.

Step 6 - Working with Angular
Now let’s start working with the Angular part.
First, we need to install the Angular CLI to our project
Angular CLI
Angular cli is a command line interface to scaffold and build Angular apps using nodejs style (commonJs) modules. Ref link
To install the Angular CLI to our project, open the Visual Studio Command Prompt and move the project folder path.
We need to move to our project folder path. If you are not sure about your project path, then click on the Project and see the properties to check the project path.

Copy the Project Folder path. Here, we can see as my project is in G: drive, so first change to G: drive and change to our project folder:

Now install the Angular CLI to your project. To install it, write the below command and run it.
npm install @angular/cli --global

Wait for few seconds to Angular CLI install on your project:

Now it's time to scaffold a Angular application in our project. Run the below command and wait for few seconds and you can see all the Angular files will be added in our project.
ng new ASPNETCOREDEMO --skip-install
Note that you need to add your project name after the new keyword from the above command. Here, my project name is ASPNETCOREDEMO. Run the above command:

Wait for a few seconds and we can see the success message like below:

In our project, we can see a new folder with our same project name has been created.

Open the folder and we can see all the Angular files have been created inside the folder.

Move all the files to the main project.
After moving all the files to the main project, delete the empty folder.
Step 7 - Working with Angular Files
Working with Angular Module
.angular-cli.json
Open angular-cli.json file and change the “outDir” to wwwroot from dist.

Change dist to wwwroot for adding all the angular resultant html and dependency script file to build and update for displaying the result.

Since we need to display the Web API result in our Angular application, we need to import the HTTPmodule in app.module file.
Open the app.module file:

Change with the below code:
import { BrowserModule } from @angular/platform-browser;
import { NgModule } from @angular/core';

import { AppComponent } from './app.component';
import { FormsModule } from @angular/forms;
import { HttpModule } from @angular/http;
@NgModule({
  declarations: [
    AppComponent
  ],
  imports: [
      BrowserModule,
      FormsModule,
      HttpModule
  ],
  providers: [],
  bootstrap: [AppComponent]
})
export class AppModule { }
Working with Angular Component
Now we need to work with our Angular Component to link with our Web API and get the JSON result to bind in our HTML file.
Open the Angular Component file and add the below code:
import { Component, OnInit } from @angular/core;
import { Http } from @angular/http
@Component({
  selector: 'app-root',
  templateUrl: './app.component.html',
  styleUrls: ['./app.component.css']
})
export class AppComponent implements OnInit {
    constructor(private _httpService: Http) { }
    title: string = "SHANU";
    apiValues: string[] = [];
    ngOnInit() {
        this._httpService.get('/api/StudentMastersAPI/').subscribe(result => {
            this.studentdetails = result.json() as string[];
        });
    }
}
Working with HTML FILE
Now we are in the final stage of the coding part, design our HTML and bind the result from Angular to your app.component.html file.
Edit the html file and change with this below code:
<h1><span style="color:#285783">Welcome to {{title}} Angular and ASP.NET Core  Demo
</span></h1>

<hr />

<table class='table' style="background-color:#FFFFFF; border:2px #6D7B8D;
padding:5px;width:99%;table-layout:fixed;" cellpadding="2"
cellspacing="2" *ngIf="studentdetails">
  <tr>
    <td width="180" align="center"><strong>STD ID</strong></td>
    <td width="180" align="center"><strong>Name</strong></td>
    <td width="180" align="center"><strong>Email</strong></td>
    <td width="180" align="center"><strong>Phone</strong></td>
    <td width="180" align="center"><strong>Address</strong></td>
  </tr>
  <tbody *ngFor="let std of studentdetails">
    <tr>
      <td align="center" style="border: solid 1px #659EC7; padding: 5px;table-layout:fixed;">
        <span style="color:#9F000F">{{std.stdID}}</span>

      </td>

      <td align="center" style="border: solid 1px #659EC7; padding: 5px;table-layout:fixed;">
        <span style="color:#9F000F">{{std.stdName}}</span>

      </td>

      <td align="center" style="border: solid 1px #659EC7; padding: 5px;table-layout:fixed;">
        <span style="color:#9F000F">{{std.email}}</span>

      </td>

      <td align="center" style="border: solid 1px #659EC7; padding: 5px;table-layout:fixed;">
        <span style="color:#9F000F">{{std.phone}}</span>

      </td>

      <td align="center" style="border: solid 1px #659EC7; padding: 5px;table-layout:fixed;">
        <span style="color:#9F000F">{{std.address}}</span>

      </td>
    </tr>
  </tbody>
</table>
Step 8 - Build and Run
First, we need to install all the Angular dependency to our application. To install, enter the below command and run in the command prompt.
npm install

Wait till the npm install is complete.

Build the Application
Enter the below command to build the application:
ng build
Wait for few seconds till the build completes:

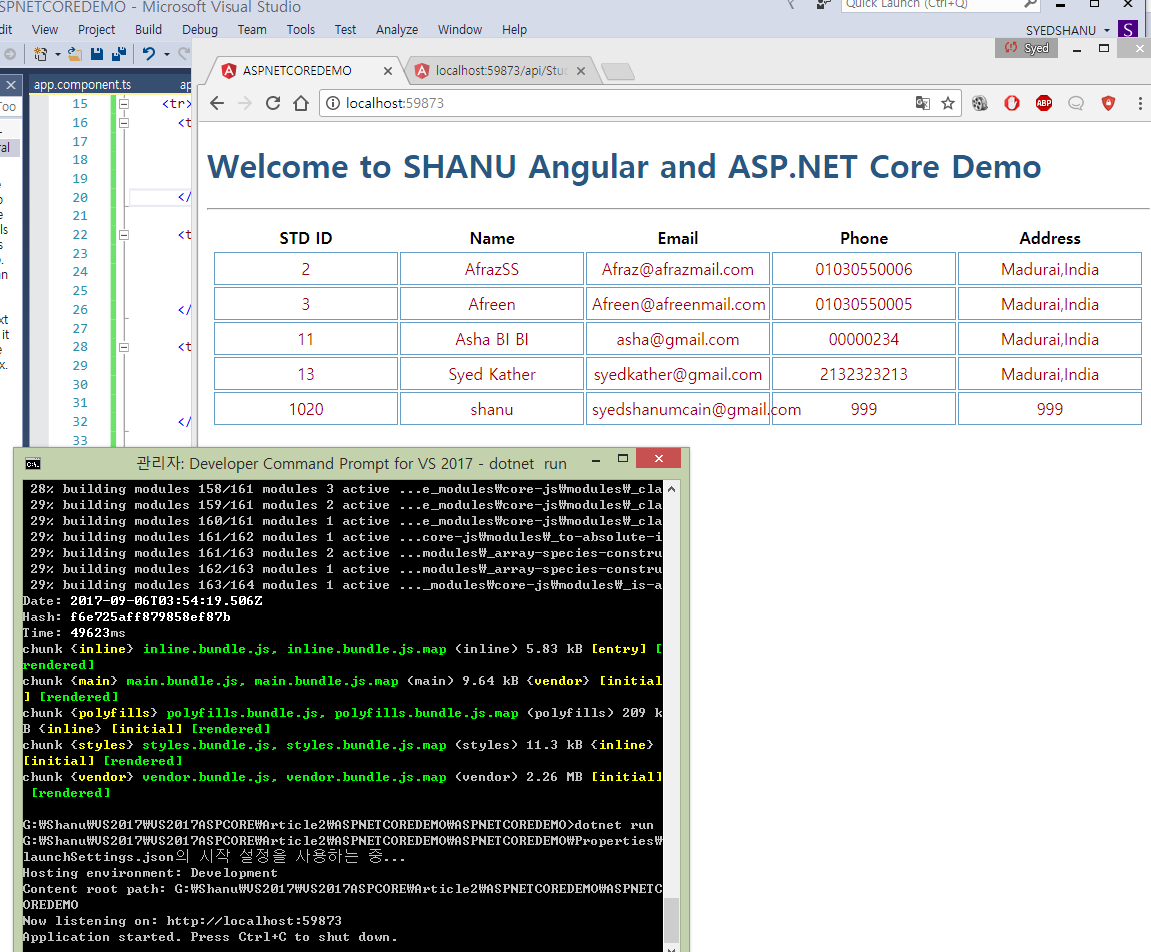
Run the Application
Enter the below command and press Enter to run the application.
dotnet run
We can see the localhost address to run our application. Enter the address in browser to see our Angular Application running with the result displayed.
Points of Interest
First, create the Database and Table in your SQL Server. You can run the SQL Script from this article to create StudentsDB database and StudentMasters Table and also don’t forget to change the Connection string from “appsettings.json”. Build and run the application to see the result.
History
- 6th September, 2017: Initial version (ASPNETCOREDEMO1.zip)