
AWS Serverless API using .NET Core 2.0
5.00/5 (2 votes)
How to create AWS Serverless API (API Gateway + Lambda Function) in .NET Core, C# using AWS SDK for Visual Studio
Introduction
Going serverless is the next big thing. The concept of cloud computing came in and abstracted the concept of underlying infrastructure. But still, there was a concept of virtual infrastructure. Resources became like DB Instances, VMs -etc. with some specific amount of memory, computing, and storage. Most importantly, they have a specific operating system. I mean they are scalable and replicable, but you have to create a whole unit of resource (Instance / VM) for that. And you get billed after the month for all the instance-hour you have consumed. No matter 80% of the time, the minimum number of your instances stayed ideal. So, you are just paying thousands of dollars for something you didn't use, you don't need. So here comes AWS Serverless.
AWS serverless is simply a combination of two of its ground breaking services - API Gateway and Lambda. In short, API Gateway is a service that provides you with a clean API stage for development or, production environment and lets you add different HTTP resources (GET, POST, PUT, etc.), different paths (to be appended to the URL) and lets you specify the request and response templates (JSON format of the request/response for example). On the other hand, Lambda is a service which lets you write functions to do some task in a cross-platform environment. This is currently supporting languages like Python, NodeJs, Java, .NET Core. Today, we will develop our serverless API using .NET Core.
20,000 Feet Overview
Well, enough of the chit-chats. Let me tell you the significance of this particular piece of article. Well, I have been a professional .NET developer for the last 3 years and while trying to develop serverless APIs in .NET Core, I found a lot of issues and couldn't get my hands on a good online article. As this is rather new technology (launched on AWS re:invent 2016), I thought it will be a good idea to create an article for anyone who is interested in the development of AWS Serverless APIs using .NET.
For this article, I am assuming that my audiences are already familiar with:
- The basic concept of AWS
- IAM, API Gateway, and Lambda
- Have working knowledge of .NET, C# and Visual Studio (2015/2017)
I will put the links below if you want to have basic understanding of AWS.
- For basic understanding of AWS concepts: Free introduction to AWS by A Cloud guru
- For the concept of AWS serverless: This youtube playlist by Savjee
You can go through any online tutorial to get your hands-on.NET Framework, C# and Visual Studio. I have learned all these by myself by going through different online tutorials and trust me, this is fun. Although, I will describe the AWS SDK for you and I will definitely go through the whole process of how to configure it for Visual Studio 2017 (you can follow the same process for configuring it for VS-2015).
So What is Visual Studio AWS SDK?
Well, the AWS SDK is a tool created for Visual Studio in order to ease your development process for AWS using Visual Studio. It lets you configure your own AWS user into your Visual Studio and monitor and manipulate different types of resources from the Visual Studio environment itself. It is quite similar to the Azure SDK for Visual Studio.

It also comes with different project templates for creating different kinds of AWS application. This will come in very handy for us in the next sections.

How to Configure and Connect AWS SDK?
I am assuming that you at-least have Visual Studio installed on your System. If not, please install Visual Studio 2015 / 2016 first. Now get a free 1-year subscription of AWS. Now, follow these below steps in order to set up your environment by installing and configuring AWS SDK.
- Download AWS SDK for Visual Studio from this link.
- Now open your Visual Studio IDE. Now it should be already configured with AWS SDK.
- Now login to AWS Console. From the browser, go to http://console.aws.amazon.com and log in using your AWS root credentials.
- Now go to Identity and Access Management (IAM) under "Security, Identity & Compliance" and click on Add User.
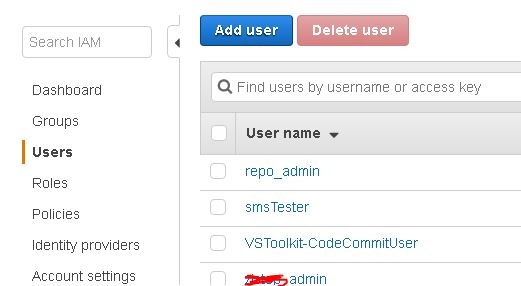
- Now put some user name and check on Programmatic access option. Now click Next.

- Now for setting permission, select the "Attach existing policies directly" option and choose "AdministratorAccess" from the below list. Please remember that choosing this "AdministratorAccess" could be very dangerous and I suggest you choose the proper policy according to your requirement and read the policy statement properly before doing that. Now click next again and review everything and create the user.
- Now download the .csv file containing the credentials.

- Now open Visual Studio and open AWS Explorer window and click on add user while selecting your preferred region.

Now browse for the .csv file that you download in step 7. And add the user. You can see all the resources in your AWS account in the AWS explorer.

Ok, now you are all set. Let's move to coding now. Yay!
Get Your Hands Dirty
Unless and until you get your hands dirty and step into the world of AWS Serverless development, the earlier sections are worthless to you. So please fasten your seat belts because things are gonna become a little crazy.
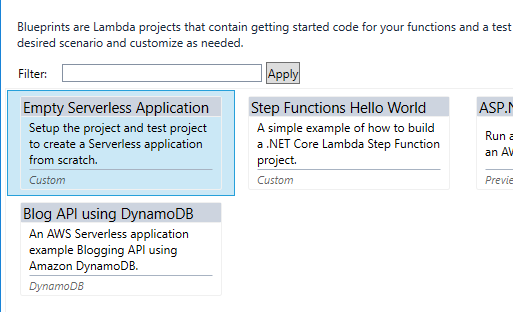
So, now that you have Visual studio opened, go to File -> New -> Project. In the window under Visual C#, select AWS Lambda. Now you will see this following templates:

Now choose the 3rd one (i.e., "AWS Serverless Application") from the list. Then choose the project blueprint of "Empty Serverless Application".
Now after the project is created, you'll see these following files:
- aws-lambda-tools-defaults.json
- Function.cs
- serverless.template

Now build the project and click on "Publish to AWS Lambda". You will be prompted with this following dialog window:

Create a new "Stack" by typing the stack name and also create a new "S3 bucket" (the bucket name is unique across AWS platform). Also, make sure to check "Save settings for future deployment" to reduce future hassle. Then click on "Publish" button.
After the deployment is done, you will be given a URL.

Now try doing a get operation to this URL. Just copy-paste it into browser and hit Enter. You will see this following text:

This is because there is a default get function which is implemented for this template.
Now let's dive into the code, shall we?
First of all, I should remind you that AWS Serverless started supporting .NET Core 2.0 and so does this demo project.
Let's check out the "serverless.template" file for more details.
{
  "AWSTemplateFormatVersion" : "2010-09-09",
  "Transform" : "AWS::Serverless-2016-10-31",
  "Description" : "An AWS Serverless Application.",

  "Resources" : {

    "Get" : {
      "Type" : "AWS::Serverless::Function",
      "Properties": {
        "Handler": "ServerLessTest::ServerLessTest.Functions::Get",
        "Runtime": "dotnetcore2.0",
        "CodeUri": "",
        "MemorySize": 256,
        "Timeout": 30,
        "Role": null,
        "Policies": [ "AWSLambdaBasicExecutionRole" ],
        "Events": {
          "PutResource": {
            "Type": "Api",
            "Properties": {
              "Path": "/",
              "Method": "GET"
            }
          }
        }
      }
    }
  },

  "Outputs" : {
  }
}
This file contains the details of different functions. As you can see above, all the properties like: MemorySize, APIHandler(C# function), Policies, Path(Route), HTTP Method are mentioned here.
Now, let's take a look into the "Functions.cs" file.
// Assembly attribute to enable the Lambda function's JSON input to be converted into a .NET class.
[assembly: LambdaSerializer(typeof(Amazon.Lambda.Serialization.Json.JsonSerializer))]

............
............
............


/// <summary>
/// A Lambda function to respond to HTTP Get methods from API Gateway
/// </summary>
/// <param name="request"></param>
/// <returns>The list of blogs</returns>
public APIGatewayProxyResponse Get(APIGatewayProxyRequest request, ILambdaContext context)
{
    context.Logger.LogLine("Get Request\n");

    var response = new APIGatewayProxyResponse
    {
        StatusCode = (int)HttpStatusCode.OK,
        Body = "Hello AWS Serverless",
        Headers = new Dictionary<string, string> { { "Content-Type", "text/plain" } }
    };

    return response;
}
As you can see, this class has a definition of the "Get()" function which is set as a handler for the default API's "GET" call which returns the text "Hello AWS Serverless" as content type text.
Update the Code
Now, let's turn it up a notch. Let's modify this function so that it can both accept and return Json object. Please follow the steps with me.
Step 1
Let's add two simple model classes called "TestReqModel" and "TestRespModel" to this project.
TestRequestModel.cs
using System;
using System.Collections.Generic;
using System.Text;

namespace ServerLessTest
{
    class TestReqModel
    {
        public string Name { get; set; }

        public string Surname { get; set; }
    }
}
TestRespModel.cs
using System;
using System.Collections.Generic;
using System.Text;

namespace ServerLessTest
{
    class TestRespModel
    {
        public string Fullname { get; set; }
    }
}
Now update the code (Functions.cs) to the following:
using System;
using System.Collections.Generic;
using System.Linq;
using System.Net;
using System.Threading.Tasks;
using Amazon.Lambda.Core;
using Amazon.Lambda.APIGatewayEvents;
using Newtonsoft.Json;

// Assembly attribute to enable the Lambda function's JSON input to be converted into a .NET class.
[assembly: LambdaSerializer(typeof(Amazon.Lambda.Serialization.Json.JsonSerializer))]

namespace ServerLessTest
{
    public class Functions
    {
        /// <summary>
        /// Default constructor that Lambda will invoke.
        /// </summary>
        public Functions()
        {
        }

        /// <summary>
        /// A Lambda function to respond to HTTP Get methods from API Gateway
        /// </summary>
        /// <param name="request"></param>
        /// <returns>The list of blogs</returns>
        public APIGatewayProxyResponse Post(APIGatewayProxyRequest request, ILambdaContext context)
        {
            context.Logger.LogLine("Get Request\n");
            //De-serialize the request object from the Json request body
            TestReqModel req = JsonConvert.DeserializeObject<TestReqModel>(request?.Body);
            TestRespModel res = new TestRespModel();
            if (req != null)
            {
                res.Fullname = req.Name + " " + req.Surname;
            }
            var response = new APIGatewayProxyResponse
            {
                StatusCode = (int)HttpStatusCode.OK,
                Body = JsonConvert.SerializeObject(res),
                Headers = new Dictionary<string,
                string> { { "Content-Type", "application/json" } }
            };

            return response;
        }
    }
}
Notice that in order to do Serialization and Deserialization, I am using the "Newtonsoft.Json" package.
And as I have changed the Http method from GET to POST, also update the "serverless.template" file accordingly.
{
  "AWSTemplateFormatVersion" : "2010-09-09",
  "Transform" : "AWS::Serverless-2016-10-31",
  "Description" : "An AWS Serverless Application.",

  "Resources" : {

    "Post" : {
      "Type" : "AWS::Serverless::Function",
      "Properties": {
        "Handler": "ServerLessTest::ServerLessTest.Functions::Post",
        "Runtime": "dotnetcore2.0",
        "CodeUri": "",
        "MemorySize": 256,
        "Timeout": 30,
        "Role": null,
        "Policies": [ "AWSLambdaBasicExecutionRole" ],
        "Events": {
          "PutResource": {
            "Type": "Api",
            "Properties": {
              "Path": "/",
              "Method": "POST"
            }
          }
        }
      }
    }

  },

  "Outputs" : {
  }
}
Well, you are all set to go. Just do a rebuild and publish the project to AWS Lambda once again. Now all your previous publish settings should be automatically restored (courtesy of "aws-lambda-tools-defaults.json" file).
Now, this serverless API is ready to test. I am using Postman for testing, but you can use the tool of your choice.

As you can see, this serverless API is both accepting and returning custom JSON data.
Summary
In this article, we explored the way to create and deploy .NET Core 2.0 API into AWS by using AWS-Serverless template for Visual Studio 2017. Please note that if you are creating APIs in .NET Core 1.0, the project structure will not be the same. I haven't used any other AWS functionalities like DynamoDB, S3, SQS, etc. Please feel free to check out the documentations to explore more. I will try to post more articles like this and include basic DynamoDB, S3 functionalities.
Please let me know any suggestions / ask questions you have on this. Thank you!