
Introduction to Microsoft Azure cloud services
4.83/5 (9 votes)
The aim of this article is to introduce the area of cloud services from the Microsoft Azure platform
Introduction
The aim of this article is to introduce the area of cloud services from the Microsoft Azure platform. This article will assume a general knowledge of cloud computing and the Microsoft Azure platform.
What are cloud services
Azure cloud services is a platform as a service (PaaS) environment that can be used to create scalable applications and services. This means you can focus on creating the application and not worry about the platform that the application will run on.
The cloud services are hosted in virtual machines. This means you can install anything on the machine that you need to run your application (e.g. credit card payment processing software) and this can be automated when a machine is started up to install the items that you need. However, the important point to remember about this is that the machines the services will be running on are stateless so that any changes made to the machine and any files written to the machine can (and probably will) be lost if the service needs to move to a different underlying machine to run on.
One of the great things about cloud services is that they still support multiple different architectures so you are not forced to use a certain paradigm. It is up to you to design how the interaction happens and what files\dlls will be uploaded to your cloud service. Cloud services can also call other cloud services to aid in the running of the application.
The other point to bear in mind is that cloud services are language agnostic i.e. they can be written in .NET, Node.js, PHP, etc. This article will demonstrate creating cloud services using C#, for other languages there is a large volume of information at Microsoft website and google.
Cloud service roles
Cloud services are containers of hosted applications which are known as roles. Roles sit on the server listening on endpoints which are configured in the code\configuration files and using the Azure dashboard. Cloud services also sit behind a load balance for when you have more than one service of the same type running but will have the same external address. This means that to the outside world it appears as if there is only one machine but you can split the workload among multiple machine internally if the load gets too great for one machine.
There are currently two types of roles in cloud services, web role (Automatically deploys and hosts your app through IIS) and worker role (Does not use IIS and runs your app standalone).
Web roles have the following installed and set up when you deploy to the cloud
- Pre-configured Windows Server
- IIS Pre-Installed
- Firewall open for port 80
- Default Endpoint for port 80
- You can run pretty much any IIS workload on it
- Customizable with start-up scripts
- Run hybrid workloads with WebRole.cs
Worker roles on the other hand are set up as the following
- Pre-configured Windows Server
- Nothing else installed
- No default Azure endpoints
- Run custom workloads that don’t require IIS
- Install additional software, etc. using scripts
- Implement Logic in the WorkerRole.cs class
The following diagram illustration the logical set up of cloud services

Implementing a cloud service
Now we have a basic understanding of cloud services here is an example of a simple worker role cloud service that calculates the future value for the nominal amount, interest rate and period provided.
Open up visual studio (I’m using visual studio 2017 for this example)
Go to File -> New and the following screen appears.

Search for Azure Cloud service under the Visual C# Templates, enter a name and click Ok. The following screen appears.

Select the basic worker role (and if you choose rename). Click ok
This then creates a basic solution with a two projects, a worker role project and a cloud service project. The cloud service project is a way to interact with how you will host your cloud service roles and other azure items. Below shows an image of it how our solution now looks.

Worker role
The important file to note in the WorkerRole1 project is the WorkerRole Class in the workerRole.cs file. This is the class that is used to run the cloud service. It is similar to a traditional service starter class but inherits from RoleEntryPoint.
There are three important methods created in the worker role when you add a new project.
| Method | Purpose |
|---|---|
| OnStart | Called when the instance is started. Used to initialise the service. |
| Run | Runs code that is intended to be run for the life of the role instance. |
| OnStop | Called when the instance is stopped (Good place to clean-up resources used) |
(By default, another method(RunAsync) is created and called by the Run method in the standard template. But this is just to stop the service from exiting straight away when run.)
We will come back to use these methods shortly. However, as you can see from the code in the generated class it isn’t currently doing much and is not very exciting. So, in order to flesh out our example and have something to host we first we need to create a WCF service to be hosted by this worker role. For this example, I’m going to be hosting a simple WCF endpoint that will work out the future value of an amount.
Creating the WCF class
For simplicity, I’m going to add the interface and class for the WCF service to the cloud service project but better practice would be to add it to its own project.
The first step is to add a reference to System.ServiceModel library.
We then create a WCF contract to be hosted. This is a standard WCF contact the creation and explanation of which is covered in other articles.
[ServiceContract]
public interface IFutureValueService
{
    [OperationContract]
    decimal CalculateFutureValue(decimal currentValue, double interestRate, double yearsInThefuture);
}
This is just a simple method that takes in some parameters and will work out the future value of an item based on the interest rate and period of time.
And the implementation is just a standard implementation of the future value formula.
class FutureValueService : IFutureValueService
{
    public decimal CalculateFutureValue(decimal currentValue, double interestRate, double yearsInThefuture)
    {
        return currentValue * Convert.ToDecimal(Math.Pow((1 + interestRate), yearsInThefuture));
    }
}
Hosting the WCF service
So now for the interesting part. How do we host this WCF service via Azure?
At a high level, what we will be doing is the following
- Creating the service host
- Creating the local end point for the WCF service to listen on
- Adding the endpoint to the service host
- Opening the service host
The 1st, 3rd and 4th items above are essentially the same as if you were creating a WCF host in a normal windows service by code. The interesting part is the creation of the endpoint in code.
Endpoints
As we are hosting a WCF service we need to configure and open up the ports to allow an external application to talk to our service. This is one area where it gets more complicated as there are two ports we need to configure an internal and external port due to Azure load balancing. The external application connects to the port on the load balancer which is then forwarded onto internal port on the actual server hosting the WCF service.
The benefit of this is that we only need to connect to one machine but if the load of the machine increases we can run multiple instances which will be forwarded on to by the load balancer.
We also need to define the internal input as by default all ports are closed on worker role machines so we need to open the ports.
Double click on the worker role cloud project
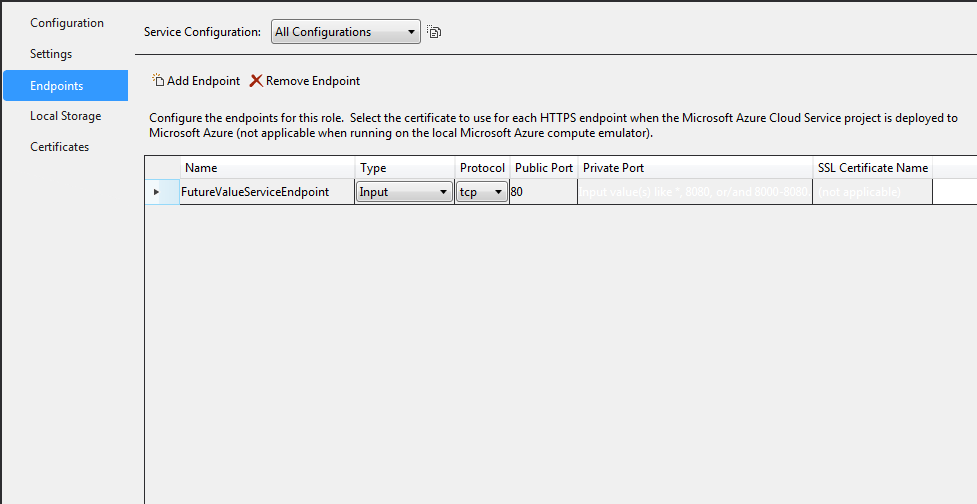
Then select the endpoints tab and the following screen should appear

You can see on this tab that no input endpoints are currently defined so we need to add one.
Click the add button
Add a name
Type - This refers to the type of endpoint we can use. There are three options
- Input – for external facing
- Internal – can only be used inside the Azure network
- InstanceInput – is used to point a specific instance of your service and isn’t load balanced
For our purposes you should leave it as input which means it is open to public access
Select the protocol you wish to use, for this demo we are going to use tcp.
Add the public port for access, we are going to use the standard port 80.
We don’t need the other field for this example so we can skip them. The endpoints should look like the following now
The endpoints are saved in a service definition file and we retrieve the information using the RoleEnvirronment class.
Configuration files
There are two categories of server configuration files the service definition files as above and the service configuration files. Of the service configuration files, you will normally start with at least two, one with the settings to use when you are trying out the service on your local machine and the other to use when you deploy to the cloud.
The steps we took above to add an endpoint added a line to the ServiceDefinition.csdef and now we need to add the domain name we are going to be using to access the WCF service both locally and in the cloud.
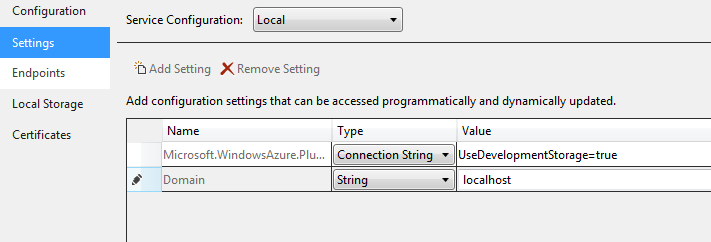
Double click the workerRole again if you have closed the properties window and this time open up the settings tab.

Notice the drop down at the top for service configuration where you can select which configuration this will apply to. With the configuration set up by default you can select All, Local or Cloud.
To add a new setting for the domain name click Add setting.
Type in the Name for the setting. For this demo call it Domain.
Make sure the type is of type string
The next step is to change the service configuration to local and then in the Value enter localhost and the screen should look like this.
And then switch to Cloud and also fill in a Value for this setting. Please note for this to work in the cloud it needs to be a unique name that will match the domain name you deploy to in the cloud. So for this test I am calling it michaelwcftest.cloudapp.net, the cloudap.net is the default Microsoft azure domain name. Please pick a suitable name for your code. The screen should look like this (with a different value).

Now we have all the settings configured that we need let us look at the actual code
The Code
The first question we need to ask is in what part of the code are we actually going to be hosting our service.
To answer this, we need to go back to the Worker role class from above. If you remember from the above table there are two methods that could be used to create and host the WCF Service, the Run method or the OnStart method. The OnStart method is executed the first time the worker role is executed and is used to initialise any code needed for the service whereas the Run method is used for the actual work to be done and usually has a loop executing inside of it to keep the service alive. For our purposes, we could set up the WCF service in either method. If we did do it in the run method we should create the WCF service outside of the loop and then have a loop or other method to keep the service alive. As an aside if you where implementing a queue watching service you where have the queue watch inside the run method and here is where you would see a difference.
The code inside the on start would look as follows
public override bool OnStart()
{
    // Set the maximum number of concurrent connections
    ServicePointManager.DefaultConnectionLimit = 12;

    CreateServiceHost();

    bool result = base.OnStart();

    return result;
}
The result is used to signal the hosting system if the initialisation was successful. If we return false the Run method won’t be called and the instance will be restarted.
You will notice that inside this method we call CreateServiceHost which is used to create the actual service host that hosts the WCF service. The code for this looks as follows.
private void CreateServiceHost()
{
    serviceHost = new ServiceHost(typeof(FutureValueService));

    string domainNameFixed = RoleEnvironment.GetConfigurationSettingValue("Domain");
    int wcfTcpPortFixed = 8044;

    string serviceEndpointUrl = string.Format("net.tcp://{0}:{1}/FutureValueService", domainNameFixed, wcfTcpPortFixed);

    RoleInstanceEndpoint externalEndPoint = RoleEnvironment.CurrentRoleInstance.InstanceEndpoints["FutureValueServiceEndpoint"];
    string serviceListenUrl = string.Format("net.tcp://{0}:{1}/FutureValueService", externalEndPoint.IPEndpoint.Address, externalEndPoint.IPEndpoint.Port);

    NetTcpBinding binding = new NetTcpBinding(SecurityMode.None);

    serviceHost.AddServiceEndpoint(typeof(IFutureValueService), binding, serviceEndpointUrl, new Uri(serviceListenUrl));

    CreateMetadataEndpoint(domainNameFixed, wcfTcpPortFixed, externalEndPoint);

    serviceHost.Open();
}
The major differences in setting up for this normal hosting and hosting in the cloud is to do with how you set up the listening points for the WCF service. For a normal wcf you would use the app.config file to specify the end points and domain, however as we don’t have a traditional app.config file you use a combination of the endpoints and service configuration files we set up earlier.
To access the information in the configuration files we use the RoleEnvironment class. This class “provides information about the configuration, endpoints, and status of running role instances” which is perfect for our current needs. The following code gets the domain name we are going to use for our WCF service, domainNameFixed = RoleEnvironment.GetConfigurationSettingValue("Domain"); We can then use the domainName wherever we need. To get the endpoint that we are going to be listening on is a simler process. RoleInstanceEndpoint externalEndPoint = RoleEnvironment.CurrentRoleInstance.InstanceEndpoints["FutureValueServiceEndpoint"]; For both of these we are using the name values we set up earlier to access into these values.
Once we have access to these two pieces of information we can then set up the correct URL for the service host endpoints and then open the service host ready to listen for requests. The end points are created by the following code
string serviceEndpointUrl = string.Format("net.tcp://{0}:{1}/FutureValueService", domainNameFixed, wcfTcpPortFixed);

string serviceListenUrl = string.Format("net.tcp://{0}:{1}/FutureValueService", externalEndPoint.IPEndpoint.Address, externalEndPoint.IPEndpoint.Port);

NetTcpBinding binding = new NetTcpBinding(SecurityMode.None);

serviceHost.AddServiceEndpoint(typeof(IFutureValueService), binding, serviceEndpointUrl, new Uri(serviceListenUrl));
and then we open up the ports for listening by calling
serviceHost.Open();
In the code above and in the project, we also have code to create the metadata point but as this is almost the same as we have already covered I’m not going to cover it again, but will put it below for you to see.
private void CreateMetadataEndpoint(string domainNameFixed, int wcfTcpPortFixed, RoleInstanceEndpoint externalEndPoint)
{
    // Add a metadatabehavior for client proxy generation and add it to he host's behaviors...
    ServiceMetadataBehavior metadatabehavior = new ServiceMetadataBehavior();
    serviceHost.Description.Behaviors.Add(metadatabehavior);

    //Create the fixed endpoint for the metadata exchange ("mex") that client's will use
    string mexEndpointUrl = string.Format("net.tcp://{0}:{1}/mex", domainNameFixed, wcfTcpPortFixed);

    //Create the URL that this role instance actually listens on give it's dynamic ip address and port
    string mexListenUrl = string.Format("net.tcp://{0}:{1}/mex", externalEndPoint.IPEndpoint.Address, externalEndPoint.IPEndpoint.Port);

    //Create a MexTcpBinding to allow metadata to be exchanged over tcp
    Binding mexBinding = MetadataExchangeBindings.CreateMexTcpBinding();

    //And create the mex endpoint, exposing the IMetadataExchange contract over the mex tcp binding, on the urls we just built.
    serviceHost.AddServiceEndpoint(typeof(IMetadataExchange), mexBinding, mexEndpointUrl, new Uri(mexListenUrl));
}
The final part of the worker role class is to make sure that we close the service host and that is done as follows.
public override void OnStop()
{
    this.cancellationTokenSource.Cancel();
    this.runCompleteEvent.WaitOne();

    if (serviceHost != null)
        serviceHost.Close();
    base.OnStop();

}
Testing the service
When you sue the Azure development kit it automatically installs a local run time enviorment. So to run the service we have developed clcik the run button.
Once the service is running you can use WCFTestclient to interact with the new service. To run WcfTest Client open a Developer Command Prompt for VS 2017 and then type WCFTestClient

When the application is open then click File -> Add Service

And type in the URL to the local service (eg net.tcp://127.0.0.1:8044/mex)
This will bring up the following screen where you can see the service as running

You are able to invoke the method and as per the next image see the results

Deployment
The following section assume you have an account set up with Microsoft azure that you can deploy too. If not, you can search for the Microsoft azure homepage and set up a trial account with some free credit.
Charges
Please note. When you deploy to Microsoft Azure there will be a charge against your account for every day that the service is deployed. Even if you stop the service unless you delete it from your account it will still be charged every day. Only deploy if you can meet the charge you may incur.
To deploy to your Azure account you right click on the Azure cloud project and select publish
This brings up the following screen.

Click next

Fill in your details, selecting the region closest to you and click next.

You then need to specify the cloud Service which is the same as the domain name you set up above. This is down by selecting the drop down for creating a new service and selecting the region. You then need to select the information for the other options on the screen, the environment you wish to run in, your build configuration and the service configuration as outlined in the screen below. (with the exception of the cloud service name you should be able to use the settings below)
Once all that info is set up all you need to do now is click publish.
Visual studio will now deploy this to Azure and you can follow the process using the Microsoft Azure Activity log window.

Once the deployment has finished you can use the WcfTestclient to connect to the deployed service and confirm it is working. This will be the same as before but instead of connecteing to localhost you connect to the name of the cloud service you deployed to for my example this would be net.tcp://michaelwcftest.cloudapp.net:8044/mex
Once again please remember if you do not delete the deployed package you will be charged every day for it (even if not used).
Issues that arose while developing article
The one major issue I had while writing this article was with the port used for the service end point. When I initially set this up I used port 80 which is used for HTTP, so when setting up a port please check and make sure you use a freely available port.
Summary
As you saw from this article as long as you bear in mind that you need to use the Azure specific classes to create the end points then to set up a WCF service is almost the same as to create a normal WCF service.
More information
For more info see the following links
|
Azure homepage => Services, Dev Centre, Community | |
|
Azure blogs from Microsoft | |
|
Cloud app development Learning | |
|
Azure Trust Centre – Privacy |
http://azure.microsoft.com/en-gb/support/trust-center/privacy/ |
|
AWS vs Azure | |
|
Case Study – Tangerine |
https://customers.microsoft.com/Pages/CustomerStory.aspx?recid=14594 |
|
Case Study – Commonwealth Bank |
https://customers.microsoft.com/Pages/CustomerStory.aspx?recid=11998 |
|
Pricing Calculator | |
|
Azure development video channel | |
|
3rd party Books/Press/Video/Tutorials |
History
Initial release