
SPA^2 using ASP.Net Core 1.1 + Angular 4.0 - Part 7
4.96/5 (11 votes)
Covering conversion from Angular 2.40 to Angular 4.0 + Publishing the ASP.Net Core / Angular 4 SPA to IIS using VS2015.
If the above link is broken, go to Github here , or for part7 only get the part7 branch here.
Introduction
This is part 7 in a series on a method of creating a single page application, or SPA, by integrating ASP.Net Core and Angular 2.4, now Angular 4.0, where ASP.Net Core retains an active part in the application pipeline, by generating Angular 4 HTML template code using tag helpers, which in turn are linked to your C# data model.
This part, part 7, will cover conversion of the SPA from Angular 2.4 into the latest Angular 4.0, setting up SSL for IIS Express, then how to publish to IIS using Visual Studio 2015 (in this part, part 7) and using Visual Studio 2017 continued in the next part, part 8.
Lastly we'll try to keep everything as simple as possible by automating everything possible.
Finally, in the tradition set in this series, we'll be avoiding the complications of having to set up webpack, grunt, gulp or server side pre-rendering.
In the process I'll make plenty of mistakes, show how to fix them on the way.
Background
So far this series of articles has been describing a way to integrate ASP.Net Core with Angular 2.
Part 1 - How to integrate ASP.Net Core and Angular 2
Part 2 - How to use Tag Helpers to display data
Part 3 - How to use Tag Helpers for data input, added SQL backend using EF Core.
Part 4 - Adding token authentication with JWT using OpenIdDict.
Part 5 - Adding async services, server-side validation, a simple Angular 2 datagrid & more tag helpers.
Part 6 - Using NSwag to create Swagger docs and generate Angular 2 / Typescript data models + data services.
this is part 7 - publishing to IIS for VS2015 users
Conversion from Angular 2.40 to Angular 4.0
Angular 4.0 is in many respects a short step from Angular 2.4. It is smaller, faster to load, some speed improvement is through optimization, and other improvements from leaving out some modules, such as animations, treating them as optional.
The basic requirements for Angular 4.0 (or any future versions) are easy to see by just looking over the code on the Angular Quickstart Github repo (linked here) this is the final Quickstart code referred to in the Angular tutorials. You can download the code (as a zip) or clone the whole repo (using Git) or just view it using the file view in your web browser. Don't be put off where the site still mentioned Angular 2 in places, as it is currently (as at 31st March, while writing this) the site has already been updated to Angular 4.0 as you can see from it's package.json file (linked here).
To convert from Angular 2.40 to Angular 4.0 we'll start changes in the package.json file which is responsible for our Node Package Modules or NPM files; previously it was:
{
  "dependencies": {
    "@angular/common": "~2.4.0",
    "@angular/compiler": "~2.4.0",
    "@angular/core": "~2.4.0",
    "@angular/forms": "~2.4.0",
    "@angular/http": "~2.4.0",
    "@angular/platform-browser": "~2.4.0",
    "@angular/platform-browser-dynamic": "~2.4.0",
    "@angular/router": "~3.4.0",

    "angular-in-memory-web-api": "~0.2.4",
    "systemjs": "0.19.40",
    "core-js": "^2.4.1",
    "rxjs": "5.0.1",
    "zone.js": "^0.7.6",
    "ngx-toastr": "^4.3.0"
  },
  "devDependencies": {
    "typescript": "~2.0.10",
    "tslint": "^3.15.1"
  },
  "repository": {}
}
this should be changed to the following:
{
  "dependencies": {
    "@angular/animations": "^4.0.0",
    "@angular/common": "~4.0.0",
    "@angular/compiler": "~4.0.0",
    "@angular/core": "~4.0.0",
    "@angular/forms": "~4.0.0",
    "@angular/http": "~4.0.0",
    "@angular/platform-browser": "~4.0.0",
    "@angular/platform-browser-dynamic": "~4.0.0",
    "@angular/router": "~4.0.0",
    "angular-in-memory-web-api": "~0.3.0",
    "core-js": "^2.4.1",
    "ngx-toastr": "^5.0.5",
    "rxjs": "5.0.1",
    "systemjs": "0.19.40",
    "typescript": "^2.1.6",
    "zone.js": "^0.8.4"
  },
  "devDependencies": {
    "typescript": "~2.1.0",
    "tslint": "^3.15.1"
  },
  "repository": {}
}
The changes in the above new copy also accommodate the need to add Angular animations, as well as update ngx-toastr to the latest version and pick up later versions of Typescript.
In VS2015 you can check your version of Typescript installed by clicking Tools menu, then Extensions and Updates, and searching in the installed section for typescript. If you need to update VS2015, go to the Online section, search for Typescript and pick the latest version (currently 2.2), download and follow the prompts to install.
Next we need to update our systemjs.config.js file located in the \wwwroot folder. Find the section of angular bundles, update that section from this:
...
      // angular bundles
      '@angular/core': 'npm:@angular/core/bundles/core.umd.js',
      '@angular/common': 'npm:@angular/common/bundles/common.umd.js',
      '@angular/compiler': 'npm:@angular/compiler/bundles/compiler.umd.js',
      '@angular/platform-browser': 'npm:@angular/platform-browser/bundles/platform-browser.umd.js',
      '@angular/platform-browser-dynamic': 'npm:@angular/platform-browser-dynamic/bundles/platform-browser-dynamic.umd.js',
      '@angular/http': 'npm:@angular/http/bundles/http.umd.js',
      '@angular/router': 'npm:@angular/router/bundles/router.umd.js',
      '@angular/forms': 'npm:@angular/forms/bundles/forms.umd.js',
...
There are 3 animations packages to be added here. Change the above section of code to this:
...
      // angular bundles
      '@angular/core': 'npm:@angular/core/bundles/core.umd.js',
      '@angular/common': 'npm:@angular/common/bundles/common.umd.js',
      '@angular/animations': 'npm:@angular/animations/bundles/animations.umd.min.js',
      '@angular/animations/browser':'npm:@angular/animations/bundles/animations-browser.umd.js',
      '@angular/platform-browser/animations': 'npm:@angular/platform-browser/bundles/platform-browser-animations.umd.js',
      '@angular/compiler': 'npm:@angular/compiler/bundles/compiler.umd.js',
      '@angular/platform-browser': 'npm:@angular/platform-browser/bundles/platform-browser.umd.js',
      '@angular/platform-browser-dynamic': 'npm:@angular/platform-browser-dynamic/bundles/platform-browser-dynamic.umd.js',
      '@angular/http': 'npm:@angular/http/bundles/http.umd.js',
      '@angular/router': 'npm:@angular/router/bundles/router.umd.js',
      '@angular/forms': 'npm:@angular/forms/bundles/forms.umd.js',
...
Next we need to ensure that our ngModule loads the animations explicitly, as this is now an add-on.
Edit the app.module.ts file in \wwwroot\app to include this extra import:
import { BrowserAnimationsModule } from '@angular/platform-browser/animations';
and then add a reference inside the ngmodule imports, like this:
imports: [ BrowserAnimationsModule, BrowserModule, FormsModule, HttpModule, ToastrModule.forRoot(), routing],
VS2017 users can do these same modifications, and both VS2015 and VS2017 users should now be able to rebuild the application, it ctrl-F5 and see the results.
Everything should just work as before. In development you might find caching an issue, in which case either clear your browser cache or alternately, if running F12 debug mode, turn on the option to 'Disable Cache'.
Your pages will then be refreshed a little more intelligently, and changes more readily seen while working on your code.
What could possibly go wrong?
Suppose you have updated your ngx-toast module but forgotten to add in animations, you might see anaemic, rather 'flat' looking toast.

You might in some cases see the error below, when expanded indicating that animations are missing.

In both cases, all you need do here is add the animations as outlined further above.
If you do not update both Angular 4 and ngx-toast together, but say do angular 4 first, you'll likely get errors to say that your version is incompatible with the older Angular2.x version. It'll save a lot of time to just do these together.
Setting up SSL in IIS Express
Before we get right into Publishing to IIS, we'll do a little more in IIS Express, setting up SSL there first.
Building and running an ASP.Net Core website in IIS Express, from Visual Studio or is quite simple. You just hit F5 or ctrl-F5 and there it is. Similarly with ASP.Net Core projects in Visual Studio, running SSL on IIS Express, is also really easy. Let's do that now, in preparation for the 'real thing' in IIS.
In VS2015 and VS2017 (1) right click your project, click properties, (2) select the Debug section, (3) check the box to enable SSL, then a times saver, (4) click the "Copy" link to make a copy in your clipboard of your SSL website's URL.

VS 2015 is shown above, and VS2017 below.

Once you have copied the SSL URL to your clipboard. hit ctrl-S to save, then rebuild and hit ctrl-F5.
Once your browser opens up, verify the site is up and running without SSL first, using the ordinary HTTP:// URL.
Once verified, hit ctrl-T in your browser to open up a new tab, then alt-D to select your address, and paste your address in (ctrl-V or shift-insert).
You should now be seeing your website in SSL, or perhaps not.
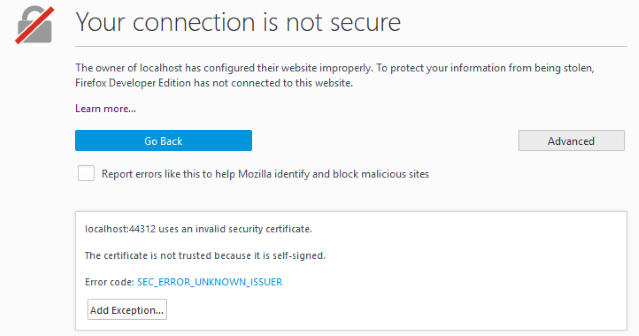
Most browsers will object when they see home grown SSL certificates. The certificate generated by Visual Studio here will work, and encrypt the traffic, but is not "signed" or authenticated by a known "CA" or "Certificate Authority". Firefox for example has this result to warn you of a potentially dangerous site.

Click Advanced, and then you see this:
Click Add Exception, follow the prompts, and you will get a chance to have the browser accept the test SSL certificate:

Next your page, now using SSL with an https:// URL should appear, though the browser still tells you it is not quite 'kosher", as it would from a bona fide, real paid-up SSL certificate:

When we're in development mode, the current settings we're not currently enforcing SSL/HTTPS. Using .DisableHttpsRequirement() in Startup.cs is what stops makes HTTPS an option:
    // Register the OpenIddict services.
    services.AddOpenIddict()
        // Register the Entity Framework stores.
        .AddEntityFrameworkCoreStores<A2spaContext>()

        // Register the ASP.NET Core MVC binder used by OpenIddict.
        // Note: if you don't call this method, you won't be able to
        // bind OpenIdConnectRequest or OpenIdConnectResponse parameters.
        .AddMvcBinders()

        // Enable the token endpoint.
        .EnableTokenEndpoint("/connect/token")

        // Enable the password flow.
        .AllowPasswordFlow()

        // During development, you can disable the HTTPS requirement.
        .DisableHttpsRequirement();
    }
To test what happens without this development option, remark out the line, add a semi colon to the line above, ie.,
...

.EnableTokenEndpoint("/connect/token")

// Enable the password flow.
.AllowPasswordFlow();

// During development, you can disable the HTTPS requirement.
//.DisableHttpsRequirement();
Rebuild and hit ctrl-F5. You should still be able to browse the site on the default HTTP URL, but when you try and log on you will get an error message that bubbles up from the backend, from OpenIdDict:

Repeat this using your HTTPS / SSL URL, as copied from your project's properties page, and now the only issue I have is forgetting to register, but at least using SSL it is now getting further
and of course, once registered, then you can log on and apart from the yellow warning (again since it's a self signed test certificate), then we're ok to go:

If you want to make this optional for development, but mandatory for production, then we need to wrap the settings inside a condition to change the behaviour. There's a problem however with trying to use with this
IHostingEnvironment
in the ConfigureServices method of startup.cs, it is not supported.
To allow us access to the environment, we will create a property, populate this when we execute startup.cs and then be able to access it everywhere.
Add this just under the class definition of startup.cs
private IHostingEnvironment CurrentEnvironment { get; set; }
and cange startup.cs from this:
public Startup(IHostingEnvironment env)
{
    var builder = new ConfigurationBuilder()
        .SetBasePath(env.ContentRootPath)
        .AddJsonFile("appsettings.json", optional: true, reloadOnChange: true)
        .AddJsonFile($"appsettings.{env.EnvironmentName}.json", optional: true)
        .AddEnvironmentVariables();

    Configuration = builder.Build();
}
to this:
public Startup(IHostingEnvironment env)
{
    CurrentEnvironment = env;

    var builder = new ConfigurationBuilder()
        .SetBasePath(CurrentEnvironment.ContentRootPath)
        .AddJsonFile("appsettings.json", optional: true, reloadOnChange: true)
        .AddJsonFile($"appsettings.{CurrentEnvironment.EnvironmentName}.json", optional: true)
        .AddEnvironmentVariables();

    Configuration = builder.Build();
}
Update the configure services method now to this:
// Register the OpenIddict services.
services.AddOpenIddict(options =>
{
    // Register the Entity Framework stores.
    options.AddEntityFrameworkCoreStores<A2spaContext>();

    // Register the ASP.NET Core MVC binder used by OpenIddict.
    // Note: if you don't call this method, you won't be able to bind OpenIdConnectRequest or OpenIdConnectResponse parameters.
    options.AddMvcBinders();

    // Enable the authorization, logout, token or userinfo endpoints here:
    options.EnableTokenEndpoint("/connect/token");

    options.AllowPasswordFlow();

    // When request caching is enabled, authorization and logout requests are stored in the distributed cache by OpenIddict and the user agent
    // is redirected to the same page with a single parameter (request_id).
    // This allows flowing large OpenID Connect requests even when using an external authentication provider like Google, Facebook or Twitter.
    // options.EnableRequestCaching();

    // During development, you can disable the HTTPS requirement.
    if (CurrentEnvironment.IsDevelopment())
    {
        options.DisableHttpsRequirement();
    }
});
And you can alter this line from:
public void Configure(IApplicationBuilder app, IHostingEnvironment env, ILoggerFactory loggerFactory, A2spaContext context)
to
public void Configure(IApplicationBuilder app, ILoggerFactory loggerFactory, A2spaContext context)
and inside the Configure method of startup.cs, also change references from env. to our new property, to CurrentEnvironment. instead.
Now we are ready to test out deployment to IIS.
Setting up IIS ready for ASP.Net Core
If you have been used to doing development of conventional .net framework based web applications, using ASP.Net or ASP.Net MVC you may have developed and debugged against IIS. I do this regularly in my 'day job', as there are a number of differences in IIS Express to IIS that preclude me using IIS Express for these older applications.
ASP.Net Core has changed this somewhat, it's not your mother's website, the ASP.Net Core web application is typically deployed or published, along with all of it's dependencies to a subdirectory that is then used in isolation to any other instances of ASP.Net Core applications. Kestrel the web server that is used to serve up the ASP.Net Core web application is not suitable for use directly, but should be placed behind a reverse proxy. IIS as it turns out is a suitable reverse proxy. Once configured a request is passed from IIS into the particular ASP.Net Core web application, and because of this and the many dependencies, it is really not easy to debug or use in situ.
This image, below, from Microsoft ASP.Net Core documentation website ( here ) clearly shows what happens in an ASP.Net Core web application hosted behind IIS:

To host your ASP.Net Core web app under IIS you'll need Windows 7 or Server 2008 R2 or later.
You will need to install the ANCM or "ASP.Net Core Module" for IIS to be able to host your ASP.Net Core web application, without it it will not work and will give odd errors when you try and set it up in IIS manager, such as missing web.config, or blank / unusable dialog boxes for items such as logging.Download ANCM by installing the ASP.Net Core Server Hosting Bundle from here.

For further information on ANCM and it's settings use these two links:
https://docs.microsoft.com/en-us/aspnet/core/fundamentals/servers/aspnet-core-module
and
https://docs.microsoft.com/en-us/aspnet/core/hosting/aspnet-core-module
Next we'll create a folder into which we'll publish our web application.
In this initial example, I'll use simple file based publishing, and target a local folder. Where IIS is on the same PC as I am using for development.

here I've created a folder called c:\publish and then inside that folder, a further folder called A2SPA.
Now go to IIS Manager, right click your default web site, click add application:

create a new application, as below. I've used the alias A2SPA, then located the publish path, c:\publish\A2SPA
For now click OK

By default your new site will likely use the application pool "DefaultAppPool". We're going to create a new app pool, as key to using ASP.Net core is having an application pool where we run unmanaged code.

Click on Application Pools on the left hand side, then click on Add Application Pool to the far right.

Enter a unique name for your new app pool, but key here is to select "No Managed Code".
Next select your new A2SPA web application, (1) on the left, then on the far right, (2) click Advanced Settings.
Once the advanced settings dialogue appears click on the [..] button beside the app pool (3) to select a new app pool, then from the app pool selection dialog (4) pick the new app pool just created, then click OK and click OK again.

Next we'll add a "binding" to allow us to use HTTPS. Since this is part of the default website, we need to either right click Default Web Site on the left, and then click edit bindings:

Alternately, click on the Default Web Site icon in the LHS, and then click on the far right click on "Bindings".
Now (1) click Add, then (2) choose HTTPS, (3) choose your IIS Express Development Certificate (or create a self signed certificate, or add your 'real' certificate), then click OK, then click Close.
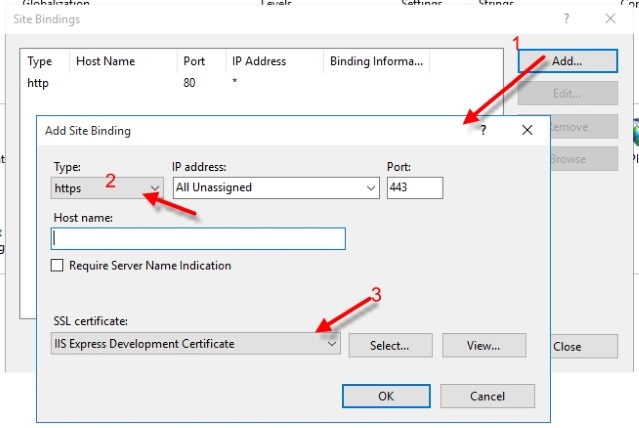
The development certificate will work, though as before will generate some validity errors. Obviously if you are publishing to a 'real' outside facing website, then you should get a real certificate. For more on this, see the links below.
Publishing to IIS
The results of publishing will be a little different in VS2015 to VS2017, however some of the same issues and bugs will be common to both. First we'll cover publishing using VS2015, then look at how VS2017 changes things.
In VS2015, right click the A2SPA project itself, then click publish. The following dialog box appears:

We'll start using the Custom option, click on Custom, then you will see a popup asking for yuo to crate a name for the profile:

Once you've thought up a name and entered it, click OK then next you need to update the "Target Location", which is where we'll be publishing the files that make up our application. This should be the same as the website we've just created in IIS, in the example so far, this is c:\publish\a2spa as below:

click Next, then you will see a further dialog. The default values are ok here, for now, so just click Next:

Now click Next or Publish, and after the site builds you'll find you have published the application.
Try browsing the the HTTPS URL you have configured in IIS, in my case this was https://localhost/a2spa
The exact message will vary, according to the browser you're using, however you see something like the following, where your browser is complaining that you have an invalid certificate.
The certificate will be safe (it is our doing here to use it), though see this normally on a public website you might rightfully be cautious. Most of these browsers too will give you an opportunity to crate an exception, as we did earlier with IIS Express. In Firefox below you will see a screen like this:

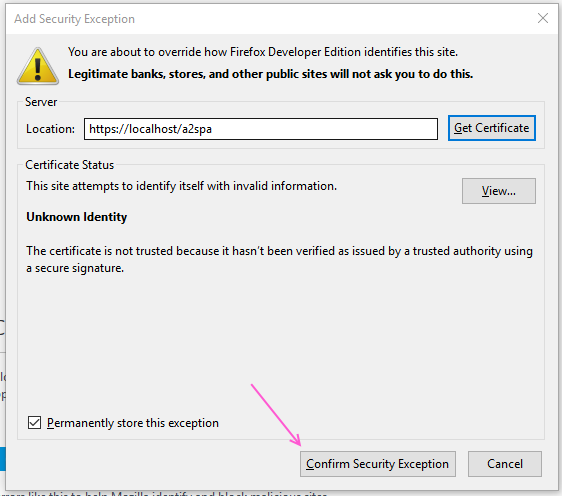
You'll need to create another exception as this time the site's URL is different, click Advanced, then click Add Exception as shown below:

You should next be able to confirm the exception, as you see further details. In the case of Firefox, click the Confirm Security Exception button:
And here's our first issue. this one an "HTTP Error 502.5: Process Failure" page generated by IIS:

To find the cause of the issue, go to IIS, click on the left hand side to select our A2SPA web application. Then double click "Logging" or right click logging and click open feature.

Notice here, below that the logging destination selections and other logging settings are grayed out:

To access these go up to the parent website, Default Web Site, on the left hand side. Again double click logging and then you'll be able to choose "Both log file and ETW event". We may not end up using the log file (more on that later), but at least we;ll see the log entries in the standard Windows Event Viewer by using ETW.

once you select ETW and log files, click Apply. Though if you forget and move away you'll be asked if you want to save or not.

now refresh the page in your web browser, then in windows click the windows key on the keyboard, and type event, then select event viewer.

the wording of the error is:
Application 'MACHINE/WEBROOT/APPHOST/DEFAULT WEB SITE/A2SPA' with physical root 'c:\publish\A2SPA\' failed to start process with commandline '"%LAUNCHER_PATH%" %LAUNCHER_ARGS%', ErrorCode = '0x80070002 : 0.
To save you the suspense, in VS2015 look at your web.config file and you'll find the default is this:
<?xml version="1.0" encoding="utf-8"?>
<configuration>

  <!--
    Configure your application settings in appsettings.json. Learn more at http://go.microsoft.com/fwlink/?LinkId=786380
  -->

  <system.webServer>
    <handlers>
      <add name="aspNetCore" path="*" verb="*" modules="AspNetCoreModule" resourceType="Unspecified"/>
    </handlers>
    <aspNetCore processPath="%LAUNCHER_PATH%" arguments="%LAUNCHER_ARGS%" stdoutLogEnabled="false" stdoutLogFile=".\logs\stdout" forwardWindowsAuthToken="false"/>
  </system.webServer>
</configuration>
the ins and outs of web.config settings are covered very will in these two places, one the ASP.Net Core docs, here, and the other place in Rick Strahl's blog, here.
TLDR; for the dotnet web application to launch properly, you need to change %LAUNCHER_PATH% to dotnet and %LAUNCHER_ARGS% to .\a2spa.dll and that's it.
In other words, change yor web.config file to this instead:
<?xml version="1.0" encoding="utf-8"?>
<configuration>

  <!--
    Configure your application settings in appsettings.json. Learn more at http://go.microsoft.com/fwlink/?LinkId=786380
  -->

  <system.webServer>
    <handlers>
      <add name="aspNetCore" path="*" verb="*" modules="AspNetCoreModule" resourceType="Unspecified"/>
    </handlers>
    <aspNetCore processPath="dotnet" arguments=".\a2spa.dll" stdoutLogEnabled="false" stdoutLogFile=".\logs\stdout" forwardWindowsAuthToken="false"/>
  </system.webServer>
</configuration>
Publish again (right click the A2SPA project, select Publish, then click the publish button) and then refresh your browser.
Look in the event viewer, when the event viewer is itself refreshed, that it shows us too that we're getting files served from Kestrel to IIS.

Kestrel, the web server used by ASP.Net Core here, is running against port 7870 which is translated automatically by IIS, as mentioned earlier:
Application 'MACHINE/WEBROOT/APPHOST/DEFAULT WEB SITE/A2SPA' started process '7004' successfully and is listening on port '7870'.
Let's check out the browser, and see what has happened there. At least we are getting to see the Angular loading message, but then nothing much else is happening and a look in the network tab and all you see are occasional successes along with many 404 errors:

Here's a close-up of the 404 errors. Some fo the JavaScript files have loaded, but notice these are only the remote files, on CDN or Content Distribution Networks; nowhere are local JavaScript files being served up properly. A few snippets of JavaScript make it as they are embedded in HTML views.

So what has happened? The secret is, when your deploy files they need to be visible, inside the wwwroot folder to be served to the outside world. Recall our NPM modules, which includes all of our Angular 4 source, these are in the node_modules folder, and not inside wwwroot, but beside it.
Another diagnosis trick if you are not sure of what's happening is to open up an admin command prompt, navigate to the folder you've just your files published to, and then try executing the application from the command line. In this example you type:
cd \publish\a2sa
dotnet .\a2spa.dll
then you'll see an error that might be clearer:

To fix this, in VS2015, we need to go to the project.json file and change this key section from this:
"publishOptions": {
  "include": [
    "wwwroot",
    "**/*.cshtml",
    "appsettings.json",
    "web.config"
  ]
},
adding the "node_modules" folder, and a comma, to become this:
"publishOptions": {
  "include": [
    "wwwroot",
    "node_modules",
    "**/*.cshtml",
    "appsettings.json",
    "web.config"
  ]
},
re-publish, and then again refresh your browser (you might need to hit shift-F5 or have the network tab open and the do not cache setting turned on.
What else could go wrong?
Publish failed!
Sometimes republishing will fail, when the dll is in use, it may not allow you to overwrite it.

To fix this, just stop IIS, publish, and then start IIS again.
APPCRASH
this error can occur if you have an internal issue in your C# code, in your browser it is usually something like this:

in Event viewer it may be like this:

a small part of the text is:
Fault bucket 120721861317, type 4
Event Name: APPCRASH
Response: Not available
Cab Id: 0
Problem signature:
P1: dotnet.exe
P2: 1.1.0.1179
P3: 5820b092
P4: KERNELBASE.dll
P5: 10.0.15063.0
in this case I had some poorly thought out code in the startup.cs file.
HTTP Error 403.14 - Forbidden
This might be as simple as forgetting to publish the files; if the publish destination folder is empty, you might get a 403.14 error, as if you were trying to browse a forbidden folder. Directory browsing is in option, and can be enabled in ASP.Net Core, but with no files, IIS is left wondering what you were doing and throws up this error:
![]()
Let's try and get this right. With a quick check of web.config, making sure it has dotnet and .\a2spa.dll then publish and using F12 network tab, with cache turned off, we can watch it blow by blow:

so what just happened? look closer at one of the good files (shown here with HTTP status = 200 for OK)

look closely at the request path eg., https://localhost/A2SPA/css/site.min.css?v=M .....
next look at one of the files with a 404 file not found error

now look at the URL of the request here, https://localhost/node_modules/ngx-toastr/toastr.css
So although we're including the node_modules folder, our website is forming requests as if it is the root of the application, and not relative to the application's URL a2spa. The static files such as our style sheet immediately above had a properly constructed URL.
For the example file above, we need the URL for anything in node modules to be requested as
https://localhost/a2spa/node_modules/... instead of https://localhost/node_modules/...
This won't take a lot of fixing, in our views\shared folder, go to the _Layout.cshtml file, and notice the paths we have for anything from /node_modules for example:
<link rel="stylesheet" href="/node_modules/ngx-toastr/toastr.css" />
these should be changed to add a tilde or ~ in front of the initial forward slash, ie.,
<link rel="stylesheet" href="~/node_modules/ngx-toastr/toastr.css" />
update all of your references in _Layout.cshtml to fix this, then republish:

Our node modules and static files are now ok, but now the road block is with the templates served up by our partial controller; these are being constructed absolutely as well, for example
https://localhost/partial/registerComponent
which should be
https://localhost/a2spa/partial/registerComponent
The problem here is our request is absolute, not relative. If it was relative it would just work. Look for example in the \wwwroot\app folder at say about.component.ts, where we load the partial component:
@Component({
    selector: 'my-about',
    templateUrl: '/partial/aboutComponent'
})
let's fix this in our Typescript components now. Change the URL for each of the templates like this:
@Component({
    selector: 'my-about',
    templateUrl: 'partial/aboutComponent'
})
Update about.component.ts, app.component.ts, contact.component.ts, index.component.ts, login.component.ts and register.component.ts to fix each template, removing the leasing slash. Re-publish and:

Almost there, now our URLs seem all to be constructed properly, but the menus and default pages are not quite right. When you navigate, clicking on say Home, you will be taken to the root https://localhost
Update AppComponent.cshtml to change the links here to remove the leading slashes, change from this:
<ul class="nav navbar-nav">
    <li>
        <a class="nav-link" (click)="setTitle('Home - A2SPA')" routerLink="/home" routerLinkActive="active">Home</a>
    </li>
    <li [hidden]="!isLoggedIn()">
        <a class="nav-link" (click)="setTitle('About - A2SPA')" routerLink="/about">About</a>
    </li>
    <li [hidden]="!isLoggedIn()">
        <a class="nav-link" href="/swagger">NSwag</a>
    </li>
    <li>
        <a class="nav-link" (click)="setTitle('Contact - A2SPA')" routerLink="/contact">Contact</a>
    </li>
</ul>
to this:
<ul class="nav navbar-nav">
    <li>
        <a class="nav-link" (click)="setTitle('Home - A2SPA')" routerLink="home" routerLinkActive="active">Home</a>
    </li>
    <li [hidden]="!isLoggedIn()">
        <a class="nav-link" (click)="setTitle('About - A2SPA')" routerLink="about">About</a>
    </li>
    <li [hidden]="!isLoggedIn()">
        <a class="nav-link" href="swagger">NSwag</a>
    </li>
    <li>
        <a class="nav-link" (click)="setTitle('Contact - A2SPA')" routerLink="contact">Contact</a>
    </li>
</ul>
and in \views\shared\_loginpartial.cshtml change from this:
<ul class="nav navbar-nav navbar-right">
    <li><a class="nav-link" (click)="setTitle('Register - A2SPA')" routerLink="/register">Register</a></li>
    <li><a class="nav-link" (click)="setTitle('Login - A2SPA')" routerLink="/login">Login</a></li>
</ul>
to this:
<ul class="nav navbar-nav navbar-right">
    <li><a class="nav-link" (click)="setTitle('Register - A2SPA')" routerLink="register">Register</a></li>
    <li><a class="nav-link" (click)="setTitle('Login - A2SPA')" routerLink="login">Login</a></li>
</ul>
Publish and check again, and we get a little further. This time we've a problem with the URL for the login. it is pointing to /connect/login instead of /a2spa/connect/login so of course we get a 404 not found error when we send our login request to the server. But hey, at least the pages are serving! This is progress.

Now don't do this next step, I tried to change startup.cs and change the setting for the token endpoint, from this:
// Enable the authorization, logout, token or userinfo endpoints here:
options.EnableTokenEndpoint("/connect/token");
to this:
// Enable the authorization, logout, token or userinfo endpoints here:
options.EnableTokenEndpoint("connect/token");
This creates an error that is a little hard to diagnose. It looked like this in the browser, F12 network debugger said it was a 500 error (the 404 was the previous session). And there's not much other help in the message.

In Event Viewer we got an obscure message saying it just took too long.

and then after a refresh, restarting IIS and then that retry actually said it worked as far as Event viewer was concerned, but gave the same result in the browser.

So off to a command prompt (or powershell in this case), and you get a hint that there's a missing mandatory slash:

The change I did earlier, to remove the leading slash from the token endpoint was not very helpful. Restore the slash and we're back where we were, still with the same 404 error, but at least not a 500 error:

To fix this one, you need to update code in a couple of places. The request is sent out from our Angular 4 code, and we need these key changes. In /wwwroot/app/app.module.ts change from this:
@NgModule({
    imports: [ BrowserAnimationsModule, BrowserModule, FormsModule, HttpModule, ToastrModule.forRoot(), routing],
    declarations: [AppComponent, routedComponents],
    providers: [SampleDataService,
        AuthService,
        AuthGuard, Title, { provide: APP_BASE_HREF, useValue: '/' }],
    bootstrap: [AppComponent]
})
to correct the base website path, by changing APP_BASE_HREF to this:
@NgModule({
    imports: [ BrowserAnimationsModule, BrowserModule, FormsModule, HttpModule, ToastrModule.forRoot(), routing],
    declarations: [AppComponent, routedComponents],
    providers: [SampleDataService,
        AuthService,
        AuthGuard, Title, { provide: APP_BASE_HREF, useValue: '/a2spa' }],
    bootstrap: [AppComponent]
})
Then in /wwwroot/app/security change the router link in auth-guard.service.ts from this:
this.router.navigate(['/login']);
to this:
this.router.navigate(['login']);
similarly change the links in /wwwroot/app/login.component.ts, (only a small part shown here) from this:
this.http.post('/connect/token', body, { headers: this.authService.contentHeaders() })
    .subscribe(response => {
        // success, save the token to session storage
        this.authService.login(response.json());
        this.router.navigate(['/about']);
removing the leading slash from the http.post and from the router link, to have this instead:
this.http.post('connect/token', body, { headers: this.authService.contentHeaders() })
    .subscribe(response => {
        // success, save the token to session storage
        this.authService.login(response.json());
        this.router.navigate(['about']);
and again, the same thing in register.component.ts, the same thing, removing the leading slasshes to be this:
this.http.post('Account/Register', JSON.stringify(body), { headers: this.authService.jsonHeaders() })
    .subscribe(response => {
        if (response.status == 200) {
            this.router.navigate(['login']);
Now publish again, and we can finally ... no another 500 error. But don't give up yet!

This time look at Event Viewer, the error can be difficult to see sometimes, so refresh you page a few times.

have another look in Event Viewer, hit F5 in Event Viewer to refresh the view of events. You'll finally see a SQL server issue.

SQL Manager is some help, open it up, right click your A2SPA database, click properties, then click "Files", it shows the owner, and the file names, though not (directly) what the path of each is.

Here we're running into limitations of LocalDB. Normally LocalDB runs under the context of your local user account, the database container (an .MDF file) and log file (an .LDF file) sit within your user directory. As you can see below:

In addition to the file and user issues, the application behind LocalDB only spins up and runs when needed, it does not run as a service, and though it is fine for development, is not the best choice for a public facing website.
Despite these issues, there are some people who have managed to get LocalDB running, though personally I think it is not worth the effort, far easier to simply use SQL Express (which is also free), but considering the time, much simpler and faster to use (hence cheaper!).
If you are interested, these two blog posts describe various hacks you can use, and are a good in depth study of the issues:
https://blogs.msdn.microsoft.com/sqlexpress/2011/12/08/using-localdb-with-full-iis-part-1-user-profile/
https://blogs.msdn.microsoft.com/sqlexpress/2011/12/08/using-localdb-with-full-iis-part-2-instance-ownership/
Installing SQL Express
Skip this if you have SQL Express installed, but if not, please do yourself a favor, download it and install it. It is small enough to have installed and disabled in services when you don't need it (or on a laptop on the train on batteries, and really don't need it).
Download SQL Express from Microsoft (currently SQL Express 2016 SP1) here:
https://www.microsoft.com/en-us/sql-server/sql-server-editions-express
and later, after that's installed download the latest (also free) SQL Server Management Studio (SSMS) here:
https://docs.microsoft.com/en-us/sql/ssms/download-sql-server-management-studio-ssms
and lastly, SQL Server Data Tools (SSDT) for Visual Studio here:
https://docs.microsoft.com/en-us/sql/ssdt/download-sql-server-data-tools-ssdt
Installing SQL Express is pretty straightforward, the installer does have a myriad of links. Start with with "New SQL Server stand-alone ..."

Of course you accept, what choice :)

next, next, ...

a named instance is important. If you are playing around with say someone's source off GitHub, chances are it assumes in the connection string the name "SQLEXPRESS" so the default is good, follow the prompts, click next:

up to you, I checked the box, clicked next.

Here's oe I find useful, the default is normally just Windows Authentication. That's OK, except sometimes you might want to user a username and password. If you have not enabled it here and now, you may save yourself a reinstall later. So why not, even if you don't use it. if you want to play with Filestream you can enable that as well, click next:

and off goes the install...

Once done, and you have your SQL Server Management Studio installed, you're set. After that intermission, back to our web application.
Converting from LocalDB to SQL Express
In Visual Studio go to the Build menu, then click Publish, or alternately right click the A2SPA project and click Publish. go back to the Settings option on the LHS, and open up the Databases option, as shown below.
I've highlighted the section you need to change. The default will have picked up the connection string from our appsettings.json file, and have for the server (localdb)\mssqllocaldb as shown:

Change this, in readiness for our new SQL Express database to .\SQLEXPRESS that is a dot, then a backslash and then SQLEXPRESS, all without spaces. as below:

Click next.
Now we're going to take a shortcut here. If you have tried to follow the SQL script export option, that is supposed to be in EF Core, and had the same results as me, you'll find it doesn't export to a script:

So how do we set up the database on SQLExpress? Given the tooling is not quite all there yet, we could do two things. We could script the database from LocalB, using SSMS we can fairly easily create a database creation script and then use that script to create the database and tables on SQL Express. Fairly easily, except we'd need to edit the script a little to get around differences between LocalDB and regular SQL.
Far simpler, we have a database seeding and auto-migration clause in startup.cs but it's set to development mode only. so temporarily remark out the if statement, at the bottom of startup.cs to this:
// if (CurrentEnvironment.IsDevelopment())
{
    options.DisableHttpsRequirement();
}
Then in SQL Server Management Studio, right cilck "Databases" and then click "New Database":

Call is say A2SPA, notice the storage location is not under a user account, quite different to LocalDB. click Ok

then open up "Databases", hit F5 to see the newly created database, A2SPA, click on A2SPA in the left hand "Object Explorer" pane. then hit ctrl-N for "New Query", and enter the following:
create login [IIS APPPOOL\a2spa] from windows;
exec sp_addsrvrolemember N'IIS APPPOOL\a2spa', sysadmin
then hit ctrl-E for execute, then click the red ! button. This will create a new login that happens to coincide with the name of the APP Pool and assign it rights to our database.
This part of things is really no different to setting up SQL Express (or other SQL) with ASP.net MVC or ASP.Net websites to work in conjunction with IIS and IIS APP Pool users. You can find more details here.
Now publish the site, and fire up your browser and finally you should be able to register a new user and login.

Well in my case, not quite, turned out I could not spell

A quick look in SQL manager and I found I misspelt my user account!

And finally .. drum roll, our published VS2015 web application:

Publishing using VS2017 and our final cleanup, to remove some of the hard coded 'hacks' to make the site work will have to come in part 8.
If you're using VS2017, hang in there, there's a few differences in publishing, particularly including node_modules and other static content that we'll address.
History
this series of articles has been describing a way to integrate ASP.Net Core with Angular 2.
Part 1 - How to integrate ASP.Net Core and Angular 2
Part 2 - How to use Tag Helpers to display data
Part 3 - How to use Tag Helpers for data input, added SQL backend using EF Core.
Part 4 - Adding token authentication with JWT using OpenIdDict.
Part 5 - Adding async services, server-side validation, a simple Angular 2 datagrid & more tag helpers.
Part 6 - Using NSwag to create Swagger docs and generate Angular 2 / Typescript data models + data services.
this is part 7 - publishing to IIS for VS2015 users
Next will be part 8, how to publish to IIS using VS2017 as well as final code optimizing and clean up for both VS2015 and VS2017 projects.
Finally a big thank you to Kévin Chalet for his great OpenIdDict security framework. It's so powerful and yet so very simple to use.