
Building Your First ReconOS App
This article will walk through the steps to developing an app walking through downloading the required tools, to running the app for the first time on Recon Jet Pro.
Get access to the new Intel® IoT Developer Kit, a complete hardware and software solution that allows developers to create exciting new solutions with the Intel® Galileo and Intel® Edison boards. Visit the Intel® Developer Zone for IoT.
ReconOS* provides a powerful Operating System for Jet Pro*. This article will walk through the steps to developing an app walking through downloading the required tools, to running the app for the first time on Recon Jet Pro. It is a brief overview of the resources you'll need to develop apps for ReconOS*, an Operating System that provides a powerful platform compatible with Android API level 16. Once you've familiarized yourself with our reference app and with the Recon SDK UI components, you should be comfortable enough to create your own Jet Pro app.

Overview of Jet Pro*
Developing an app for Jet Pro* is similar to developing an app for Android smartphone. However, you must be aware of Jet Pro's unique capabilities and limitations:
- Controls: Jet Pro does not have a touch screen. Instead, the device is operated with an optical touchpad (which is mapped to a d-pad in software) as well as two hardware buttons: select and back/power. Best practices for implementing these controls are outlined in the Understanding Jet's Controls section of Recon’s design guide.
- Display: 428x240 micro LCD. Note that the display is not designed to rotate. Also, for optimal readability and battery life, we recommend using light text and light graphics on a black background. For more details, see the Styling and Best Practices section of Recon’s design guide.
- Battery: Jet Pro's battery should provide between 2 and 5 hours of run time. The exact run time depends on the use case.
- Network: Bluetooth*, Wi-Fi*, and ANT+*. Jet Pro can get internet access either through Wi-Fi, or through a smartphone connected via Bluetooth using the Web API component of the Recon SDK.
- Audio: Jet Pro features a mono speaker positioned on the right side of the device, facing the user's ear.
Developing Your First ReconOS* App
These instructions will teach you how to build your first application using the Recon SDK. You'll learn how to set up your development environment and create a new project in Android Studio. You'll also learn how to add the Recon SDK to your project and access some of its features. Next, you'll go through the steps of building a simple app.
Setting up your environment
Before you can start developing your app, you must set up your environment; the following sections will guide you through this process.
Install Android Studio
Before you start developing your app, you should download and install Android Studio. These tutorials are written with the expectation that you'll be using this software.
Open the Android SDK Manager
- If this is your first time opening Android Studio, click Configure on the welcome screen, then choose SDK Manager.

- If you already have an open project, select Android from the Tools menu, then click SDK Manager. Finally, select Launch Standalone SDK Manager.

Install updates and API-16
- To install only the required files, click the blue Deselect All link, then click the blue Updates link. (Don't click the Install x packages... button yet.)

- Expand Android 4.1.2 (API 16), then select SDK Platform and Sources for Android SDK, and click Install x packages.

- Review the license agreement, click the Accept License radio button, then click the Install button.
Install the correct ADB driver
Instead of the ADB driver provided with the Android SDK, you should use the ADB driver located here. To install this driver, follow the steps below:
- Enter
adb kill-serverin a Terminal (OS X*), shell (Linux*), or Command Prompt (Windows*) window to terminate any running adb server processes. - In OS X or Linux, enter
which adbin a Terminal or shell window. - Replace the existing driver files with the ones located here. On Windows, the file should be in one of the following locations:
- C:\Program Files (x86)\Android\android-sdk\platform-tools\
- C:\Users\<yourName>\AppData\Local\Android\sdk\platform-tools\
- On your Recon Jet Pro, navigate to Settings > Advanced, and make sure USB Debugging is enabled.
- Plug your Recon Jet Pro into your computer.
- Enter adb devices in your Terminal, shell, or Command Prompt window, and make sure your Recon device is recognized.
Note: If you are using Windows and see the following error, add the adb folder to the Windows PATH variable:
'adb' is not recognized as an internal or external command, operable program or batch file
Adding the adb folder to the Windows PATH variable
- Press the Windows key to open the Start menu or Start screen, then type environment variables to begin a search. In the search results, click Edit environment variables for your account.
- In the Environment Variables control panel, scroll through the System Variables list until you find the variable named Path. Select that variable, then press the Edit... button.
- Add the path of the folder containing adb.exe to the Variable value field. That path should be one of the following:
- 'C:\Program Files (x86)\Android\android-sdk\platform-tools\'
- 'C:\Users\<yourName>\AppData\Local\Android\sdk\platform-tools\'
- Once you've found the correct path, add it to the end of the Variable value field. Make sure the entry is preceded by a semicolon (for example, “...;C:\Users\<yourName>\AppData\Local\Android\sdk\platform-tools”).
- Restart Command Prompt. The adb command should now be recognized.
Creating a New Project
- If you don't have a project open, click New Project on the Welcome screen. Otherwise, open the File menu and select New > New Project...
- Fill in the Application name, Company Domain, and Project location, then, click Next.

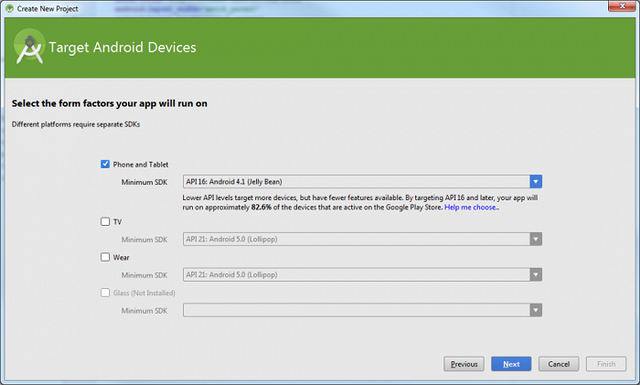
- Make sure only the Phone and Tablet box is selected. In the corresponding Minimum SDK drop-down menu, select API 16: Android 4.1 (Jelly Bean). Then, click Next.
- Select the Empty Activity option. Then, click Next.

Note: For more information about activities and their place in Android applications, visit this page. - Next, fill in the Activity Name, Layout Name, Title, and Menu Resource Name fields, and click Finish.

That's it! Your Android Studio project has been created. You now have a basic 'Hello World' application.
Adding the Recon* SDK
Before your application can use the available Recon* SDK dependencies, you'll need to modify its Gradle files.
Step 1: Add the Maven repository
- Open the build.gradle (Project: My First Recon App) file, and add the following lines as shown below:
maven {
url "http://repo.reconinstruments.com/artifactory/libs-release"
}
- Open the build.gradle (Module: app) file, and add the following three lines to the dependencies { ... } section, as shown below:
compile 'com.reconinstruments.app:recon-application:X.X.X'
compile 'com.reconinstruments.ui:recon-ui:X.X.X'
provided 'com.reconinstruments.os:recon-platform:X.X.X'

Note: Make sure that you change the 'X.X.X' specification above to reflect the most recent SDK version. For more information, review the latest latest releast notes.
Note: Make sure that the minSdkVersion and targetSdkVersion are both set to 16.
Step 3: Update the project's manifest
- Open the file called .../manifests/AndroidManifest.xml, and add the following line to the application settings as shown in line 9 of the image below:
android:theme="@style/ReconTheme" - Add the library use lines to the application body (lines 20 & 21 in the image below):
<uses-library  android:name="com.reconinstruments.os"/>
 <uses-library  android:name="com.reconinstruments.lib"/>
Note: Make sure these lines are the inside application body. or your project will generate errors.

- Save the manifest file. The lines we've just added will tell your application two things: that it will use a Recon UI theme for its graphical components and that it will use a custom library within its main activity.
You're now ready to start coding your project using the Recon SDK!
Note: For more information about Manifest files and their uses, see the App Manifest API Guide.
Making a User Interface and Adding Core Functionality
To make effective use of the Recon Jet Pro compact, sunlight-readable display, we recommend that you use the ReconUI package and that you familiarize yourself with Recon’s design guide.
The Enterprise Launcher app serves as a custom launcher that contains a scrolling list of other applications that can be invoked by calling the intents.
In this part of the tutorial, you will learn how to implement a simple user interface and add core functionality to your app's main activity. For an implementation of this tutorial, see the source code of the ReconOSComponentsActivity within the EnterpriseLauncher sample app.
First, we'll implement a standard ReconOS vertical list. Vertical lists can contain both read-only data and interactive elements, and they can be scrolled. When you scroll to the end of a list, your selection will wrap back to the beginning (and vice-versa). Because vertical scrolling is tedious on Jet Pro, we recommend that you use vertical lists only in low-traffic areas of your app, and only to show large sets of elements (as in the Settings menu).

With ReconUI, setting up a basic vertical list UI is very simple:
- To start off, open your Activity class and add the following imports:
import com.reconinstruments.ui.list.SimpleListActivity;
import com.reconinstruments.ui.list.StandardListItem;
- Make sure the MainActivity extends the SimpleListActivity class:
public class MainActivity extends SimpleListActivity {
...
}
Making a custom List
Selectable functionality can be built into lists. For example, list items can be made to open new intents.
- To make a custom list, extend the StandardListItem class, and add our your own functionality to the onClick(...) function:
public class ListItem extends StandardListItem { Intent intent; public ListItem(String text, Intent i) { super(text); this.intent = i; } public void onClick(Context context) { context.startActivity(intent); } } - Add your custom list items using the setContents(...) function:
@Override public void onCreate(Bundle savedInstanceState) { super.onCreate(savedInstanceState); setContentView(R.layout.list_standard_layout); setContents( new ListItem("Start Activity A", IntentA), new ListItem("Start Activity B", IntentB), new ListItem("Start Activity C", IntentC)); } - When your list's items are selected, they'll launch the specified intents.
Adding callable intents
The following sample code shows how to integrate intents from the AN005 into the list you just created:
public class MainActivity extends SimpleListActivity {
    // ReconOS apps and components:
    static final String ENGAGE_PHONE_CONNECTION = "com.reconinstruments.connectdevice.CONNECT";
    static final String NOTIFICATION_CENTER = "com.reconinstruments.messagecenter.frontend";
    static final String CAMERA_APP= "com.reconinstruments.camera";
    static final String GALLERY_APP= "com.reconinstruments.camera.gallery";
    static final String COMPASS= "com.reconinstruments.compass.CALIBRATE";
    static final String INSTALLED_APPS= "com.reconinstruments.jetappsettings.apps";
    static final String RECON_SETTINGS = "com.reconinstruments.jetappsettings.settings";
    static final String POWER_MENU = "com.reconinstruments.power.RECON_POWER_MENU";
    // The setting page for the enterprise launcher app.
    static final String SETTINGS = "com.reconinstruments.enterprise.settings";

    @Override
    protected void onCreate(Bundle savedInstanceState) {
        super.onCreate(savedInstanceState);
        setContentView(R.layout.list_standard_layout);
        ArrayList components_items = new ArrayList();
        components_items.add(new ListItem(getString(R.string.phone_connection),new Intent(ENGAGE_PHONE_CONNECTION)));
        components_items.add(new ListItem(getString(R.string.notification_center),new Intent(NOTIFICATION_CENTER)));
        components_items.add(new ListItem(getString(R.string.settings),new Intent(SETTINGS)));
        components_items.add(new ListItem(getString(R.string.recon_settings),new Intent(RECON_SETTINGS)));
        if(!DeviceUtils.isSnow2()) {
            components_items.add(new ListItem(getString(R.string.camera_app), new Intent(CAMERA_APP)));
            components_items.add(new ListItem(getString(R.string.gallery_app), new Intent(GALLERY_APP)));
        }
        components_items.add(new ListItem(getString(R.string.compass), new Intent(COMPASS)));
        components_items.add(new ListItem(getString(R.string.installed_apps), new Intent(INSTALLED_APPS)));
        components_items.add(new ListItem(getString(R.string.power_menu), new Intent(POWER_MENU)));
        setContents(components_items);
    }
}
Your app is now fully functional and is now ready to test! To run this app, plug Recon Jet Pro into your computer and hit the Run button in Android Studio shown below.

Once you have successfully run the app on Recon Jet Pro, explore adding functionality to the app. For example, try adding, renaming, or removing items from the SimpleList example, or changing the SimpleList to a Carousel.