
Getting Started with Intel IoT Gateways with the Intel IoT Developer Kit
This article contains steps to assemble your gateway (if needed) and connect the gateway to any peripheral devices.
Get access to the new Intel® IoT Developer Kit, a complete hardware and software solution that allows developers to create exciting new solutions with the Intel® Galileo and Intel® Edison boards. Visit the Intel® Developer Zone for IoT.
This section contains steps to assemble your gateway (if needed) and connect the gateway to any peripheral devices. If you've chosen the Intel® NUC as your gateway, you'll need to assemble it before you begin, as described in the steps below. Otherwise, skip straight to connecting peripherals.
Requirements
- Your gateway device. if you've chosen the Intel NUC, you may need additional components, as described below.
- A monitor compatible with your gateway device. Depending on your gateway, you may need a VGA or micro HDMI cable to connect the monitor to the gateway
- A USB keyboard and mouse
Assembling the Intel® NUC
Before you can include an Intel® NUC in your gateway solution, you must add memory to the Intel NUC. Optionally, you can add a wireless card (to enable the Intel NUC to connect to a wireless network) or another hard drive. This guide contains steps to install these additional components in the Intel NUC.
Parts
- Intel NUC. The following components can be used to complete the Intel NUC:
- A DDR3 non-EED memory card (required)
- A wireless card (optional)
- A hard drive (optional). The Intel NUC comes with a 4GB hard drive, but you can supply your own if you need additional space.
Tools
- Small screwdriver, with a variety of Phillips head sizes
- Small scissors
Assembling the Intel® NUC
- Unscrew the two screws in the front of the gateway.

- With the screws removed, gently pull open the chassis.

- Take the memory module and slide it into the socket at a slight angle, as shown. There will be gold headers on the leading edge of the memory card, which fit into the socket. Be sure to match the location of the notch on the leading edge of the memory module to the notch in the socket (the module will not fit in any other orientation).

- Press down gently on the elevated end of the memory module until it snaps snugly into place. The plastic brackets on either side of the socket should fit neatly around the sides of the memory module.

- Pull up the tape that attaches the gray and black wireless connector cables to the inside of the NUC. Both cables will have plastic wrapping around the header.

- Gently cut and remove the plastic wrapping from the headers.

- Unscrew the screw in front of the wireless card socket.

- Slide the wireless card into the socket, lining up the hole in the wireless card with the hole you just removed the screw from.

- Screw the wireless card securely into place.

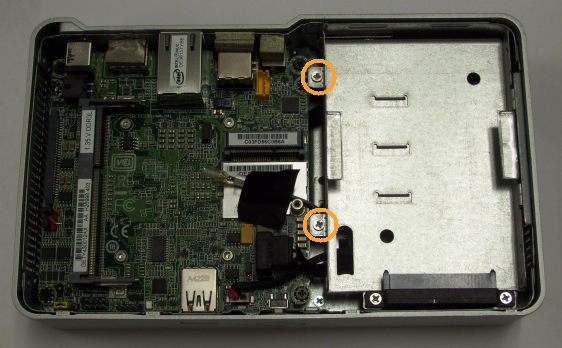
- Unscrew the screws attaching the empty hard drive tray to the inside of the NUC chassis, then lift the tray free. You might need to detach one or two cables in order to remove the tray, as they'll be tightly tucked into a holder in the bottom of the tray.
- Attach the wireless headers to the wireless card. The gray wire should be attached to the left socket and the black to the right.

- Slide your hard drive into the empty tray, lining the gold headers up with the connectors on the tray.

- Secure the hard drive into the tray with the screws provided.

- Replace the hard drive and tray in the NUC. Also replace any wires and reconnect any connections you may have disconnected to remove the tray.

- Close the chassis and replace the outer screws.
Connecting peripherals
- Attach your monitor to your gateway.
- Attach the USB keyboard and mouse to your gateway. Do not power your gateway on yet!
Next Steps
Now that you have your gateway connected to its peripherals, continue to choose your operating system.