
Introduction to the UPDATE Statement
4.17/5 (4 votes)
An introduction to the UPDATE statement
The UPDATE statement is used to change data within columns of a SQL Server data table. In this article, we’ll explore how to use the UPDATE statement. We discuss some best practices, limitations, and wrap-up with several examples.
This is the third article in a series of articles. You can start at the beginning by reading Introduction to SQL Server Data Modification Statements.
All the examples for this lesson are based on Microsoft SQL Server Management Studio and the AdventureWorks2012 database. You can get started using these free tools using my Guide Getting Started Using SQL Server.
Before We Begin
Though this article uses the AdventureWorks database for its examples, I’ve decided to create an example table for use within the database to help better illustrate the examples. You can find the script you’ll need to run here.
Also, let’s initially populate the table with some data using the following INSERT statement:
WITH topSalesPerson (FullName, SalesLastYear, City, rowguid)
AS (
SELECT S.FirstName + ' ' + S.LastName,
       S.SalesLastYear,
       S.City ,NEWID()
FROM   Sales.vSalesPerson S
WHERE  S.SalesLastYear > 1000000
)
INSERT INTO esqlSalesPerson (FullName, SalesLastYear, City, rowguid)
SELECT FullName,
       SalesLastYear,
       City,
       rowguid
FROM   topSalesPerson
You can learn more about the INSERT statement by reading our article Introduction to the INSERT Statement.
Basic Structure
The UPDATE statement is used to change column values. Though an update statement can modify columns data from many sources, such as literal values or other query results, the basic format is the same.
There are three components to an UPDATE statement:
- The table you wish to change
- The column you wish to change
- The source data you wish to use to make the change
The general format for the UPDATE statement is:
UPDATE tableName
SET    column1 = value1,
       column2 = value2,
…
We’re now going to do some sample updates, so if you haven’t done so already, run the script to create the esqlSalesPerson table.
Simple Example – Updating Every Row
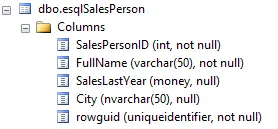
In this example, we insert a single row into the esqlSalesPerson table. Here is its table structure:
Let’s assume we want to update the city for every sales person to Ann Arbor. The command to run is:
UPDATE esqlSalesPerson
SET    City = 'Ann Arbor'
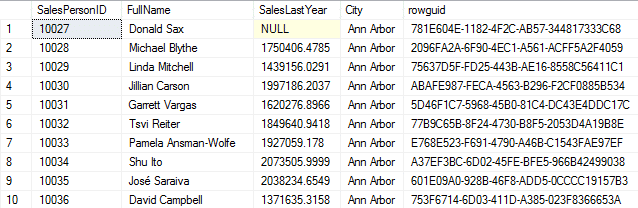
You can also update more than one column at a time. To update both the City and rowguid, we can run:
UPDATE esqlSalesPerson
SET    City = 'Ann Arbor',
       rowguid = NEWID()
Which updates the table to the following:
UPDATE esqlSalesPerson
SET    FullName = 'Don Sax'
WHERE  SalesPersonID = 10027
Changes Donald Sax’s name to Don Sax.
Notice we used the primary key SalesPersonID to filter the row. This makes it really easy to ensure we are updating exactly one row.

Note: The SalesPersonID generated for your table’s rows may be different than what is shown in the exercises, since this primary key is auto generated.
Simple Example – Updating Multiple Rows
The UPDATE statement is capable of updating more than one row. This is controlled by the WHERE clause. All rows returned via the WHERE clause criteria are updated.
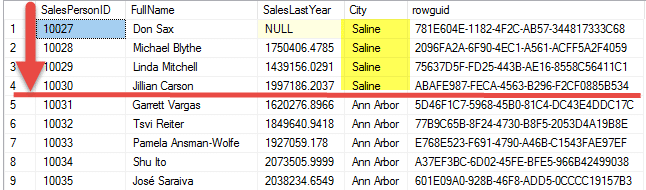
Suppose every SalesPerson whose ID is less than 10031 worked in Saline. To update the rows to reflect this, we could use this UPDATE statement:
UPDATE esqlSalesPerson
SET    City = 'Saline'
WHERE  SalesPersonID < 10031
Which results in the following row modifications:
Considerations using UPDATE
The UPDATE statement is complex and there are many elements to consider. Here are some of the more important ones. For a full list, check out the UPDATE (Transact-SQL) article.
Data Type Considerations (Padding)
Keep in mind that when updating data in columns whose data type is CHAR, VARCHAR, or VARBINARY, the padding or truncation of data depends upon the SET ANSI_PADDING setting.
When SET ANSI_PADDING OFF then CHAR data types are padded with spaces, VARCHAR data types have trailing spaces removed, and VARBINARY have trailing zeros removed.
For instance, if a field is defined as CHAR(10) and you update the value ‘Kris’ into this column, then it will be padded with six spaces. The value is changed to ‘Kris ‘.
Error Handling
You can handle errors when executing an UPDATE statement using a TRY…CATCH construct.
There are several common reasons an UPDATE statement may fail. Some of the common ones are:
- Unique Key Violation – You’re trying to update a value which causes a duplicate key value.
- Data Type Conversion – You’re trying to update a value which can’t be correctly converted into the corresponding columns data type.
In these cases, the UPDATE statement execution stops and the UPDATE generates an error. No rows from the UPDATE statement are saved into the table, even those rows that didn’t generate an error.
This “all or nothing” behavior can be modified for arithmetic errors. Consider a divide by zero error.
UPDATE myNumbers
SET    X = 10/0
Will generate an error if SET ARITHABORT is set to ON. In this case, the inserted is stopped, no rows are updated and an error thrown.
Locking Behavior
An exclusive (X) lock is always placed on a table when an update is run. The lock is held in place until the update statement completes. Since this is an exclusive lock, not other transaction can modify data on this table, until the one which originally placed the lock is completed.
Complex Example – Update From Another Table
In this example, we’re going to show you how to update’s column values based on a match to another table. The general form to use is:
UPDATE maintable
SET    columnToUpdate = secondtable.columnValue
FROM   maintable
       INNER JOIN secondtable
       ON join condition
Where maintable is the table you wish to update and secondtable contains the update values; we use joins to do the matching.
Let's suppose that someone has accidentally updated all esqlSalesPerson.City column values to NULL!
How can we easily repopulate this data without having to retype it in?
Knowing that esqlSalesPerson was originally populated by information from Sales, we use knowledge to set up a query that pumps data from vSalesPerson into esqlSalesPerson. This is possible since the sales person’s full name is common to both tables.
In the diagram below, you’ll see where there is a match between these two tables:
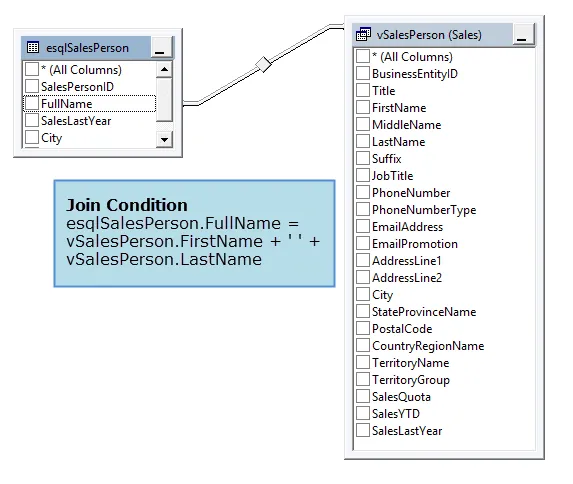
By matching esqlSalesPerson.FullName to vSalesPerson, we can update esqlSalesPerson.City with the matched record.
Before we go much further, let’s first wipe out the city column values. You can run the following to do so and then verify all cities are NULL.
-- Blank out the City
UPDATE esqlSalesPerson
SET    City = Null;

-- Proof
SELECT SalesPersonID, City
FROM esqlSalesPerson
Once that is complete, we can proceed to update the city with the match value using this UPDATE statement:
UPDATE esqlSalesPerson
SET    City = v.City
FROM   esqlSalesPerson
       INNER JOIN Sales.vSalesPerson v
       ON e.FullName = v.FirstName + ' ' + v.LastName
Once you look at the statement, you’ll see we added FROM and INNER JOIN clauses.
Recall the INNER JOIN clause is used to match the rows from one table to another using a join condition.
In our case, the join condition is e.FullName = v.FirstName + ‘ ‘ + v.LastName. Notice here we’re constructing a full name from the views FirstName and LastName columns. It’s cool, and it works!
So, once we have the join, the last bit of business to it do the update. We simply set City to its match counterpart, v.City, and all is well.
Complex Example – Using OUTPUT to Log Changes
The OUTPUT clause is used to log changes made to rows affected by an UPDATE statement.
Suppose the SalesLastYear figures were found to be incorrect and needed to be adjusted by five percent. You can easily adjust the values using the following statement:
UPDATE esqlSalesPerson
SET    SalesLastYear = SalesLastYear * 1.05
However, suppose the sales department wants a record of all changes. Sure, you could run a query before the update, one after the update, and then compare, but rather than doing all of that, we can use the OUTPUT clause to log the changes directly into a table.
The complete script to run to log the output into a temporary table is:
DECLARE @UpdateLog table(
SalesPersonID int NOT NULL,
OldSalesLastYear int,
NewSalesLastYear int)

UPDATE esqlSalesPerson
SET    SalesLastYear = SalesLastYear * 1.05
OUTPUT inserted.SalesPersonID,
       deleted.SalesLastYear,
       inserted.SalesLastYear
       INTO @UpdateLog

SELECT SalesPersonID,
       OldSalesLastYear,
       NewSalesLastYear
FROM   @UpdateLog
We’ll not talk about the three pieces in turn.
Notice we’re declaring a table variable to house the logged results. We do this using the following command in our script:
DECLARE @UpdateLog table(
SalesPersonID int NOT NULL,
OldSalesLastYear int,
NewSalesLastYear int)
This statement defines a table with three columns and names the table variable @UpdateLog. The reason we’re using a table variable is temporary and will be removed once query session is closed.
With the table variable defined, we’re safe log the results using OUTPUT as we do here:
UPDATE esqlSalesPerson
SET    SalesLastYear = SalesLastYear * 1.05
OUTPUT inserted.SalesPersonID,
       deleted.SalesLastYear,
       inserted.SalesLastYear
       INTO @UpdateLog
As each row is updated, the special column prefix values deleted and inserted provide a means to see the value before and after the update respectively.
The old sales value exists in deleted.SalesLastYear; whereas, inserted.SalesLastYear contains the newly updated value.
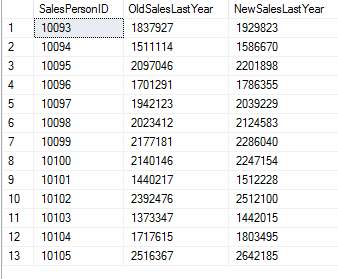
To view the logged values, you can run the following:
SELECT SalesPersonID,
       OldSalesLastYear,
       NewSalesLastYear
FROM   @UpdateLog
which displays:
Note: If you like the OUTPUT clause, remember, you can also use it with INSERT, DELETE, and MERGE!
The post Introduction to the UPDATE statement appeared first on Essential SQL.