
Connecting an Intel® IoT Gateway to Amazon Web Services
This guide will walk you through adding the IoT Cloud repository to your Intel® IoT Gateway and adding support for Amazon Web Services so you can begin developing applications for this platform in your programming language of choice.
Get access to the new Intel® IoT Developer Kit, a complete hardware and software solution that allows developers to create exciting new solutions with the Intel® Galileo and Intel® Edison boards. Visit the Intel® Developer Zone for IoT.
Prerequisites
- Intel® IoT Gateway Technology running IDP 3.1 or above with internet access
- A development device (e.g., laptop) on the same network as the Intel® IoT Gateway
- Terminal access to the Intel® IoT Gateway from your development device
- Amazon Web Services account: https://aws.amazon.com/
Please see the following documentation for setting up your Intel® IoT Gateway:https://software.intel.com/en-us/node/633284
Adding the IoT Cloud repository to your Intel® IoT Gateway
- Access the console on your gateway using either a monitor and keyboard connected directly, or SSH (recommended).
- Add the GPG key for the cloud repository using the following command:
rpm --import http://iotdk.intel.com/misc/iot_pub.key - On your development device (e.g., laptop) open a web browser and load the IoT Gateway Developer Hub interface by entering the IP address of your gateway in the address bar.
Tip: You can find your gateway’s IP address using theifconfigcommand. - Login to the IoT Gateway Developer Hub interface using your credentials. The default login and password are both root.

- Add the IoT Cloud repository.

- Go to the Packages section and click the Add Repo + button.

- Populate the fields with the following information and click Add Repository:
Name: IoT_Cloud
URL: http://iotdk.intel.com/repos/iot-cloud/wrlinux7/rcpl13 - Finally, click the Update Repositories button to update the package list.
Adding AWS* support to your Intel® IoT Gateway

- Click the Add Packages + button to bring up the list of packages you can install.

Search for cloud-aws using the search box at the top of the package window. Click the Install button next to the packagegroup-cloud-aws entry.
Setup your user in AWS* console
- In a browser navigate to the AWS* console at https://console.aws.amazon.com and login to your AWS account.
- Assign the AWSIoTFullAccess policy to your user.
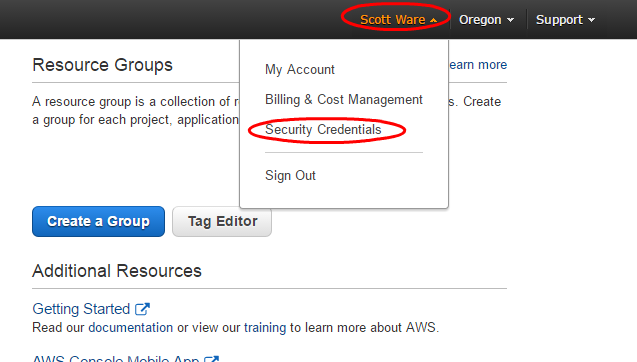
- Click on your account name in the top right corner of the console and select Security Credentials from the drop-down list.

IF you get the popup message above select Continue to Security Credentials.

- Select Users from the left-hand panel to get a list of all users in your AWS account. If there are no users listed click the Create New Users button, enter the usernames you would like to create and click Create. Your AWS users should then be listed as above.

- Click on your user to show a summary page. Select the Permissions tab and click on Attach Policy.

- Scroll down through the list of policies until you find AWSIoTFullAccess. Select this policy and click Attach Policy to add this policy to your user.
- Create an access key for your device

- Back on the user summary screen, select the Security Credentials tab and click on Create Access Key.

At this point, a window will appear showing you your unique access key pair. The Secret Access Key will not be shown again once this window is closed, which means you will need to generate a new access key.
Warning: Do not close this window before completing the next section!
Configuring your gateway
Tip: It is recommended that you use SSH to connect to your gateway, or access the command line through the Intel Developer Hub interface to make copying access keys easier. If you are accessing the command line of your gateway directly, using a monitor and keyboard, you will need to manually enter the access key and secret access key in the next section.
1. Add your user credentials to the gateway.
Enter the following command to add your user credentials to the gateway:
aws configure
When prompted, enter the following information:
- AWS Access Key ID: The Access Key ID you just generated.
- AWS Secret Access Key: The Secret Access Key which pairs the access key you just generated.
- Default region name: See here for a list of regions (e.g. eu-west-1) http://docs.aws.amazon.com/general/latest/gr/rande.html#iot_region
- Default output format: Default is fine, so hit Enter to continue.
2. Create a thing.
Enter the following commands on your gateway to create an associated thing in your AWS* instance:
aws iot create-thing --thing-name gateway-test-01
If adding the thing is successful, you will get output similar to below.

3. Create a permissive policy
Enter the following command to create a new policy in your AWS instance:
aws iot create-policy --policy-name gateway-policy --policy-document '{ "Version": "2012-10-17", "Statement": [{ "Effect": "Allow", "Action":["iot:*"], "Resource": ["*"] }] }'
If the policy is successfully added, the console output should be similar to that below.

4. Create keys and certificate for thing.
Enter the following commands on your gateway to create keys and certificates to communicate with AWS*:
wget -O rootCA.pem https://www.symantec.com/content/en/us/enterprise/verisign/roots/VeriSign-Class%203-Public-Primary-Certification-Authority-G5.pem

aws iot create-keys-and-certificate --set-as-active --certificate-pem-outfile cert.pem --private-key-outfile privkey.pem
You should get output similar to that shown below, followed by a lot of JSON data. For the next step, we need to know only the certificateArn value, which is at the beginning of the console output.

5. Attach the policy to the certificate.
You now need to attach the thing certificate we just generated to the policy you created earlier. Do this with the following command:
aws iot attach-principal-policy --policy-name ${POLICY_NAME} –principal ${CERTIFICATE_ARN}
Be sure to enter the policy name you entered above (e.g. gateway-policy) and the certificateArn from the previous step. For example:
aws iot attach-principal-policy --policy-name gateway-policy --principal arn:aws:iot:eu-west-1:681450608718:cert/122c86b84c6e0b919353882c03ca37385855897e16804438a20d44b3f9934cb3
6. Check device in AWS* IoT Console.

In your browser navigate to the AWS* console home screen by clicking on the AWS icon in the top-left of the page. In the top right-hand corner check that the region you configured your gateway with is selected (e.g. Ireland) and then select the AWS IoT service from the list.

Your AWS IoT dashboard should now contain your thing, policy and certificate you just configured on your gateway.
Sending data to AWS* IoT service using Python
Now that your gateway is configured, you are ready to begin sending data to AWS IoT. There are a number of Python samples included which you can use for testing.
Monitor gateway communication in the AWS* console

- From your AWS IoT console select MQTT Client near the top-right of the page.

- In the MQTT Client window, enter the thing name for your gateway which you assigned earlier (e.g. gateway-test-01) and click Connect.

The Connection status indicator will turn green and say Connected if AWS is able to communicate with your gateway.

- Select Subscribe to topic from the MQTT Client Actions.

- In the Subscription topic field, enter sdk/test/Python and click Subscribe.

Messages received from the gateway will now appear in the message box on the left.
Send messages from the gateway
- Enter the following command to get the endpoint to send messages to AWS:
aws iot describe-endpoint

This will return the endpointAddress, which we will need for the next step. So, copy the address in quotes.
- Navigate to the directory that contains the AWS samples:
cd /usr/share/awsiotsdk/samples/python/
- Run the sample using the following command:
python basicPubSub.py -e [ENDPOINT] -r [ROOTCA_PATH] -c [CERT_PATH] –k [PRIVATE_KEY_PATH]
- ENDPOINT: This is the endpoint address you discovered in the previous step.
- ROOTCA_PATH: This is the path to the rootCA.pem file you downloaded earlier.
- CERT_PATH: This is the path to the cert.pem file you generated earlier.
- PRIVATE_KEY_PATH: This is the path to the privkey.pem file you generated earlier.
All of the certificates and keys should have been downloaded or created in the same path. By default this will be /root or $HOME unless you changed directory after logging into the gateway.
Below is a working example:
python basicPubSub.py -e a1gx5hswnkj6kf.iot.eu-west-1.amazonaws.com -r $HOME/rootCA.pem -c $HOME/cert.pem -k $HOME/privkey.pem

If the sample app is running correctly, you will start seeing console output like that shown above, indicating that messages are being sent on the sdk/test/Python topic.
To verify this, head back to your browser and take a look in the message window. You should see new messages being displayed similar to those in the screenshot below.

Your gateway is now connected to AWS* IoT and able to send and receive data.