
Learn SharePoint in 8 hours –Site Columns, Content Types and MVC integration Part 4
4.50/5 (2 votes)
In this lab we will see how to create content types, site columns and we will also see how to integrate MVC with SharePoint.
Contents
Introduction
Theory: -Site Columns & Content Types:
Lab 12:- Creating Site columns
Theory of site content type
Lab 13:- Creating Site Content types
- Step 1 :- Creating site content types
- Step 2 :- Enable content type
- Step 3 :- Applying content types to the document library
Lab 14:- MVC integration with SharePoint
- Step 1 :- Get Visual studio and office templates
- Step 2 :- Creating a simple hello world App / Addin
- Theory :- Understanding Provider hosted and Sharepoint hosted concept
- Step 3 :- Selecting type of ASP.NET Project
- Step 4 :- Specifying the security model
- Step 5:- Put some code in Action and View
- Theory :- What is the need of “SharePointContextFilter” attribute ?
- Step 7:- Giving trust to the App
Introduction
In the previous lab i.e. Part 3 we looked in to how to customize master pages of SharePoint. In this lab we will see how to create content types, site columns and we will also see how to integrate MVC with sharepoint.
If you are new to SharePoint then we would strongly suggest to start from the below youtube videos and codeproject labs.

Lab 1 (1st hour):- In this lab we will see how to get SharePoint access, create site, site collection and added pages. To read the first article click here.
Lab 2 (2nd hour):- In this lab we understand how to add list, document library and how to assign permission and rights to SharePoint site. To read the second article click here.
Lab 3 (3rd hour):- In this Lab we will see how to customize SharePoint master pages. To read the third article click here.
Theory: -Site Columns & Content Types:
The whole point of site columns and content types is reusability of fields across list and document libraries.
For example consider that you have document library called as “Sales Department” and in that you have a column added called as “Document title” as shown in the below figure. Now if you want to reuse this column with other document library it is difficult.
When you add columns using the “+” icon of the document library ( read this ) you are adding a private column.

Site columns and content types are global column definition which gets created in a central place and then can be reused and applied to different apps like document, list, wiki and so on. With this we do not have define columns again and again for every app.

So let us first understand how to create site columns and then we will move to content types.
So we will create a simple column called as “Document title” and apply it to multiple document libraries.
Lab 12:- Creating Site columns
Step 1 :- Creating the site column
In order to create site columns go to site settings and click on site columns as shown in the below figures. Site columns is seen in the category of “Web Designer gallery”.


Once you click on site columns you will get a screen as shown below. In this screen click on “Create” hyper link.

Once you click on “Create” hyperlink you will be asked that this column belongs to which category. We will select “Custom Columns” for now and give name as “Employee Number”.


So now this site column has got created centrally and we can apply this site column to multiple document and lists.
Step 2 :- Applying the site column
So now let us say we want to apply the above created site column to a sales department document library. So go to the document library and click on library settings as shown in the below figure.

Then select column which you want to apply to the document library. For example in this case we will select “EmployeeNumber” as shown in the below figure.

Once you apply you should see the employee number field added to the document library.

Theory of site content type
Now site columns are good way to define column definition for single fields. But what if you have group of fields like Employee Info (EmployeeName, Employee Number and Employee description). It would be tedious to create 4 individual columns and then apply them one by one.
That’s where site content types comes to rescue. Site content types logically group’s site columns. So we can just apply the site content types rather than applying each field.
Lab 13:- Creating Site Content types
Step 1 :- Creating site content types
In order to create site content types, click on site settings and click on site content types as shown in the below figure.

And then click on create menu.

Give name to the content type and ensure to select parent content types as document set.
Note :- If you want to apply this content type to a document library then you need to select “Document set” , if you want to apply to a list type then you need to select “List”.

Once we have the content types we need to add the site column to the content type. So select the columns, click add and save it.

Now that we have created the content type it’s time to enable content type on document library. Click on the document library and click on library settings.

Then click on advanced settings.

Click “Yes” to allow management of content types.

Step 3 :- Applying content types to the document library
Once you have allowed management of content types again go to the document library and select add from existing content type.

Select the employee content type and you would see that all the fields of the content type are selected.

Once you apply you should see all the field of the content type applied to the document library.

Lab 14:- MVC integration with SharePoint
Till Lab 13 we have been learning fundamentals of SharePoint like site, site collection, list, document library, content, site columns and so on. But now it’s time to get in to SharePoint customization using MVC and C#.
Step 1 :- Get Visual studio and office templates
In order to host MVC application inside SharePoint you need to create a SharePoint App. We had already discussed about SharePoint APP’s in Lab 8.
In SharePoint 2016 App is termed as Add-in. So let’s not worry about what is it termed. For now you can think that SharePoint APP or Add-in is nothing a but small piece of functionality which we want to run inside the SharePoint site.
So to create an APP / Add-in the first step is to download visual studio community edition from www.visualstudio.com..

Now in VS 2015 community edition you do not get necessary templates to create SharePoint addin or app.
To get those templates you need to install office dev tools for VS 2015 http://aka.ms/officedevtoolsforvs2015.
In case you are using VS 2015 Enterprise editions then you do not need to install the office tools as the templates are part of it.
If you are using Visual Studio 2013 Ultimate edition then there is no need to download office devtools templates are part of it.
Step 2 :- Creating a simple hello world App / Addin
So let’s create a simple MVC page which says “Hello to SharePoint from MVC” and host it inside SharePoint. So let’s hit new project and click on “Office/SharePoint” menu as shown in the below figure and then click on “App for SharePoint 2013” template as shown in the below figure.
Please note in 2016 App is changed to “Add-in”. But the steps should be almost same. In case you find there are differences please mail us to questpond at questpond dot com we will guide you.

Once you press ok, it would then give a box where we need to enter the SharePoint site where we want to host this app. Now in the same UI you will also find three options Provider hosted, Auto and Sharepoint hosted. Let’s understand the difference between them.
Theory :- Understanding Provider hosted and Sharepoint hosted concept
In Provider hosted model our App is hosted in a different server and the SharePoint is running on some different server. While in Sharepoint hosted our App is running on the same server where sharepoint is running.
Note: - In SharePoint hosted environment you can only run HTML, JavaScript and CSS , you can use C# and MVC. For this lab we will be hosting using provider hosted model. So click provider hosted and press next.


Step 3 :- Selecting type of ASP.NET Project
ASP.NET is a web framework from Microsoft and there are two coding styles MVC and WebForm by which you can create projects. In this lab we will use MVC as that’s the latest thing people are using. In case you are new to ASP.NET MVC I would suggest start from this 1 hour MVC training video which will help you learn MVC as soon as possible.
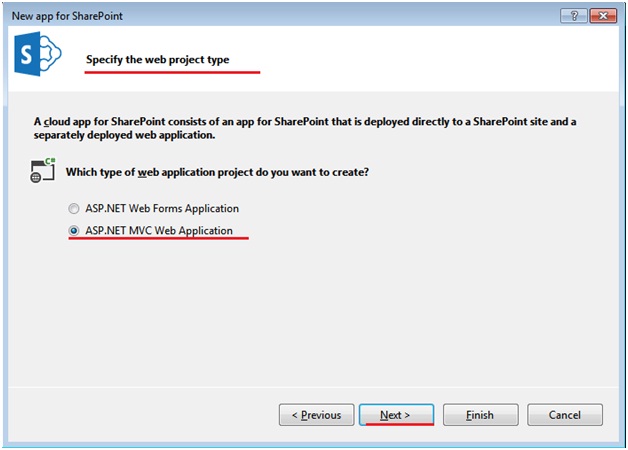
So select ASP.NET MVC and hit next.
Step 4 :- Specifying the security model
Now remember that office 365 sharepoint is secured by using users from office 365, please read about user group and permission from the previous article. So even visual studio has to authorize himself to host the app or addin.
For visual studio it gives two options either we can use certificates or use windows azure access control.
We will talk about both the differences later for now just select access control. Access control means we will be providing the user name and password now itself.

So once you click finish you will be shown a credential input window for user name and password. Enter the office 365 username and password. Once done you should see the below MVC project created.

You can see it your same old MVC structure with Models, Controllers, Views, ActionResult and so on.
Step 5:- Put some code in Action and View
Now the default MVC project already has some views, actions and controllers. So let’s start from scratch. So let’s delete the “Index.cshtml” view which is invoked from the “Index” action. Let’s right click on the index action and add a view “Index.cshtml”.


In this view we will just put a simple message “Hello to SharePoint from MVC”.

Theory :- What is the need of “SharePointContextFilter” attribute ?
If you notice the Index action code currently you will see“SharePointContextFilter” attribute decorated on the index action. Let us right on it and goto definition to see what is it exactly ?.

If you see it is nothing but a simple MVC action filter. In case you are new to MVC action filter you can read about it from here. MVC action filter are pre-processing and post-processing logic which you want to execute before and after the action is executed.

“SharePointContextFilter” is ready made action filter from sharepoint.
This filter helps to redirect to the provider hosted server and brings lot of information of sharepoint and especially it brings the context of sharepoint so that our MVC and C# code can access sharepoint objects. Without this filter getting sharepoint context access is difficult.
Step 6:- Publishing the App / Addin
Now let us publish this app to sharepoint. Let us remove all code from “Index” action and let us keep the minimum return code which invokes the “Index” view.

Let us build our project and click on deploy to publish this project to sharepoint server. When you deploy a app to sharepoint, it identifies the app by a unique GUID number. You can see in the output window we have the client GUIID.

Step 7:- Giving trust to the App
Once the deployment is successful let us hit control + F5 from visual studio and let us try to run the project. Now when you try to run the project ( App / Addin) , sharepoint want you to give trust to the app. In other words SharePoint is saying can you confirm that this does not have any malicious code which can hamper our SharePoint site.
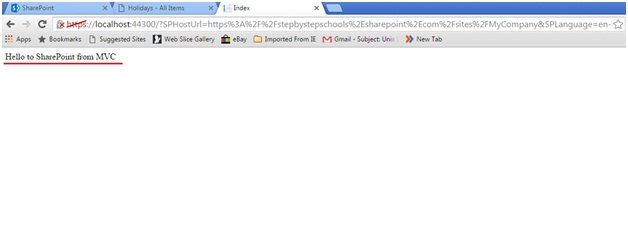
You should get a UI as shown below, press trust it and let the app/addin execute.

Once the trust is given it should display our MVC view as shown below.

In your site where this is app is published you should be able to see the App / Addin link in your recent link section.

If you edit the recent link you can see that it invokes the MVC application by using the unique identifier.
Now remember that is provider hosted. So if the provider server is down from some reason then the application would not run and you get an error saying site not found.
What is next in Part 5
In the next section we will look in to how to access list data in ASP.NET MVC using SharePoint provider hosted model.