
ASP.NET Core: Compile Once, Host Everywhere
5.00/5 (15 votes)
How to host a cross-platform ASP.NET Core application
Introduction
It is somehow the second part of a series about .NET Core. While in the first part (.NET Core: compile once, run everywhere), we learned the basic fact, how .NET Core can be used on different platforms, in this part, I want to extend the idea to the hosting of the same web application on different platforms...
Background
You will find several samples of ASP.NET Core 'Getting started'. I created my version because I found those incomplete, or even in contrary to the idea of cross-platform... Some were focusing only on the code and talking nothing about hosting, others solving the hosting problem from within the project, which automatically makes the project non cross-platform, or explaining the hosting only for a single platform...
In his article, I will focus less on the code (the code sample will be very simple and short) but more on how hosting on different platforms works...
In this article, I use the same setup as in the first part (link above). If you didn't go through the setup process, please open the article and follow it up to the 'The True Magic' section (not included).
A Very Basic Web Application
To handle all the code, I will use the VS Code editor and its integrated terminal, best to follow at this point...
For the first step (creating the project), open the integrated terminal. View->Integrated Terminal or Ctrl+`, and run these commands to create a new .NET Core project...
mkdir aspcore
cd aspcore
dotnet new
Add Web Related Stuff
Now use the File->Open Folder menu to open your project just created. You will see two files on the left-side bar, open project.json to add new dependencies to the ASP.NET Core HTTP Server (Kestrel) and to IIS integration.
The final result should look like this:
{
  "version": "1.0.0-*",
  "buildOptions": {
    "debugType": "portable",
    "emitEntryPoint": true
  },
  "dependencies": {},
  "frameworks": {
    "netcoreapp1.0": {
      "dependencies": {
        "Microsoft.AspNetCore.Server.IISIntegration": "*",
        "Microsoft.AspNetCore.Server.Kestrel": "*"
        "Microsoft.NETCore.App": {
          "type": "platform",
          "version": "1.0.1.*"
        },
      },
      "imports": "dnxcore50"
    }
  }
}
The next step is to refresh the dependencies (download the DLLs) you just declared... For that, you have two options... If VS Code already popped-up a notification like below, you may chose 'Restore' and wait for the download to finish...

If you prefer the command line, go back to the integrated terminal and run dotnet restore...
Modify main to Run the Server
Like in any normal console application, the main function is the entry point, but instead of actually running something, now it starts the HTTP host, which will listen to the requests...
Open Program.cs and modify it to look like this:
using Microsoft.AspNetCore.Hosting;

namespace WebApi
{
    public class Program
    {
        public static void Main(string[] args)
        {
            var oHost = new WebHostBuilder()
                .UseKestrel()
                .UseIISIntegration()
                .UseStartup<Startup>()
                .Build();

            oHost.Run();
        }
    }
}
UseKestrel- This line will utilize the Kestrel web server (a build in, cross-platform, HTTP host for ASP.NET Core) as the hosting process.UseIISIntegration- OK. That looks like a violation of the cross-platform IDE, but it is not. This line will help us to integrate our application with IIS server, but does not affect the ability of the application to run every supported platform, even IIS not presented...UseStartup- Identifies the class that has the methods to configure the application/environment... You will see it in a moment.
Startup - Configure the Environment
This class provides the configuration information for your application and for the hosting environment, by defining the Configure (must have) and ConfigureServices (optional) methods.
Let's see our sample, and then some explanations... Add a new file named Startup.cs to your project and copy the code from below into...
using Microsoft.AspNetCore.Builder;
using Microsoft.Extensions.DependencyInjection;

namespace WebApi
{
    public class Startup
    {
        public void ConfigureServices(IServiceCollection Services)
        {
            Services.AddMvcCore()
                .AddJsonFormatters();
        }

        public void Configure(IApplicationBuilder App)
        {
            App.UseMvc(
                Routes => {
                    Routes.MapRoute(
                        name: "Default",
                        template: "{controller=Home}/{action=Index}/{id?}"
                    );
                }
            );
        }
    }
}
If you ever worked with Web API or MVC applications in Visual Studio, this code will be very familiar, but even without it, it is easy to understand...
In the ConfigureServices method, I load the MVC Core layer (which enables us to use controllers and models in an easy way), and add to it the JSON formatter as I prefer it over XML...
The Configure method initializes the MVC just loaded and adds to it a routing map with some defaults...
This part will not compile until you add the dependencies for the classes we just used here. So add the two lines from below to project.json and run dotnet restore command again from the integrated terminal...
"Microsoft.AspNetCore.Mvc.Core": "*",
"Microsoft.AspNetCore.Mvc.Formatters.Json": "*"
Some Actual Code
In this part, we will add a controller that will provide a list of users or a single user if ID is known...
You need to add a folder named Models with a file named Users.cs in it, and another folder named Controllers with a file named UsersController.cs in it.
Models/Users.cs
namespace WebApi
{
    public class User
    {
        public int ID { get; set; }
        public string Name { get; set; }
    }
}
Controllers/UsersController.cs
using Microsoft.AspNetCore.Mvc;
using System.Collections.Generic;
using System.Linq;

namespace WebApi
{
    [Route("/api/users")]
    public class UsersController
    {
        // some data
        private static List<User> _Users = new List<User>(new[] {
            new User() { ID = 1, Name = "Kornfled" },
            new User() { ID = 2, Name = "Eliyahu" },
            new User() { ID = 3, Name = "Peter" },
        });

        [HttpGet]
        public IEnumerable<User> Get()
        {
            return( _Users );
        }

        [HttpGet("{id}")]
        public IActionResult Get(int ID)
        {
            User oUser = _Users.FirstOrDefault(User => User.ID == ID);

            if (oUser == null)
            {
                return(new NotFoundResult());
            }

            return(new OkObjectResult(oUser));
        }
    }
}
Now we have all the code and configuration in place, so time to check it...
Open the integrated terminal and run dotnet run, when it is up and running open your browser and test, using these URLs...
localhost:5000/api/users
localhost:5000/api/users/2
You should get answers like this...
[{"id":1,"name":"Kornfled"},{"id":2,"name":"Eliyahu"},{"id":3,"name":"Peter"}]
and this...
{"id":2,"name":"Eliyahu"}
Publishing
The very last, code-related, step is to publish the code we just created... For that, use the integrated terminal again, and type in the dotnet publish -c Release command... The answer should look like this:
publish: Published to /home/peter/Applications/aspcore/bin/Release/netcoreapp1.0/publish
Published 1/1 projects successfully
The result is a long list of files that you need to run your application. This folder can now be moved around between machines (with .NET Core installed) and run on each and every platform supported...
To check it, all you need is run dotnet run from the published folder and navigate to localhost:5000/api/users with your browser. It will work the same on Linux and Windows too (I do not mention Mac because I have none to actually test, but based on Microsoft, it should go the same there).
Hosting - The Background
Now, that we have the cross-platform web application, we can talk about the main subject we come for... Hosting...
Why No Kestrel
You probably were thinking: Hold your horses! We already have all we need! We have a web server (Kestrel) already part of our application, up and running. Let's expose it to our users and start the feast!
All the good things of Kestrel (size, speed, cross-platform) come at a prize! Kestrel is not build for the prime-time. It does not have functionalities one should expect from a true web server.
- A single Kestrel can run only a single application
- Every Kestrel instance will have to use a different port
- No security, like SSL or IP filtering
- And more...
So Kestrel is out of question to face the real word (but perfectly good for testing in the development cycle and doing the actual hosting behind some real web server).
The Solution
It is a setup that will completely hide the fact that we have something else, than the exposed web server. Gives us the possibility to use any security measurement we have in the web server and keep our application separated from the underlying OS and keep it cross-platform... Also, enable to run numerous ASP.NET Core sites under the same address/port combination, like they were part of the same site...
Of course, this is the point where we say goodbye to cross-platform, as every web service will have its own solution to be a reverse proxy server, but that's all about settings and configurations - we will not touch the code no more!
Hosting How To
Windows
In Windows, we will use IIS as a reverse-proxy server for Kestrel. I do not see any reason to use Apache as both are free and good, but IIS feels much better on Windows...
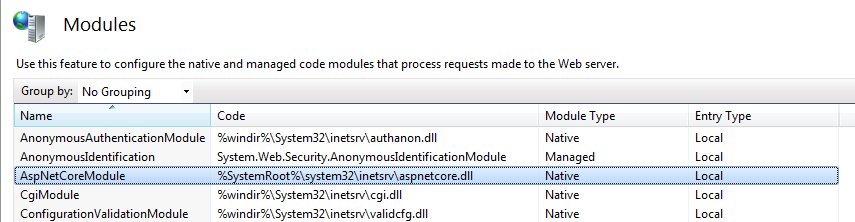
The first step is to install a special IIS module, that was created exactly for our needs - the AspNetCoreModule... ASP.NET Core Server Hosting Bundle. If you already installed .NET Core SDK you have it, so skip the installation. To see if all is in place, go to the IIS Manager and check the list of the modules installed...
This module not only will handle the request redirection, but more importantly will take care for our application up and running all the time.
This module is not only native but very low level, so it will intercept all requests and anything seems to fit will be redirected to ASP.NET Core process, even request originally would go to other handlers, like ASPX... The solution is to set up a separate application pool. As this pool will server as a simple proxy, we need no .NET runtime so set .NET CLR version to 'No Managed Code'.

The next step is create a new application that points to the folder where your published ASP.NET Core code sits...

There will be issues with the security. The default pool identity (ApplicationPoolIdentity) has no right to run an executable (dotnet.exe) from the IIS, so you have to change that to some user has those rights. For the testing, I changed it to LocalSystem, but in a true production environment, you should contact your system administrator to create a more tailored user...

The last step is to create a web.config file in the root of your application with this content (this configuration file actually can be part of your project and published with it to every platform too - it will not harm anyone):
<?xml version="1.0"?>
<configuration>
  <system.webServer>
    <handlers>
      <add name="ASP.NET Core" path="*" verb="*"
       modules="AspNetCoreModule" resourceType="Unspecified" />
    </handlers>
    <aspNetCore processPath="dotnet" arguments=".\aspcore.dll" />
  </system.webServer>
</configuration>
If you want to see logs form the .NET Core environment (it is a good idea if you have problems to start the dotnet executable), you should change the aspNetCore line to this:
<aspNetCore processPath="dotnet" arguments=".\aspcore.dll" stdoutLogEnabled="true"
 stdoutLogFile=".\stdout.log"  />
Now open your browser and navigate to http://localhost/ASPDOTNET/api/users... You also can test it from another computer on the same network using IP/machine name, or from the outside world if your computer is truly online...
Release the Linux Daemon
On Linux systems, there is no such help we got with IIS. No integration module to handle the dotnet executable process, so the first step we have to take is to ensure that our application is up and running...
Fedora (and most of the other Linux versions) use systemd as a framework to run different services (daemons in the Linux world). What we have to do is create a description file for our application and from that point on, it will run after every system restart too...
As the first step, I moved the published application to a more convenient path... In my case, it was from /home/peter/aspcore/bin/Release/netcoreapp1.0/publish to /home/peter/aspcoreapp.
Now you need to open a terminal and create the description file. The command for that is:
sudo gedit /etc/systemd/system/dotnet-aspcoreapp.service
The content of the file should look like this:
[Unit]
    Description=Sample ASP.NET Core Web API Application

[Service]
    ExecStart=/usr/local/bin/dotnet /home/peter/aspcoreapp/aspcore.dll
    Restart=always
    RestartSec=10
    SyslogIdentifier=dotnet-aspcoreapp
    User=root
    Environment=ASPNETCORE_ENVIRONMENT=Production

[Install]
    WantedBy=multi-user.target
Now run these 3 commands to enable, start and verify the new service...
sudo systemctl enable dotnet-aspcoreapp.service
sudo systemctl start dotnet-aspcoreapp.service
sudo systemctl -l status dotnet-aspcoreapp.servicesud
If all is well, you should get an output like below for the status:
● dotnet-aspcoreapp.service - Sample ASP.NET Core Web API Application
   Loaded: loaded (/etc/systemd/system/dotnet-aspcoreapp.service; enabled; vendor preset: disabled)
   Active: active (running) since Wed 2016-11-16 10:08:06 IST; 8min ago
 Main PID: 749 (dotnet)
   CGroup: /system.slice/dotnet-aspcoreapp.service
           └─749 /usr/local/bin/dotnet /home/peter/aspcoreapp/aspcore.dll
Now this service entry will start our application after restart of the OS too, or after crash of any kind...
The Proxy Setup - nginx
The nginx web server is one of the most popular web services for Linux. It has grown in popularity, mainly because of its weight and scaling...
The first step is to install nginx using the terminal...
sudo dnf install nginx
sudo service nginx start
Now you can see if it indeed works by navigating to http://localhost in your browser...

The next step is to configure nginx to forward incoming request to our application. For that, we have to edit nginx's configuration file...
sudo gedit /etc/nginx/nginx.conf
The original looks like this:
server {
    listen    80 default_server;
    listen    [::]:80 default_server;
    server_name    _;
    root    /usr/share/nginx/html;

    # Load configuration files for the default server block.
    include /etc/nginx/default.d/*.conf;

    location / {
    }
After the changes, it should look like this:
server {
    listen 80 default_server;
    listen [::]:80 default_server;

    # Load configuration files for the default server block.
    include /etc/nginx/default.d/*.conf;

    location / {
    }

    location /kestrel {
        proxy_pass http://127.0.0.1:5000/api;
    }
The second location definition will redirect every request under the kestrel folder to our ASPNET Core application's api folder. So if previously, we browsed for http://localhost:5000/api/users, now we browse for http://localhost/kesterl/users... and this address is accessible also from outside the server and can be secured and so on...
The last bit is to enable the redirecting between the two servers. For that, we have to set a property of SELinux (a security layer in Linux) that enables that kind of connection... and reboot...
sudo setsebool httpd_can_network_connect on -P
reboot
The Proxy Setup - Apache
Note: This part does NOT continue the pervious about nginx but parallel/replacement to it!
While nginx is a strong player, apache still holds the majority of web servers and it is entirely possible you will have it installed on your target server already (as you have it on Fedora), so let's see how to configure it for Kestrel...
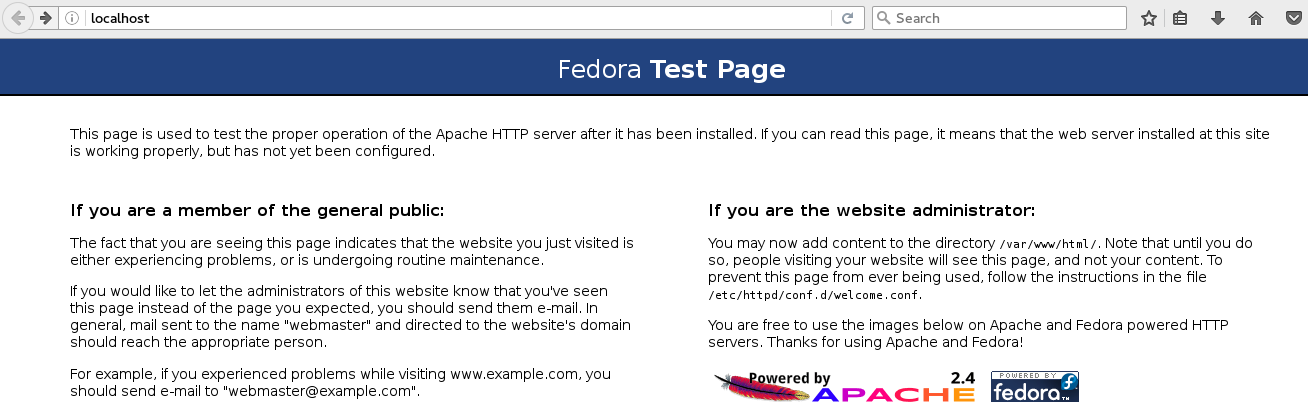
To enable and run apache server, use these commands:
sudo systemctl enable httpd.servic
sudo systemctl start httpd.service
If you navigate now to http://localhost, you should get a page like this:
The next step is to edit the configuration file to define the proxy settings we need...
sudo gedit /etc/httpd/conf/httpd.conf
At the end of that file, add these lines:
<VirtualHost *:80>
    DocumentRoot /home/peter/aspcoreapp
    ProxyPreserveHost On
    ProxyPass /kestrel/ http://127.0.0.1:5000/api/
    ProxyPassReverse /kestrel/ http://127.0.0.1:5000/api/
</VirtualHost>
The /home/peter/aspcoreapp part is the path where your published application is sitting, and must be the same as the one you used in the daemon definition file...
The last bit - just like before - is to enable the redirecting between the two servers. For that, we have to set a property of SELinux (a security layer in Linux) that enables that kind of connection... and reboot...
sudo setsebool httpd_can_network_connect on -P
reboot
Summary
I'm a long time web developer, both front and back end. For a long time, while struggling with browser support of standards, I did not have the spare time nor the desire to do the same with the server side. As of today, I see a big opportunity to build applications that can target more and more customers without the need of forcing specific OS on them first...
Today, I can focus on the code - all in one place and leaving the configuration around to some administrator. A great feeling! :-)