
Tutorial | Quick start-up for .NET core on Windows and Linux
5.00/5 (14 votes)
This article will give a kick off start to build an application using .NET core on Linux and Windows
Introduction
This article will cover the following things
- Brief Concepts
- Implementation - Two ways to develop an application in Windows:
- Implementation - Develop application in Windows:
- Implementation - Install .NET Core on Linux Server (Ubuntu 16.04)
- Implementation - Deploy Application (Created on Windows) on Linux Server (Ubuntu 16.04)
- Implementation - Develop application on Linux
- Implementation - Develop a MVC application on Windows using Visual Studio:
Brief Concepts
What is Dot Net Core?
- Development platform/framework maintained by Microsoft.
- It supports following OS:
- Windows
- MAC
- Linux
- cloud
- Embedded/IOT scenarios
Features
- Flexible deployment:
- Can be deployed on all the supported machines.
- Cross-platform:
- Runs on Windows, MAC and Linux; - - will be covered in today’s session
- Can be ported to other OS. - - will be covered in today’s session
- Can be installed by any command line tool.
- Compatibility:
- NET Core is compatible with .NET Framework, Xamarin and Mono, via the .NET Standard Library.
- Open source:
- The .NET Core platform is open source: https://github.com/dotnet/core
Implementation (Using Code):
1. Two ways to develop an application in Windows
- Using command line
- Using Visual Studio IDE
2. Develop application in Windows
2.1. Using Command Line - STEPS
- Download .NET Core SDK for Windows from the prior path

- Open cmd.exe / relevant command line tool
- Follow the below commands to create a sample project and install .NET core
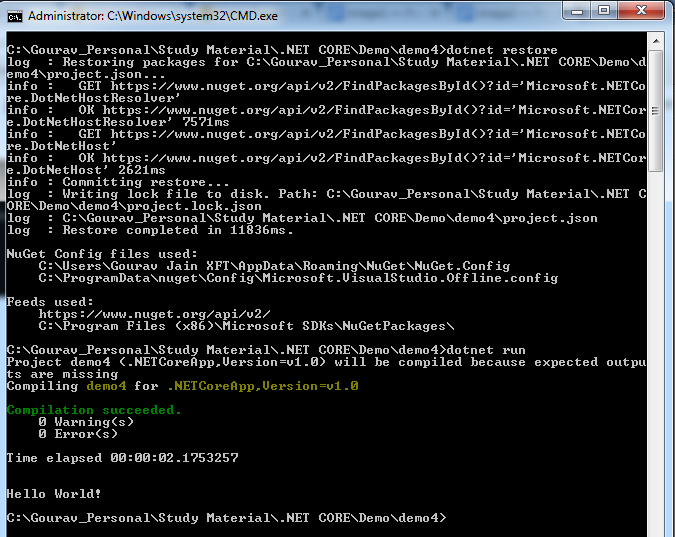
- cd C:\Gourav_Personal\Study Material\.NET CORE\Demo
- mkdir demo1
- cd demo1
- dotnet new

- Restore the packages and run the project
- dotnet restore
- dotnet run
Download demo1 attachment for the reference.
2.2. Using Visual Studio - STEPS
- Install and Open VS 2015 with update 3 or above
- Install .NET Core RC2 Package
- Create a project
- Choose .NET Core tab and select console application(.NET Core)

- Write few line of codes in program.cs

- Run the application.

Download demo2 attachment for the reference.
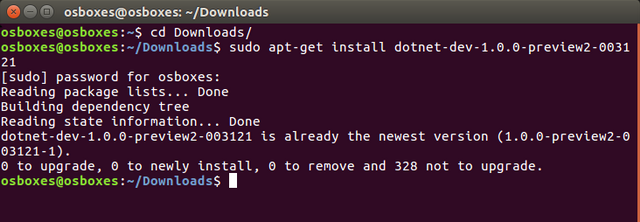
3. Install .NET Core on Linux Server (Ubuntu 16.04)
- I am using Oracle Virtual Box with Ubuntu 16.04 image on my windows machine to execute this use case.
- Run the following commands to get this working:
- sudo sh -c 'echo "deb [arch=amd64] https://apt-mo.trafficmanager.net/repos/dotnet/ trusty main" > /etc/apt/sources.list.d/dotnetdev.list'
- sudo apt-key adv --keyserver hkp://keyserver.ubuntu.com:80 --recv-keys 417A0893
- sudo apt-get update

- Install the following package on your Linux machine:

- Now GO to the downloaded location and run the following commands :
- sudo dpkg -i libicu52_52.1-3ubuntu0.4_amd64.deb

- sudo apt-get install dotnet-sharedframework-microsoft.netcore.app-1.0.0-rc2-3002702

- sudo apt-get install dotnet-dev-1.0.0-preview2-003121
4. Deploy Application (Created on Windows) on Linux Server (Ubuntu 16.04)
- Move the demo1 application attached in the article into the Linux machine and un-pack it.
- Go the application location in terminal.

- Restore the packages and run the project
- dotnet restore

- dotnet run

5. Develop application on Linux
STEPS
- Open Terminal
- Follow the below commands to create a sample project and install .NET core
- cd Downloads
- mkdir demo2
- cd demo2
- dotnet new

- Restore the packages and run the project
- dotnet restore
- dotnet run

6. Develop a MVC application on Windows using Visual Studio
STEPS – Multiple Concepts
- General:
- Open VS 2015 and Create Project

- Choose Web - > ASP .NET Core Web Application (.NET Core) and Choose template – Empty (To understand the concept better)
- Run the application

- Static Files:
- Comment the default code in the StartUp.cs file.

- Add Html files in wwwroot folder

- Add “Microsoft.AspNetCore.StaticFiles” into the project.json file under the dependencies section

- Restoring of packages once we save the file in VS 2015
- Add
app.UseStaticFiles()into the startup file into the configure method.

- Run the application with the static URL for e.g. http://localhost:50938/Sample.html

- MVC
- Add “
Microsoft.AspNetCore.Mvc” into the project.json file
- Add “

- Add MVC structure (Add Controllers and Views Folder and default files into that)

- Add
services.AddMvc()in the "ConfigureServices" method into the startup file - Add the following code into the "
Configure" method related to MVc route
app.UseMvc(routes =>
      {
        routes.MapRoute(
          name: "default",
          template: "{controller}/{action}/{id?}",
          defaults: new { controller = "Home", action = "Index" }
        );
      });

- Run the application with the MVC URL for e.g. http://localhost:50938/Home/Index

- Class Library Concept:
- Add Class library to extract any common code (type .NET core)

- Create interface and class and implement some logic

- Mention the entry into the main project's project.json “for the class library” to use it in the main project. For e.g. "ClassLibrary1": "1.0.0-*"

- Use it as a service in Startup.cs file using dependency injection concept. For e.g.
services.AddSingleton<IInterface, Class1>();

- Implement the same into the controller as "Controller Injection"

- Run the application with the MVC URL for e.g. http://localhost:50938/Home/Index

- Middleware Concept:
- Comment all the code in the "
Configure" method into the StartUp.cs file.
- Comment all the code in the "

- Add middleware class into the main project.

- Few changes into the "
Invoke" method into the middleware class for e.g.
    public Task Invoke(HttpContext httpContext)
    {
      httpContext.Response.WriteAsync("Middleware Output");
      return _next(httpContext);
    }

- Use the same middleware class into the startup file for e.g.
app.UseMiddleware();

- Run the application for e.g. http://localhost:50938

Download demo3 attachment for the reference.
Points of Interest
I loved using .NET core as it allows us to develop application on any platform and apart from that if the application is developed on Windows or Linux,it can be deployed on both of them.
Thats amazing thing by Microsoft :)
Reference Demos
I have attached three demo files for the demostration of the explaination showed in the above article.