
Create OData endpoint for MongoDB on MEAN stack
4.76/5 (9 votes)
This article is a tutorial on creating a basic OData (Open Data Protocol) endpoint for a MongoDB database using MEAN stack.
Introduction
For beginners here is the short description of OData and MEAN stack, along with my thoughts on its usefulness.
OData (Open Data Protocol) is an OASIS standard that defines a set of best practices for building and consuming RESTful APIs. OData helps you focus on your business logic while building RESTful APIs without having to worry about the various approaches to define request and response headers, status codes, HTTP methods, URL conventions, media types, payload formats, query options, etc. OData also provides guidance for tracking changes, defining functions/actions for reusable procedures, and sending asynchronous/batch requests.
-- http://www.odata.org/
Because Odata is built on core protocols like HTTP using REST methodologies, it is easy to build RESTful API which can used to for querying the underlying database. It is also easy for clients to consume the OData Restful API because of the standard protocol and URL conventions for querying, filtering, aggregation, CRUD operations and sharing of data. The other great thing about OData API is Metadata. The developer consuming the API can easily understand the description of the data model of the API and the OData Metadata is machine-readable.
MEAN is a free and open-source JavaScript software stack for building dynamic web sites and web applications. The MEAN stack makes use of MongoDB, Express.js, Angular.js, and Node.js. Because all components of the MEAN stack support programs are written in JavaScript, MEAN applications can be written in one language for both server-side and client-side execution environments.
-- https://en.wikipedia.org/wiki/MEAN_(software_bundle)
One of the big advantage of MEAN stack is that all its components are open-source and it is updated regularly and is free to use. The other advantage is the use of JavaScript on client-side and server-side, which makes it easy for web-developers to become full-stack developers.
Background
I was looking for a standard way of querying, filtering, searching and performing CRUD operations on MongoDB databases on MEAN stack. While there are many tutorials on building OData endpoint using Microsoft .NET stack, I could not find any start to end tutorial on building a simple OData endpoint on MEAN stack. The idea is to share the knowledge I learned using web and open-source technologies in hope that it will help others.
Prerequisites
If you intend to follow this tutorial, you will need to install the following items:
1) Install node.js specific to your machine from https://nodejs.org. I downloaded and installed node-v4.4.7-x64.msi for Windows (x64).
2) Install MongoDB specific to your machine from https://www.mongodb.com. I downloaded MongoDB Community Server 3.2.7 version for Windows Server 2008 R2 64-bit and later, with SSL support and installed on my Windows 7 64-bit machine. For more information on installation see https://docs.mongodb.com/getting-started/shell/installation/
Let's get started
In this section we will create a working app directory 'odataapp' and package.json file for our OData endpoint. We will also install Express and other npm packages in the app directory.
Create App Directory
Create a directory to hold your application, and make that your working directory. On my machine the working directory is located at "C:\projects\odataapp". Open Command Prompt and change directory to your working directory. Use the npm init command to create a package.json file for your application.
npm init
As seen in below screenshot, this command prompts you for a number of things, such as the name and version of your application. For now, you can simply hit RETURN to accept the defaults for most of them.

Install Express in the app directory and save it in the dependencies list in the package.json file by running below command.
npm install express --save
Since we are talking MEAN stack we will store our data in MongoDB. Install npm package for mongodb.
npm install mongodb --save
Install other npm packages. For this tutorial I am using simple-odata-server package for creating a OData endpoint for a MongoDB collection.
npm install simple-odata-server --save
Installing below package is optional. Installing Cross-origin resource sharing (CORS) package will enable the application to serve AJAX (XMLHttpRequest) requests from another domains outside the domain of the endpoint.
npm install cors --save
Below image shows Command Prompt after I installed simple-odata-server and cors package in app directory.

After successful installation of the packages, the 'package.json' file should have all the dependencies listed in it as below.
{
  "name": "odataapp",
  "version": "1.0.0",
  "description": "",
  "main": "index.js",
  "scripts": {
    "test": "echo \"Error: no test specified\" && exit 1"
  },
  "author": "",
  "license": "ISC",
  "dependencies": {
    "cors": "^2.7.1",
    "express": "^4.14.0",
    "mongodb": "^2.2.1",
    "simple-odata-server": "^0.2.0"
  }
}
Import data into MongoDB for demo
For this tutorial we will import data from files\products.json into MongoDB server using 'mongoimport' utility which comes with MongoDB. You may use below command or RoboMongo or any other tools of your choice to import data. I have included the data files into the source code and highlighted the command below to import data in below image. The data is imported into a 'products' collection of 'demo' database in MongoDB server.

If the data was successfully imported into 'products' collection in demo database you can view the data in Mongo shell by using following commands.
use demo
db.products.find()
If you are using RoboMongo, you should see 11 items when you query the 'products' collection.

Using the code
In package.json, note the file listed in the main field. We kept it index.js in our demo. It is the primary entry point to your app. Let us create new index.js file in our app directory with following code inside. You may use Visual Studio Code, Sublime Text or any code editor of your choice to create and edit this file. I have put comments before variables and methods to help you understand the code.
// Assign the required packages and dependencies to variables
var express = require('express');
var ODataServer = require("simple-odata-server");
var MongoClient = require('mongodb').MongoClient;
var cors = require("cors");

// Create app variable to initialize Express
var app = express();

// Enable Cross-origin resource sharing (CORS)  for app.
app.use(cors());

// Define Odata model of the resource entity i.e. Product.
// The metadata is defined using OData type system called the Entity Data Model (EDM),
// consisting of EntitySets, Entities, ComplexTypes and Scalar Types.
var model = {
    namespace: "demo",
    entityTypes: {
        "Product": {
            "_id": {"type": "Edm.String", key: true},
            "ProductNum": {"type": "Edm.Int32"},
            "Name": {"type": "Edm.String"},
            "Description": {"type": "Edm.String"},
            "ReleaseDate": {"type": "Edm.DateTime"},
            "DiscontinuedDate": {"type": "Edm.DateTime"},
            "Rating": {"type": "Edm.Int32"},
            "Price": {"type": "Edm.Double"}
        }
    },
    entitySets: {
        "products": {
            entityType: "demo.Product"
        }
    }
};

// Instantiates ODataServer and assigns to odataserver variable.
var odataServer = ODataServer()
                  .model(model);

// Connection to demo database in MongoDB
MongoClient.connect("mongodb://localhost/demo", function(err, db) {
    odataServer.onMongo(function(cb) { cb(err, db); });
});

// The directive to set app route path.
app.use("/odata", function (req, res) {
        odataServer.handle(req, res);
    });

// The app listens on port 3010 and prints the endpoint URI in console window.
var server = app.listen(3010, function () {
    console.log('Server running at http://127.0.0.1:3010/');
});
Let us run the application by opening command prompt at the working directory and running node index.js as below. If all is well, you should see the console message of server running.

Querying the Collection
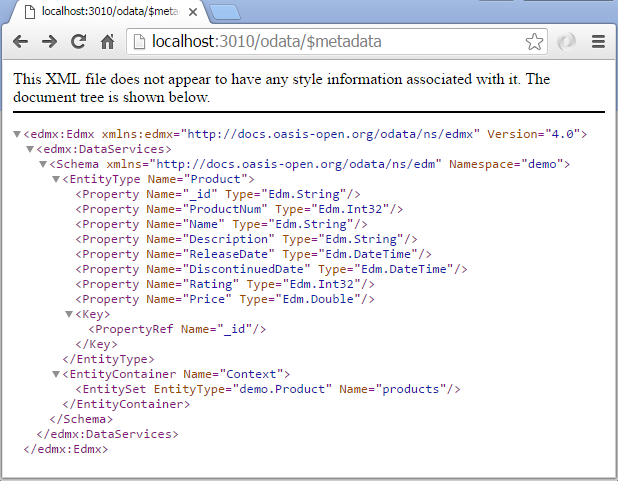
Let us send some OData queries to index.js which is our OData Endpoint running locally on Node server at port 3010. In the below example I am requesting metadata using the URL http://localhost:3010/odata/$metadata.
Let us request data from the Odata endpoint via HTTP GET request. The request below returns the 'products' collection in 'demo' database in MongoDB server.

I am making HTTP requests in Google Chrome browser. I have JSONView app added to Chrome to view JSON documents. You may use Fiddler or Postman or any other developer tool of your choice to send HTTP request and response.
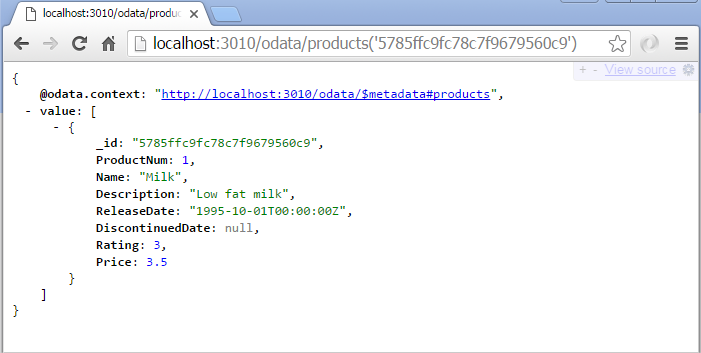
Below is a example of requesting an individual entity by id.
Let us send a get request http://localhost:3010/odata/products?$filter=Name eq 'Bread' to filter collection where Name equals 'Bread'

You can try below OData queries for filtering, sorting, counting the product collections in MongoDB.
The $filter query option allows clients to filter a collection of resources
http://localhost:3010/odata/products?$filter=Name eq 'Bread' or Name eq 'Milk'
The $top query option requests the number of items in the queried collection to be included in the result.
http://localhost:3010/odata/products?$top=5
The $skip query option requests the number of items in the queried collection that are to be skipped and not included in the result.
http://localhost:3010/odata/products?$skip=10
The $select query option allows the clients to requests a limited set of properties for each entity
http://localhost:3010/odata/products?$select=Name
http://localhost:3010/odata/products?$select=Name, Description
The $orderby query option allows clients to request resources in either ascending order using asc or descending order using desc. If asc or desc not specified, then the resources will be ordered in ascending order.
http://localhost:3010/odata/products?$orderby=ProductNum desc
http://localhost:3010/odata/products?$orderby=Rating
The $count option allows clients to request a count in the collection.
http://localhost:3010/odata/products/$count
Based on above queries, you can see that an OData endpoint can be generic WebAPI for querying the collection in a standard way. For example I can get three most expensive products with their Id, Name, Description and Price in the collections using below OData query.
http://localhost:3010/odata/products?$select=Name, Description, Price&$orderby=Price desc&$top=3

We can also use OData endpoint for CRUD operations on our Product collection. To demo this I will be using Postman app in Chrome Browser.
Create an Entity
We can send a POST request to our OData Endpoint to add a new product in our database. Below is the new product we will POST to our endpoint at http://localhost:3010/odata/products.
{
"ProductNum": 12,
"Name": "Chai",
"Description": "Bulk packet of Darjeeling Tea",
"ReleaseDate": "1992-12-31T00:00:00Z",
"DiscontinuedDate": null,
"Rating": 1,
"Price": 5.99
}
In below image after sending above POST to the OData Endpoint you can see "Status: 201 Created". The request has been fulfilled and resulted in a new resource being created. The Id of the new product created in my demo database is '5799f7048e68450964afc81f'. We will use this id to update the new product in next section.

Update an Entity
OData follows RESTful API principles which allow HTTP methods PATCH and PUT to perform updates. PATCH performs a partial update and is preferred instead of PUT. The client specifies just the properties to update. PUT replaces the entire entity and the client must send values for all of the properties in the entity, including values that are not changing.
We will send a PATCH request to odata endpoint http://localhost:3010/odata/products('5799f7048e68450964afc81f') to make changes to Name and Price of the product.

The changes can be seen in the MongoDB database by going to resource URI http://localhost:3010/odata/products('5799f7048e68450964afc81f')

Make note that id of the product in your database should be passed in the URI for UPDATE and DELETE request.
Delete an Entity
We can also use OData Endpoint to delete a product in the database by passing id in the DELETE request.

If the DELETE operation was successful, the get query http://localhost:3010/odata/products/$count should have one less value.
Conclusion, Limitation and Ideas on Enhancements
In this tutorial, I have built a basic OData Endpoint which can be a WebAPI to serve basic data operations such as select, filter, orderby, top, skip, count, create, update and delete. I have built OData Endpoint on MEAN stack using various npm modules. The Endpoint is limited by the functionality supported by the modules. The good part is that for any enhancement you can replace the modules with your own or other third party modules which meet your requirements. There are many open source modules available at https://www.npmjs.com. For a public facing WebAPI you may want to enable security in your API by enabling authentication and authorization. Security of WebAPI is a topic by itself. You can use Passport, a authentication package if it fits you requirements. Becuase the OData Endpoint is REST based you can use OAuth2, OpenID , bearer token or any other standards to secure the web service.