
Dynamically Adding and Deleting Rows in GridView and Saving All Rows at Once
4.43/5 (4 votes)
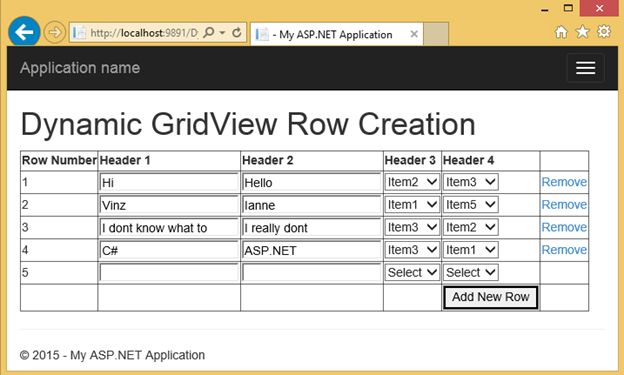
A simple demo on how to dynamically add rows in GridView with TextBox and DropDownList, retain the values on postbacks and save all row values at once using SQLBulkCopy.
Introduction
Many years ago I wrote a series of articles showing how to add dynamic textboxes, dynamic dropdownlists and a combination of both controls in a GridView control. I've posted another couple of posts about how to delete rows for dynamically created rows and how to save them all at once. You can find the series of articles here: ASP.NET and Dynamic Controls.
Questions like "how do I generate dynamic controls in GridView on a click of a Button" has been frequently asked up unti now. So in this article, I'm going to wrap up everything into one place for easy reference. The following are the main features that you will see:
- Adding rows of TextBox and DropDownlist
- Retain TextBox values and DropDownList selected values across postbacks
- Ability to remove rows
- Save all values at once
Using the code
To get started fire up Visual Studio and then add a new WebForm page. Add a GridView control to the page. Here's the GridView HTML markup:
ASPX
<asp:Label ID="lblMessage" runat="server" ForeColor="Green" />
        <asp:gridview ID="Gridview1"  runat="server"  ShowFooter="true"
                             AutoGenerateColumns="false"
                             OnRowCreated="Gridview1_RowCreated">
            <Columns>
                <asp:BoundField DataField="RowNumber" HeaderText="Row Number" />
                <asp:TemplateField HeaderText="Header 1">
                    <ItemTemplate>
                        <asp:TextBox ID="TextBox1" runat="server"></asp:TextBox>
                    </ItemTemplate>
                </asp:TemplateField>
                <asp:TemplateField HeaderText="Header 2">
                    <ItemTemplate>
                        <asp:TextBox ID="TextBox2" runat="server"></asp:TextBox>
                    </ItemTemplate>
                </asp:TemplateField>
                <asp:TemplateField  HeaderText="Header 3">
                    <ItemTemplate>
                        <asp:DropDownList ID="DropDownList1" runat="server"
                                          AppendDataBoundItems="true">
                             <asp:ListItem Value="-1">Select</asp:ListItem>
                        </asp:DropDownList>
                    </ItemTemplate>
                </asp:TemplateField>
                <asp:TemplateField HeaderText="Header 4">
                    <ItemTemplate>
                        <asp:DropDownList ID="DropDownList2" runat="server"
                                          AppendDataBoundItems="true">
                             <asp:ListItem Value="-1">Select</asp:ListItem>
                        </asp:DropDownList>
                    </ItemTemplate>
                    <FooterStyle HorizontalAlign="Right" />
                    <FooterTemplate>
                         <asp:Button ID="ButtonAdd" runat="server"
                                     Text="Add New Row"
                                     onclick="ButtonAdd_Click"
                                    OnClientClick="return ValidateEmptyValue();" />
                    </FooterTemplate>
                </asp:TemplateField>
                <asp:TemplateField>
                    <ItemTemplate>
                        <asp:LinkButton ID="LinkDelete" runat="server"
                                        onclick="LinkDelete_Click">Remove</asp:LinkButton>
                    </ItemTemplate>
                </asp:TemplateField>
            </Columns>
        </asp:gridview>
As you can see from the markup above, I have setup a BoundField for displaying the RowNumber and some TemplateField columns so that the GridView will automatically generate a row of TextBoxes and DropDownLists when adding a new row. You will also see that I have added a Button Control under the FooterTemplate at the last DropDownLists column and a LinkButton at the last column in the GridView for removing rows.
Note: Since we added a control at the GridView footer, then be sure to set ShowFooter to TRUE in the GridView.
CODE BEHIND
Just for the simplicity of the demo, I'm creating a dummy data using ArrayList as the data source for our DropDownLists. In a real scenario you may query your database and bind it to your DropDownList. Here is the full code:
using System;
using System.Collections;
using System.Data;
using System.Web.UI;
using System.Web.UI.WebControls;
using System.Collections.Specialized;
using System.Text;
using System.Data.SqlClient;

namespace WebFormsDemo
{
    public partial class DynamicGrid : System.Web.UI.Page
    {
        private ArrayList GetDummyData() {

            ArrayList arr = new ArrayList();

            arr.Add(new ListItem("Item1", "1"));
            arr.Add(new ListItem("Item2", "2"));
            arr.Add(new ListItem("Item3", "3"));
            arr.Add(new ListItem("Item4", "4"));
            arr.Add(new ListItem("Item5", "5"));

            return arr;
        }

        private void FillDropDownList(DropDownList ddl) {
            ArrayList arr = GetDummyData();

            foreach (ListItem item in arr) {
                ddl.Items.Add(item);
            }
        }

        private void SetInitialRow() {

            DataTable dt = new DataTable();
            DataRow dr = null;

            dt.Columns.Add(new DataColumn("RowNumber", typeof(string)));
            dt.Columns.Add(new DataColumn("Column1", typeof(string)));//for TextBox value
            dt.Columns.Add(new DataColumn("Column2", typeof(string)));//for TextBox value
            dt.Columns.Add(new DataColumn("Column3", typeof(string)));//for DropDownList selected item
            dt.Columns.Add(new DataColumn("Column4", typeof(string)));//for DropDownList selected item

            dr = dt.NewRow();
            dr["RowNumber"] = 1;
            dr["Column1"] = string.Empty;
            dr["Column2"] = string.Empty;
            dt.Rows.Add(dr);

            //Store the DataTable in ViewState for future reference
            ViewState["CurrentTable"] = dt;

            //Bind the Gridview
            Gridview1.DataSource = dt;
            Gridview1.DataBind();

            //After binding the gridview, we can then extract and fill the DropDownList with Data
            DropDownList ddl1 = (DropDownList)Gridview1.Rows[0].Cells[3].FindControl("DropDownList1");
            DropDownList ddl2 = (DropDownList)Gridview1.Rows[0].Cells[4].FindControl("DropDownList2");
            FillDropDownList(ddl1);
            FillDropDownList(ddl2);
        }

        private void AddNewRowToGrid() {

            if (ViewState["CurrentTable"] != null) {

                DataTable dtCurrentTable = (DataTable)ViewState["CurrentTable"];
                DataRow drCurrentRow = null;

                if (dtCurrentTable.Rows.Count > 0) {
                    drCurrentRow = dtCurrentTable.NewRow();
                    drCurrentRow["RowNumber"] = dtCurrentTable.Rows.Count + 1;

                    //add new row to DataTable
                    dtCurrentTable.Rows.Add(drCurrentRow);


                    for (int i = 0; i < dtCurrentTable.Rows.Count - 1; i++) {

                        //extract the TextBox values

                        TextBox box1 = (TextBox)Gridview1.Rows[i].Cells[1].FindControl("TextBox1");
                        TextBox box2 = (TextBox)Gridview1.Rows[i].Cells[2].FindControl("TextBox2");

                        dtCurrentTable.Rows[i]["Column1"] = box1.Text;
                        dtCurrentTable.Rows[i]["Column2"] = box2.Text;

                        //extract the DropDownList Selected Items

                        DropDownList ddl1 = (DropDownList)Gridview1.Rows[i].Cells[3].FindControl("DropDownList1");
                        DropDownList ddl2 = (DropDownList)Gridview1.Rows[i].Cells[4].FindControl("DropDownList2");

                        // Update the DataRow with the DDL Selected Items

                        dtCurrentTable.Rows[i]["Column3"] = ddl1.SelectedItem.Text;
                        dtCurrentTable.Rows[i]["Column4"] = ddl2.SelectedItem.Text;

                    }

                    //Store the current data to ViewState for future reference
                    ViewState["CurrentTable"] = dtCurrentTable;


                    //Rebind the Grid with the current data to reflect changes
                    Gridview1.DataSource = dtCurrentTable;
                    Gridview1.DataBind();
                }
            }
            else {
                Response.Write("ViewState is null");

            }
            //Set Previous Data on Postbacks
            SetPreviousData();
        }

        private void SetPreviousData() {

            int rowIndex = 0;
            if (ViewState["CurrentTable"] != null) {

                DataTable dt = (DataTable)ViewState["CurrentTable"];
                if (dt.Rows.Count > 0) {

                    for (int i = 0; i < dt.Rows.Count; i++) {

                        TextBox box1 = (TextBox)Gridview1.Rows[i].Cells[1].FindControl("TextBox1");
                        TextBox box2 = (TextBox)Gridview1.Rows[i].Cells[2].FindControl("TextBox2");

                        DropDownList ddl1 = (DropDownList)Gridview1.Rows[rowIndex].Cells[3].FindControl("DropDownList1");
                        DropDownList ddl2 = (DropDownList)Gridview1.Rows[rowIndex].Cells[4].FindControl("DropDownList2");

                        //Fill the DropDownList with Data
                        FillDropDownList(ddl1);
                        FillDropDownList(ddl2);

                        if (i < dt.Rows.Count - 1) {

                            //Assign the value from DataTable to the TextBox
                            box1.Text = dt.Rows[i]["Column1"].ToString();
                            box2.Text = dt.Rows[i]["Column2"].ToString();

                            //Set the Previous Selected Items on Each DropDownList  on Postbacks
                            ddl1.ClearSelection();
                            ddl1.Items.FindByText(dt.Rows[i]["Column3"].ToString()).Selected = true;

                            ddl2.ClearSelection();
                            ddl2.Items.FindByText(dt.Rows[i]["Column4"].ToString()).Selected = true;

                        }

                        rowIndex++;
                    }
                }
            }
        }

        protected void Page_Load(object sender, EventArgs e) {
            if (!Page.IsPostBack) {
                SetInitialRow();
            }
        }

        protected void ButtonAdd_Click(object sender, EventArgs e) {
            AddNewRowToGrid();
        }

        protected void Gridview1_RowCreated(object sender, GridViewRowEventArgs e) {
            if (e.Row.RowType == DataControlRowType.DataRow) {
                DataTable dt = (DataTable)ViewState["CurrentTable"];
                LinkButton lb = (LinkButton)e.Row.FindControl("LinkButton1");
                if (lb != null) {
                    if (dt.Rows.Count > 1) {
                        if (e.Row.RowIndex == dt.Rows.Count - 1) {
                            lb.Visible = false;
                        }
                    }
                    else {
                        lb.Visible = false;
                    }
                }
            }
        }

        protected void LinkDelete_Click(object sender, EventArgs e) {
            LinkButton lb = (LinkButton)sender;
            GridViewRow gvRow = (GridViewRow)lb.NamingContainer;
            int rowID = gvRow.RowIndex;
            if (ViewState["CurrentTable"] != null) {

                DataTable dt = (DataTable)ViewState["CurrentTable"];
                if (dt.Rows.Count > 1) {
                    if (gvRow.RowIndex < dt.Rows.Count - 1) {
                        //Remove the Selected Row data and reset row number
                        dt.Rows.Remove(dt.Rows[rowID]);
                        ResetRowID(dt);
                    }
                }

                //Store the current data in ViewState for future reference
                ViewState["CurrentTable"] = dt;

                //Re bind the GridView for the updated data
                Gridview1.DataSource = dt;
                Gridview1.DataBind();
            }

            //Set Previous Data on Postbacks
            SetPreviousData();
        }

        private void ResetRowID(DataTable dt) {
            int rowNumber = 1;
            if (dt.Rows.Count > 0) {
                foreach (DataRow row in dt.Rows) {
                    row[0] = rowNumber;
                    rowNumber++;
                }
            }
        }
    }
}
Method Definitions
GetDummyData(): A method that returns anArrayList. Basically this method contains a static dummy data for populating theDropDownList. You may want to use a database when dealing with real world scenarios.FillDropDownList(DropDownList ddl): A method that fills theDropDownListwith the dummy data.SetInitialRow(): A method that binds theGridViewon initial load with a single row of data. TheDataTabledefined in this method is stored inViewStateso that it can be referenced anywhere in the code across postbacks. Basically this table will serve as the originalDataSourcefor theGridView. Keep in mind that this is just for demo, so be careful when usingViewStateto avoid page performance issue. AlsoViewStatehas a limit when it comes to size so make sure that you don't store a huge amount of data in it.AddNewRowToGrid(): A method that adds a new row to theGridViewwhen aButtonis clicked and store the newly added row values in the Original Table that was defined in theSetInitialRow()method.SetPreviousData(): A method that retains all the items that was selected from theDropDownListandTextBoxwhen it postbacks.ResetRowID(): A method that refreshes the grid's row number when a row is deleted.
The Events
ButtonAdd_ Click: Calls thenAddNewRowToGrid()method.LinkDelete_Click: This method will be invoked once the “remove” link is clicked from the grid. This is where the data from the data source will be remove based on the row index , reset the row number afterwards and finally store the updated data source inViewStateagain and bind it to the grid to reflect the changes.Gridview1_RowCreated: This is where we put the basic validation inGridViewfor not allowing users to see the “remove” button in the last row.
The Output
Running the page will display something like this in the browser.
On Initial load:

Adding some new rows:

Removing a row:
After removing a row:

That's it! Now the next thing that you guys might be asking is how to save the data in the database. Well, don't worry, because in the next step I'm going to show you how.
Saving All Data at Once
The first thing to do is you need to create a database and a table for storing the data. So fire up SQL Management Studio or the Express version of SQL Server and create the table below with the following fields:
CREATE TABLE [dbo].[GridViewDynamicData](
    [RowID] [tinyint] IDENTITY(1,1) NOT NULL,
    [Field1] [varchar](50) NULL,
    [Field2] [varchar](50) NULL,
    [Field3] [varchar](50) NULL,
    [Field4] [varchar](50) NULL
) ON [PRIMARY]

GO
Save the table to whatever you like but for this demo I named the table as “GridViewDynamicData”.
Note: I set the RowID to auto increment so that the id will be automatically generated for every new added row in the table. To do this select the Column name “RowID” and in the column properties set the “Identity Specification” to yes.
Once you've created the table then switch back to Visual Studio and add a Button control to the form.
For example:
<asp:Button ID="BtnSave" runat="server" Text="Save All" OnClick="BtnSave_Click" />
Now let's create the method for saving the data to the database. The first thing we need here is to set up the connection string so that we can communicate with our database from our code. For this example we will use the web.config file for setting up the connection string. See the markup below:
<connectionStrings>
   <add name="DBConnection" connectionString="Data Source=win-ehm93ap21cf\SQLEXPRESS;Initial Catalog=DemoDB;Integrated Security=SSPI;" providerName="System.Data.SqlClient"/>
</connectionStrings>
Note: You may need to change the value of Data Source and Initial Catalog.
We can now proceed to creating the method for saving the data to the database. First, add the following namespaces below:
using System.Data;
using System.Data.SqlClient;
We need to declare the namespaces above so that we can use the SqlClient, ADO.NET objects to work with data.
Second, create the method for calling the connection string that was setup from the web.config file.
private string GetConnectionString()
{
   return ConfigurationManager.ConnectionStrings["DBConnection"].ConnectionString;
}
And here's the code block for inserting all the rows into our database:
private void InsertRecords(DataTable source) {
            using (SqlConnection connection = new SqlConnection(GetConnectionString()))
            {
                using (SqlBulkCopy sqlBulkCopy = new SqlBulkCopy(connection))
                {
                    //Set the Database Table to use
                    sqlBulkCopy.DestinationTableName = "dbo.GridViewDynamicData";

                    //[OPTIONAL]: Mappings of columns from Datatable against Database table
                    sqlBulkCopy.ColumnMappings.Add("Field1", "Field1");
                    sqlBulkCopy.ColumnMappings.Add("Field2", "Field2");
                    sqlBulkCopy.ColumnMappings.Add("Field3", "Field3");
                    sqlBulkCopy.ColumnMappings.Add("Field4", "Field4");
                    connection.Open();
                    sqlBulkCopy.WriteToServer(source);
                }
            }

            lblMessage.Text = "Records successfully saved!";
}
The InsertRecords() method takes a DataTable object as the parameter. The DataTable object contains all the values from the dynamic grid. We use the SqlBulkCopy.WriteToServer method to load all the rows from the DataTable to a specified table name from a database at once.
Finally, here is the code block for the Button click event:
protected void BtnSave_Click(object sender, EventArgs e) {
            if(Gridview1.Rows.Count > 0)
            {
                DataTable dt = new DataTable();
                dt.Columns.AddRange(new DataColumn[4] {
                    new DataColumn("Field1", typeof(string)),
                    new DataColumn("Field2", typeof(string)),
                    new DataColumn("Field3",typeof(string)),
                    new DataColumn("Field4",typeof(string))});

                foreach (GridViewRow row in Gridview1.Rows)
                {
                    string field1 = ((TextBox)row.Cells[1].FindControl("TextBox1")).Text;
                    string field2 = ((TextBox)row.Cells[2].FindControl("TextBox2")).Text;
                    string field3 = ((DropDownList)row.Cells[3].FindControl("DropDownList1")).SelectedItem.Text;
                    string field4 = ((DropDownList)row.Cells[4].FindControl("DropDownList2")).SelectedItem.Text;

                    dt.Rows.Add(field1, field2, field3, field4);
                }
                InsertRecords(dt);
            }
}
The code above is pretty much straight forward. First we created a new DataTable and define some column definitions for us to store some values to it. We then loops through the rows from the GridView to extract the control values and then add each control values in the DataTable. After all the values are added, we then call the method InsertRecords() to actually execute the inserts to the database.
Here's the output below after clicking on the “Save All” button:

And here's the captured data stored in the database:

Now here's the bonus, if you want validate for empty values in each TextBox then you can use this JavaScript:
    <script>
        function ValidateEmptyValue() {
            var gv = document.getElementById("<%= Gridview1.ClientID %>");
            var tb = gv.getElementsByTagName("input");

            for (var i = 0; i < tb.length; i++) {
                if (tb[i].type == "text") {
                    if (tb[i].value < 1) {
                        alert("Field cannot be blank!");
                        return false;
                    }
                }
            }
            return true;
        }
    </script>
Then you can call the JavaScript function in the ButtonAdd control like this:
<asp:Button ID="ButtonAdd" runat="server"
                Text="Add New Row"
                onclick="ButtonAdd_Click"
                OnClientClick="return ValidateEmptyValue();" />
That's it! I hope you will find this article useful.
I have attached the project for you to download. Have fun!
Summary
In this article we've learned how to generate dynamic controls in GridView on a click of Button and save all the data at once in the database.