
Creating C# Applications on Raspberry Pi
4.00/5 (9 votes)
Creating C# application’s on Raspberry Pi
Azure IOT Series
1. Azure IOT with Raspberry Pi : Azure IOT
- Buy (and receive): Raspberry Pi kit (Raspberry Pi 2, HDMI cable, Wi-Fi Adapter/LAN wire, USB charger/normal USB driver mobile charger, Memory Card with NOOBS preinstalled)… Done
- You would have got NOOBS preinstalled…so OS is ready….Done
- Connect Raspberry Pi to internet using your Wi-Fi Adapter.
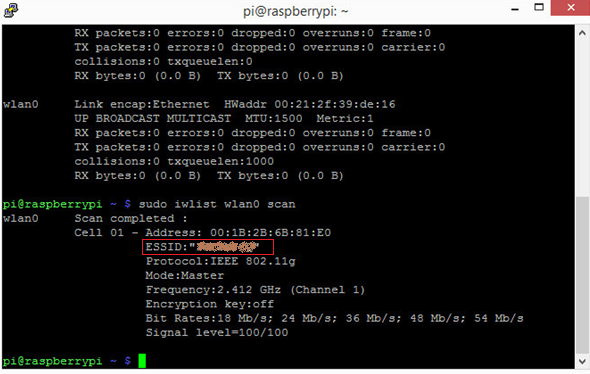
- Open command prompt and type in
sudo iwlist wlan0 scan
This will list all the Wi-Fi networks available. You would need to note the ESSID of the network you wish to connect.
- Open the “wpa_supplicant” file as below:
sudo nano /etc/wpa_supplicant/wpa_supplicant.conf
Go to the bottom of the file and type in:
network={ ssid="The_ESSID_from_earlier" psk="Your_wifi_password" } - Now save the file by pressing Ctrl+X then Y, then finally press Enter.
- Reboot your Pi:
sudo reboot
- You can verify if it has successfully connected using:
ifconfig wlan0
If the “
inet addr” field has an address beside it, the Pi has connected to the network. If not, check your password and ESSID are correct.
- Open command prompt and type in
- Now to write C# applications, we need to intall Mono on our Pi:
$ sudo apt-get update
$ sudo apt-get install mono-runtime
- To make your mono applications make REST based calls, we would need to install trusted roots certificate from Mozilla as below:
$ sudo mozroots --import --ask-remove --machine
- Now open Visual Studio and create any simple “
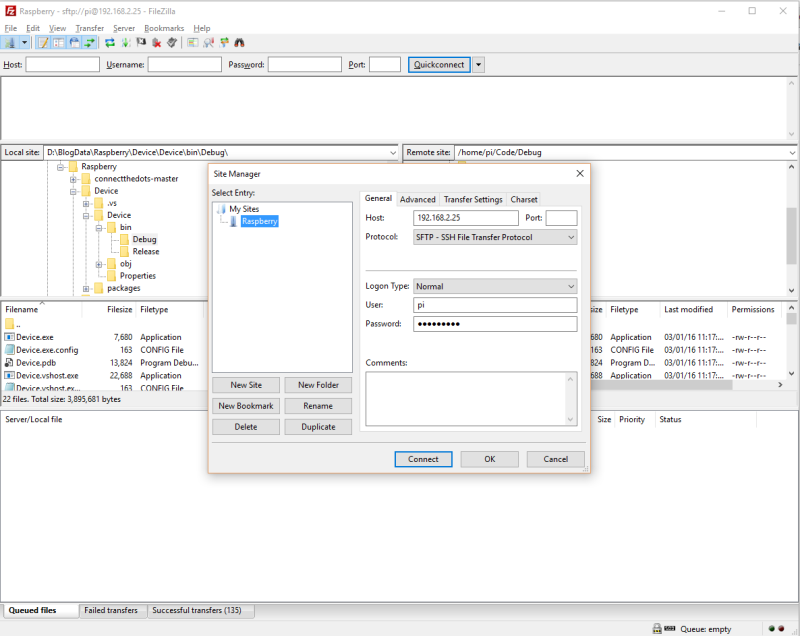
Hello World” Console Application. Build and generate the ‘.exe’ file.using System; public class HelloWorld { static public void Main () { Console.WriteLine ("Hello from Raspberry Pi"); } } - Download FileZilla Client from: https://filezilla-project.org/. This is used for transferring your files from your desktop to Raspberry Pi.
- Once download and install click File -> Site Manager.
Host: Ip Address of Raspberry Pi ( use command ip addr to get the Ip from Rasp)
Protocol: SFTP
Logon Type: Normal
User: pi
Password: raspberryThen you will be able to transfer the file.
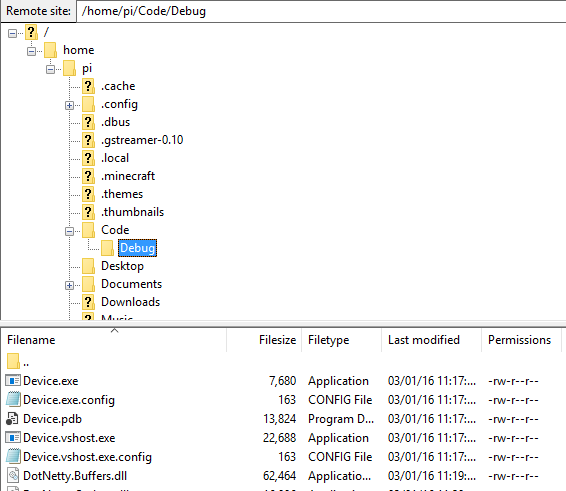
- Once you have copied your Release folder into Raspberry Pi, I created a folder called Code and dumped the Debug file. Our Rasp will look as below:
- In Raspberry Pi, you will be able to run your application as:
mono /home/pi/Code/Debug/Device.exe


In our next blog, we will learn how to use Azure IOT and connect our Raspberry Pi to Azure and receive messages.