
How to run .Net Micro Framework 4.4 on STM32F4Discovery
5.00/5 (8 votes)
How to build and run .Net Micro Framework 4.4 on STM32F4Discovery board.
Introduction
.Net Micro framework is a technology that allows to write applications for microcontrollers using the power of managed code and Visual Studio. It was founded long time ago and now it is big open-source project which has recently moved to GitHub. However, it is not "boxed" product yet. Work with .Net micro framework requires certain skills. In the last article. I wrote about how to create and run a simple "Hello world" application on the emulator for Windows. Now I will focus on how to work with the .Net micro framework on STM32F4Discovery board. Russian version if this article is here.
Background
The board is quite common and can be purchased for example here. Starting with the version 4.4 the port for this board is included in the netmf-interpreter repository. Previously, it existed as a separate project.
You can find some materials about the launch of .Net micro framework on STM32F4Discovery board, but they refer to version 4.3, and they use compiled assemblies. I'll talk about how to compile and run .Net micro framework version 4.4 on STM32F4Discovery board in detail. The article will be long, since it is necessary to fix a few issues in the distribution and download and install several utilities and drivers.
Preparing for compilation
First of all, you need to have that distribution.
You can find the repository here. It can be downloaded as a zip-archive or can be obtained using git. Instructions on how to get the repository and build the installation files can be found here. This article is based on these instructions. Versions of the repository associated with specific releases can be downloaded as a zip-archive from here.
Use these steps to get repository using git:
- Create public copy of the repository in your GitHub account on the GitHub servers with fork command. All pull requests must come from a public GitHub repository.
- Get a local copy of the repository by using clone command. For example:
git clone https://github.com/<your GitHub ID>/netmf-interpreter.git
Important: When you select a path to a local repository, it is necessary to make at least one parent folder. For example, D:\NETMF\repo, where the repo - folder for the repository.
- Set up a local repository as the Upstream. Establishing the official repository as the "Upstream" repository for your local clone enables you to pull changes from the latest official commits into your repository and resolve merge issues locally before submitting a pull request. The command for establishing the Upstream remote is:
git remote add upstream https://github.com/NETMF/netmf-interpreter.git
Important: When you unpack the repository from a zip-file, you also need to make at least one parent folder. For example, D:\NETMF\repo, where the repo - folder for the repository.
Unfortunately .NET Micro Framework v4.4 Release To Web (RTW) contains issues that do not allow you to immediately build the installation files from the repository. However, these issues can be easily fixed.
When you get your own local copy of the repository, you need to do this steps:
- Download binary tools zip file. This file contains the tools needed to build both the installation files and "ports" for devices. In the future, it is planned to remove these utilities, but they are still needed.
-
Unzip the contents of
binary toolszip-file in the parent folder of the repository. For example, for the pathD:\NETMF\repo, where therepo- the repository folder, thebinandtoolsfolder must be in the folderD:\NETMF. - Important: In the file
<repo folder>\Framework\Tools\BuildTasksInternal\BuildSigner\BuildSignerSpotBuild.csproj
in line 37 change
<HintPath>$(MSBuildProgramFiles32)\Microsoft Internal\Codesign.Submitter\CODESIGN.Submitter.dll</HintPath>
to
<HintPath>$(SPOROOT)\tools\x86\CODESIGN\CODESIGN.Submitter.dll</HintPath>
This is the first issue fix. Without such replacement, build of the repository will not succeed. This fix is needed only for .NET Micro Framework v4.4 Release To Web (RTW). In the future, the repository will already contain correct file. You can read here about this issue.
- You need to download the CMSIS library and put it in the folder
<repo folder>\CMSIS. More information about version and links to the CMSIS library can be found in the file <repo folder>\CMSIS\ReadMe.md.
CMSIS stands for Cortex Microcontroller Software Interface Standard. This library does not depend on a particular manufacturer and intend to work with the Cortex-M core. CMSIS is supplied and supported by kernel developers - the ARM company. Using this library allows you to simplify the creation of the "ports" for different microcontrollers from different manufacturers.
In case of version of .Net Micro Framework 4.4 you need to download CMSIS version 4.3 or newer. The library is supplied as a zip-archive (CMSIS-SP-00300-r4p3-00rel0.zip). It can be downloaded at ARM web site. The content of the archive should be put in the folder <repo folder>\СMSIS.
- In this step you need to install the .Net Micro Framework Cryptographic Libraries. These libraries are used to sign the assemblies that will be executed on the microcontroller. Only executable files of cryptographic library are needed for build process. But you can download source code too.
Libraries are available as msi file. I recommend to install them in any convenient folder (we will call it <crypto install folder>), and then copy them to the root of each repository. For example D:\NETMF\repo and D:\NETMF\repo_master.
The repository is a complex structure with lots of cross-references. It is combined by an MSBuild project. Project files look like sln and proj files for Visual Studio but they have more complex structure inside. That's why Visual Studio can’t be used for building.
I'll discuss the components and references in the repository in future articles. But for now you need to know that the STM3F4Discovery port is located in the
<repo folder>\Solutions\STM32F4DISCOVERY
and binary and hex files will be found in folder
<repo folder>\BuildOutput
MSBuild is a part of Visual Studio. The documentation for .netmf interpreter 4.4 states that the version of Visual Studio 2015 Community, Pro and Ultimate are supported, so you need to install one of them.
Next you need a compiler for ARM..Netmf interpreter 4.4 is supporting two compilers:
RealView compiler is part of Keil MDK development tools. The free version has a limit of 32 KB of code. But the port has a larger size, so be sure you get a license. For example, 7-Day MDK-Professional Trial License. You can read here about Keil MDK installation.
It should be installed by default in the folder C:\Keil_v5.
GCC is free, but it generates the firmware that has a 10% greater size than those generated by the RealView compiler. GCC ARM Embedded can be downloaded as a zip file and unzipped to any destination. I will call a folder with contents of zip file: <gcc folder>.
Compile Using the Arm Realview Compilation Tools
The repository already has settings for MDK version 3.1, 3.80a, 4.12, 4.13, 4.54, 5.04, 5.05. If you want to use a different version, you can add a few lines in a file
<repo_dir>\tools\Targets\Microsoft.Spot.system.mdk.targets
I used version 5.06. To do this after the lines
<CC      Condition="'$(COMPILER_TOOL_VERSION)'=='MDK5.05'">"$(MDK_TOOL_PATH)\ARMCC\bin\armcc.exe"</CC>
<CPP     Condition="'$(COMPILER_TOOL_VERSION)'=='MDK5.05'">"$(MDK_TOOL_PATH)\ARMCC\bin\armcc.exe"</CPP>
<AS      Condition="'$(COMPILER_TOOL_VERSION)'=='MDK5.05'">"$(MDK_TOOL_PATH)\ARMCC\bin\armasm.exe"</AS>
<LINK    Condition="'$(COMPILER_TOOL_VERSION)'=='MDK5.05'">"$(MDK_TOOL_PATH)\ARMCC\bin\armlink.exe"</LINK>
<AR      Condition="'$(COMPILER_TOOL_VERSION)'=='MDK5.05'">"$(MDK_TOOL_PATH)\ARMCC\bin\armar.exe"</AR>
FROMELF Condition="'$(COMPILER_TOOL_VERSION)'=='MDK5.05'">"$(MDK_TOOL_PATH)\ARMCC\bin\fromelf.exe"</FROMELF>
<MdkCrtLibLinkSwitch Condition="'$(COMPILER_TOOL_VERSION)'=='MDK5.05'">$(MdkCrtLibLinkSwitch) $(SWTC)libpath $(MDK_TOOL_PATH)\ARMCC\LIB</MdkCrtLibLinkSwitch>
I added lines
<CC      Condition="'$(COMPILER_TOOL_VERSION)'=='MDK5.06'">"$(MDK_TOOL_PATH)\ARMCC\bin\armcc.exe"</CC>
<CPP     Condition="'$(COMPILER_TOOL_VERSION)'=='MDK5.06'">"$(MDK_TOOL_PATH)\ARMCC\bin\armcc.exe"</CPP>
<AS      Condition="'$(COMPILER_TOOL_VERSION)'=='MDK5.06'">"$(MDK_TOOL_PATH)\ARMCC\bin\armasm.exe"</AS>
<LINK    Condition="'$(COMPILER_TOOL_VERSION)'=='MDK5.06'">"$(MDK_TOOL_PATH)\ARMCC\bin\armlink.exe"</LINK>
<AR      Condition="'$(COMPILER_TOOL_VERSION)'=='MDK5.06'">"$(MDK_TOOL_PATH)\ARMCC\bin\armar.exe"</AR>
<FROMELF Condition="'$(COMPILER_TOOL_VERSION)'=='MDK5.06'">"$(MDK_TOOL_PATH)\ARMCC\bin\fromelf.exe"</FROMELF>
<MdkCrtLibLinkSwitch Condition="'$(COMPILER_TOOL_VERSION)'=='MDK5.06'">$(MdkCrtLibLinkSwitch) $(SWTC)libpath $(MDK_TOOL_PATH)\ARMCC\LIB</MdkCrtLibLinkSwitch>
Now you can start compiling. Open a command prompt and navigate to the folder with the repository, like this:
cd /d D:\WORKDIR\NetMf\NetMFRepo\repo
then you need to set environment variables by running:
setenv_mdk 5.06

Then go to the folder with the port (<repo_dir>\Solutions\STM32F4DISCOVERY). For example:
cd /d D:\WORKDIR\NetMf\NetMFRepo\repo\Solutions\STM32F4DISCOVERY
Now you can start the compilation by using, for example, the following command:
msbuild dotnetmf.proj /p:flavor=release /fl
where
msbuild - starts compilation
dotnetmf.proj - STM32F4DISCOVERY port project
/p:flavor=release - build type (debug/release/rtm)
/fl - write log to the file.
The log file will be in the current folder (in my example path it is D:\WORKDIR\NetMf\NetMFRepo\repo\Solutions\STM32F4DISCOVERY). If the log file is not needed, /fl can be removed.
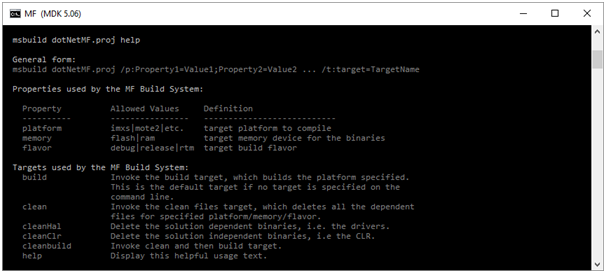
To see all the options, you need to execute this command:
msbuild /t:help
Compiling takes about 10 minutes for me:

The result is a set of files but we will need only these:
<repo_dir>\BuildOutput\THUMB2FP\MDK5.06\le\FLASH\release\STM32F4DISCOVERY\bin\Tinybooter.hex <repo_dir>\BuildOutput\THUMB2FP\MDK5.06\le\FLASH\release\STM32F4DISCOVERY\bin\tinyclr.hex\ER_CONFIG <repo_dir>\BuildOutput\THUMB2FP\MDK5.06\le\FLASH\release\STM32F4DISCOVERY\bin\tinyclr.hex\ER_FLASH
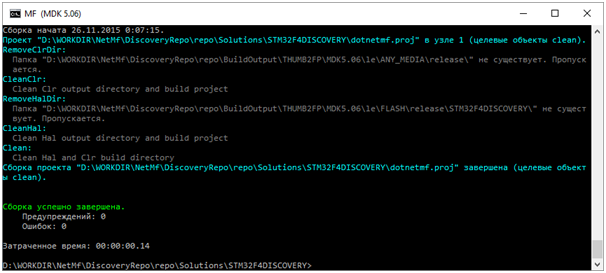
To “clean” build before command
msbuild dotnetmf.proj /p:flavor=release /fl
execute command
msbuild /t:clean
or remove folder
<repo_dir>\BuildOutput
Compile using GCC ARM Embedded
Using GCC may require another fix. In the file:
repo_dir>\Solutions\STM32F4DISCOVERY\STM32F4DISCOVERY.settings
after the line
<NO_BOOTLOADER_COMPRESSION>true</NO_BOOTLOADER_COMPRESSION>
you need to add
<PLATFORM_EMULATED_FLOATINGPOINT Condition="'$(COMPILER_TOOL)'=='GCC'">true</PLATFORM_EMULATED_FLOATINGPOINT>
This fixes “NNNN.a uses VFP register arguments” issue. Read more details here.
However, this error can not occur if you use a "clean" build.
To “clean” build before command
msbuild dotnetmf.proj /p:flavor=release /fl
execute command
msbuild /t:clean
or remove folder
<repo_dir>\BuildOutput

So, to build the port, you need to open a command prompt and navigate to the folder with the repository. For example:
cd /d D:\WORKDIR\NetMf\NetMFRepo\repo
Then you need to set environment variables by running:
setenv_gcc <gcc ver> <gcc folder>
where <gcc ver> - GCC version
<gcc folder> - GCC ARM Embedded path
The command might look like this:
setenv_gcc 4.9.3 D:\WORKDIR\NetMf\gcc_4_9_3

Then go to the folder with the port (<repo_dir>\Solutions\STM32F4DISCOVERY). For example:
cd /d D:\WORKDIR\NetMf\NetMFRepo\repo\Solutions\STM32F4DISCOVERY
Now you can start the compilation by using, for example, the following command:
msbuild dotnetmf.proj /p:flavor=release /fl
where
msbuild - starts compilation
dotnetmf.proj - STM32F4DISCOVERY port project
/p:flavor=release - build type (debug/release/rtm)
/fl - write log to the file.
The log file will be in the current folder (in my example path is D:\WORKDIR\NetMf\NetMFRepo\repo\Solutions\STM32F4DISCOVERY). If the log file is not needed, /fl can be removed.
To see all the options, you need execute this command:
msbuild /t:help

Compiling takes about 10 minutes for me:

The result is a set of files but we will need only these:
<repo_dir>\BuildOutput\THUMB2FP\GCC4.9\le\FLASH\release\STM32F4DISCOVERY\bin\Tinybooter.hex
<repo_dir>\BuildOutput\THUMB2FP\GCC4.9\le\FLASH\release\STM32F4DISCOVERY\bin\tinyclr.hex\ER_CONFIG
<repo_dir>\BuildOutput\THUMB2FP\GCC4.9\le\FLASH\release\STM32F4DISCOVERY\bin\tinyclr.hex\ER_FLASH
Uploading firmware to board
We have 3 files: Tinybooter.hex, ER_CONFIG и ER_FLASH. Tinybooter is a bootloader. It is used for CLR uploading. ER_CONFIG and ER_FLASH is CLR itself.
Also you will need additional software:
- STM32 ST-LINK Utility - utility for TinyBooter upload
- Installed MicroFraimworkSDK.MSI and NetMF VS 14.vsix files. The first contains the required libraries and utilities, the second contains .net micro fraimwork template projects for Visual Studio.
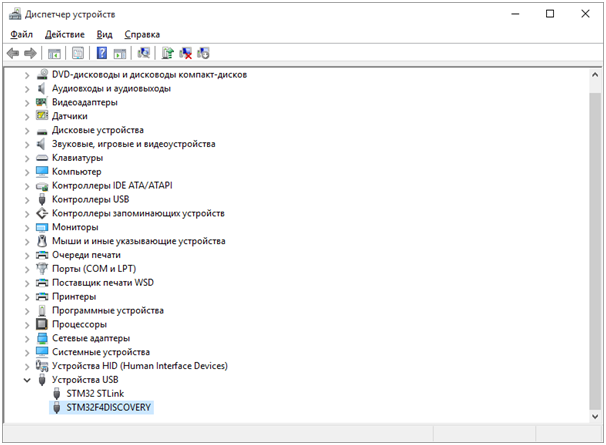
- USB driver needed for MicroFraimworkSDK utilities. Without these, the driver utilities will not recognize the board. (It is not required for Windows 10).
Do the following to upload firmware:
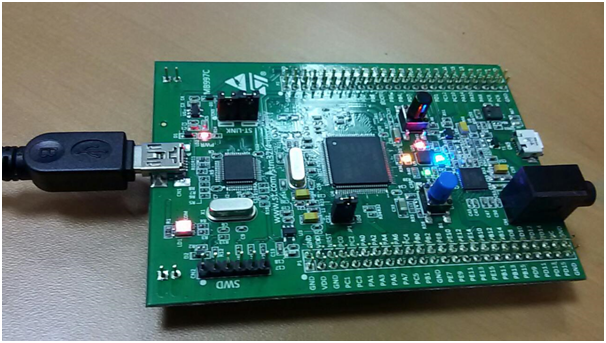
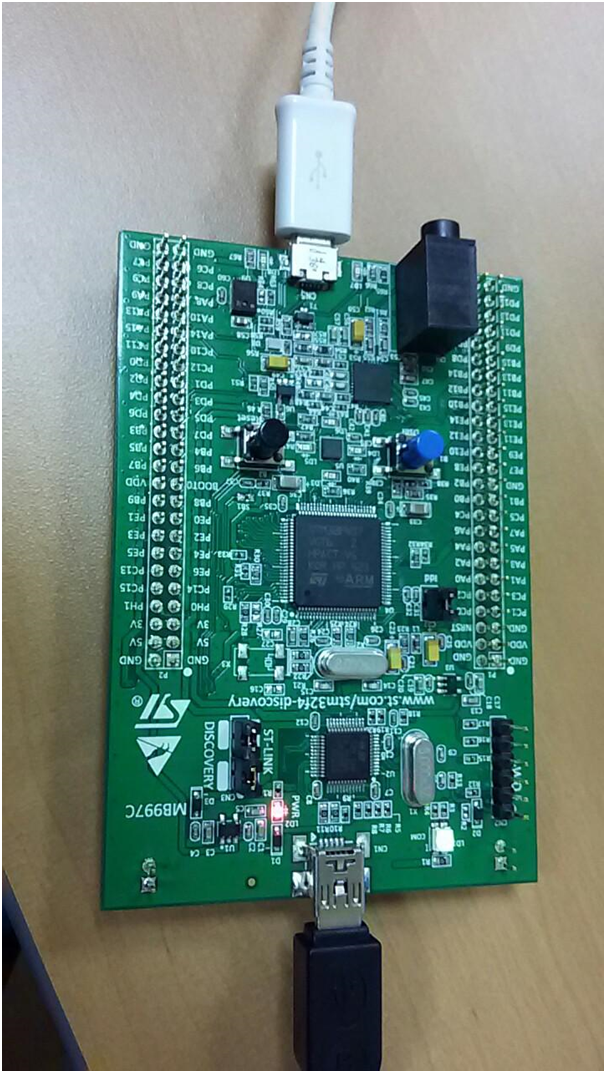
1) Connect the board to the computer via the mini USB cable:
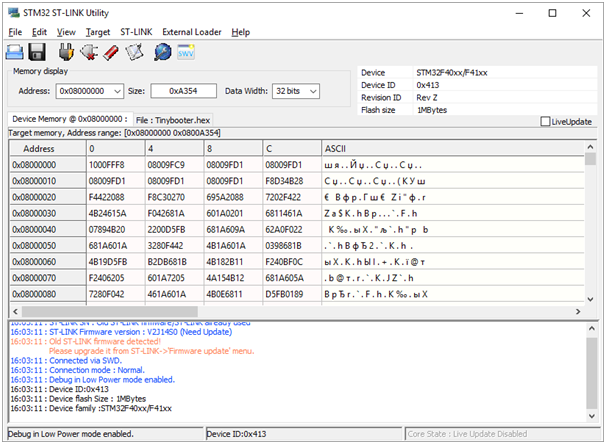
2) Run STM32 ST-LINK Utility and select the menu Target-> Connect
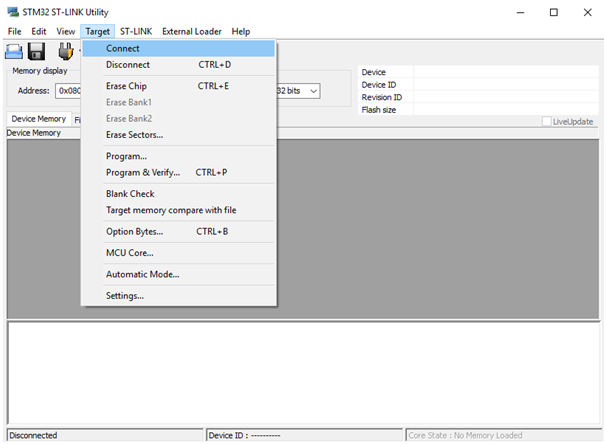
After connecting with the board STM32 ST-LINK Utility will look like this
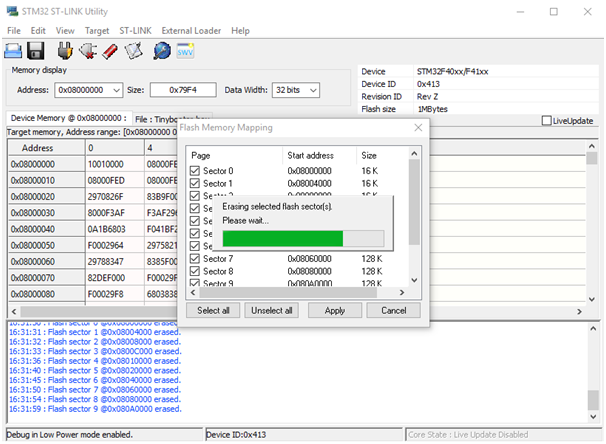
3) It is necessary to delete the current firmware by selecting Target-> Erase Sectors ...

And there click Select All and then Apply

The microcontroller flash cleaning process:
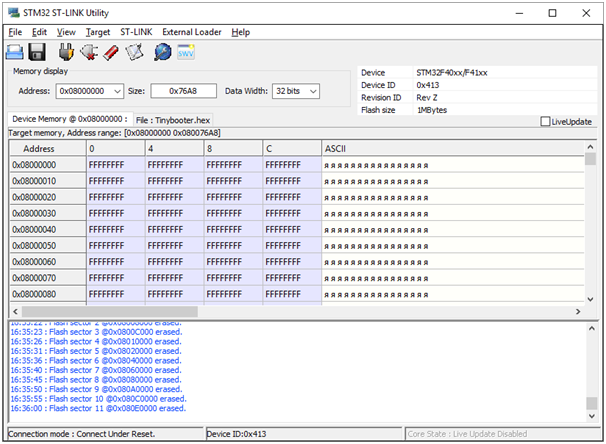
After cleaning STM32 ST-LINK Utility will look like this:
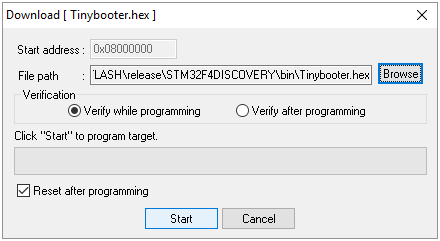
4) It is necessary to upload TinyBooter.hex by selecting Target-> Program & Verify ...

then select the tinybooter.hex file and press Start
After firmware uploading STM32 ST-LINK Utility will look like this:

5) It is necessary to restart the board by pulling out the mini Usb cable or pressing the black Reset button.
6) Insert the micro USB cable:
Now STM32 ST-LINK Utility can be closed. Mini Usb cable will be used only as power supply.
7) On Windows 10 the driver is installed automatically, but for other versions it is required to install the USB driver manually.
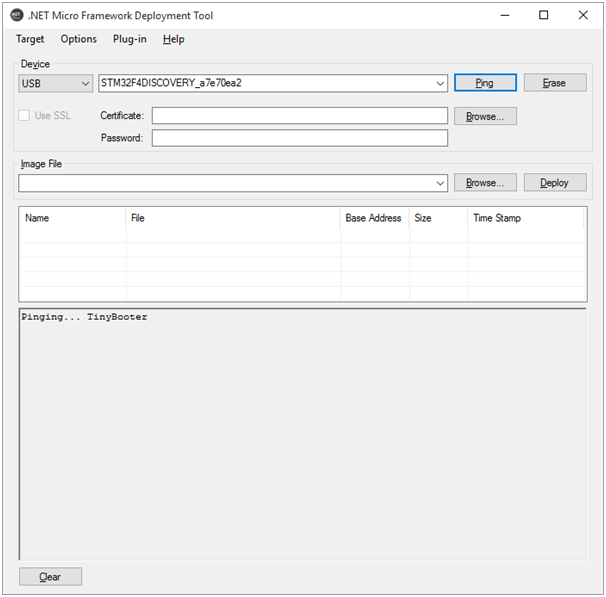
8) Now you need to run .NET Micro Framework Deployment Tool.
You can find it in MicroFrameworkSDK:
C:\Program Files (x86)\Microsoft .NET Micro Framework\v4.4\Tools\MFDeploy.exe
It is necessary to switch from the Serial interface to USB:

This will show the name of the board. You can click the Ping button to check TinyBooter. The console will display Pinging ... TinyBooter.
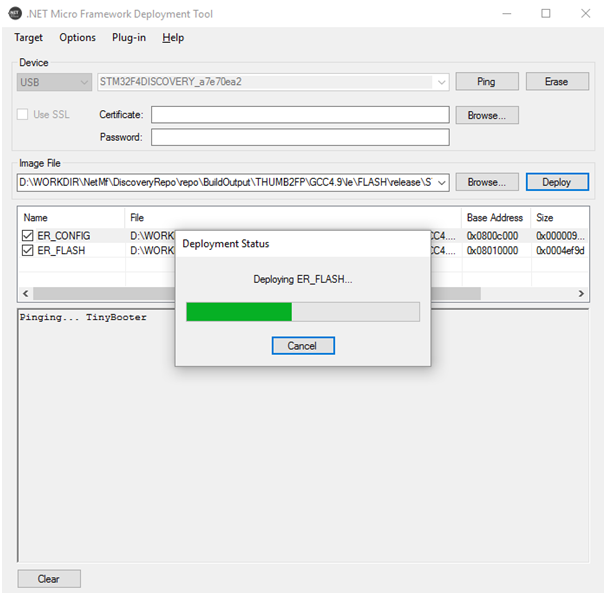
9) Next you need to upload remaining two files ER_CONFIG and ER_FLASH by using .NET Micro Framework Deployment Tool. Select them by clicking the lower Browse... button:
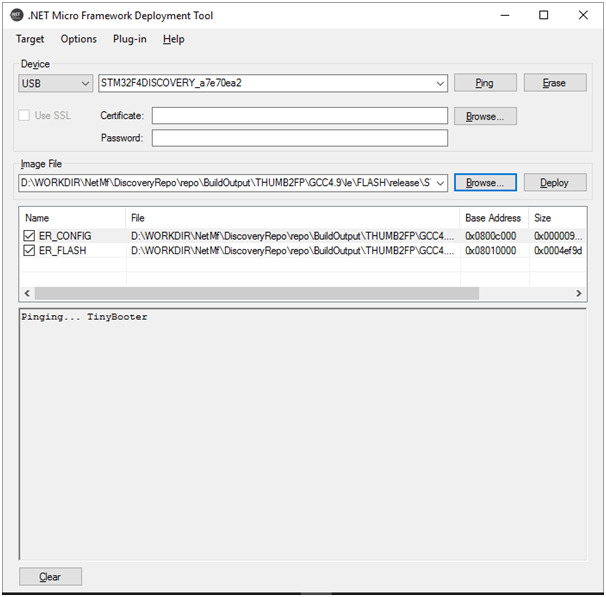
Click the Deploy button to upload the firmware.
You can press the Ping button again and make sure the CLR deployed on the board after uploading:
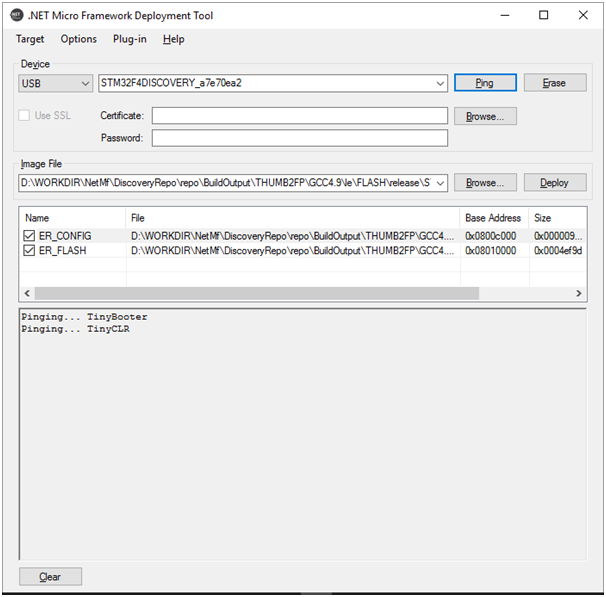
Now board is ready for work.
Create blinky project by Visual Studio
Now you can build and run the project in the Visual Studio. We make a simple project blinky flashing LEDs.
Start Visual Studio and create a new project:

If SDK and vsix installation was performed correctly, there will be a new Micro Framework project template. Choose Console Application:

You can go to the project properties after solution creating:

Select USB in the Transport field in the .NET Micro Framework project settings tab. After that, the name of the board should appear in the Device field:

Save and close the configuration.
Next you need to add a Reference to the assembly at:
C:\Program Files (x86)\Microsoft .NET Micro Framework\v4.4\Assemblies\le\Microsoft.SPOT.Hardware.dll

And the last step is to modify the code in program.cs:
using System;
using System.Threading;
using Microsoft.SPOT;
using Microsoft.SPOT.Hardware;

namespace STM32F4DISC_Test
{
   public class Program
   {
       public static void Main()
       {
           OutputPort ledGreen = new OutputPort((Cpu.Pin)60, false);
           OutputPort ledYellow = new OutputPort((Cpu.Pin)61, false);
           OutputPort ledRed = new OutputPort((Cpu.Pin)62, false);
           OutputPort ledBlue = new OutputPort((Cpu.Pin)63, false);

           while (true)
           {
               ledGreen.Write(true);
               Thread.Sleep(500);
               ledYellow.Write(true);
               Thread.Sleep(500);
               ledRed.Write(true);
               Thread.Sleep(500);
               ledBlue.Write(true);
               Thread.Sleep(500);
               ledGreen.Write(false);
               ledYellow.Write(false);
               ledRed.Write(false);
               ledBlue.Write(false);
               Thread.Sleep(500);
           }
       }
   }
}
Run the project:

And after a few seconds, the LEDs on the board will start blinking.
Summary
.NET Micro Framework is a quite complex project . At the moment, it still requires certain skills and knowledge, especially when working with the repository. In this article, I specifically discussed as much as possible in detail what is encountered in building the ports. This information is useful for providing solutions to new boards.
However, you can easy use .NET Micro Fraimwork on STM32F4Discovery by taking the already existing files Tinybooter.hex, ER_CONFIG and ER_FLASH. You can download them here.
Points of Interest
Here are some links about .Net Micro Framework:
- GitHub repository.
- Old .NetMF repo on Codeplex
- .NetMF team blog
- .NetMF website
- .NetMF from GHI Electronics
- .NetMF website from Jan Kučera
- Netduino
- Articles about .NetMF in Russion