
Hello World to Watchapp, Pebble Development on CloudPebble
Pebble Watchapp development using C. Starting with a walk through of CloudPebble, Pebble's online development environment, we will build a swim lap counter with some unique features.
Introduction
For about 20 years I've been searching for a way to keep track of the laps I've swam with not much success. I've tried a number of swim watches, some that advertise that they can auto-count, they don't, others manual. Unique among smart watches, Pebble watches are water resistant enough to wear when swimming and there are a number of swimming watchapps now available for the Pebble. But, like all the other previous devices, none of these watchapps address a fundamental problem. That is, if you're actively swimming you cannot see the display of your laps on your finger or wrist. The allure of fabulous prizes has finally motived me to stop waiting for the perfect app and get to the keyboard to write my own.
Here I intend to address the problem by building a watchapp that provides feedback to the swimmer with the Pebble's vibration motor. Every 10 laps I'm implementing a vibration pattern where each vibration represents 10 laps. As I'm swimming I'll know when I hit 10, 20, 30 laps because the watch will vibrate 1 time for each ten laps. When I hit 30 for example, I'll feel 3 distinct vibrations.
Swim lap counters typically count laps in 2 ways; manually by a button click or by motion detection. Other than the finger worn manual counters neither in my experience work well while swimming. In this watchapp, I use Pebble's accelerometer to detect a flick of the wrist to add a lap.
My last requirement for this watchapp is a mode that enables you to set a lap goal. That is, how many laps I want to swim that day, and to provide a swim complete vibration pattern when its time to dry off and crack open a beer.
I structured this article in a tutorial format where in each section we will add functionality to our lap counter as we introduce new Pebble SDK functions. In the first section, we will walk through CloudPebble, Pebbles browser based IDE. This section is targeted to anyone new to programming or perhaps C programming. If you're more advanced, feel free to click the ClouldPebble link, Create a new project and select the HelloWorld template to see the emulator in action.
Section 2 begins the lap counter watchapp development. In this section we look at TextLayers, a display object, and button click events to create a lap goal display and and change the count.
Section 3 covers persisting variables on the Pebble, adding images and implementing an Action Bar, a display object that controls and displays button clicks.
Section 4 is where we will add the swim mode to the watchapp and build our event handler for the tap event, our wrist flick, to increment the swim lap count.
In section 5, we complete the watchapp by dynamically generating a vibration pattern based on the current lap count.
Starting with section 2, I have provided a project zip file for each section that you can upload to your CloudPebble environment.
Background
My scope for this article is SDK 2 on the Aplite platform. This means I'm targeting Pebble Classic and Pebble Steel watches with black and white displays. Newer Pebbles have 64 color displays and run on SDK 3 and higher. Pebbles also can be programmed in JavaScript which is also outside the scope of this article.
Hello World on CloudPebble
CloudPebble is located here:
After creating an account, you will be routed to your Projects Page.

Click on "Create" to Open the Create New Project Window.
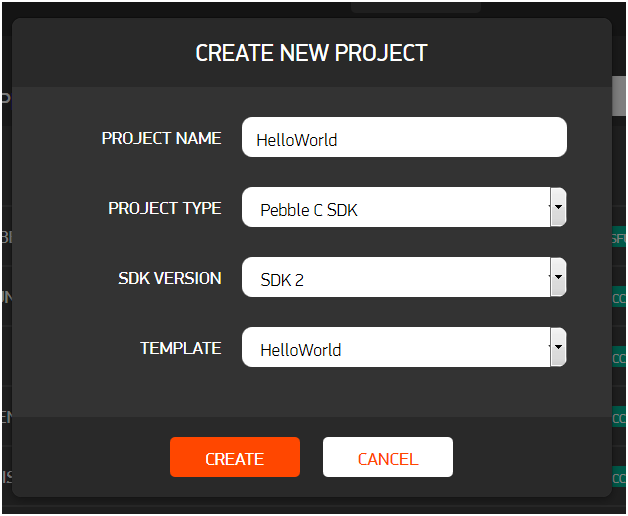
Enter a Project Name; keep the default Project Type, Pebble C SDK; Select SDK 2 for SDK Version and HelloWorld for the Template.
Select "Create" and CloudPebble will create your first Project. On the left side under Source Files, click on "hello_world.c" to view the code CloudPebble generated for us.

Scroll to the bottom of the file to the function main. If you’re not familiar with C or languages similar to C, the function main is the code that the processor will first run in most programs. Of the three functions we call in main, most of our work will be in the handle_init function. It does not need to be called handle_init nor does it need to be a single function. What is important is that all our setup, including displays and event handlers, are completed before we hit the function app_event_loop.
 int main(void) {
    handle_init();
    app_event_loop();
    handle_deinit();
}
The SDK function app_event_loop runs the watchapp. It waits for events to occur and directs them to any applicable handlers. These are typically SDK handlers or custom handlers that we created in our handle_init function. While our watchapp is running, we will be in the app_event_loop until the watchapp gets a call to shut down and exit.
That which you create you must destroy. In C, we are our own garbage collectors, so the function handle_deinit is where we will cleanup everything we created in handle_init. This frees up memory and other watch resources used by our watchapp that are no longer needed since we are shutting down. Like handle_init, handle_deint can have any name or be divided into multiple functions. What is important for handle_deinit is its position after app_event_loop so we execute it as we shutdown and exit the watchapp's code.
Let’s take a closer look at our setup code in handle_init. In our Hello World watchapp, we don’t have any events that we need to configure, but we do setup and configure our display. The base object to display anything on a Pebble is the Window object and in handle_init we assign our static window pointer. This pointer is declared near the top of the file as a pointer to a Window object. In handle_init, using the SDK function window_create, we assign the pointer the address of a newly created window object.
Now that we have a window to work from, we will add a TextLayer object so we can display our text message in the window. Like the Window object, the TextLayer object also has a SDK create function, text_layer_create, to assign our TextLayer pointer to the address of a TextLayer object. With the TextLayer object created, we can add our text along with customizing our text format by setting our font and text alignment. Now, we can add the TextLayer to the Window object with SDK function, layer_add_child. With our Window and its new TextLayer setup, we are ready to send the Window to the Pebble’s display with the SDK function, window_stack_push, with our Window object as the first parameter.
void handle_init(void) {
    // Create a window and text layer
    window = window_create();
    text_layer = text_layer_create(GRect(0, 0, 144, 154));

    // Set the text, font, and text alignment
    text_layer_set_text(text_layer, "Hi, I'm a Pebble!");
    text_layer_set_font(text_layer, fonts_get_system_font(FONT_KEY_GOTHIC_28_BOLD));
    text_layer_set_text_alignment(text_layer, GTextAlignmentCenter);

    // Add the text layer to the window
    layer_add_child(window_get_root_layer(window), text_layer_get_layer(text_layer));

    // Push the window
    window_stack_push(window, true);

    // App Logging!
    APP_LOG(APP_LOG_LEVEL_DEBUG, "Just pushed a window!");
}
The CloudPebble HelloWorld template demo's one more function in handle_init, APP_LOG. APP_LOG isn’t really needed to display our Hello World message, but sooner or later you will need it to troubleshoot. APP_LOG is a necessary tool for watchapp development. The SDK function, APP_LOG, is our print statement and can be placed throughout the code to help figure what went wrong in your code. When running in both the emulator or on a watch, you can view the log file live for your APP_LOG messages as your watchapp runs.
In handle_init we created a Window object and a TextLayer object, so in handle_deinit we need to clear them with each object’s destroy functions, text_layer_destroy and window_destroy.
void handle_deinit(void) {
    // Destroy the text layer
    text_layer_destroy(text_layer);

    // Destroy the window
    window_destroy(window);
}
With the cleanup complete we are now ready to compile our code and run our watchapp in the Pebble Aplite emulator. On the right side of the browser, click on the play button to compile and run.
If all goes well, the emulator will display on your left as shown below. When you see "Installed successfully!", click view logs to see our APP_LOG debug message.

When finished running the emulator, click on the gear in the lower right corner of the watch. Then, select "Shut Down".

That is the happy path. Not so happy is a compile error. If a compile error is thrown, the compile log will display the error or errors logged. If you’re new to programming compiled languages, decrypting compiler messages can be an art. My best advice is to compile your code from the start of a project and often after that, so that when you get an error, you have a good idea of the changes you have made since the last successful compile.
Button Clicks and the Text Layer
Download buttonclicksandtextlayer.zip
In our Hello World project, the setup and cleanup for the watchapp was accomplished by handle_init and handle_deint. In this section, we are going to shorten them to init and deinit. The newly renamed init function gets some big changes. First, we are going to give the window its own handlers for loading and unloading. It’s cleaner and provides a structure for loading and unloading multiple windows at run time. Even though we will only use a single window for this article, this structure is easier to manage and gives us some flexibility to easily add multiple windows as needed. Any object that is child to the window will now be managed by the new loading event handler, window_load, and the cleanup for these objects managed by the unload event handler, window_unload. The text layer configurations get moved to window_load and the cleanup for the text layer to window_unload leaving just window_destroy in deinit.
static void init(void) {
  s_LapGoal = TOTAL_LAPS;
  window = window_create();
  window_set_click_config_provider(window, click_config_provider);

window_set_window_handlers(window, (WindowHandlers) {
     .load = window_load,
    .unload = window_unload,
  });

  const bool animated = true;
  window_stack_push(window, animated);
}
In init, we will use the SDK function, window_set_window_handlers, to register our 2 new window handlers. While we are registering the window handlers, we will also register the handler, click_config_provider, with the SDK function, window_set_click_config_provider. This function links the widow to the button clicks. The handler, click_config_provider, then registers each button click event with, wait for it… more handlers, one for each button click. We’ll cover the button click handlers in the next section.
The last change to init from the Hello World project is a cosmetic/style change, adding the Boolean variable, animated, setting it to true and using it as the second parameter in the function, window_stack_push. So what does animated do? If true, the window slides in using sliding animation. Animated is also a parameter for the function, window_stack_pop, where the window will use sliding animation as it is leaves.
The fun, new stuff, starts here. In this app, we are only going to have a single window, but that window will have 2 modes, a run mode and a goal lap setup mode. We are going to start with the goal lap setup mode. In the goal lap setup mode, the up button will increment the number of laps displayed by the text layer and the down button will decrement the display. The middle button is the select button which starts the run mode, but, here we will just have it display 9's on the text layer. The back button will stay its default function, leave the app and go to the Pebble menu.
Back in init, we registered the click configuration handler, click_config_provider. Here we will connect the 3 click handlers, up_click_handler; down_click_handler; and select_click_handler, to their click events. This is accomplished with the SDK function window_single_click_subscribe. The first parameter in window_single_click_subscribe is a constant to identify the button. The second parameter is the click handler.
static void click_config_provider(void *context) {
  window_single_click_subscribe(BUTTON_ID_SELECT, select_click_handler);
  window_single_click_subscribe(BUTTON_ID_UP, up_click_handler);
  window_single_click_subscribe(BUTTON_ID_DOWN, down_click_handler);
}
For the select click handler, we will use text_layer_set_text to display “99999”, a placeholder, until we add the run mode. The up and down button click handlers will do the work in this mode to set our lap goal.
static void select_click_handler(ClickRecognizerRef recognizer, void *context) {
  text_layer_set_text(s_text_layer, "99999");
}

static void up_click_handler(ClickRecognizerRef recognizer, void *context) {
  inc_and_display_laps();
}

static void down_click_handler(ClickRecognizerRef recognizer, void *context) {
  dec_and_display_laps();
}
The static integer variable, s_LapGoal, will hold our value and by using a #define TOTAL_LAPS will set the default value of 10. In init, we set s_LapGoal to the TOTAL_LAPS and set the display to s_LapGoal in window_load using text_layer_set_text. But, there is a little problem. The function, text_layer_set_text, only takes a char pointer to an array and we have an integer. Although, I have already snuck in a few pointer variables, it's time to discuss a char pointer to an array in most languages a string.
I hear the groans, pointers… it had to be pointers…
Somehow we need to convert an integer to an array of chars. Fortunately, we have a function snprintf to do the work for us. All we need is a character buffer set to the correct size and snprintf does the rest. So what is the correct size for our character buffer?
For an answer, let’s briefly jump ahead to the formatting of the text layer in window_load. In addition to feeling the lap count, I also want to display the count in a font as big as possible. That way, the value can still be seen clearly through wet foggy goggles.
In our case we are going to use Roboto 49 Bold Subset, one of the larger system fonts, a font so large that it only contains digits and a colon to save on Pebble memory space.
Pebble system fonts and their keys can be found here:
At size 49, this font can display 5 digits in the window, so this gives us our physical maximum of 99999 defined as MAX_LAPS in main.c. This also gives us our character buffer size, 5 integer digits.
/* Text buffer for the size required to display the lap count goal */
static char s_LapDisplayBuffer[sizeof(int)*5];
Now that we have the buffer size, we use snprintf to fill the buffer with the integer value allowing us to load the character representation of s_LapGoal in the text layer.
  snprintf(s_LapDisplayBuffer, sizeof(s_LapDisplayBuffer), "%u", ++s_LapGoal);
  text_layer_set_text(s_text_layer, s_LapDisplayBuffer);
In case you were wondering “%u” is the format specification for an unsigned integer. We will be limiting our Lap Goal to non-negative integers.
And that brings us to the 2 functions called by our up and down click handlers, inc_and_display_laps and dec_and_display_laps. Both follow the same logic: check s_LapGoal for upper or lower range and display the result.
static void inc_and_display_laps() {
  if (s_LapGoal >= MAX_LAPS)
    {
      --s_LapGoal;
    }
  snprintf(s_LapDisplayBuffer, sizeof(s_LapDisplayBuffer), "%u", ++s_LapGoal);
  text_layer_set_text(s_text_layer, s_LapDisplayBuffer);
}

static void dec_and_display_laps() {
  if (s_LapGoal < 2)
    {
      s_LapGoal = 1;
    }
  snprintf(s_LapDisplayBuffer, sizeof(s_LapDisplayBuffer), "%u", --s_LapGoal);
  text_layer_set_text(s_text_layer, s_LapDisplayBuffer);
}
Before re-compiling and running, our last step is to complete the setup and format of the text_layer in the Pebble’s window_load function. In Hello World, the text layer was created with hard coded values for the struct GRect. Now we are going to use the window_layer to partially populate the struct so we can size our text layer based on the window size.
To get the window's window_layer, we use window_get_root_layer. To get the GRect struct, we then use layer_get_bounds. Using this struct, we can then create the text layer with its size and position relative to the parent window layer. GRect has 2 data points for the origin, x and y coordinates, and 2 data points for the size, height and width. I’m setting the origin to the far left, 0 and half way down the window layer, bounds.size.h/2 with an offset of 49 to compensate for the height of the text layer which is based on the font size. In addition to 49 for the text layer size’s height, I’m using the window layer width, bounds.size.w, as the text layer width.
static void window_load(Window *window) {
  Layer *window_layer = window_get_root_layer(window);

  s_action_bar = action_bar_layer_create();
  action_bar_layer_add_to_window(s_action_bar, window);
  action_bar_layer_set_click_config_provider(s_action_bar, click_config_provider);

  action_bar_layer_set_icon(s_action_bar, BUTTON_ID_UP, s_icon_plus);
  action_bar_layer_set_icon(s_action_bar, BUTTON_ID_DOWN, s_icon_minus);
  action_bar_layer_set_icon(s_action_bar, BUTTON_ID_SELECT, s_icon_start);

  GRect bounds = layer_get_bounds(window_layer);
  text_layer = text_layer_create((GRect) { .origin = { 0, bounds.size.h/2 - 49 },
                                            .size = { bounds.size.w - ACTION_BAR_WIDTH - 3, 49 } });
  snprintf(s_LapDisplayBuffer, sizeof(s_LapDisplayBuffer), "%u", s_LapGoal);
  text_layer_set_text(s_text_layer, s_LapDisplayBuffer);
  text_layer_set_text_alignment(s_text_layer, GTextAlignmentCenter);
  text_layer_set_font(s_text_layer,fonts_get_system_font(FONT_KEY_ROBOTO_BOLD_SUBSET_49));
  layer_add_child(window_layer, text_layer_get_layer(s_text_layer));
}
Now we can compile and run the emulator by clicking the green play button on the right side of your browser.
You can test the up and down buttons to verify that they do increment and decrement the display. Select will set the display to 99999, but selecting up and down will again show the Lap Goal.

Now try pressing the back button on the left side of the watch.

This will take you to the Pebble’s menu. To get back into our app scroll down to SwimLapCounter on the menu and press the middle select button.

When our app re-initializes, the lap goal is set back to 10 and the 18 Lap Goal is lost. We will address this problem in the next section.
Variable Persistence and Image Resources
Download persistanceandimages.zip
Persisting a variable in a Pebble app is done in 3 steps, create a value key for the value, check and load the value from the key in init and write to the key location on deinit.
To create the address location key I’m using a #define and suffixing the address value with _PERSISTKEY. For our initial value of total laps, I’ve added the suffix _DEFAULT. This constant will now only be used if we don’t have a value at TOTAL_LAPS_PERSISTKEY.
#define TOTAL_LAPS_DEFAULT 10
#define TOTAL_LAPS_PERSISTKEY 42
#define MAX_LAPS 99999
The next step is to load our watchapp’s variable with the persisted value. Here I’m using a ternary operator with SDK functions persist_exists to check to see for the key and persist_read_int to pull the value from persisted memory. If the value does not exist, we start with the default value that we defined; in this case 10.
static void init(void) {
  s_LapGoal = persist_exists(TOTAL_LAPS_PERSISTKEY) ?
                     persist_read_int(TOTAL_LAPS_PERSISTKEY) :TOTAL_LAPS_DEFAULT;
The last step is to save the value set in our watchapp session to persisted memory by using the SDK function persist_write_int in deinit. Now we can set our Lap Goal once and re-use it for multiple swims.
static void deinit(void) {
  persist_write_int(TOTAL_LAPS_PERSISTKEY, s_LapGoal);
Now that our watchapp can save our lap goal we can move on to adding an action bar to the window. An Action Bar runs down the right side of the window next to the up, down and select buttons and contains icons for each button to give the user a visual queue on each button’s current function.

When finished, our Action Bar will have a plus icon on the up button, minus on the down button and a play icon to go to swim mode.
Pebble's icons for the Action bar are .png images using both colors, black and white, and must be a resolution of no more than 28 by 28. A good resource for these icons is located here:
https://github.com/pebble-hacks/pebble-icons
To add the icon to your project go to the left side of your browser and click the "ADD NEW" button just behind the RESOURCES header. This will open the resource import form. Click the "Browse…" button to upload your file. Pebble recommends using ~bw and ~color in the file names to support multiple SDK’s and builds, but, here we are sticking to SDK 2.0 and the Aplite build for Pebble classic and will drop the image suffixes.
Below the FILE and the Browse… button is the IDENTIFIER field. This identifier with the RESOURCE_ID_ prefix is how you access the image in the code. In our example below IMAGE_ACTION_ICON_START will be accessed by the identifier RESOURCE_ID_ IMAGE_ACTION_ICON_START.
When you have added your identifier, press "SAVE" and the icon will display as below.

On CloudPebble it’s not very clear what happens when you add a resource, but if you download your project as a zip file you will see a resources folder in the home project folder and the file appinfo.json. The resources folder contains the images and in the root folder of your project, file appinfo.json links the images from the image files to the SDK and the compiler.
...

"longName": "swim_lap_menu_persist",
    "projectType": "native",
    "resources": {
        "media": [
            {
                "file": "images/action_bar_icon_start.png",
                "name": "IMAGE_ACTION_ICON_START",
                "type": "png"
            },
            {
                "file": "images/action_icon_minus.png",
                "name": "IMAGE_ACTION_ICON_MINUS",
                "type": "png"
            },
            {
                "file": "images/action_icon_plus.png",
                "name": "IMAGE_ACTION_ICON_PLUS",
                "type": "png"
            }
        ]
    },
    "sdkVersion": "2",

...
With our icons added to the project, we can add the Action Bar along with its images to main.c. Here we will start by adding static variable pointers for the ActionBarLayer and 3 GBitmaps pointers for the icons.
static ActionBarLayer *s_action_bar;
static GBitmap *s_icon_plus, *s_icon_minus, *s_icon_start;
Next, we go to init and assign the icon resources to the GBitmap variables by using the function gbitmap_create_with_resource and the identifier for the icon with the RESOURCE_ID_ prefix.
 s_icon_plus = gbitmap_create_with_resource(RESOURCE_ID_IMAGE_ACTION_ICON_PLUS);
 s_icon_minus = gbitmap_create_with_resource(RESOURCE_ID_IMAGE_ACTION_ICON_MINUS);
 s_icon_start = gbitmap_create_with_resource(RESOURCE_ID_IMAGE_ACTION_ICON_START);
What we create we must destroy…
In deinit, we want to release the memory used by our resources. This is done with the function gbitmap_destroy with the icon’s variable as the parameter.
  gbitmap_destroy(s_icon_plus);
  gbitmap_destroy(s_icon_minus);
  gbitmap_destroy(s_icon_start);
Now we move to window_load to create the Action Bar layer, attach the Action Bar to the window and assign the icons to the buttons. The Action Bar supplies its own button click provider so we will also move our click handlers from the window object to the Action Bar by adding the function action_bar_layer_set_click_config_provider in window_load and removing window_set_click_config_provider from init.
 window = window_create();
  // window_set_click_config_provider(window, click_config_provider);
  window_set_window_handlers(window, (WindowHandlers) {
...
action_bar_layer_add_to_window(s_action_bar, window);
 action_bar_layer_set_click_config_provider(s_action_bar, click_config_provider);

action_bar_layer_set_icon(s_action_bar, BUTTON_ID_UP, s_icon_plus);
What we create we must destroy. Now where have I heard that?
Like the text layer we created previously, the Action Bar will also need to be cleaned up and the memory released. This is done by implementing SDK function, action_bar_layer_destory, in window_unload.
static void window_unload(Window *window) {
  text_layer_destroy(s_text_layer);
  action_bar_layer_destroy(s_action_bar);
}
Before we compile, we need to deal with some boundary issues.
The Action bar and the text layer are overlapping since we have the text layer width set to width of the window layer.

This is easily remedied by subtracting the width of the Action Bar using ACTION_BAR_WIDTH plus a little wiggle room from the width of the window layer.

Click the green play button to compile and start the emulator. Our Action Bar is now showing in all its glory and the watch initialized to 10 since it could not find the key for TOTAL_LAPS. Since the button clicks are now managed by the Action Bar the bar provides visual feedback, reversing black and white, when the buttons on the right side are pressed. Test the persistence by clicking the left side back button to go to the Pebble Main Menu. In the Main Menu, scroll back down to the swim_lap_counter and select. If all goes well, you should see the last value proudly displayed on the watch.
Anyone click the middle button? Since the text layer is now thinner, it can no longer hold 5 digits so the display now adds an ellipse after 999. We will be removing our 99999 placeholder in the next section when we add the run mode.
Swim Mode and Tap Events
Download swimmodeandtapevents.zip
In this section we will fully implement the click event handler for the select button, add a status text layer to the window layer and create a hander to connect to the tap event so we can increment our lap counter.
At the bottom of the text window, we are adding a status text layer that will toggle between black and white text and background. This along with the action bar provides the user with visual feedback on the watchapp’s run status.

The header text layer is added the same way as our main text layer. First, create a static text layer variable, add the new layer in window_load and destroy in window_unload. For the header text layer, we will use a smaller font and we will control the display format with a new function, set_header_format. This function will manage the display based on the watchapp’s state, run or set lap goal.
The Boolean variable s_RunMode will handle our state, so set header_format will set the text, the text color and background color based on the value of s_RunMode.
static void set_header_format() {
  if (s_RunMode){
    text_layer_set_background_color(s_header_layer,GColorWhite);
      text_layer_set_text_color(s_header_layer,  GColorBlack);
      display_curent_lap_status();
  }
  else{
      text_layer_set_background_color(s_header_layer, GColorBlack);
      text_layer_set_text_color(s_header_layer, GColorWhite);
      text_layer_set_text(s_header_layer, "Set Lap Goal");
  }
}
When the watchapp is in run mode, the action bar also provides a visual queue to the user by changing the start icon(starter pistol) to a stop icon(X) in run mode.
If you're following along, yes I got a little artistic, created a starter pistol icon and replaced the play icon in the resource file without having to change the identifiers in the code.
Add a dismiss icon using the same procedure as before, import the icon resource, create a static GBitmap variable, s_icon_dismiss, attach the resource to s_icon_dismiss in init and destroy in deinit. Before we connect the action bar button to its icon in windows_load, we will move the icon formatting for the action bar to its own function, set_action_bar_format. This is where we will set the action bar appearance based on the state of s_RunMode.
static void set_action_bar_format() {
  if (s_RunMode){
    action_bar_layer_clear_icon(s_action_bar,BUTTON_ID_UP);
    action_bar_layer_clear_icon(s_action_bar,BUTTON_ID_DOWN);
    action_bar_layer_set_icon(s_action_bar, BUTTON_ID_SELECT, s_icon_dismiss);
  }
  else{
       action_bar_layer_set_icon(s_action_bar, BUTTON_ID_UP, s_icon_plus);
        action_bar_layer_set_icon(s_action_bar, BUTTON_ID_DOWN, s_icon_minus);
        action_bar_layer_set_icon(s_action_bar, BUTTON_ID_SELECT, s_icon_start);
  }
}
The new function, set_action_bar_format, will clear icons from the up and down buttons using the SDK function, action_bar_layer_clear_icon, and switch to the dismiss icon from the icon start when the watchapp is in run mode. The else is the default format for set goal mode that we originally had in windows_load.
Clearing the icons on the up and down button tells the user that these buttons have no functionality in run mode. For both click handlers, we want to make sure that nothing happens if the buttons are pressed in run mode by checking the state of s_RunMode and only incrementing or decrementing the lap goal in set goal mode.
static void up_click_handler(ClickRecognizerRef recognizer, void *context) {
  if (!s_RunMode){
    inc_and_display_laps();
  }
}

static void down_click_handler(ClickRecognizerRef recognizer, void *context) {
  if (!s_RunMode){
    dec_and_display_laps();
  }
}
In select_click_handler, we will check s_RunMode, toggle the state, and display either our lap goal or a running count of our laps swam. For the running count, we need to add another static integer variable, s_Laps, and in run mode select_click_handler will initialize s_Laps to 0. Displaying either the lap goal or the running lap count is now handled by a separate function, display_count, that takes an integer parameter and displays it in the text layer. The final step in the select click handler is to update the header and action bar by calling the 2 functions, set_header_format and set_action_bar_format, the new functions that we added above.
static void select_click_handler(ClickRecognizerRef recognizer, void *context) {
  if (s_RunMode){
    s_RunMode = false;
    display_count(s_LapGoal);
  }
  else {
    s_RunMode = true;
    s_Laps = 0;
    display_count(s_Laps);
  }
  set_header_format();
  set_action_bar_format();
}
We are now ready to implement the tap event to increment our lap count. We are going to use the Pebble’s accelerometer to fire this event with a flick of the wrist. The accelerometer senses motion in 3 dimensions and any combination of the x, y and z axes can be used. Using the SDK, you can collect sampled accelerometer data and react on the sampled set. Some swim watchapps use accelerometer data to detect a pattern on turns and auto-increment the lap count. Here, we are keeping it simple and will use the SDK’s tap event service instead. Tap events provide the axis and an integer as a measure of the acceleration detected The length of the watch in parallel with the band is the y-axis and that is what we will be using for our wrist flick. The x-axis is the width of the watch left-right and the z-axis is above-below the surface of the watch face.
We first create function, tap_handler, where we will increment and display the laps swam in swim mode when an y-axis tap is sensed. The axis is determined by checking the first parameter of AccelAxisType.
static void tap_handler(AccelAxisType axis, int32_t direction) {

 if (axis == ACCEL_AXIS_Y && s_RunMode ) {

     display_count(++s_Laps);
     display_curent_lap_status();
  }
}
All that is left is to register our tap handler in init with the SDK function, accel_tap_service_subscribe, and cleanup with accel_tab_service_unsubscribe() in deinit.
With the tap event complete, we are ready to compile and test with the emulator. When running the emulator, an accelerator tap event can be triggered with x, y and z keys. In my experience on Firefox, they work intermittently, so you may need to hit the key a few times to see any reaction. If your key press triggers multiple events where the lap count increments in 2’s 3’s … refresh your browser, this is a known bug.
In this section, we created our run mode and implemented the Pebble SDK’s tap event to increment the lap count while we are swimming. In the last section, we will use the watch’s vibration motor as feedback to confirm the wrist flick, to return the lap count for every 10 laps and to signal that we have swam our goal laps.
Generating Good Vibes
In this final section, we will use the Vibes API to control Pebble’s vibration motor to provide haptic feedback to the swimmer to confirm the lap incremented, give the current count in 10 lap intervals and signal when the swim is completed.
To generate our response we are going to use the API function vibes_enqueue_custom_pattern that takes as its parameter an array of unsigned integers. Each array element represents a time interval in milliseconds with at least a single vibrate-on element. If 2 or more elements are in the array, the pattern alternates on-interval, off-interval for the remaining elements in the array. Using vibes_enqueue_custom_pattern, we are going to dynamically generate an array that as a minimum will contain a single vibration to acknowledge a wrist flick. If we are in a lap divisible by 10 and/or reached our lap goal, this acknowledged vibration will also be followed by a series of on/off count vibrations or a second on/off pattern to signal the lap goal has been completed.
In our watchapp, our vibration pattern will be generated and executed in a single function, vibe_response, along with the help of a number of #defines. This new function will be called in tap_handler our tap event handler. Since we are dynamically generating an array in memory, we will also as painlessly as possible be playing with pointers and memory allocation. First, we initialize our array size variable to 1. In most cases, we will only need a single vibration to confirm the wrist flick. If we have not reached our swim lap goal or if no goal has been set, we next mod the current lap count with our notification interval, 10, to see if we need to generate a pattern to report the number of laps we have swam. If we are on an interval of 10, then we calculate the array size by dividing the count by the interval, doubling the result and adding it to the current array size value, 1. We double the result since we need to account for the sleep or off intervals as well as the vibrate intervals. If we have reached our lap goal, we just set the array size to our completed array size and go on from there.
static void vibe_response(int count){
  // 1 contains the ack vibe for the tap and will always be there
  int arraysize = 1;
  //Generate the tracking response based on the count
  if (count < s_LapGoal || s_LapGoal == 0){
    if (count%INTERVAL_NOTICIFATION_DEFAULT == 0){
    //for each interval we need a sleep and a vibe length so we * by 2
    arraysize = arraysize + (count/INTERVAL_NOTICIFATION_DEFAULT * 2);
    }
  }
  else{
     arraysize = COMPLETED_ARRAY_SIZE;
  }
Now that we have our array size we can allocate memory for our vibration pattern array. First, we create a pointer for an unsigned integer and then allocate the memory for the array with the function malloc. For the function’s parameter, we calculate the memory we need by multiplying our calculated arraysize by the size needed for an unsigned 32 byte integer as calculated by the function sizeof.
  else{
     arraysize = COMPLETED_ARRAY_SIZE;
  }
  uint32_t *response;
  response = (uint32_t*)malloc(arraysize * sizeof(uint32_t));
  if (count < s_LapGoal || s_LapGoal == 0){
Anytime we allocate memory with malloc, we also want to free up that memory when we are done with the object, So, we jump ahead to the end of the function and release the memory with free and the pointer we created as the function’s parameter.
  //Run the generated pattern
  vibes_enqueue_custom_pattern(patttern);

  free(response);

}
Now that our array has memory, the next step is to populate the array with the pattern that we will send to the vibration motor. If we are at our lap goal, we populate the array with the on-off pattern 10 times with the value of SWIM_COMPELETE, 300 ms. If we are still swimming, we know that the first element will be the acknowledge interval, ACK_TAP_RESPONSE or 400 ms. If the array size is larger than 1, then we also know that the second element in the array will be the sleep time between the acknowledge response and the count of the number of 10’s of laps swam or SEPARATION_SLEEP_TIME, 2000 ms. For the count of laps swam in 10’s elements with an even numbered index will be the vibrate time or LAP_COUNT_RESPONSE, 500 ms, and odd numbered elements greater than 1 will be LAP_COUNT_SLEEP, also 500 ms.
 if (count < s_LapGoal || s_LapGoal == 0){
    for (int i = 0; i < arraysize; ++i ){
              if(i == 0){
                  response[i] = ACK_TAP_RESPONSE;
              }
              else if (i%2==1){
                  if (i == 1){
                      // sleep time between ack and count feedback
                      response[i] = SEPARATION_SLEEP_TIME;
                  }
                  else{
            // interval sleep time
                      response[i] = LAP_COUNT_SLEEP;
                  }
              }
              else{
          // vibrate time
                  response[i] = LAP_COUNT_RESPONSE;
              }
          }
    }
  else{
    // completed pattern on/off 10 times
    for (int i = 0; i < arraysize; ++i ){
      response[i] = SWIM_COMPLETE;
    }
  }
The function vibes_enqueue_custom_pattern takes as its parameter a struct of type VibePattern where durations is our array and num_segments is the array size. So we create this struct, clear the vibration motor and execute our pattern.
 VibePattern patttern = {
  .durations =  response,
  .num_segments = arraysize
  };
  //Clear any current viberation
  vibes_cancel();
  //Run the generated pattern
  vibes_enqueue_custom_pattern(patttern);

  free(response);

}
Compile and run on the emulator. The emulator will shake when the motor is enabled and follow the pattern that we generated.
Adding the vibration feedback completes the swim lap counter watch app. In this section, we dynamically created an array based on the laps swam and sent that pattern to Pebble’s vibration motor so the swimmer will feel their current lap status.
History
Initial Release 14 Oct 2015