
Using sonarQube with .NET Projects
Installing sonar server on local machine and analyzing .NET projects
Contents
1 Software used
2 Installations
2.1 Java Development Kit (JDK) 1.7 -32bit
3 Installing Microsoft Fxcop 10.0
4 Installing Gallio
5 Installing Opencover (You may skip this step, as this is optional)
6 Installing Sonar
6.1 Download Sonar Runner
7 Installing C# Plugins
8 Configuring Sonar
8.1 Contents of sonar.properties File
9 Configuring Sonar-Runner
9.1 Contents of sonar-runner.properties file
10 Setting the Environment Variables
11 Running Sonar Server
12 Log on to sonar server
13 C# Plugins
14 Creating .Net Project
14.1 Writing code
15 Creating Project Properties file
15.1 Project Identification
16 Sonar Related Settings
17 C# Setting
18 Dotcover setting
19 Skipping Modules
19.1 Project Properties File Contents
20 Saving Project Properties File
21 Analyzing .Net project with Sonar
22 Getting Sonar Analysis Reports
23 Detailed Reports
24 Getting to know the issue
24.1 Viewing issue in code
1. Softwares Used
- .NET framework 4.5.2
- Windows 7 64 bits Service Pack 1
- Java JDK 1.6.0_29 (32 bit)
- Sonar 3.2
- Sonar-Runner 2.0
- CSharp Plugins Ecosystem 1.4
- FxCop 10.0
- Gallio Bundle 3.4.14.0 [optional]
- OpenCover 4.0.301 [optional, it’s used to get coverage statistics results].
2. Installation
To use sonar for code analysis you need to have some perquisites installed. We will go through step by step installation of all of the required software.
Note that the versions of software we have used is not necessary, you may use the latest versions but they need to compatible with each other.
2.1 Java Development Kit (JDK) 1.7 -32bit
Download and install the JDK 1.7.0, if you don’t have it installed.
You can download JDK from this link

Install JDK, by default it will be installed in Program Files of your OS drive, which you can change.
Note down this path as you will need it later

After installation of JDK you will find a folder named Java in your Program Files folder.
In our case it is present in C:\Program Files (x86)

3. Installing Microsoft Fxcop 10.0
Install Microsoft Fxcop 10.0 and note down it installation directory as we did above.
In our case it is present in C:\Program Files (x86)\Microsoft Fxcop 10.0

4. Installing Gallio
Install Gallio and note down it installation directory as we did above.In our case it is present in
C:\Program Files (x86)\Gallio

5. Installing Opencover (This is optional, you may skip this step)
Install opencoverand by default it will be installed in this directory.
In our case it is present in
C:\Windows\SysWOW64
If you are unable to find out the installation directory of open cover. Do as follows
Click on start button and type open

Right click on Open Cover Prompt and click on Find Location, Select the path in folder explorer.

6. Installing Sonar
Download Sonar 3.2. You can use this link to download it
http://www.sonarqube.org/downloads/
It may be downloaded in a zip file. Unzip the file and place the folder in any drive of your choice.
We have placed it in
E:\Sonar

6.1. Download Sonar Runner
You also need to download Sonar Runner 2.4. (from the same url) It can be downloaded from the same link. Unzip the downloaded file and place it in any directory of your choice. We have placed in the same directory where we placed the sonar i.e. E:\Sonar. As shown above
7. Installing C# Plugins
You need the CSharp Plugins Ecosystem 1.4 plugin which you may download from the link below:
http://docs.sonarqube.org/display/PLUG/C%23+Plugin
Unzip the file (if it is zipped) and copy the file sonar-csharp-plugin-3.2.jar to plugins directory of Sonar.
In our case it is to be copied in in here
E:\Sonar\sonar-3.7.4\extensions\plugins

8. Configuring Sonar
Before starting sonar server we will need to do certain configuration changes.
I. Go to conf folder of sonar
In our case it may be found at
E:\Sonar\sonar-3.7.4\conf
here you will find the sonar.properties file
II. Open file in Notepad or in some other editor
III. Try to find "sonar.jdbc.username" within the file (without quotes)

IV. Uncomment these lines (by deleting the # before the line), if they are commented(having # sign in the beginning) so that the file contains the below contents
8.1 Contents of sonar.properties File
After the change, my sonar.properties file contains the following
#--------------------------------------------------------
# This file must contain only ISO 8859-1 characters
# see http://docs.oracle.com/javase/1.5.0/docs/api/java/util/Properties.html#load(java.io.InputStream)
#
# To use an environment variable, use the following syntax : ${env:NAME_OF_ENV_VARIABLE}
# For example :
# sonar.jdbc.url: ${env:SONAR_JDBC_URL}
#
#
# See also the file conf/wrapper.conf for JVM advanced settings
#---------------------------------------------------------

#---------------------------------------------------------
# WEB SETTINGS - STANDALONE MODE ONLY
# These settings are ignored when the war file is deployed to a JEE server.
#---------------------------------------------------------
# Listen host/port and context path (for example / or /sonar). Default values are 0.0.0.0:9000/.
#sonar.web.host: 0.0.0.0
#sonar.web.port: 9000
#sonar.web.context: /
# Log HTTP requests. Deactivated by default.
#sonar.web.jettyRequestLogs: ../../logs/jetty-yyyy_mm_dd.request.log
#sonar.web.jetty.threads.min: 5
#sonar.web.jetty.threads.max: 50
#-----------------------------------------------------------------------
# DATABASE
#
# IMPORTANT : the embedded database H2 is used by default.
# It is recommended for tests only. Please use an external database
# for production environment (MySQL, Oracle, Postgresql, SQLServer)
#
#-----------------------------------------------------------------------
#----- Credentials
# Permissions to create tables and indexes must be granted to JDBC user.

# The schema must be created first.
sonar.jdbc.username: sonar
sonar.jdbc.password: sonar
#----- Embedded database H2
# Note : it does not accept connections from remote hosts, so the
# SonarQube server and the maven plugin must be executed on the same host.
# Comment the following line to deactivate the default embedded database.
sonar.jdbc.url: jdbc:h2:tcp://localhost:9092/sonar
# directory containing H2 database files. By default it's the /data directory in the SonarQube installation.
#sonar.embeddedDatabase.dataDir:
# H2 embedded database server listening port, defaults to 9092
#sonar.embeddedDatabase.port: 9092
#----- MySQL 5.x
# Comment the embedded database and uncomment the following line to use MySQL
#sonar.jdbc.url: jdbc:mysql://localhost:3306/sonar?useUnicode=true&characterEncoding=utf8&rewriteBatchedStatements=true
#----- Oracle 10g/11g
# To connect to Oracle database :
#
# - It's recommended to use the latest version of the JDBC driver (ojdbc6.jar).
# Download it in http://www.oracle.com/technetwork/database/enterprise-edition/jdbc-112010-090769.html
# - Copy the driver to the directory extensions/jdbc-driver/oracle/
# - Comment the embedded database and uncomment the following line :
#sonar.jdbc.url: jdbc:oracle:thin:@localhost/XE
# Uncomment the following property if the Oracle account has permissions to access multiple schemas,
# for example sonar schemas with different versions. In that case, use the same property during project analysis
# (-Dsonar.jdbc.schema=<schema>)
# The schema is case-sensitive.
#sonar.jdbc.schema: sonar

#----- PostgreSQL 8.x/9.x
# Comment the embedded database and uncomment the following property to use PostgreSQL
#sonar.jdbc.url: jdbc:postgresql://localhost/sonar
# Uncomment the following property if the PostgreSQL account has permissions to access multiple schemas,
# for example sonar schemas with different versions. In that case, use the same property during project analysis
# (-Dsonar.jdbc.schema=<schema>)
#sonar.jdbc.schema: public
#----- Microsoft SQLServer
# The Jtds open source driver is available in extensions/jdbc-driver/mssql. More details on http://jtds.sourceforge.net
#sonar.jdbc.url: jdbc:jtds:sqlserver://localhost/sonar;SelectMethod=Cursor
#----- Connection pool settings
sonar.jdbc.maxActive: 20
sonar.jdbc.maxIdle: 5
sonar.jdbc.minIdle: 2
sonar.jdbc.maxWait: 5000
sonar.jdbc.minEvictableIdleTimeMillis: 600000
sonar.jdbc.timeBetweenEvictionRunsMillis: 30000
#---------------------------------------------------------
# UPDATE CENTER
#---------------------------------------------------------
# The Update Center requires an internet connection to request http://update.sonarsource.org
# It is activated by default:
#sonar.updatecenter.activate=true
# HTTP proxy (default none)
#http.proxyHost=
#http.proxyPort=
# NT domain name if NTLM proxy is used
#http.auth.ntlm.domain=

# SOCKS proxy (default none)
#socksProxyHost=
#socksProxyPort=
# proxy authentication. The 2 following properties are used for HTTP and SOCKS proxies.
#http.proxyUser=
#http.proxyPassword=
#---------------------------------------------------------
# NOTIFICATIONS
#---------------------------------------------------------
# Delay (in seconds) between processing of notification queue
sonar.notifications.delay=60
9. Configuring Sonar-Runner
I. Now go to the conf folder of sonar-runner-2.4
In our case it could be found at
E:\Sonar\sonar-runner-2.4\conf

II. open sonar-runner.properties file in Notepad or in some other editor
III. Try to find this text "sonar.sourceEncoding=UTF-8". If it is commented un comment it (by deleting the prefix # sign). So the contents of the file are as below
9.1 Contents of sonar-runner.properties file
After the above change my sonar-runner.properties file contains the following:
#Configure here general information about the environment, such as SonarQube DB details for example
#No information about specific project should appear here
#----- Default SonarQube server
#sonar.host.url=http://localhost:9000
#----- PostgreSQL
#sonar.jdbc.url=jdbc:postgresql://localhost/sonar

#----- MySQL
#sonar.jdbc.url=jdbc:mysql://localhost:3306/sonar?useUnicode=true&characterEncoding=utf8
#----- Oracle
#sonar.jdbc.url=jdbc:oracle:thin:@localhost/XE
#----- Microsoft SQLServer
#sonar.jdbc.url=jdbc:jtds:sqlserver://localhost/sonar;SelectMethod=Cursor
#----- Global database settings
#sonar.jdbc.username=sonar
#sonar.jdbc.password=sonar
#----- Default source code encoding
sonar.sourceEncoding=UTF-8
#----- Security (when 'sonar.forceAuthentication' is set to 'true')
#sonar.login=admin
#sonar.password=admin
10 Setting the Environment Variables
To set up the environment variables, you need to go to System Settings
I. press window key+brek button to open System settings or
Go to Start->Control Panel->System

II. Click on Advance system settings link. It will open a dialog as shown below:

III. Click on Environment Variables button. It will open another dialog box as shown below:

IV. If you find variable named JAVA_HOME in the System variables, select it and click Edit Button. Otherwise click New button.
V. Fill the following in the dialog box
Variable name: JAVA_HOME
Variable value: C:\Program Files (x86)\Java\jdk1.7.0_21
Note: Remember the variable value is same path where the JDK has been installed. As mentioned in section 2.1 above.

VI. Click Ok
VII. Use the same steps to create another System variable name SONAR_RUNNER_HOME
VIII. Fill the following for the variable SONAR_RUNNER_HOME
Variable name: SONAR_RUNNER_HOME
Variable value: E:\Sonar\sonar-runner-2.4
IX. Click OK
X. Finally try to find Path system variable in the list. If it is not there create it.

However if it already exists, select it and click Edit button.
XI. Do not change the existing value of the variable, just add the following at the end of the value
;%JAVA_HOME%\bin;%SONAR_RUNNER_HOME%\bin
If you have put sonar server at different path you will have to change the underline text accordingly.

XII. Click OK and we are done with defining the Environment Variables
11 Running Sonar Server
You have everything set to get the sonar server running. To run the sonar sever do the following steps:
I. Go to bin directory of your sonar server. In our case it is E:\Sonar\sonar-3.7.4\bin
E:\Sonar\sonar-3.7.4\bin

Where you will see different directories for different OS. Since we have installed 32 bit JDK, we will go to windows-x86-32 directory.
II. Open windows-x86-32 folder
III. Right click on StartSonar.bat file and choose Run as administrator to open it. You may get the popup shown below, click on Run button to open the file

It will open a command prompt. Wait for some time until the sonar server is started as shown below.

Now you have successfully started the sonar server.
12 Log on to sonar server
After the sonar server has started you can log on to sonar server by visiting the url
http://localhost:9000/
and you will see the below page.

Click on the log in link and enter the following credentials:
Login: admin
Password: admin
Note: Both username and password are case sensitive.

After you are logged in as an administrator you will see the dash board as shown below.
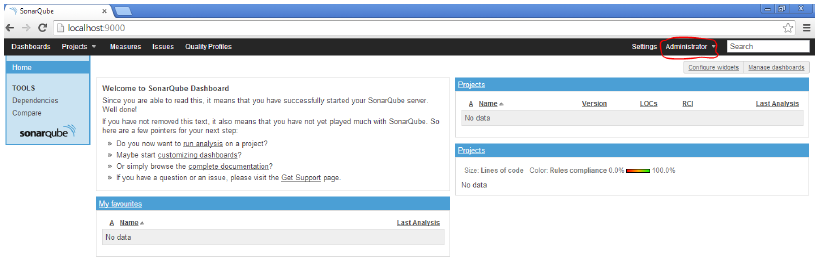
This is sonar dash board where see the list of projects, Menus etc.
13 C# Plugins
Click on the Settings link the top right corner.
From the menu on the left click on Update Center (in newer versions you may find it under system tab)
Click on the Installed Plugins tab

You should be seeing C# [csharp] 3.2 under Installed plugins. You can also install other plugins related to c# from Available Plugins tab
14 Creating .Net Project
Now that all is set, we will create a .NET project, write some code and analyse it in Sonar.
Note: You may skip this section if you have existing project ready and go to Creating Project Properties file.
I . Open Visual Studio.
II. Create New Project.
III. Choose Console Application from the project templates.
IV. Enter the name of the project we have kept it as MySonarProject
V. Browse for the project location of your choice. We have kept it in E:\Sonar Projects\

14.1 Write some code
Add some class files to your project and write some code. So that we can use Sonar to analyse this code.
I. Add a class file CSharp.cs and write following code in it.
public class CSharp

{

string Version;

string Technology;

public void GetDetails()

{

Console.WriteLine("version : " + Version);

Console.WriteLine("Technology : " + Technology);

}

public void SetDetails(string version,string technology)

{

Version = version; Technology = technology;

}

}
II. Add another class file Sonar.cs and write following code in it.
public class Sonar

{

public void Welcom()

{

Console.WriteLine("Welcom to Sonar Qube"); Console.WriteLine("We will analyze .NET projects here...");

}

}
III. Write the following code in your Program.cs file
class Program

{

static void Main(string[] args)

{

int myvariable=0;

Sonar sonar=new Sonar();

sonar.Welcom();

CSharp csharp = new CSharp();

csharp.SetDetails("4.0", "Asp.Net MVC");

csharp.GetDetails();

Console.ReadKey();
}

}
Note: we have kept unused variable myvariable in the Main method so that it is caught during code analysis
IV. Run the application and you will see the following output.

All is done now we will proceed to doing sonar analysis.
15 Creating Project Properties file
Open nodepad or some other editor to create project properties file
Create a new file. Where you will write the following project propetis.
15.1 Project Identification
Project Identification is defined by various properties. As mentioned below
- Project key which must be unique for all the projects. It is defined by sonar.projectkey as shown below
-
sonar.projectKey=Tutorial:SonarCshar
- Project Version It is defined by sonar.projectVersion as show below
-
sonar.projectVersion=1.
- Project Name this is the name of project that will appear in the sonar project list. It could be different from your solution name.
-
sonar.projectName=My C# Project for Sonar Analysis
16 Sonar Related Settings
Here you are going to specify the properties required by sonar to work for .Net projects. As shown below
sonar.sources=.
sonar.language=cs
17 C# Setting
Here you will be defining the properties for C# by specifying where the c# plugins are installed and the location of project.
- Project location project location is specified by sonar.dotnet.visualstudio.solution.file property. It value is the actual name of solution file along with extension, as shown below. sonar.dotnet.visualstudio.solution.file=MySonarProject.sln
- .NET Installation Directory here you have to specify the installation directory of .NET, as shown belo sonar.dotnet.4.0.sdk.directory=C:/WIndows/Microsoft.NET/Framework/v4.0.30319
- .NET Version specify the .Net version as below sonar.dotnet.version=4.0
- Test Project if you have created any unit test project in your project, you can specify it with the following property sonar.donet.visualstudio.testProjectPattern=*UnitTests*;*test*;*Test*
- FXCOP Installation Directory here you have to specify where the FXCOP is installed as shown below
sonar.fxcop.installDirectory=C:\Program Files (x86)\Microsoft Fxcop 10.0
- Gallio Installation Directory specify the installation directory of Gallio with the following property
sonar.gallio.installDirectory=C:\Program Files (x86)\Gallio
- FXCOP Dependency Directories specify the list of FXCOP dependency directories as shown below
sonar.fxcop.assemblyDependencyDirectories=c:/Program Files (x86)/Microsoft ASP.NET/ASP.NET MVC 3/Assemblies,D:\Visual Studio Installation\Common7\IDE\PublicAssemblies,c:/Program Files (x86)/Microsoft ASP.NET/ASP.NET Web Pages/v1.0/Assemblies
18 Dotcover setting
You can skip this section if you have not installed Dotcover.
Installation Directory specify dotcover installation directory with the following property
sonar.opencover.installDirectory=C:\Windows\SysWOW64
Code Coverage Tool specify code coverage too with the following property
sonar.gallio.coverage.tool=OpenCover
sonar.gallio.runner=IsolatedProcess
sonar.gallio.timeoutMinutes=60
19 Skipping Modules
You can skip the desired modules from being analyzed by Sonar with the following property
sonar.skippedModules=UnitTests
19.1 Project Properties File Contents
The whole contents our sonar-project.properties is as follows
#Project identification

sonar.projectKey=Tutorial:SonarCsharp
sonar.projectVersion=1.0
sonar.projectName=My C# Project for Sonar Analysis

#Info required for Sonar

sonar.sources=.

sonar.language=cs

#Core C# Settings sonar.dotnet.visualstudio.solution.file=MySonarProject.sln

sonar.dotnet.4.0.sdk.directory=C:/WIndows/Microsoft.NET/Framework/v4.0.30319

sonar.dotnet.version=4.0

sonar.donet.visualstudio.testProjectPattern=*UnitTests*;*test*;*Test* sonar.fxcop.installDirectory=C:\Program Files (x86)\Microsoft Fxcop 10.0 sonar.gallio.installDirectory=C:\Program Files (x86)\Gallio sonar.fxcop.assemblyDependencyDirectories=c:/Program Files (x86)/Microsoft ASP.NET/ASP.NET MVC 3/Assemblies,D:\Visual Studio Installation\Common7\IDE\PublicAssemblies,c:/Program Files (x86)/Microsoft ASP.NET/ASP.NET Web Pages/v1.0/Assemblies

sonar.opencover.installDirectory=C:\Windows\SysWOW64

sonar.gallio.coverage.tool=OpenCover

sonar.gallio.runner=IsolatedProcess

sonar.gallio.timeoutMinutes=60

# Exclusions Settings
sonar.skippedModules=UnitTests
Note: Please varify the paths for various assemblies etc. used in this file. You will need to change the path if it doesn't match with the path of your assemblies.
20 Saving Project Properties File
Save the above file in the same directory where your project solution file (with extension .sln) exists with the name sonar-project.properties as shown below
Note: the file must not have any other extension than .properties like txt etc. Extension should be .properties only

21 Analyzing .Net project with Sonar
Now finally we will analyze our .NET project with sonar qube.
To run Sonar Analysis on .NET project do the following steps
I. Start the sonar server as explained in section 11
II. Run command prompt as Adminstrator
III. Reach to the directory where you have kept the sonar-project.properties file.(where .sln file exists) with the following command cd [path of properties file],in our case it is
E:\Sonar Projects\MySonarProject

IV. when you reach to your solution directory enter the following command sonar-runner, as shown below
Note: The sonar server must be running when you enter this command

V. Wait for some time until the analysis are run on the project and you get the success message as shown below.

22 Getting Sonar Analysis Reports
The sonar analysis has been done and we can see the analysis reports on the sonar server.
To see the analysis server
- Just refresh the page (Dash Board page) on http://localhost:9000/ and log in if you are not logged in already.
- And you will be seeing your project in projects section, where you see 96% of Rule Compliance, because we have written something wrong in code (Remember the unused variable int myvariable) as shown below

23 Detailed Reports
To see the detailed Analysis Report of you .Net Project just click on the name of your project, displayed under Projects section and you will be able to see the reports as shown below.

24 Getting to know the issue
As shown above we have 1 issue of Major category. To know what issue is exactly, click on the Major Link.
When you click on the Major Link it show you which rule is violated and what is the solution, as shown below

24.1 Viewing issue in code
Click on the suggestion link Remove this unused "myvariable" local variable. Shown above. It will show you the actual code where the rule is being violated along with the file name etc. as shown below

That's all folks :)