
Skype Web SDK Sending an Instant Message
4.75/5 (3 votes)
Sending an Instant Message using the Skype Web SDK is a remarkably simple process - and only requires a few lines of JavaScript code. In this tutorial, we'll step through the process of authenticating, adding participants, and sending an instant message.
Sending an Instant Message using the Skype Web SDK is a remarkably simple process - and only requires a few lines of JavaScript code.
In this tutorial, we'll step through the process of authenticating, adding participants, and sending an instant message.
Important Prerequisites
The Skype Web SDK requires that the UCWA framework is installed and enabled on your Front-End, Edge and Director servers. Click here to view instructions for how to install UCWA. The Skype Web SDK simply won't function without these steps.
Application Flow

The application performs a few basic steps, which are outlined below.
- Initialize the SDK
- Authenticate with user credentials
- Start the conversation using chatService
- Add one or more participants to the conversation
- Send the actual Instant Message
- Stop the conversation using chatService
- Logout
- Miscellaneous Functions
The Code
The full code of for this application is listed below.
If you’ve already built an application using the Skype Web SDK, you can probably skip steps 1 & 2.
Step 1 – Initializing the SDK
The first step is to actually initialize the SDK. This requires the inclusion of the actual SDK in your HTML file, and this is made very easy as Microsoft conveniently provide this on their CDN.
<script src="https://swx.cdn.skype.com/shared/v/1.1.23.0/SkypeBootstrap.min.js"></script>
The version of the script may change from time to time, so it’s always best to check http://developer.skype.com regularly.
The SDK is exposed to JavaScript with the "Skype." prefix, which is case-sensitive.
Within your JavaScript file, we now need to initialize the SDK, which we can achieve by calling the SDK’s initialize method.
var Application
var client;
Skype.initialize({
    apiKey: 'SWX-BUILD-SDK',
        }, function (api) {
            Application = api.application;
            client = new Application();
        }, function (err) {
            log('An error occurred initializing the application: ' + err);
});
In this example, we’re creating an application object, called (obviously) Application. The Application object is created by calling the application constructor and is the entry point to the SDK, and we will create a new instance of this called client.
Step 2 - Authenticate with user credentials
Once the application has been initialized, the next step is to authenticate against the server using your sign-in credentials.
// start signing in
client.signInManager.signIn({
    username: ‘matthew@contoso.com’,
    password: ‘p@ssw0rd!’
})
In this project, we really don’t want to hard-code credentials, so instead lets collect them from forms on the web page.
// start signing in
client.signInManager.signIn({
    username: $('#username').text(),
    password: $('#password').text()
})
We should handle authentication errors gracefully, so lets add a handler to let us know when authentication is successful, or when it fails.
// start signing in
application.signInManager.signIn({
    username: $('#username').text(),
    password: $('#password').text()
}).then(
    //onSuccess callback
    function () {
        // when the sign in operation succeeds display the user name
        log('Signed in as'+ application.personsAndGroupsManager.mePerson.displayName());
    },
    //onFailure callback
    function (error) {
        // if something goes wrong in either of the steps above,
        // display the error message
        log(error || 'Cannot sign in');
    })
});
To help know whether the Application remains signed in, or indeed it’s state at any time, it’s useful to set up a subscription to the SignInManager.state.change method.
// whenever state changes, display its value
application.signInManager.state.changed(function (state) {
    log('Application has changed its state to: ' + state);
});
Step 3 - Start the conversation using chatService.start() method
Before we can add participants to the conversation or send a message, we need to start the chatService.
This is achieved by the rather verbose call to the chatService.start() method. We'll add error checking to ensure that if it fails we are notified accordingly.
    conversation.chatService.start().then(function () {
        log('chatService started!');
    }).then(null, function (error) {
        log('Error:' + error);
    });
Step 4 - Add one or more Participants to the Conversation
A Participant is simply a member of the conversation - another Lync or Skype for Business user. One or more participants must be added to the conversation before an Instant Message can be sent, otherwise you'll really just be chatting to yourself.
    conversation.addParticipant("sip:matthew@telewebica.com.au).then(function () {
        log("Participant successfully added!");
    }).then(null, function (error) {
        log("Error:" + error);
    });
A participant is represented by their SIP address, which is typically their email address in most Lync and Skype environments.
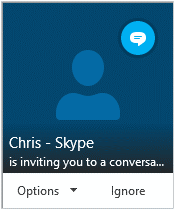
Once a participant has been added, an Accept Message dialog box will appear on their computer - such as the one shown here. Assuming they accept the invitation to join the conversation, you can then send a message.
If the participant ignores or declines the invitation, an error is thrown, and they will not receive any Instant Messages.
Step 5 - Send the actual Instant Message
Now that you have one or more participants in your conversation, you can send an Instant Message using the .sendMessage() method.
This method simply accepts a string, and passes it to the SDK, which then attempts to deliver it to all participants.
    var the_message = "Hello world!";
    log('Sending message: ' + the_message);
    conversation.chatService.sendMessage(the_message).then(function () {
        log('Message sent.');
    }).then(null, function (error) {
        log('Error:' + error);
    });
Step 6 - Stopping the conversation using chatService.stop() method
Once we have finished sending Instant Messages, we simply need to stop the chatService, using the .stop() method.
    conversation.chatService.stop().then(function () {
        log('chatService started!');
    }).then(null, function (error) {
        log('Error:' + error);
    });
Step 7 - Logout
When you want to close the dashboard, it’s recommended that you log out using the SDK’s functions, as opposed to just closing the browser or navigating away. This ensures that the session to Lync 2013 or Skype for Business is closed correctly.
(Code from https://msdn.microsoft.com/EN-US/library/dn962162%28v=office.16%29.aspx )
// when the user clicks on the "Sign Out" button
$('#signout').click(function () {
    // start signing out
    application.signInManager.signOut().then(
    // onSuccess callback
    function () {
        // and report the success
        log('Signed out');
    },
    // onFailure callback
    function (error) {
        // or a failure
        log(error || 'Cannot sign in');
    });
});
Step 8 – Miscellaneous Functions
Throughout this tutorial, I’m reporting status and updates via a log() function, instead of using the alert() function. Aside from being annoying when it pops up a message, alert() is not overly flexible. Instead, my log() function simply prepends the text message to a DIV, with the current time stamp – very useful for debugging and seeing activities in real time.
function log(texttolog) {
    var d = new Date();
    var time = padLeft(d.getHours(), 2) + ":" + padLeft(d.getMinutes(), 2) + ":" + padLeft(d.getSeconds(), 2) + ":" +
    padLeft(d.getMilliseconds(), 3);
    $('#logging_box').append(time + ": " + texttolog + "<br>");
}
function padLeft(nr, n, str) {
    return Array(n - String(nr).length + 1).join(str || '0') + nr;
}
There’s also a simple padLeft() function that pads time references with 0’s where they are less than 2 digits long, to make them nice and consistent.
The Full Code
<!doctype html>
<html>
<head>
    <title>Skype Web SDK Sending an Instant Message</title>
    <!-- SkypeWeb library requires IE compatible mode turned off -->
    <meta http-equiv="X-UA-Compatible" content="IE=edge">

    <!-- the jQuery library written by John Resig (MIT license) -->
    <script src="http://ajax.aspnetcdn.com/ajax/jQuery/jquery-1.10.1.min.js"></script>

    <!-- SkypeWebSDK Bootstrap Libray -->
    <script src="https://swx.cdn.skype.com/shared/v/1.1.23.0/SkypeBootstrap.min.js"></script>

    <!-- Load Bootstrap -->
    <link rel="stylesheet" href="https://maxcdn.bootstrapcdn.com/bootstrap/3.3.5/css/bootstrap.min.css">
    <script src="https://maxcdn.bootstrapcdn.com/bootstrap/3.3.5/js/bootstrap.min.js"></script>

    <!-- Javascript used in this demonstration -->
    <script src="index.js"></script>

    <!-- Styles for this demonstration -->
    <link href="index.css" rel="stylesheet">
</head>
<body>

    <div class="container">
        <h2>Skype Web SDK Sending an Instant Message</h2>
        <div id="loginbox" class="loginbox input-group">
            <div>Login</div>
            <div id="address" contenteditable="true" class="input form-control"></div>
            <div>Password</div>
            <input type="password" id="password" name="password" class="input form-control" />
            <div id="signin" class="button">Sign In</div>
        </div>
        <div id="chatfunctions">
            <div class="row">
                <div class="col-md-6 col-sm-6 col-lg-6">
                    <div class="input-group">
                        <div id="the_message" contenteditable="true" class="input form-control"></div>
                        <div id="send_message" class="input-group-addon btn btn-primary">Send</div>
                    </div>

                    <br />
                    <div id="startChat" class="button">Start chatService</div>
                    <div id="stopChat" class="button">Stop chatService</div>

                    <br /><br />
                    <div class="input-group">
                        <div id="the_participant" contenteditable="true" class="input form-control"></div>
                        <div id="add_participant" class="input-group-addon btn btn-primary">Add Participant</div>
                    </div>
                    <br />

                    <div id="signout" class="button">Sign Out</div>
                </div>
                <div class="col-md-6 col-sm-6 col-lg-6">
                </div>
            </div>
        </div>

        <div class="small">
            <b>Event Logs</b><br />
            <div id="logging_box" contenteditable="false" class="code"></div>
        </div>

    </div>

</body>
</html>
/*
   Generic Functions
*/
function log(texttolog) {
    var d = new Date();
    var time = padLeft(d.getHours(), 2) + ":" + padLeft(d.getMinutes(), 2) + ":" + padLeft(d.getSeconds(), 2) + ":" + padLeft(d.getMilliseconds(), 3);
    $('#logging_box').prepend(time + ": " + texttolog + "<br>");
}
function padLeft(nr, n, str) {
    return Array(n - String(nr).length + 1).join(str || '0') + nr;
}

/*
   How to send an Instant Message using the Skype Web SDK
*/
$(function () {
    'use strict';

    log("App Loaded");
    $('#chatfunctions').hide();

    var Application
    var client;
    var conversation;

    Skype.initialize({
        apiKey: 'SWX-BUILD-SDK',
    }, function (api) {
        Application = api.application;
        client = new Application();
    }, function (err) {
        log('some error occurred: ' + err);
    });

    log("Client Created");

    // when the user clicks the "Sign In" button
    $('#signin').click(function () {
        $('#signin').hide();
        log('Signing in...');
        // and invoke its asynchronous "signIn" method
        client.signInManager.signIn({
            username: $('#address').text(),
            password: $('#password').text()
        }).then(function () {
            log('Logged In Succesfully');
            $('#loginbox').hide();
            $('#chatfunctions').show();

            //create a new conversation
            log("Creating a new Conversation");
            conversation = client.conversationsManager.createConversation();


        }).then(null, function (error) {
            // if either of the operations above fails, tell the user about the problem
            log(error || 'Oops, Something went wrong.');
            $('#signin').show()
        });
    });

    $('#add_participant').click(function () {
        var the_participant = $('#the_participant').text();
        log("Adding the participant " + the_participant);
        conversation.addParticipant("sip:" + the_participant).then(function () {
            log(the_participant + " added!");
        }).then(null, function (error) {
            log("Error:" + error);
        });
    });

    $('#send_message').click(function () {
        var the_message = $('#the_message').text();
        if (the_message != "") {
            log('Sending message: ' + the_message);
            conversation.chatService.sendMessage(the_message).then(function () {
                log('Message sent.');
            }).then(null, function (error) {
                log('Error:' + error);
            });
        } else {
            log('<b><font color=red>Please enter a message to send!</font></b>');
        }
    });

    $('#startChat').click(function () {
        log('Starting chatService...');
        conversation.chatService.start().then(function () {
            log('chatService started!');
            $('#startChat').hide();
        }).then(null, function (error) {
            log('Error:' + error);
        });
    });

    $('#stopChat').click(function () {
        log('Stopping chatService...');
        conversation.chatService.stop().then(function () {
            log('chatService stopped.');
            $('#startChat').show();
        }).then(null, function (error) {
            log('Error:' + error);
        });
    });

    // when the user clicks on the "Sign Out" button
    $('#signout').click(function () {
        // start signing out
        log("Signing Out");
        client.signInManager.signOut().then(
                //onSuccess callback
                function () {
                    // and report the success
                    log('Signed out');
                    $('#loginbox').show();
                    $('#signin').show();
                    $('#chatfunctions').hide();
                },
            //onFailure callback
            function (error) {
                // or a failure
                log(error || 'Cannot Sign Out');
            });
    });

});
.input {
border: 1pt solid gray;
padding: 2pt;
overflow: hidden;
white-space: nowrap;
}

.button {
border: 1pt solid gray;
cursor: pointer;
padding: 2pt 5pt;
margin-top:5px;
display: inline-block;
}

.button:hover {
    background: lightgray;
}

.signinframe > .button {
    margin-top: 8pt;
}

.userdetails {
    border: 1pt solid lightgray;
    padding:5px;
}

.logoutbox, .loginbox {
    padding: 5px 0 10px 0;
}
Very Important Considerations
The code examples here require the framework to be logged in as you (or using an account that has your contacts/groups configured as well) – so be careful with your credentials.
We recommend running this code on a site protected by SSL, and under no circumstances hard-coding your credentials into the code. If you do, it’s at your own peril!