
Getting Started with React & ES6
How to get started with React and ES6
Feeling like having a go with Facebook's hugely popular React framework but not sure where to start?
In this post, I'm going to build a simple React application from scratch - using ECMAScript 6.
We'll put together the bare minimum skeleton of a site and keep the folder structure free of noise and clutter so that you can focus on the app code and not the tooling!
The simple app we'll build is at github.com/dwmkerr/react-es6-starter, or see it live.
Building ES6 Code
Not all browsers are supporting ES6 yet, so we're going to have to transpile our ES6 code, turning it into ES5. We're also going to have to handle 'JSX', the special JavaScript that we can use for React. We also need to play well with existing code.
Fortunately, two key libraries will deal with all of these problems for us.
Webpack is a bundler. It'll take a bunch of loose JavaScript files and build a single file from the lot1:
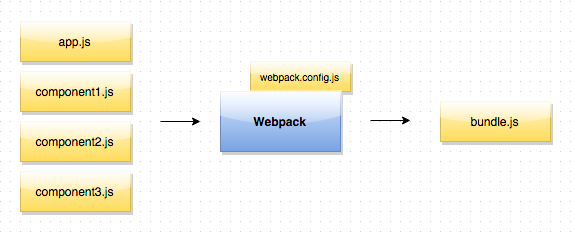
Even better, we can configure webpack to run files that match a certain pattern to go through other 'loaders', which can process the files further.
We can use the Babel transpiler to turn an ES6 file to ES5. We just need the glue to let Webpack use Babel as a loader. That comes in the form of the Babel Loader:

Let's install these three modules:
npm install --save webpack babel babel-loader
We'll also need a webpack config file. By default, webpack expects a file named webpack.config.js to be in the root of the project. But every tool under the sun wants to stick its config file in the root of our project, and most of the time they're just in the way.
So let's put everything to do with our tooling in a tooling folder instead. Create the file webpack.config.js in a tooling folder in the root of the project:
var path = require('path');

module.exports = {

  //  Defines the entrypoint of our application
  entry: path.resolve(__dirname, '../src/app.js'),

  //  Bundle to a ./public/bundle.js file
  output: {
    path: path.resolve(__dirname, '../public'),
    filename: 'bundle.js'
  },

  //  Use babel for anything that is *.js or *.jsx
  module: {
    loaders: [
      {
        test: /\.jsx?$/,
        loader: 'babel-loader',
        include: path.resolve(__dirname, '../src')
      }
    ]
  }
};
First we define our entry point - the first file which will actually be run if we run the final bundled script. This is the app.js file we'll create shortly. Next, we specify that everything should be bundled into a ./public/bundle.js file. Finally, we specify that every file in src which matches the \.jsx?$ regex will go through the babel loader.
That's ES6!
We've actually got enough now to use ES6. Create a file in public called index.html:
<!DOCTYPE html>
<html>
<body>
  <script src="bundle.js"></script>
</body>
</html>
Then create a src/app.js file:
const PI = 3.14;
let vals = [1, 2, 3].map(x => x*2);
console.log("Pi is " + 3.14 + " and vals is " + vals);
Run the command ./node_modules/.bin/webpack --config ./tooling/webpack.js and serve the public folder. Check the console and you'll see the result, you have got your ES6 code built and running in the browser!
If this is all you need, get the code from the minimal branch of the github.com/dwmkerr/react-es6-starter repo:
git clone git@github.com:dwmkerr/react-es6-starter.git && git checkout minimal
However, if you're here because you want some React, then read on!
Adding Some React
Before we continue, let's make our lives a little easier. That webpack command is a pain to type, so let's put it in a script. We'll also install http-server in dev mode so that we can create a start script to serve the public folder:
npm install --save-dev http-server
Our package.json will have a scripts section like this:
{
   ...
"scripts": {
    "start": "./node_modules/.bin/http-server",
    "postinstall": "./node_modules/.bin/webpack --config ./tooling/webpack.js",
    "webpack": "./node_modules/.bin/webpack --config tooling/webpack.js",
    "webpack-watch": "./node_modules/.bin/webpack --config tooling/webpack.js --watch --colors"
  }
The http-server binary will just serve anything in the public folder. postinstall will run automatically after npm install and that means we'll get a bundle built. webpack-watch is a convenience, when coding it's easier to have webpack run automatically when files change.
OK, with this out of the way, we can quickly build with npm run-script webpack or just leave npm run-script webpack-watch running.
Let's add a React component. Create a folder under app called home and add a home.js file:
import React from 'react';

export default class Home extends React.Component {
  render () {
    return <div>
        <h1>React ES6 Starter</h1>
        <p>Welcome to the React ES6 Starter home page!</p>
      </div>;
  }
}
This is our first react component, which does nothing more than render
some basic markdown. We'll use this as the starting point for our
application.
Now, we need to update the index.html file in the public/ folder, adding a div tag into which we'll render our React app. Update index.html so that it looks like this:
<!DOCTYPE html>
<html>
<head lang="en">
  <meta charset="UTF-8">
  <title>React ES6 Starter</title>
  <link rel="stylesheet"
   href="https://cdnjs.cloudflare.com/ajax/libs/materialize/0.97.0/css/materialize.min.css">
</head>
<body>
  <div class="container">
    <div id="root"></div>
  </div>
  <script src="bundle.js"></script>

  <!-- Materialize -->
  <script type="text/javascript"
  src="https://code.jquery.com/jquery-2.1.1.min.js"></script>
  <script src=
   "https://cdnjs.cloudflare.com/ajax/libs/materialize/0.97.0/js/materialize.min.js">
  </script>
</body>
</html>
We've also added materialize.css along the way so that we have some basic styling. We'll render everything into the div with id root.
To complete the picture, we can now take our app.js file and render
our Home component into the div. Here's app.js:
import React from 'react/addons';
import Home from './home/home';

React.render(<Home />, document.getElementById('root'));
That's all there is to it! We've got a clean and simple starting point to begin playing with React.
Testing
Even the most simple app would be incomplete without looking into how we will deal with the testing.
Many will recommend the Jest framework to test React applications. However, it's a bit more to learn and has some problems with NodeJS v0.12, so until we get Node v4, I'm going to keep things simple.
First, we'll install Karma as a test runner. We'll use Jasmine as a framework to write test cases and PhantomJS as a headless browser in which our tests will run. This means we'll need to add some more dev dependencies:
npm install --save-dev karma jasmine karma-webpack karma-jasmine karma-phantomjs-launcher
We can now create a karma.config.js file in our tooling folder:
var path = require('path');

module.exports = function(config) {
  config.set({
    browsers: ['PhantomJS'],
    files: [
      //  We need to polyfill as PhantomJS doesn't support 'bind'
      '../node_modules/babel-core/browser-polyfill.js',
      '../**/*.spec.js'
    ],
    frameworks: ['jasmine'],
    preprocessors: {
      '../**/*.spec.js': ['webpack'],
    },
    reporters: ['progress'],
    singleRun: true,
    webpack: {
      module: {
        loaders: [
          {
            test: /\.jsx?$/,
            loader: 'babel-loader',
            include: path.resolve(__dirname, '../src')
          }
        ],
      },
      watch: true,
    },
    webpackMiddleware: {
      noInfo: true
    },

    plugins: [
      require('karma-webpack'),
      'karma-jasmine',
      'karma-phantomjs-launcher'
    ]
  });
};
So here we are:
- Loading a polyfill from babel core (sorry guys, one more
npm install --save-dev babel-core) which gives PhantomJS thebindfunction (along with some others). This is needed as some of the testing code in the browser needs these features. - Specifying that anything that ends in .spec.js should be loaded
- Running anything that ends in .spec.js through webpack
- Telling webpack to use babel
Quite a bit of config, but we're re-using the same webpack tooling as before. We run the code through webpack, which sends it through babel and builds ES5 we can test in the browser.
With this in place, we can write a spec. Add home.spec.js to the home folder:
import React from 'react';
import $ from 'jquery';
import Home from './home.js';

describe('Home', () => {

  it('should render to the DOM', function() {

    //  Create the <Home /> react component
    var component = React.render(<Home />, document.body);

    //  Find the DOM element for the created component
    var node = React.findDOMNode(component);

    //  Check the DOM looks how we'd expect it to
    expect($(node).children('h1').text()).toEqual("React Redux Starter");
  });
});
What's going on here? We just ask React to render our Home component directly into the DOM. We get a component back from this call. We can then ask React to give us the DOM associated with the component and use familiar tools (jQuery!) to test the shape of the generated DOM.
All that's missing is the last of the dev dependencies we've missed:
npm install --save-dev jquery karma-cli phantomjs
We can run tests with:
./node_modules/.bin/karma ./tooling/karma.config.js
In fact, we'll update our package.json scripts so that this is the test command:
"scripts": {
  "test": "./node_modules/.bin/karma start ./tooling/karma.config.js",
  ...
Done!
We now have a very simple setup which allows us to run tests. You can build on this - perhaps adding Jest later or a more sophisticated or React specific set of tools. You could add coverage (in fact, this will be one of the key things we'll do in the next article).
Wrapping Up
This provides a very lean starting point for learning React. There's no moving parts at the moment - no state management. We'll get into that in later articles but right now you have a playground.
You can set up CI in a flash, just sign up for a Travis account and use a travis.yml like this:
language: node_js
node_js:
  - "0.12"
This repo is all ready to push to Heroku, no Procfile is needed. Check out react-es6-starter.herokuapp.com to see the code in action.
I hope you've found this article useful! Next time, we'll be looking at code coverage and getting into the details of managing state in React.
Please fork the repo and have a play, let me know of any suggestions or improvements!
github.com/dwmkerr/react-es6-starter
-
Actually, it will do a lot more than that, but this is the key feature we're interested in! Webpack is very powerful, so check out webpack.github.io to find out more. ↩