
Create an ASP.NET Web API web service to send authenticated emails with Office 365
How to create a centralized web service to send authenticated emails through Office 365 using ASP.NET Web API
Introduction
You can use Office 365 as an outgoing SMTP server for your applications and if you are using it to deliver mails to a permission limited distribution list on Office 365, your code needs to authenticate the user account that is sending out the mail besides just simply setting the From field in your Mailmessage object.
This article will demonstrate the following points:
- How to connect and use Office 365 SMTP server to send out emails from your application
- How to authenticate with Office 365 so that you can send to permission limited distribution list
- How to implement the code as a shared web service through ASP.Net Web API so it can be easily reused
Background
Recently, we have switched to Office 365 for our organizational email service and have retired our old internal SMTP server which accepts anonymous incoming SMTP mails. Previously, applications which need to send broadcast emails out just need to send an anonymous email to the internal SMTP server and it will get delivered to the users that are in the specified distribution list. However, Office 365 permission limited distribution list requires the account sending the mail to be authenticated before it is allowed to deliver the mail to the respective distribution list.
To ease the code change transition for the myriad of applications that I have developed over the years, I have decided to implement a centralized web service which wraps the logic of sending the authenticated email so that we can easily re-use the code in a standarized way.
This article will also demonstrate how to connect to the web service via a simple REST call through POST with a small C# console application, however, it can be easily adapted to any languages which requires sending an authenticated email. Do drop me an email if you would like client code examples in your language.
Software pre-requisite
- Visual Studio 2015 (or Visual Studio 2013) with .NET Framework 4.5 and above
- Office 365 account
If you don't have the full versions of Visual Studio 2015 or Visual Studio 2013, you can use the free Visual Studio 2015 Community version downloadable from Microsoft website.
Setting up the ASP.NET Web API project
We will need to setup a new ASP.NET Web API project in Visual Studio so that we can add the code to send email later in one of the routed actions. Start up Visual Studio and select a new ASP.NET web application. We can select the Web API template in the next screen.

In the next screen, select the Web API template. By selecting this template, Visual Studio conveniently creates folders for us to organize our code. Remember to uncheck the "Host in the Cloud" option if you are using Visual Studio 2015 and also for simplicity of this demonstration and reusability, let's change the authentication to "No Authentication".


Creating our Email controller
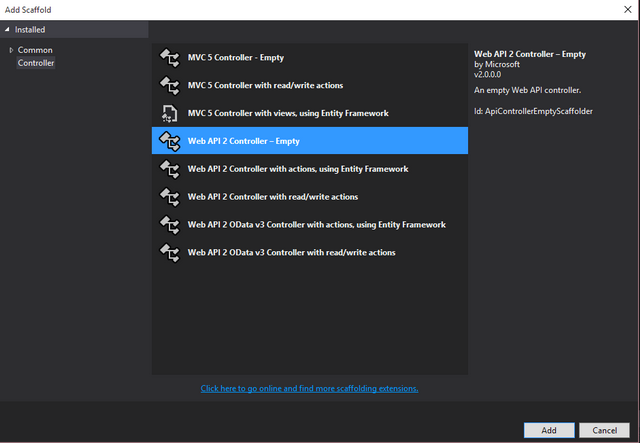
Let's create a new controller to handle our email sending code. Right click on the Controllers folder and add a new "Web API 2 Controller - Empty" as we do not need any database access for this example.
ASP.NET Web API resolves which method to be activated via routes, which is specified in App_Start > WebApiConfig.cs. Let's specify a name for our new email send method so that we can call it easily from our client applications.
[HttpPost]
[ActionName("sendmail")]
public IHttpActionResult processAuthEmail()
{
}
In our code example above, we have named our action with the name "sendmail". In our POST request, we will use make a request to the "sendmail" action which will cause ASP.NET Web API to route request to this method. We have also marked this method to respond only to POST request with the attribute "HttpPost".
Authenticating with Office 365 and sending emails
In our example, I will be showing how we can add different kind of mail options like cc, reply to and attachments to your mail object. First we need to specify what kind of data will be POSTed over to the server via the use of a model. This model will allow you to specify the fields that will be posted in the client request.
In the Solution Explorer, right click on Models and select "New Class". Let's name our new class "SendMailRequest.cs".

Inside the class, we will put the properties that are commonly associated with a mail message. Besides the common properties, you can also include any custom properties you would like your client to send over for processing on the server. The finished code looks like this:
public class SendMailRequest
{
    public string recipient { get; set; }
    public string cc { get; set; }
    public string replyto { get; set; }
    public string subject { get; set; }
    public string body { get; set; }
    public string filecontent { get; set; }
    public string filename { get; set; }
}
Switching back to our EmailController class, let's include the Models path so that the controller knows how to reference the new class that we have created. At the top of the EmailController.cs, put a "using" statement to the Models path.
using SendAuthMailService.Models;
We are now ready to write the code for the authentication to Office 365 and to send emails out, but before that, we need to make sure the POST parameters from the client are mapped automatically to properties as specified by our SendMailRequest class just now and these parameters are passed to our method.
To do this, modify the "processAuthEmail" method to pass in a SendMailRequest object.
public IHttpActionResult SendEmail(SendMailRequest mailModel)
Now we can use the properties that are passed in to the method through the "mailModel" object.
First, we define a new MailMessage object so we can set the mail options against it.
System.Net.Mail.MailMessage msg = new MailMessage();
Next, we can then work on the data that is passed into the method. Let's populate the recipients.
// Separate the recipient array
    string[] emailAddress = mailModel.recipient.Split(',');

    foreach (string currentEmailAddress in emailAddress) {
        msg.To.Add(new MailAddress(currentEmailAddress.Trim()));
    }
Next, let's populate the Cc field and the Reply-to field. These fields are optional so we need to check if they were defined in the model that is passed into the method. The Reply-To field is important if you want the reply of a broadcast email to be addressed to a person.
// Separate the cc array , if not null
    string[] ccAddress = null;

    if (mailModel.cc != null)
    {
        ccAddress = mailModel.cc.Split(',');
        foreach (string currentCCAddress in ccAddress)
        {
            msg.CC.Add(new MailAddress(currentCCAddress.Trim()));
        }
    }

    // Include the reply to if not null
    if (mailModel.replyto != null)
    {
        msg.ReplyToList.Add(new MailAddress(mailModel.replyto));
    }
Finally, in our sample code, we add the ability to add an optional attachment to our outgoing email. Recall that our model specifies two string - filename and filecontent, where the filename is the filename that is send by the client and the filecontent is the Base64 representation of the file. We will show a sample client at the end of this article. Notice that we have also included a temp directory where we use to assemble the file from the base64 string.
// Include the file attachment if the filename is not null
    if (mailModel.filename != null)
    {
        // Declare a temp file path where we can assemble our file
        string tempPath = Properties.Settings.Default["TempFile"].ToString();

        string filePath = Path.Combine(tempPath, mailModel.filename);

        using (System.IO.FileStream reader = System.IO.File.Create(filePath))
        {
            byte[] buffer = Convert.FromBase64String(mailModel.filecontent);
            reader.Write(buffer, 0, buffer.Length);
            reader.Dispose();
        }

        msg.Attachments.Add(new Attachment(filePath));

    }
After we have assigned the various mail options to our MailMessage object, we are now ready to set the sender of our mail message and authenticate against the Office 365 servers to send our mail out. The code below shows how this is done.
string sendFromEmail = Properties.Settings.Default["SendFromEmail"].ToString();
string sendFromName = Properties.Settings.Default["SendFromName"].ToString();
string sendFromPassword = Properties.Settings.Default["SendFromPassword"].ToString();

msg.From = new MailAddress(sendFromEmail , sendFromName);
    msg.Subject = mailModel.subject;
    msg.Body = mailModel.body;
    msg.IsBodyHtml = true;
    SmtpClient client = new SmtpClient("smtp.office365.com");
    client.Port = 587;
    client.EnableSsl = true;
    client.UseDefaultCredentials = false;
    NetworkCredential cred = new System.Net.NetworkCredential(sendFromEmail , sendFromPassword);
    client.Credentials = cred;
    client.DeliveryMethod = SmtpDeliveryMethod.Network;
    ServicePointManager.SecurityProtocol = SecurityProtocolType.Tls;
We wrap our send action in a try and catch exception block to handle any unexpected errors. Notice that after we have finished sending our email, we also remove the file that was assembled in the temporary folder if there was an attachment specified.
try
  {
        client.Send(msg);
        msg.Dispose();

        // Clean up the temp directory if used
        if (mailModel.filename != null)
        {
            string tempPath = Properties.Settings.Default["TempFile"].ToString();
            string filePath = Path.Combine(tempPath, mailModel.filename);
            File.Delete(filePath);
        }

        return Ok("Mail Sent");

    }
    catch (Exception e)
    {
        // Handle errors here
    }
Finally, we add a properties file to the project so that we can specify our various application properties like TempFile, SendFromName, SendFromEmail etc.
To add a properties file, right click on the project under Solution Explorer and select "Properties". In the newly opened tab, click on "Settings". Visual Studio will then let you know that you do not have a default settings file yet. Click on the link to create a default settings file.

Enter all the required settings for this application, an example of the TempFile setting looks like this:

Putting everything together, the completed code looks like this:
[HttpPost]
    [ActionName("sendmail")]
    public IHttpActionResult processAuthEmail(SendMailRequest mailModel)
    {

        // Send the email
        System.Net.Mail.MailMessage msg = new MailMessage();

        // Separate the recipient array
        string[] emailAddress = mailModel.recipient.Split(',');

        foreach (string currentEmailAddress in emailAddress)
        {
            msg.To.Add(new MailAddress(currentEmailAddress.Trim()));
        }

        // Separate the cc array , if not null
        string[] ccAddress = null;

        if (mailModel.cc != null)
        {
            ccAddress = mailModel.cc.Split(',');
            foreach (string currentCCAddress in ccAddress)
            {
                msg.CC.Add(new MailAddress(currentCCAddress.Trim()));
            }
        }

        // Include the reply to if not null
        if (mailModel.replyto != null)
        {
            msg.ReplyToList.Add(new MailAddress(mailModel.replyto));
        }

        // Include the file attachment if the filename is not null
        if (mailModel.filename != null)
        {
            // Declare a temp file path where we can assemble our file
            string tempPath = Properties.Settings.Default["TempFile"].ToString();

            string filePath = Path.Combine(tempPath, mailModel.filename);

            using (System.IO.FileStream reader = System.IO.File.Create(filePath))
            {
                byte[] buffer = Convert.FromBase64String(mailModel.filecontent);
                reader.Write(buffer, 0, buffer.Length);
                reader.Dispose();
            }

            msg.Attachments.Add(new Attachment(filePath));

        }

        string sendFromEmail = Properties.Settings.Default["SendFromEmail"].ToString();
        string sendFromName = Properties.Settings.Default["SendFromName"].ToString();
        string sendFromPassword = Properties.Settings.Default["SendFromPassword"].ToString();

        msg.From = new MailAddress(sendFromEmail, sendFromName);
        msg.Subject = mailModel.subject;
        msg.Body = mailModel.body;
        msg.IsBodyHtml = true;

        SmtpClient client = new SmtpClient("smtp.office365.com");
        client.Port = 587;
        client.EnableSsl = true;
        client.UseDefaultCredentials = false;
        NetworkCredential cred = new System.Net.NetworkCredential(sendFromEmail, sendFromPassword);
        client.Credentials = cred;
        client.DeliveryMethod = SmtpDeliveryMethod.Network;
        ServicePointManager.SecurityProtocol = SecurityProtocolType.Tls;

        try
        {
            client.Send(msg);
            msg.Dispose();

            // Clean up the temp directory if used
            if (mailModel.filename != null)
            {
                string tempPath = Properties.Settings.Default["TempFile"].ToString();
                string filePath = Path.Combine(tempPath, mailModel.filename);
                File.Delete(filePath);
            }

            return Ok("Mail Sent");
        }
        catch (Exception e)
        {
            return NotFound();
        }

    }
Sample C# client code to send email
As we have implemented the ASP.Net Web API as a standard REST service, we can activate it by using POST. The default URL routing for our web service is "/api/{controllername}/{actionname}", which in our case is "email".
The sample code for clients are as follows:
 WebClient client = new WebClient();
     string SERVERPATH = "YOUR SERVER PATH";
    NameValueCollection valCollection = new NameValueCollection();
    valCollection.Add("recipient", "test@test.com");
    // valCollection.Add("cc", "anothertest@test.com"); // Uncomment if you have a CC party
    valCollection.Add("subject", "Test Subject");
    valCollection.Add("body", "Test Body");
    // valCollection.Add("filename", "myfile.txt");
    // valCollection.Add("filecontent", Serialize("C:\\MyOriginalFile.txt")); // Uncomment if you want to send a file across

    client.UploadValues(SERVERPATH + "/api/email/sendmail", valCollection);

    Console.WriteLine("Done");
Sample code for the convenience Serialize method
We will be sending our file as a Base64 string. Below is the code you can use to convert the file into a Base64 string.
public static string Serialize(string fileName)
    {
        using (FileStream reader = new FileStream(fileName, FileMode.Open))
        {
            byte[] buffer = new byte[reader.Length];
            reader.Read(buffer, 0, (int)reader.Length);
            return Convert.ToBase64String(buffer);
        }
    }
Let me know how it works for you!