Here we discuss the basic implementation of a vehicle speed detection algorithm using an Haar object detector and an object correlation tracker.
Introduction
Traffic speed detection is big business. Municipalities around the world use it to deter speeders and generate revenue via speeding tickets. But the conventional speed detectors, typically based on RADAR or LIDAR, are very expensive.
This article series shows you how to build a reasonably accurate traffic speed detector using nothing but Deep Learning, and run it on an edge device like a Raspberry Pi.
You are welcome to download code for this series from the TrafficCV Git repository. We are assuming that you are Python and have basic knowledge of AI and neural networks.
In the previous article, we set up a development environment on Windows 10 for the TrafficCV program that we will deploy and test the code on Raspberry Pi. In this article, we’ll look at the overall design of TrafficCV, the problems this program tackles, and the implementation of a vehicle detector using an object detector model and an object correlation tracker.
TrafficCV: What It Is and What It Does
The basic functionality of TrafficCV – or any OpenCV program – is to analyze video frame-by-frame using the various algorithms or neural network models to classify objects, extract features (like object bounding boxes), calculate points (like object centroids), identify objects, and tracks them through a video’s frames. Usually a timer is run to measure how much time elapses between an object centroid moving from one set of pixel coordinates to another The program can then use this information, along with constants obtained through calibrating camera pixel distances against physical distances, to estimate object’s speed.
The basic problems TrafficCV has to solve in real time are:
- Process a video frame-by-frame with scaling, colorspace, or other transformations required by the computer vision algorithms or models that will be run on the video frames.
- Detect objects as vehicles, pedestrians, and so on, and get the bounding boxes for all the objects identified as vehicles with a certain confidence threshold.
- Track vehicles throughout the video – correlate object identified in the currentframe with the same object identified in previous frames.
- Measure pixel distance covered by a vehicle in a video and the time it took to cover that distance.
- Estimate the speed of the vehicle using the various constants obtained from the camera properties and the pixel/physical distance calibration.
- Display the computed information in a way that is easy to understand for humans.
The First Pass Detector
Let’s look at the first pass (of the haarcascade_kraten) model and detector in TrafficCV. This is the easiest to understand implementation of the vehicle speed detector, and it will serve as a template for using other kinds of detectors. The first pass detector uses an OpenCV Haar Cascade Classifier model trained for vehicle detection, which was released by Kartike Bansal, combined with an object correlation tracker from the dlib library.
The classifier runs on the CPU and detects bounding boxes of vehicle objects every fc frames, where fc is a command-line detector argument with a default value of 10. So every 10 frames we check if any new vehicle objects have appeared. The rest of the frames we pass to the object correlation tracker that calculates the new position of every existing vehicle’s bounding box. Then the speed estimator runs using the distance between the previous and the current vehicle’s bounding box position with pixel-per-metre (ppm) and frames-per-second (fps) constants. These constraints must be obtained through physical measurement and calibration and the camera properties.
The detector then uses OpenCV drawing and text functions to draw the bounding boxes on the frame in green, along with the estimated speed in white. The estimated FPS is shown at the top in red.
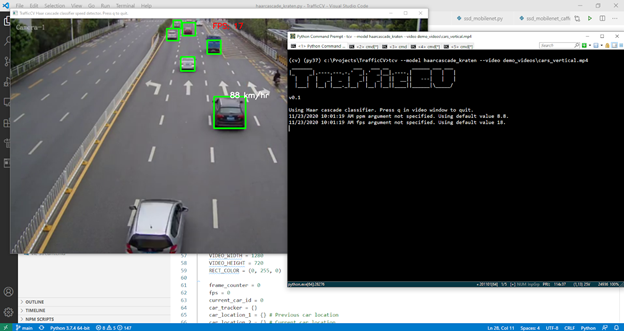
TrafficCV: Haar cascade classifier on Raspberry Pi 4
Click the link above to see a YouTube video of the first attempt run on Pi 4. In order to run this model, download TrafficCV model files and demo videos. Unzip the archives in your TrafficCV folder so that you have the models and demo_videos subdirectories. Then on Windows, you can say
tcv --model haarcascade_kraten --video demo_videos\cars_vertical.mp4
On Pi 4, you can say
./tcv MYHOST:0.0 --model haarcascade_kraten \
--video demo_videos/cars_vertical.mp4
where MYHOST:0.0 is the name of an available X server. If you are logged in at the Pi’s local desktop, you can say
./tcv $DISPLAY --model haarcascade_kraten \
--video demo_videos/cars_vertical.mp4
Let’s look at the code in the haarcascade_kraten.py file to see how our tasks 1-6 above are implemented in Python. First we set up an instance of CascadeClassifier using our pretrained model file, as well as a video source of our input video, and then we read the arguments that the user specifies:
classifier = cv2.CascadeClassifier(model_file)
    video = cv2.VideoCapture(video_source)
    ppm = 8.8
    if 'ppm' in args:
        ppm = args['ppm']
We also initialize variables and constants we’ll need when processing the video:
VIDEO_WIDTH = 1280
VIDEO_HEIGHT = 720
RECT_COLOR = (0, 255, 0)
frame_counter = 0
fps = 0
current_car_id = 0
car_tracker = {}
car_location_1 = {}
car_location_2 = {}
speed = [None] * 1000
VIDEO_WIDTH and VIDEO_HEIGHT are the width and height the classifier expects a video frame to have. We need to resize each video frame to the dimensions that the classifier model expects. We also need variables to track the location and speed of each vehicle object detected, as well as a variable to record how many video frames are being processed per second. With the required parameters and variables set up, everything happens in a while loop that reads a frame from the video, makes a copy of it, and increments the frame counter:
while True:
    start_time = time.time()
    _, image = video.read()
    if image is None:
        break
    image = cv2.resize(image, (VIDEO_WIDTH, VIDEO_HEIGHT))
    result = image.copy()
    frame_counter += 1
    ...
The next step is to update our dlib correlation tracker with the current frame:
for car_id in car_tracker.keys():
        tracking_quality = car_tracker[car_id].update(image)
        if tracking_quality < 7:
            car_ids_to_delete.append(car_id)
        for car_id in car_ids_to_delete:
            debug(f'Removing car id {car_id} + from list of tracked cars.')
            car_tracker.pop(car_id, None)
            car_location_1.pop(car_id, None)
            car_location_2.pop(car_id, None)
The tracking_quality variable is actually a value called the peak to-side lobe ratio that the dlib object tracker calculates when updating a tracked object’s position. If this value is less than 7, then the object may have disappeared, or is occluded by another object, so we remove it from our tracker.
We next check if the frame_counter variable is a multiple of the fc parameter. If it is, we run the classifier on the current frame:
if not (frame_counter % fc):
    gray = cv2.cvtColor(image, cv2.COLOR_BGR2GRAY)
    cars = classifier.detectMultiScale(gray, 1.1, 13, 18, (24,   24))
We use OpenCV functions to transform the color-space of the input video frame to BGR gray-scale, which is the most commonly used color-space in Haar classifiers, then call the detectMultiScale function. This function’s arguments specify parameters like the minimum bounding box size for objects that will be detected by the classifier. In our casem this is set to 24 * 24 pixels. For each detected vehicle object, we calculate the centroid of the bounding box:
for (_x, _y, _w, _h) in cars:
                x = int(_x)
                y = int(_y)
                w = int(_w)
                h = int(_h)
                x_bar = x + 0.5 * w
                y_bar = y + 0.5 * h
We then loop through all the previous vehicle objects we detected during the last classifier run, and are tracking now, and calculate centroids of those objects as well:
matched_car_id = None
           for car_id in car_tracker.keys():
                tracked_position = car_tracker[car_id].get_position()
                t_x = int(tracked_position.left())
                t_y = int(tracked_position.top())
                t_w = int(tracked_position.width())
                t_h = int(tracked_position.height())
                t_x_bar = t_x + 0.5 * t_w
                t_y_bar = t_y + 0.5 * t_h

                if ((t_x <= x_bar <= (t_x + t_w)) and
                    (t_y <= y_bar <= (t_y + t_h)) and
                    (x <= t_x_bar <= (x + w)) and
                    (y <= t_y_bar <= (y + h))):
                         matched_car_id = car_id
We compare the bounding boxes and centroids of each detected object with those existing objects that our tracker predicts the position for. If a tracked object’s position overlaps with a detected object’s position, we assume that this detected object is the same as the existing tracked object (remember that we’ve already removed existing objects that are occluded by other objects in the tracker). If no objects overlap in the above way, we assume that we detected a new object. We then assign this new object an ID and create a tracker for it:
if matched_car_id is None:
  debug (f'Creating new car tracker with id {current_car_id}.' )
  tracker = dlib.correlation_tracker()
  tracker.start_track(image, dlib.rectangle(x, y, x + w, y + h))
  car_tracker[current_car_id] = tracker
  car_location_1[current_car_id] = [x, y, w, h]
  current_car_id += 1
So we’ve gotten positions in our current frame for both new vehicle objects (using the Haar cascade classifier) and for existing objects (in our object correlation tracker). We can draw green bounding boxes for these objects on our frame using the OpenCV rectangle function:
for car_id in car_tracker.keys():
    tracked_position = car_tracker[car_id].get_position()
    t_x = int(tracked_position.left())
    t_y = int(tracked_position.top())
    t_w = int(tracked_position.width())
    t_h = int(tracked_position.height())
    cv2.rectangle(result, (t_x, t_y), (t_x + t_w, t_y + t_h),   RECT_COLOR, 4)
We also update the car_location_2 variable with the positions calculated for each object:
car_location_2[car_id] = [t_x, t_y, t_w, t_h]
The car_location_1 variable contains positions of vehicle objects calculated in the previous frame. So we can now use these two positions for each object to calculate the speed:
for i in car_location_1.keys():
if frame_counter % 1 == 0:
[x1, y1, w1, h1] = car_location_1[i]
[x2, y2, w2, h2] = car_location_2[i]
car_location_1[i] = [x2, y2, w2, h2]
if [x1, y1, w1, h1] != [x2, y2, w2, h2]:
if (speed[i] is None) and y1 >= 275 and y1 <= 285:
speed[i] = estimate_speed(ppm, fps, [x1, y1, w1, h1], [x2, y2, w2, h2])
if speed[i] is not None and y1 >= 180:
cv2.putText(result, str(int(speed[i])) + "
km/hr", (int(x1 + w1/2), int(y1-5)),cv2.FONT_HERSHEY_SIMPLEX,
0.75, (255, 255, 255), 2)
For a new object, we estimate the speed only when it passes through a certain zone. Speed calculation is performed once, and we store the values in the speeds variable. We display the speed only when the object is moving quickly enough.
The last bit of code displays the frame with all our rectangle and text annotations in a window and waits for the user to press a key if they desire to break out of the loop and end the program:
cv2.imshow('TrafficCV Haar cascade classifier speed detector.  Press q to quit.', result)
if cv2.waitKey(1) & 0xFF == ord('q'):
    break
The end result is a window replaying the frames of the video with the detected vehicle objects’ bounding boxes and estimated speeds displayed.
CPU Usage Considerations
When we run this for the first time in Windows on a demo video, we can see the basic detector is working from the video window output with the FPS counter around 18. However, the CPU usage is high, and gets higher as more vehicles get tracked. On Pi with its mobile ARM processor, we can only manage a few frames per second. Even then, if we track CPU usage via the Linux htop program, we’ll see that it’s high.
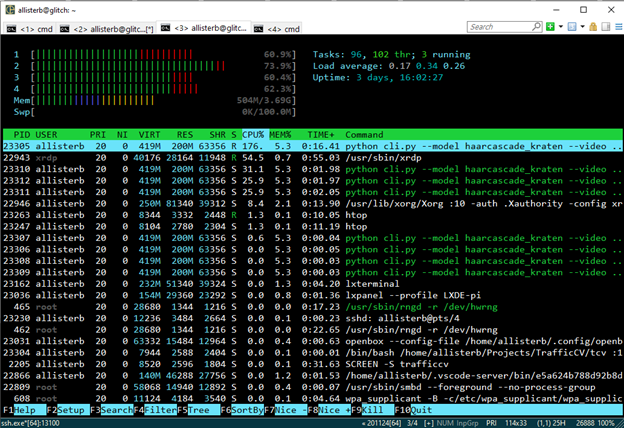
When running this initial version of TrafficCV over RDP, we see that the first CPU core is dedicated to the xrdp server while the other three cores run the video processing tasks. However, when we use a remote X server running on Windows, the CPU usage is lower. It’s single-threaded, which indicates that there are blocking I/O operations taking a significant amount of time on our video processing thread. The time required to send an X frame over the network is much greater than the time needed to process a video frame in OpenCV.
If we increase the fc parameter (increase the intervals between when the classifier runs), we can increase the FPS as the correlation tracker is less CPU-intensive than the classifier. But with a basic skeleton program that works, we can now explore more advanced speed detection models using TensorFlow.
Next Step
In the next article, we’ll focus on developing a computer vision framework that can run the various Machine Learning and neural network models – like SSD MobileNet – on live and recorded vehicle traffic videos. Stay tuned!
I've been programming computers as a hobby and professionally for more than 20 years. I like both Windows and Linux. My current areas of interest are computer security, machine learning, conversational user interfaces, and .NET HPC.


 General
  News
News  Suggestion
  Question
  Bug
Bug  Answer
  Joke
Joke  Praise
  Rant
Rant  Admin
Admin 


