This tutorial illustrates migrating a legacy Extract, Transform, and Load (ETL) process to Azure using Azure Functions and Azure SQL Database-as-a-Service. The process involves creating Azure Functions to trigger ETL tasks upon file upload, setting up an Azure SQL Database, and deploying the solution to Azure, facilitating seamless cloud-based data integration.
Extract, Transform, and Load (ETL) is a common business function that is often necessary for integration between different systems. Traditional approaches often involve setting up dedicated FTP servers, then deploying scheduled jobs to parse files and translate them for business use. Serverless architecture makes the job easier because a trigger can fire when the file is uploaded. Azure Functions is small pieces of code that focus on a specific problem and are ideal for tackling tasks like ETL.
This tutorial demonstrates how to take a legacy process and migrate it to run 100% in the cloud using the Azure SQL Database-as-a-Service offering combined with Azure Functions. You start with a local development environment, build and test the process end-to-end, then create the cloud-based assets and deploy to Azure.
Background
The following concepts are covered in this lab. Click on the following links to learn more about each functional area that is covered in the lab exercises.
Exercises
- Create an Azure Functions project
- Test the project locally
- Create the SQL database
- Add and test the code to update the database
- Create an Azure SQL Database
- Migrate the database
- Deploy the project to Azure
- Test uploads
1. Create an Azure Functions Project
This exercise introduces you to Azure Functions along with the ability to emulate storage and debug functions locally. The Azure Functions host makes it possible to run a full version of the functions host on your development machine.
Prerequisites
- Visual Studio 2017 15.5 or later
- The Azure Development workload
- Azure Functions and Web Jobs Tools (15 or later) (should be installed automatically with the Azure Development workload)
Steps
-
Open Visual Studio 2017.
-
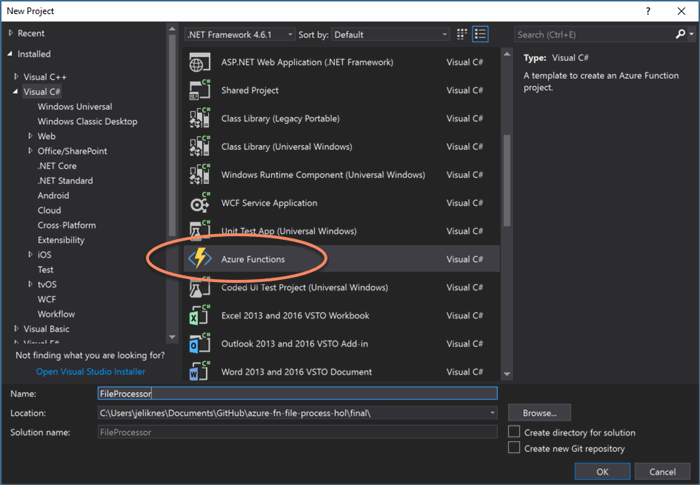
Select File then New Project and choose the Azure Functions template. Enter FileProcessor for the Name. Click OK.
-
In the Azure Functions dialog, choose the Azure Functions v1 (.NET Framework) host and select the Empty project template. Make sure that Storage Emulator is selected for the Storage Account. (This automatically sets up connection strings for storage emulation.) Click OK and wait for the project to create.

-
Right-click on the project name in the Solution Explorer and choose Add then New Item...
-
Select Azure Function for the item and give it the name FileProcessFn.cs and click Add.
-
In the next dialog, choose the Blob trigger template. You can leave Connection blank or populate it with AzureWebJobsStorage. Type import for the Path.
-
After the class is created, ensure it looks like this (if you did not fill out the Connection in the previous step, you can add it here):
namespace FileProcessor
{
    public static class FileProcessFn
    {
        [FunctionName("FileProcessFn")]
        public static void Run([BlobTrigger("import/{name}",
               Connection = "AzureWebJobsStorage")]Stream myBlob,
               string name, TraceWriter log)
        {
            log.Info($"C# Blob trigger function Processed blob\n Name:{name}
                     \n Size: {myBlob.Length} Bytes");
        }
    }
}
-
In the Solution Explorer, open local.settings.json. It should have development storage set, like this:
{
    "IsEncrypted": false,
    "Values": {
        "AzureWebJobsStorage": "UseDevelopmentStorage=true",
        "AzureWebJobsDashboard": "UseDevelopmentStorage=true"
    }
}
Learn more about Azure Blob Storage Triggers.
Now you've successfully created a function. The next exercise will walk through how to test it on your local machine.
2. Test the Project Locally
Prerequisites
Steps
-
Launch the Storage Emulator by following the directions here.
-
Open Storage Explorer and navigate to Blob Containers in developer storage.
-
Right-click on Blob Containers and choose Create Blob Container. This opens a node that you can type the name for the container: import. Hit ENTER and the container details load.
-
In Visual Studio, click the Debug button or press F5 to start debugging.
-
Wait for the functions host to start running. The console eventually shows the text Debugger listening on [::]:5858 (your port may be different.)
-
In the Storage Explorer window for the import container, click the Upload button and choose the Upload folder... option.
-
In the Upload Folder dialog, select the data folder that is provided with this tutorial. Make sure Blob type is set to Block blob and Upload to folder (optional) is empty. Click Upload.
-
Confirm the files in the folder were processed by checking the logs in the function host console window.
-
Stop the debugging session.
-
Delete the data folder and files from the storage emulator.
The Azure Function is ready. In the next exercise, you will create a database and table to process the files into.
3. Create the SQL Database
This exercise walks through creating the local SQL database for testing.
Prerequisites
Steps
-
Open SQL Server Management Studio and connect to your local server instance.
-
Right-click on the Databases node and choose New Database...
-
For the Database name type todo. Adjust any other settings you desire and click OK.
-
Right-click on the todo database and choose New Query. In the window that opens, type the following commands:
CREATE TABLE TodoItems (Id Int Identity, Task NVarChar(max), IsComplete Bit);
INSERT TodoItems(Task, IsComplete) VALUES ('Insert first record', 1);
SELECT * FROM TodoItems;
-
Click Execute.
-
Confirm that a single result is returned with "Insert first record" as the task.
The database is now ready. The next exercise will walk you through enhancing your function to parse the file and insert records into the database.
4. Add and Test the Code to Update the Database
The local database is ready to test. In this exercise, you use Entity Framework to insert the records you parse from the uploaded files into the SQL database.
Steps
-
Add the connection string for SQL Server to local.json.settings. It should look like this (example assumes SQL Express):
{
  "IsEncrypted": false,
  "Values": {
    "AzureWebJobsStorage": "UseDevelopmentStorage=true",
    "AzureWebJobsDashboard": "UseDevelopmentStorage=true"
  },
  "ConnectionStrings": {
    "TodoContext": "Server=localhost\\SQLEXPRESS;Database=todo;Trusted_Connection=True;"
  }
}
-
In Visual Studio, add a class file named TodoItem.cs and populate it:
namespace FileProcessor
{
    public class TodoItem
    {
        public long Id { get; set; }
        public string Task { get; set; }
        public bool IsComplete { get; set; }
    }
}
-
Open the Package Manager Console (under Tools) and type:
Install-Package EntityFramework
-
Add another class file named TodoContext.cs then include the following code to define the database connections. The connection string name is passed to the base class in the constructor:
using System.Data.Entity;

namespace FileProcessor
{
    public class TodoContext : DbContext
    {
        public TodoContext() : base("TodoContext")
        {
        }

        public DbSet<TodoItem> TodoItems { get; set; }

    }
}
-
Open FileProcessFn.cs and change the Run method to be asynchronous by replacing void with async Task. Be sure to add using System.Threading.Tasks to the top of the file.
-
After the log.Info statement, add the structure for reading lines from the stream:
if (myBlob.Length > 0)
{
    using (var reader = new StreamReader(myBlob))
    {
        var lineNumber = 1;
        var line = await reader.ReadLineAsync();
        while (line != null)
        {
            await ProcessLine(name, line, lineNumber, log);
            line = await reader.ReadLineAsync();
            lineNumber++;
        }
    }
}
-
Implement the ProcessLine method:
private static async Task ProcessLine
   (string name, string line, int lineNumber, TraceWriter log)
{
    if (string.IsNullOrWhiteSpace(line))
    {
        log.Warning($"{name}: {lineNumber} is empty.");
        return;
    }

    var parts = line.Split(',');
    if (parts.Length != 2)
    {
        log.Error($"{name}: {lineNumber} invalid data: {line}.");
        return;
    }

    var item = new TodoItem { Task = parts[0] };
    if ((int.TryParse(parts[1], out int complete) == false) ||
                                complete < 0 || complete > 1)
    {
        log.Error($"{name}: {lineNumber} bad complete flag: {parts[1]}.");
    }
    item.IsComplete = complete == 1;
}
-
After setting the IsComplete flag, add the logic to check for duplicates and insert the record if it is unique:
using (var context = new TodoContext())
{
    if (context.TodoItems.Any(todo => todo.Task == item.Task))
    {
        log.Error($"{name}: {lineNumber} duplicate task: \"{item.Task}\".");
        return;
    }
    context.TodoItems.Add(item);
    await context.SaveChangesAsync();
    log.Info($"{name}: {lineNumber} inserted task: \"{item.Task}\" with id: {item.Id}.");
}
-
Press F5 to debug. In Azure Storage Explorer, upload GoodData.csv to the import container. You should see several success messages the functions console.
-
Upload BadData.csv and verify only a few records are processed and errors are printed.
-
Open SQL Server Management Studio and run the query:
SELECT * FROM TodoItems
-
Verify you receive results similar to this:
-
Delete the imported tasks by executing this SQL statement:
DELETE FROM TodoItems WHERE Id > 1
Now the project is successfully running locally. The next few exercises demonstrate how to move the process to Azure.
5. Create the Azure SQL Database
Next, you create an Azure SQL database in the cloud. This exercise uses the Azure portal.
Prerequisites
Steps
-
Choose Create a resource and search for or select SQL Database.
-
Enter a unique Database name.
-
Choose your Azure subscription.
-
Select the Create new option for Resource group and enter my-todo-hol.
-
Keep the default Blank database for Select source.
-
Click Configure required settings for Server.
-
Select Create new server.
-
Enter a unique Server name.
-
Provide a login and password. Note: Be sure to save your credentials!
-
Pick your preferred Location.
-
Click the Select button.
-
Click Pricing tier.
-
Slide the DTU bar to the lowest level for this lab.
-
Tap Apply.
-
Check Pin to dashboard.
-
Click Create.
-
Once the database is created, navigate to the Overview for your database and select Set server firewall.
-
Click Add client IP to add your IP address, then click Save. Test that you can access the database by connecting from SQL Server Management Studio.
Wait for the deployment to complete (you will receive an alert) and then continue to the next exercise.
6. Migrate the Database
You can follow the steps in Exercise 3 (Create the SQL Database) to create and populate the Azure SQL tables, or you can migrate from your local SQL instance. If you choose to create the table yourself, you may skip this exercise.
Prerequisites
Steps
-
Open the Microsoft Data Migration Assistant.
-
Click the plus sign to start a new project, check Migration, give the project a name and make sure the Source server type is SQL Server and the Target server type is Azure SQL with a Migration scope of Schema and data. Click Create.
-
Fill out the credentials for the source server, click Connect, then select the database you created in Exercise 3. Click Next.
-
Fill out the credentials for the target server (Azure SQL) and click Connect then select the database you created in Exercise 5. Click Next.
-
In the next dialog, make sure only dbo.TodoItems under Tables is checked and click Generate SQL script.
-
The next dialog will show you SQL script to create the table. Click Deploy schema to deploy the table to Azure SQL.
-
Verify the deployment was successful, then click Migrate data.
-
Click Start data migration.
-
Verify the migration was successful. You can test the migration by browsing the data in SQL Server Management Studio.
Now that the Azure SQL database is ready, you deploy the function to Azure.
7. Deploy the Project to Azure
In this exercise, you use the built-in Visual Studio tools to create a function app and app service plan and deploy your function to the cloud.
-
Inside Visual Studio, from the Solution Explorer, right-click on the project name and choose Publish....
-
Choose Azure Function App, check Create New, and click Publish.
-
Give the app a unique name, choose your Subscription, and select the same Resource Group that you used for the Azure SQL Server. For App Service Plan click New....
-
Give the plan a unique name, choose the Location, and pick Consumption for the Size. Click OK.
-
Back in the Create App Service dialog, click Create.
-
The publish shows build output and eventually the text Publish completed. when it's done.
-
Open your Azure SQL Database in the Azure portal and navigate to Connection Strings. Copy the connection string for ADO.NET.
-
Navigate to the function app in the portal. Click Application settings.
-
Scroll to the Connection strings section. Click + Add new connection string. Type TodoContext for the name, paste the value from step 7 (be sure to update {your_username} and {your_password} to the correct values), and set the type to SQLAzure.
-
Above the Connection strings section is Application settings. Note the AccountName from the AzureWebJobsStorage entry to get the storage account name.
-
Scroll to the top and click Save.
Everything has been deployed and configured in Azure. In the next step, you will create the import container and upload files to test the cloud implementation.
8. Test Uploads
Now the function app is deployed and configured. This last exercise helps you create a blog container, upload the file, and test the processing trigger.
-
Navigate to the storage account from Step 10. It should be the only storage account in your resource group. Click on Blobs.
-
From the Blob service page, click + Container to add a new container.
-
Type import for the name, leave Public access level at Private (no anonymous access) and click OK.
-
Once the container is created, click on the container name (import) to open the container, then click Upload.
-
Click the folder to browse to the GoodData.csv file, choose the file and click Upload.
-
Navigate back to the function app and click Monitor.
-
Wait for the logs to appear (use the Refresh button if necessary). After the log appears, click on the log entry to view the log information and verify the data was inserted.
-
Use SQL Server Management Server to verify the records.
-
Repeat Steps 4 - 7 with the BadData.csv file.
Congratulations! You have successfully completed this lab to create a serverless function that imports files into a SQL database.
Note: articles posted here are independently written and do not represent endorsements nor reflect the views of my employer.
I am a Program Manager for .NET Data at Microsoft. I have been building enterprise software with a focus on line of business web applications for more than two decades. I'm the author of several (now historical) technical books including Designing Silverlight Business Applications and Programming the Windows Runtime by Example. I use the Silverlight book everyday! It props up my monitor to the correct ergonomic height. I have delivered hundreds of technical presentations in dozens of countries around the world and love mentoring other developers. I am co-host of the Microsoft Channel 9 "On .NET" show. In my free time, I maintain a 95% plant-based diet, exercise regularly, hike in the Cascades and thrash Beat Saber levels.
I was diagnosed with young onset Parkinson's Disease in February of 2020. I maintain a blog about my personal journey with the disease at https://strengthwithparkinsons.com/.


 General
  News
News  Suggestion
  Question
  Bug
Bug  Answer
  Joke
Joke  Praise
  Rant
Rant  Admin
Admin 


