Introduction
This practical demonstration will help you to understand how to implement CRUD (CREATE, READ, UPDATE and DELETE) operations functionality in Python with SQL database. For any application which is associated with a database, we perform some operations for inserting the record [C= Create], reading the records [R=Read], updating the existing record with new value [U=Update] or deleting the record from the database [D=Delete]. So, These four operations are essentials when talking about any application where we have to use a database.
Day 1: Set and test python environment in Visual Studio 2017
Day 2: Getting started with first python project in Visual Studio 2017
Background
Today, we will try to implement this CRUD operations functionality with a simple Python application. We will use SQL Server for this demo and see how we make connectivity with the SQL server. We will follow step by step practical demonstration and cover each step in detail. The steps will be as follows:
- Create a Python project in Visual Studio 2017
- Create a database and a table in SQL
- Create a config file for the database
- Install Python Package as "Pypyodbc"
- Create a connection file
- Create new record
- Read Data
- Update existing record
- Delete data
I have defined the objective for this article above. So, without wasting much time, let's move to the actual implementation.
Create a Python Project in Visual Studio
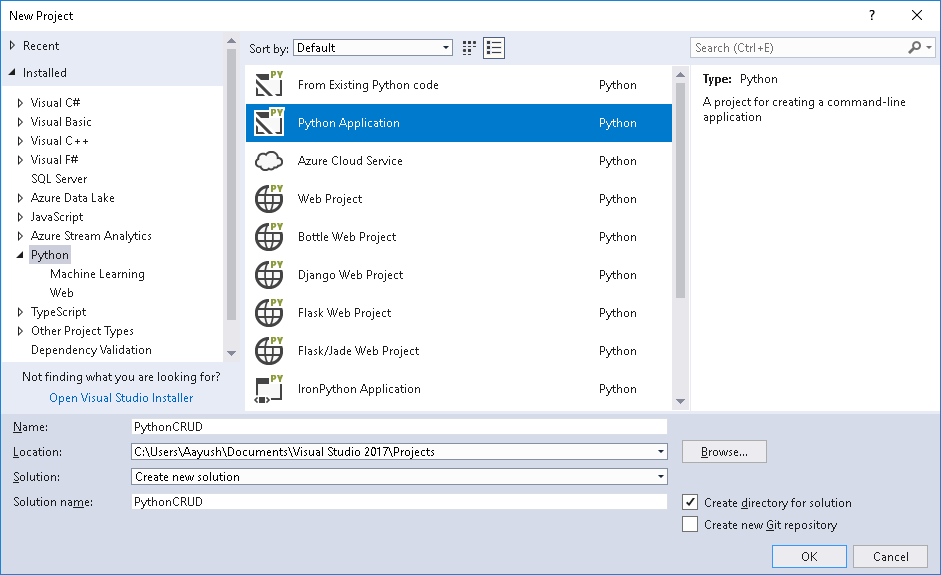
Open Visual Studio 2017 and go to File > New > Project. It will open the New Project window, now just select the Python from the installed section in the left panel and from the middle section, just click to "Python Application" and provide the suitable name "PythonCRUD". You can also change the location for this application, if you wish and click to OK.
It will take some time and your project will be ready. You can also read this article for step by step information on how to create your first Python application in Visual Studio.
Create a Database and a Table in SQL
We have a Python project ready and we are ready to implement CRUD operations, but before that, let's create the database and a table in SQL Server. So that we will perform CRUD operations with a live database. Here, we will create a simple database as "Test" and will create a simple table as "Employee" as follows. Following is the SQL script for creating database and table. You can directly execute it. Once it will execute successfully, you can find a Test database along with the Employee table in SQL Server.
CREATE DATABASE Test
GO

USE Test
GO

CREATE TABLE Employee(Id int PRIMARY KEY IDENTITY(1,1),	Name varchar(255) NULL,	Age int NULL)
Create a Config File for the Database
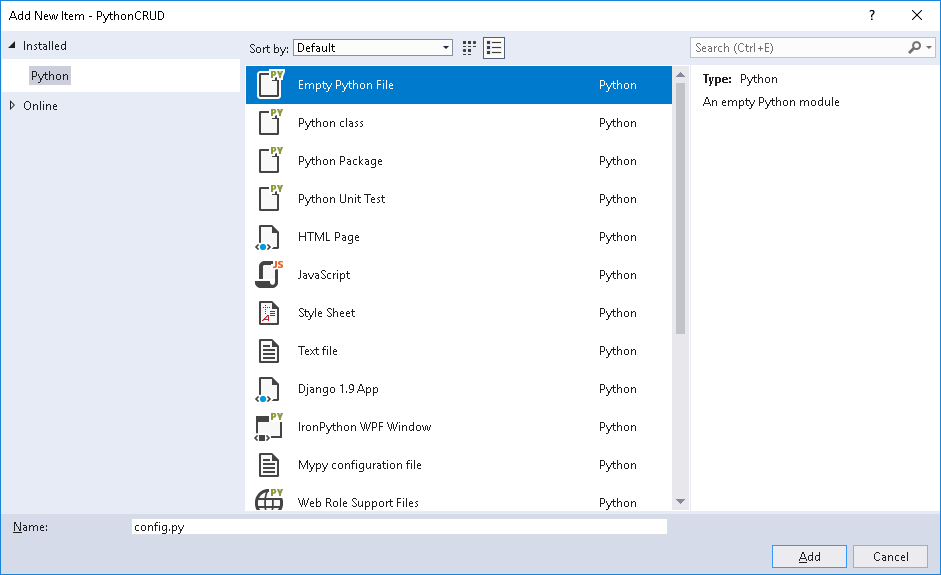
Now let's add a configuration file in this project where we will define all the properties and their values. These properties further will use while creating the connection with SQL database. So, open the Solution Explorer and right-click on Project and choose Add > New Item. It will open the "Add New Item" window similar to as follows. From this window, we have to select "Empty Python File" and provide the valuable name as "config.py" and click to Add. After clicking to Add, it will add a new Python file in the project as config.py.
Now, let's modify the "config.py" and add the required properties and its values which are required for SQL database connection as follows. Here, we need driver name, server name, database name, and credentials as user name and password. These properties are inside an object so that we can use it later.
DATABASE_CONFIG ={
'Driver': 'SQL Server',
'Server': 'DESKTOP-QQ95JAD',
'Database': 'Test',
'UID': 'sa',
'Password': 'xxxxxxx'
}
Install Python Package as "Pypyodbc"
Next, we will install a Python package which is required for making the database connection and executing the command on the database. It is Pypyodbc which is a pure Python package for database operations.
As per PyPi.Org: Pypyodbc is One pure Python script, runs on CPython / IronPython / PyPy , Version 2.4 / 2.5 / 2.6 / 2.7 / 3.2 / 3.3, Win / Linux , 32 / 64 bit. For more..https://pypi.org/project/pypyodbc/
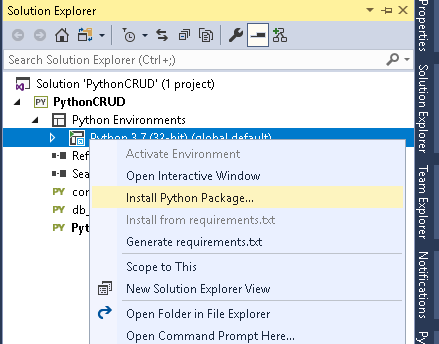
For installing a new package in a project environment, right click to Python environment and choose "Install Python Package...".
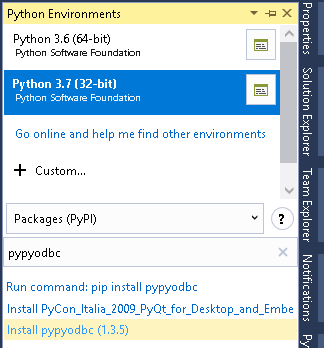
It will open Python Environments windows where you can find all install environments and just below it, we have a search box from where we can search any specific package and install it. So, just search pypyodbc as shown in the below image and click to "Install pypyodbc (1.3.5)".
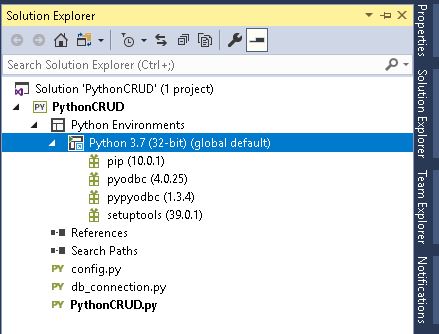
Once you will install the pypyodbc, you can see the successfully installed message in the Output window and find that package in Python environment as well.
Create a Connection File
Any application which works with database and performs database operations, it has a mechanism to create and manage the connection with the database. Here in this application, we will do the same and create a database connection file, which generates the connection with a defined configuration in a configuration file. Let's create a new python file as "db_connection.py" and create a method in it. This method (getConnection()) will return the database connection based on database configuration defined in config.py.
First, let import the pypyodbc, so that we can use it. For accessing the configuration properties defined in config.py, first we have to import that file using "import filename" and then can access the object directly.
import pypyodbc
import config
def getConnection():
connection = pypyodbc.connect("Driver= {"+config.DATABASE_CONFIG["Driver"]+"} ;
Server=" + config.DATABASE_CONFIG["Server"] + ";
Database=" + config.DATABASE_CONFIG["Database"] + ";
uid=" + config.DATABASE_CONFIG["UID"] + ";pwd=" + config.DATABASE_CONFIG["Password"])
return connection
Now, let's decorate the main function from where execution will start. As you can see the below code, this is the PythonCRUD.py file which is created automatically when we created the project in Visual Studio with the similar name of the project. Here, first of all, we are importing all required modules as pypyodbc for database connection and operations with SQL Server, db_connection for getting the connection based on configuration provided above. And four other files as read, create, update and delete for performing CRUD operations respectively.
The first screen will give the user to input for his/her choice among available options as C=Create, R=Read, U=Update and D=Delete.
import pypyodbc
import db_connection as dbConn
from read import Read
from create import Create
from update import Update
from delete import Delete
def main():
print('Available Options: C=Create, R=Read, U=Update, D=Delete ')
choice = input('Choose your option = ')
if choice == 'C':
createObj=Create()
createObj.func_CreateData()
elif choice == 'R':
readObj = Read()
readObj.func_ReadData()
elif choice == 'U':
updateObj = Update()
updateObj.func_UpdateData()
elif choice == 'D':
deleteObj = Delete()
deleteObj.func_DeleteData()
else:
print('Wrong choice, You are going exist.')
main()
Create New Record
As we have done lots of things as Project Creation, Database and Table Creation, Creating the Configuration File for the database, Creating the Connection File, etc. Now, let's move and create a new record from python file and save it into the database.
So, first create a new empty python file as "create.py" as same we have created in the above step. In this file, create a class as "Create" and a method as "func_CreateData(self)", this method will be responsible for adding a new record in the database. Here, we are doing the following things.
- First, getting the database connection from db_connection file.
- Making two input for entering the values for name and age respectively.
- Create the insert query using input values (name, age) and execute it.
- Commit the connection, so that value commit in a database table.
- In
finally block, close the connection. - Maintaining the execution in
try-except-finally block. - Print the valuable message.
import db_connection as dbConn
class Create:
def func_CreateData(self):
connection = dbConn.getConnection()
name = input('Enter Name = ')
age = input('Enter Age = ')
try:
query = "Insert Into Employee(Name, Age) Values(?,?)"
cursor = connection.cursor()
cursor.execute(query, [name, age])
connection.commit()
print('Data Saved Successfully')
except:
print('Something wrong, please check')
finally:
connection.close()
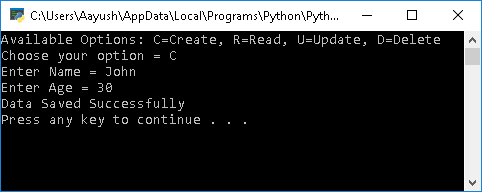
Let's run the project and you will get the windows similar to below. Here, you will get the options for your choice [Code will be available at the bottom of this article]. So, first choose your option as C. It means, you are going to create a new record.
It will ask to enter the name and age respectively and data will save with appropriate message that "Data Saved Successfully".
Read Data
Let's create one more file as "read.py" for reading the data and printing it. Here, we will also do the same operation as we have done in creating.
- First, getting the database connection from db_connection file.
- Create the
select query and execute it. - Get the value in some variable, here we are getting in a cursor.
- Loop on the cursor and print the value.
import db_connection as dbConn
class Read:
def func_ReadData(self):
connection = dbConn.getConnection()
cursor = connection.cursor()
cursor.execute('Select * from Employee')
for row in cursor:
print('row = %r' % (row,))
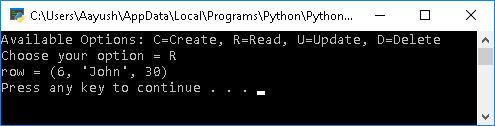
While running the project, just choose R as an option for reading the data and press the enter. You will get the output as follows:
Update Existing Record
Now, it's time to update the existing record. So, for that, first let's create one more file as "update.py" and make the code as follows. Here, we have to first get the record which needs to be updated and then we will provide the new values for that record and update it.
import db_connection as dbConn;
class Update:
def func_UpdateData(self):
connection = dbConn.getConnection()
id = input('Enter Employee Id = ')
try:
sql = "Select * From Employee Where Id = ?"
cursor = connection.cursor()
cursor.execute(sql, [id])
item = cursor.fetchone()
print('Data Fetched for Id = ', id)
print('ID\t\t Name\t\t\t Age')
print('-------------------------------------------')
print(' {}\t\t {} \t\t\t{} '.format(item[0], item[1], item[2]))
print('-------------------------------------------')
print('Enter New Data To Update Employee Record ')
name = input('Enter New Name = ')
age = input('Enter New Age = ')
query = "Update Employee Set Name = ?, Age =? Where Id =?"
cursor.execute(query, [name, age, id])
connection.commit()
print('Data Updated Successfully')
except:
print('Something wrong, please check')
finally:
connection.close()
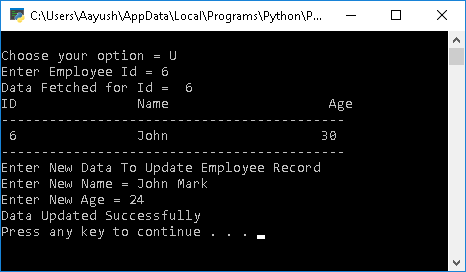
This time while running the project, just choose U as an option for updating the record. First, it will ask to enter the employee id which is going to be updated and show the data for that employee. Next onwards this, it will ask to enter updated data for name and age for that employee and update it. Once it will update successfully, it will show the confirmation message.
Delete Data
Here, we will try to delete the existing record. So, let's create one more file for delete operation as "delete.py". Here, we will first ask a user to enter the employee id which needs to be deleted and based on that, it shows the data for that employee.
Next message will ask to confirm to you that you are willing to delete or not. We have two options as "Y" and "N". Just press Y, if you would delete the record.
import db_connection as dbConn;
class Delete:
def func_DeleteData(self):
connection = dbConn.getConnection()
id = input('Enter Employee Id = ')
try:
sql = "Select * From Employee Where Id = ?"
cursor = connection.cursor()
cursor.execute(sql, [id])
item = cursor.fetchone()
print('Data Fetched for Id = ', id)
print('ID\t\t Name\t\t\t Age')
print('-------------------------------------------')
print(' {}\t\t {} \t\t\t{} '.format(item[0], item[1], item[2]))
print('-------------------------------------------')
confirm = input('Are you sure to delete this record (Y/N)?')
if confirm == 'Y':
deleteQuery = "Delete From Employee Where Id = ?"
cursor.execute(deleteQuery,[id])
connection.commit()
print('Data deleted successfully!')
else:
print('Wrong Entry')
except:
print('Something wrong, please check')
finally:
connection.close()
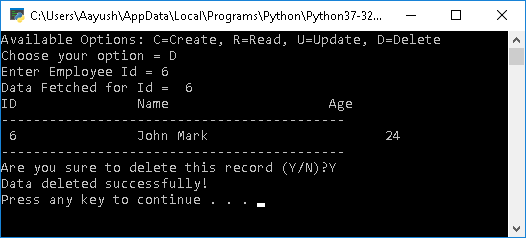
Run the project and choose the last option as D for deleting the record and provide the employee id which needs to be deleted. After providing the employee id, first, it will show the record data and ask for confirmation. If you provide Y as confirmation, then it will delete the record and show the confirmation message that data has deleted successfully.
Conclusion
So, today, we have learned how to perform CRUD operations in Python with SQL database.
I hope this post will help you. Please put your feedback using comment which will help me to improve myself for the next post. If you have any doubts, please ask in the comments section below and if you like this post, please share it with your friends. Thanks!
A Software Developer, Microsoft MVP, C# Corner MVP, Blogger and has extensive experience with designing and developing enterprise scale applications on Microsoft .NET Framework.
http://www.mukeshkumar.net
https://www.linkedin.com/in/mukeshkumartech


 General
  News
News  Suggestion
  Question
  Bug
Bug  Answer
  Joke
Joke  Praise
  Rant
Rant  Admin
Admin 


