In this article, we build a web application based on Angular framework, Angular Material, Reactive forms and Observables.
Introduction
The main goals of this article are to learn how to:
- manipulate mat-table through crud operations
- add column filtering on mat-table
- create a form dialog
- create a confirm dialog
- use
BehaviorSubject
To achieve these goals, we will create an application for persons management.
Prerequisites
To understand this article well, you should have some knowledge about Angular, JavaScript/Typescript , HTML and CSS.
Before we start, we have to setup Angular environment. To do that, I recommend you to visit the Angular official documentation.
Create a New Application and Setup Angular Material
For this demo, I have used Angular version 9.
- First, we need to create a new Angular application by running the following command line:
ng new angular-datatable
- Next, install Angular material to have a nice design for your UI components by running this command line:
ng add @angular/material
- Declare all needed Angular material components modules inside app.module.ts:
 imports: [
  BrowserModule,
  BrowserAnimationsModule,

  CdkTableModule,
  MatTableModule,
  MatPaginatorModule,
  MatSortModule,
  MatMenuModule,
  MatIconModule,
  MatButtonModule,
  MatDialogModule,
  ReactiveFormsModule,
  MatInputModule,
  MatSelectModule
],
Create Model
- First, we have to define an entity class named
Person. It contains the following properties:
Id: unique identifierFirstName: the first nameAgeJob: the job name that person can have like: Dentist, Software developer...
  export class Person {

  id?: number;
  firstName: string;
  age: number;
  job: string;

  constructor(id: number = null,
              firstName: string = '', age: number = 0, job: string = '') {
    this.id = id;
    this.firstName = firstName;
    this.age = age;
    this.job = job;
  }
}
- Then, we need to declare an array of
persons for our project which works only on the client side. This data is like a local data store.
import { Person } from "../models/person";

export const personsData: Person[] = [
  new Person(1, 'person 1', 30, 'Software Developer'),
  new Person(2, 'person 2', 33, 'Dentist'),
  new Person(3, 'person 3', 32, 'Physician Assistant'),
  new Person(4, 'person 4', 33, 'Software Developer'),
  new Person(5, 'person 5', 34, 'Software Developer'),
  new Person(6, 'person 6', 25, 'Nurse'),
  new Person(7, 'person 7', 36, 'Software Developer'),
  new Person(8, 'person 8', 27, 'Physician'),
  new Person(9, 'person 9', 28, 'Software Developer'),
  new Person(10, 'person 10', 28, 'Software Developer')
]
Implement Crud Operations
To manage the data store of persons, we need to create an Angular service for this purpose.
ng generate service person.service
This service contains:
persons$: Type of BehaviorSubject<Person[]>, this kind of observables used to push received messages to all subscribers. In our example, we use it to refresh data-table after a CRUD operationpersons: Contains a copy of our data store, it’s updated after each CRUD operationsgetAll(): Returns a list of available personsedit(person: Person): Replaces some properties of an existing entity and refreshes the displayed listremove(id: number): Delete an existing entity from the data store and refresh the displayed entries of data-table
import { Injectable } from '@angular/core';
import { BehaviorSubject } from 'rxjs';
import { personsData } from '../constants/persons-static-data';
import { Person } from '../models/person';

@Injectable({
  providedIn: 'root'
})

export class PersonService {

  persons$: BehaviorSubject<Person[]>;
  persons: Array<Person> = [];

  constructor() {
    this.persons$ = new BehaviorSubject([]);
    this.persons = personsData;
  }

  getAll() {
    this.persons$.next(this.persons);
  }

  add(person: Person) {
    this.persons.push(person);
  }

  edit(person: Person) {
    let findElem = this.persons.find(p => p.id == person.id);
    findElem.firstName = person.firstName;
    findElem.age = person.age;
    findElem.job = person.job;
    this.persons$.next(this.persons);
  }

  remove(id: number) {

    this.persons = this.persons.filter(p => {
      return p.id != id
    });

    this.persons$.next(this.persons);
  }
}
Display Data
- Create
DataTableComponent by running the following command line inside app/components folder:
ng g c data-table
This component is the main component, it contains the data-table that displays and manages the persons list and offers the possibility to filter by column using a custom filter which will be implemented later. To read more about mat-table, you can visit this link.
- Next, we need to prepare the HTML template by editing data-table.component.html:
<div class="mat-elevation-z8">
  <table mat-table [dataSource]="dataSource" matSort class="mat-elevation-z8">
    <ng-container *ngFor="let column of displayedColumns" [matColumnDef]="column">
      <th mat-header-cell *matHeaderCellDef>
        <div style="display: flex; align-items: center;">
          <span mat-sort-header>{{column}}</span>

        </div>
      </th>
      <td mat-cell *matCellDef="let element"> {{element[column]}} </td>
    </ng-container>
    <ng-container [matColumnDef]="'actions'">
      <th mat-header-cell *matHeaderCellDef> actions </th>
      <td mat-cell *matCellDef="let element">
        <button mat-icon-button (click)="edit(element)">
          <mat-icon mat-icon-button color='primary'>edit</mat-icon>
        </button>
        <button mat-icon-button (click)="delete(element['id'])">
          <mat-icon mat-icon-button color="warn">delete</mat-icon>
        </button>
      </td>
    </ng-container>
    <tr mat-header-row *matHeaderRowDef="columnsToDisplay"></tr>
    <tr mat-row *matRowDef="let row; columns: columnsToDisplay;"></tr>
  </table>

  <mat-paginator [pageSize]="5"
  [pageSizeOptions]="[5, 10, 50]" showFirstLastButtons></mat-paginator>

</div>
- Then, we should do the implementation part by editing the data-table.component.ts:
import { AfterViewInit, Component, OnDestroy, OnInit, ViewChild } from '@angular/core';
import { Subscription } from 'rxjs';
import { MatPaginator } from '@angular/material/paginator';
import { MatTableDataSource } from '@angular/material/table';
import { MatSort } from '@angular/material/sort';
import { MatDialog } from '@angular/material/dialog';
import { ConfirmationDialogComponent } _
from '../confirmation-dialog/confirmation-dialog.component';
import { PersonFormDialogComponent } _
from '../person-form-dialog/person-form-dialog.component';
import { PersonService } from 'src/app/core/services/person.service';
import { Person } from 'src/app/core/models/person';
@Component({
selector: 'app-data-table',
templateUrl: './data-table.component.html',
styleUrls: ['./data-table.component.scss']
})
export class DataTableComponent implements OnInit, OnDestroy, AfterViewInit {
@ViewChild(MatPaginator) paginator: MatPaginator;
@ViewChild(MatSort) sort: MatSort;
public displayedColumns: string[] = ['firstName', 'age', 'job'];
public columnsToDisplay: string[] = [...this.displayedColumns, 'actions'];
public columnsFilters = {};
public dataSource: MatTableDataSource<person>;
private serviceSubscribe: Subscription;
constructor(private personsService: PersonService, public dialog: MatDialog) {
this.dataSource = new MatTableDataSource<person>();
}
edit(data: Person) {
const dialogRef = this.dialog.open(PersonFormDialogComponent, {
width: '400px',
data: data
});
dialogRef.afterClosed().subscribe(result => {
if (result) {
this.personsService.edit(result);
}
});
}
delete(id: any) {
const dialogRef = this.dialog.open(ConfirmationDialogComponent);
dialogRef.afterClosed().subscribe(result => {
if (result) {
this.personsService.remove(id);
}
});
}
ngAfterViewInit(): void {
this.dataSource.paginator = this.paginator;
this.dataSource.sort = this.sort;
}
ngOnInit(): void {
this.personsService.getAll();
this.serviceSubscribe = this.personsService.persons$.subscribe(res => {
this.dataSource.data = res;
})
}
ngOnDestroy(): void {
this.serviceSubscribe.unsubscribe();
}
}
</person></person>
To load data into mat-table, we need to get a list from persons service. To do that, we need to call getAll method of persons service and subscribe to persons$ observable.
We also prepare empty methods for delete and edit actions.
Delete an Existing Person
- Create
ConfirmationDialogComponent by running the following command line inside app/components folder:
ng g c confirmation-dialog
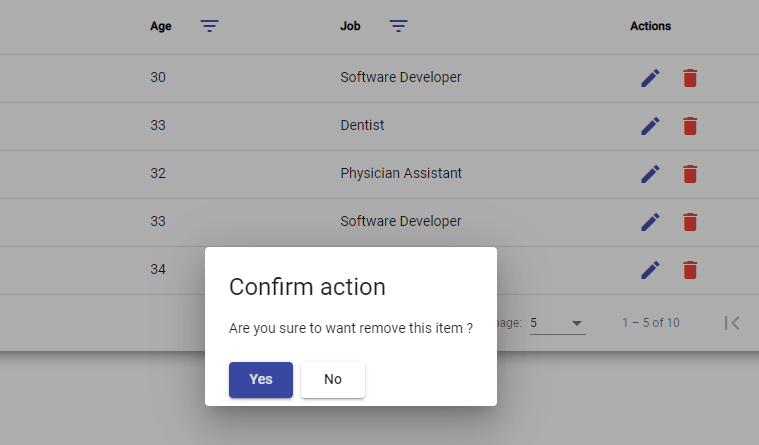
This component is useful to show confirm action dialog for users who want to make a critical action like delete operation.
To show this component on dialog, we use the MatDialog service.
The MatDialog service is in charge of showing dialog, passing data to dialog and configuring it.
When this dialog is open, user will get two choices:
-
Yes: It confirms the action by returning true to afterClosed observable and refreshes data store by calling delete method of person service.
-
No: It rejects the action by returning false to afterClosed observable.
- Next, we need to edit template file of confirmation-dialog.component.html:
<h1 mat-dialog-title>Confirm action</h1>
<div mat-dialog-content>Are you sure to want remove this item ?</div>
<div mat-dialog-actions class="mt-15">
  <button mat-raised-button color="primary"
  [mat-dialog-close]="true" cdkFocusInitial>Yes</button>
  <button mat-raised-button mat-dialog-close>No</button>
</div>
- Declare this component as an
entryComponent in app.module.ts:
entryComponents: [ConfirmationDialogComponent]
- Implement delete action of data-table.component.ts:
delete(id: any) {
  const dialogRef = this.dialog.open(ConfirmationDialogComponent);

  dialogRef.afterClosed().subscribe(result => {
    if (result) {
      this.personsService.remove(id);
    }
  });
}
- Finally, when you run this application, you should be able to delete an existing user after confirmation action.
Update an Existing Person
- Create
PersonFormDialogComponent by running the following command line inside app/components folder:
ng g c person-form-dialog
This component displays selected person data into a form dialog and the user is able to introduce some changes on his properties.
To create this form, we use a Reactive Form approach to have a deep control of form state and an efficient way for input validation.
When a user clicks on the edit icon from one of the datatable rows, the selected person will be injected to form a dialog component by using the MatDialog service and MAT_DIALOG_DATA.
If the form is valid, the user can save changes and the result will be passed to afterClosed observable to be treated by edit method of persons service.
For our example, we suppose that all form controls are mandatory fields otherwise user can’t be able to save change.
- Next, we need to build our template person-form-dialog.component.html:
<h1 mat-dialog-title>Edit Person</h1>

<div mat-dialog-content>
  <form [formGroup]="formInstance">
    <div>
      <mat-form-field class="fullWidth" appearance="outline">
        <mat-label>first Name *</mat-label>
        <input matInput type="text"
        name="firstName" formControlName="firstName">
        <mat-error *ngIf="
        formInstance.controls['firstName']?.errors?.required">field required</mat-error>
      </mat-form-field>
    </div>

    <div class="mt-5">
      <mat-form-field class="fullWidth" appearance="outline">
        <mat-label>Age *</mat-label>
        <input matInput type="number" name="age" formControlName="age" />
        <mat-error *ngIf="
        formInstance.controls['age']?.errors?.required">field required</mat-error>
      </mat-form-field>
    </div>

    <div class="mt-5">

      <mat-form-field class="fullWidth" appearance="outline">
        <mat-label>Job *</mat-label>
        <mat-select name="job" formControlName="job">
          <mat-option value="Software Developer">Software Developer</mat-option>
          <mat-option value="Physician">Physician</mat-option>
          <mat-option value="Dentist">Dentist</mat-option>
          <mat-option value="Nurse">Nurse</mat-option>
        </mat-select>
        <mat-error *ngIf="formInstance.controls['job']?.errors?.required">field required
        </mat-error>
      </mat-form-field>

    </div>
  </form>
</div>

<div class="mt-5" mat-dialog-actions>
  <button mat-raised-button color="primary"
  [disabled]="formInstance.dirty && formInstance.errors" (click)="save()"
    cdkFocusInitial>Yes</button>
  <button mat-raised-button mat-dialog-close>No</button>

</div>
- Edit the person-form-dialog.component.ts:
import { Component, Inject, OnInit } from '@angular/core';
import { FormControl, FormGroup, Validators } from '@angular/forms';
import { MatDialogRef, MAT_DIALOG_DATA } from '@angular/material/dialog';
import { Person } from 'src/app/core/models/person';

@Component({
  selector: 'app-form-dialog',
  templateUrl: './person-form-dialog.component.html',
  styleUrls: ['./person-form-dialog.component.scss']
})

export class PersonFormDialogComponent implements OnInit {
  formInstance: FormGroup;

  constructor(public dialogRef: MatDialogRef<PersonFormDialogComponent>,
    @Inject(MAT_DIALOG_DATA) public data: Person) {
    this.formInstance = new FormGroup({
      "id":  new FormControl('', Validators.required),
      "firstName": new FormControl('', Validators.required),
      "age": new FormControl('', Validators.required),
      "job": new FormControl('', Validators.required),
    });

    this.formInstance.setValue(data);
  }

  ngOnInit(): void {

  }

  save(): void {
    this.dialogRef.close(Object.assign(new Person(), this.formInstance.value));
  }
}
- Implement
edit method of data-table.component.ts:
edit(data: Person) {
  const dialogRef = this.dialog.open(PersonFormDialogComponent, {
    width: '400px',
    data: data
  });

  dialogRef.afterClosed().subscribe(result => {
    if (result) {
      this.personsService.edit(result);
    }
  });
}
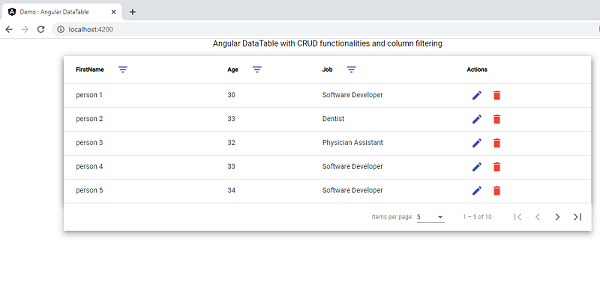
- Finally, we should get this result when we run the application:

Implement Filtering Column
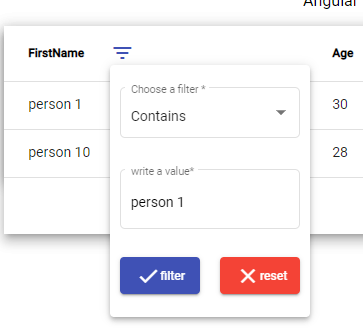
The idea is to filter data by searching some values on a specific column.
Our text filter is additive, we can combine several search criteria from different columns.
For our example, we will implement these string comparison methods which are case-insensitive:
contains: data should contain a substring of searched valueequals: data should be equal to searched valuegreater than: data should be greater than the searched valueless than: data must be less than the search valueend with: data must end with search valuestart with: data must start with search value
Each column can hold only one type of filter at the same time.
To do that, we should:
- Modify data-table.component.html
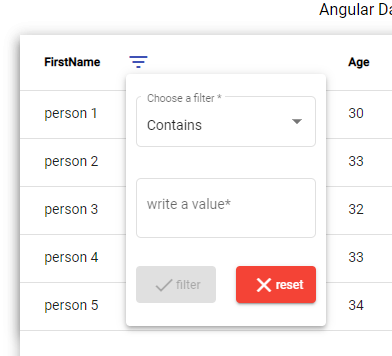
to add drop-down filter:
This filter is an angular mat-menu that contains a list of available filtering operations, an input text filter and buttons to clear filter from column or to add a new one.
<div class="mat-elevation-z8">
<table mat-table [dataSource]="dataSource" matSort class="mat-elevation-z8">
<ng-container *ngFor="let column of displayedColumns" [matColumnDef]="column">
<th mat-header-cell *matHeaderCellDef>
<div style="display: flex; align-items: center;">
<span mat-sort-header>{{column}}</span>
<button mat-icon-button>
<mat-icon mat-icon-button color="primary" [matMenuTriggerFor]="menu"
[matMenuTriggerData]="{columnName: column}">filter_list </mat-icon>
</button>
</div>
</th>
<td mat-cell *matCellDef="let element"> {{element[column]}} </td>
</ng-container>
<ng-container [matColumnDef]="'actions'">
<th mat-header-cell *matHeaderCellDef> actions </th>
<td mat-cell *matCellDef="let element">
<button mat-icon-button (click)="edit(element)">
<mat-icon mat-icon-button color='primary'>edit</mat-icon>
</button>
<button mat-icon-button (click)="delete(element['id'])">
<mat-icon mat-icon-button color="warn">delete</mat-icon>
</button>
</td>
</ng-container>
<tr mat-header-row *matHeaderRowDef="columnsToDisplay"></tr>
<tr mat-row *matRowDef="let row; columns: columnsToDisplay;"></tr>
</table>
<mat-paginator [pageSize]="5"
[pageSizeOptions]="[5, 10, 50]" showFirstLastButtons></mat-paginator>
</div>
<!--
<mat-menu #menu="matMenu" class="matMenu">
<ng-template matMenuContent let-dataColumnName="columnName">
<div class="flex-column" (click)="$event.stopPropagation();">
<div class="mb-5">
<mat-form-field class="fullWidth" appearance="outline">
<mat-label>Choose a filter *</mat-label>
<mat-select #selectedOperationFilter [value]="'contains'">
<mat-option value="contains" select>Contains</mat-option>
<mat-option value="equals">Equals</mat-option>
<mat-option value="greaterThan">Greater than</mat-option>
<mat-option value="lessThan">Less than</mat-option>
<mat-option value="endWith">End with</mat-option>
<mat-option value="startWith">Start With</mat-option>
</mat-select>
</mat-form-field>
</div>
<div class="mb-5 fullWidth">
<mat-form-field class="fullWidth" appearance="outline">
<mat-label>write a value*</mat-label>
<input matInput #searchValue type="text">
</mat-form-field>
</div>
<div class="fullWidth flex-row mb-5 flex-justify-space-between">
<button [disabled]="!searchValue.value" mat-raised-button color="primary"
class="flex-row flex-align-center btn-filter-action"
(click)="applyFilter(dataColumnName,
selectedOperationFilter.value, searchValue.value)">
<mat-icon>check</mat-icon>
<label>filter</label>
</button>
<button mat-raised-button
class="flex-row flex-align-center btn-filter-action" color="warn"
(click)="clearFilter(dataColumnName)">
<mat-icon>clear</mat-icon>
<label>reset</label>
</button>
</div>
</div>
</ng-template>
</mat-menu>
- Implement actions related to the filter in data-table.component.ts:
private filter() {
this.dataSource.filterPredicate = (data: Person, filter: string) => {
let find = true;
for (var columnName in this.columnsFilters) {
let currentData = "" + data[columnName];
if (!this.columnsFilters[columnName]) {
return;
}
let searchValue = this.columnsFilters[columnName]["contains"];
if (!!searchValue && currentData.indexOf("" + searchValue) < 0) {
find = false;
return;
}
searchValue = this.columnsFilters[columnName]["equals"];
if (!!searchValue && currentData != searchValue) {
find = false;
return;
}
searchValue = this.columnsFilters[columnName]["greaterThan"];
if (!!searchValue && currentData <= searchValue) {
find = false;
return;
}
searchValue = this.columnsFilters[columnName]["lessThan"];
if (!!searchValue && currentData >= searchValue) {
find = false;
return;
}
searchValue = this.columnsFilters[columnName]["startWith"];
if (!!searchValue && !currentData.startsWith("" + searchValue)) {
find = false;
return;
}
searchValue = this.columnsFilters[columnName]["endWith"];
if (!!searchValue && !currentData.endsWith("" + searchValue)) {
find = false;
return;
}
}
return find;
};
this.dataSource.filter = null;
this.dataSource.filter = 'activate';
if (this.dataSource.paginator) {
this.dataSource.paginator.firstPage();
}
}
applyFilter(columnName: string, operationType: string, searchValue: string) {
this.columnsFilters[columnName] = {};
this.columnsFilters[columnName][operationType] = searchValue;
this.filter();
}
clearFilter(columnName: string) {
if (this.columnsFilters[columnName]) {
delete this.columnsFilters[columnName];
this.filter();
}
}
- The end result should be like this:
Run Application
Try to download source code, and do the following steps:
- Extract the source code, and navigate to the folder path using
CMD commands. - Download
npm packages by running npm install. - Run application by running
npm start.
References
Points of Interest
I hope you appreciated this article. Thank you for viewing my post, try to download the source code and do not hesitate to leave your questions and comments.
History
- v1 19th December, 2020: Initial version
Microsoft certified professional in C# ,HTML 5 & CSS3 and JavaScript, Asp.net, and Microsoft Azure.


 General
  News
News  Suggestion
  Question
  Bug
Bug  Answer
  Joke
Joke  Praise
  Rant
Rant  Admin
Admin 


 , it seems that the codeproject server has problem, I have removed the .zip file.