This article purposes the construction of a lighting control device designed to meet residential needs, bringing practicality and modernity to the environment, in addition to possibly assisting with accessibility issues for users with some type of disability or difficulty and also to assist in the matter sustainability in cases of savings by automatically turning off the lights. As a practical activity, an Arduino board with motion sensor will be prepared. Through this device integrated with its motion sensor modules, it will be possible to control the lights remotely without the need of direct interaction with the device.
Introduction
With the digital revolution, driven by the advent of what is called Internet of Things, more and more modern devices capable of automating domestic activities began to appear. Home automation has been used for decades and has become increasingly popular for using technology to facilitate and automate some actions that would have been done manually by residents or employees in the environments that now use it. Many things can be done with this automation, such as a home monitoring system, an automatic irrigation system, or in the case of this work that will be used to automate lighting control in a home.
The motivation of this work is to bring more modernity and practicality to an environment (residential or small commercial) and also to assist in more specific cases such as sustainability, due to the savings that the project can bring by automating a residential lighting system preventing expenses for lights on for longer than necessary and can also help in a situation where the user has a disability and would not be able to activate a lamp switch in a common way.
Objectives and Methodology
This work aims to prepare a device with Arduino boards and their presence or movement sensor modules so that it detects when it is the right time to turn on the lights in an environment, or to facilitate this action for people with difficulties. The methodology used is based on a practical approach, using an Arduino microcontroller with the presence sensor module and a Bluetooth module that allows the user to control the operation of the sensors at home by any cell phone that has access to the Google app store.
The project will be developed in an Arduino IDE (Integrated Development Environment) and will serve a home in a residential neighborhood with automation of an internal lighting point. It was concluded that the materials needed for project development are: Arduino Uno, Bluetooth Module HC-05, 9V power sources, PIR presence sensor HC-SR501, Protoboard, 5V relay modules, lamps, sockets, network cables, USB cables and 1 meter of electrical wires.
Development
Project Specification
For the development of the project, the work uses the C programming language to create code and the following support tools will be used:
- Sublime Text: Text editor that will be used for the generation and better experience in typing the code before exporting to the IDE
- Arduino Software: IDE platform that will be used to write and upload code to the Arduino board
- Adobe Photoshop: Image editor
- TinkerCad: Online tool for simulating electrical circuits (analog and digital)
- Fritzing: Tool for simulation and design of electronic hardware. During the initial development phase, a platform identification study was carried out to simulate the circuits digitally, before applying them to the physical circuit by IDE.
This analysis identified a few good ways to apply this type of test, such as the TinkerCad platform that is completely online and free where you can implement the circuit and the code to test directly to the project, and Fritzing, a software where we can create the design and import different devices created by users through the Fritzing forum to integrate into our digital circuit, thus contributing to the creation of a more complete work.
This analysis contributed to identify all the basic requirements for the circuit designed in this work to allow the user to control the lighting in the environment with little direct interaction.
In figure 1, we can see the floor plan of a house designed with the sensors, the microcontroller and the lamps that are activated by the two items mentioned above, it is a fictitious project for an easier visualization of how we can set up an environment that is fully automatic or something like a smart home. In all rooms, we have a lamp, and we have the presence sensor at the entrance of the house and the Bluetooth sensor only in the room since it can receive commands from anywhere in the projected house.
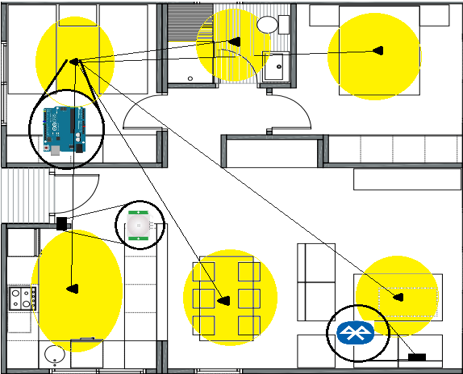
Figure 1. House project with the sensors, microcontroller and the lamps
Results
Figure 2 illustrates the ready circuit, with the Arduino, the Protoboard for cable organization, a relay module on the right next to the lamp, the PIR presence sensor module, the Bluetooth module above all and the battery on the right side of the image representing the power source that, in our case, is a conventional outlet.

Figure 2. Base circuit made in Fritzing
In the following paragraph, we have the finished code, in C, starting with the configuration that matches the physical configuration of the circuit, after that, the checks and configurations for the activation of the LED begin according to the change of the variables that the presence sensor is responsible for. For noticing the movement and that the Bluetooth sensor detects cell phone commands, and then delivers the activation command to the microcontroller and the microcontroller activates the relay to send energy to activate the lamp, in case after a few seconds, the sensor stops feeling the presence or if the Bluetooth sensor receives an off command, the lamp is turned off.
int key = 5;
int val = 0;
int inputPin = 7;
int pirState = LOW;
int val = 0;
int RELE_PIN = 63;

void setup() {
    Serial.begin(9600);
    pinMode(key,0UTPUT);
    digitalWrite (key, HIGH);
    pinMode(RELE_PIN, OUTPUT);
    pinMode (input Pin, INPUT);
}

void loop1(){
    val=Serial.read();

    if (val=='A'){
        digitalWrite (key,LOW);
    }

    if (val=='D') {
        digitalWrite (key, HIGH);
    }
}

void loop2(){
    val = digitalRead (inputPin);
    if(val == HIGH){
        digitalWrite(RELE_PIN, LOW);
        delay(15000);
    if(pirState == LOW){
        Serial.println("Motion detected!");
        pirState = HIGH;
    }
}
    else{
        digitalWrite(RELE_PIN, HIGH);
        delay(30);
        if (pirState == HIGH) {
            Serial.println("Motion ended!");
            pirState = LOW;
        }
    }
}
This code is in the public domain and was obtained from the Internet from Github repository in https://github.com/baraunav/ArduinoLightsWBluetoothAndPIR.
The tests carried out indicate that it is perfectly capable of administering commands received through presence sensors and with a microcontroller, transforming them into digital signals to activate other electrical devices.
In order for the lamp to communicate with the presence sensor module or the Bluetooth module connected to the microcontroller, it is not necessary to make any other mandatory configuration besides the one that already exists in the code applied on the board and the circuit already assembled.
With the code applied, when activating the sensor with some close movement or by the Bluetooth app, it sends a command to the relay, which forwards the information to the microcontroller, which finally activates the corresponding digital output by activating the lamp, in this case with a delay of 30 seconds until the lamp turns off if the surroundings are not detecting any movement or until the application sends the ‘turn off’ command.
Problems and Drawbacks
The biggest problem faced in this project was the requirement to use online tools. Because of the pandemic moment we are experiencing, the practical tasks in the laboratory remained. Likewise, the acquisition and testing of equipment at local stores. Thus, the solution was the exploration of TinkerCad and Fritzing platforms during this prototype version leaving the implementation ready and easy to adapt as soon as the expected equipment is acquired.
Conclusion
This work allowed the first contact with designing a simple circuit with sensors and different modules from the beginning. There is a lot of public content on the internet on the subject and this allowed me to learn a lot in a short time on the subject covered in this article.
This project also allowed to apply some of the subjects applied in the course, such as introduction to algorithms with its use of C and Digital Systems with its explanations of usability with this type of circuit. It is worth mentioning that the work provided evidence of points to be added to this project in the future, such as the creation of a type of way to make this circuit more portable for a possible commercialization of the project for application in any type of environment.
References
- Amaral, Guilherme da Silva and Ribeiro, Victor Emanuel. (2017). "Automação Residencial Utilizando a Plataforma Arduino e Dispositivos Móveis". Bachelor's degree Research
- Arduino (2005). "Site to developers and applications to microcontrollers in Arduino " [on-line]. Available in "https://www.arduino.cc/en/Main/Software;. March, 25 of 2020.
- Augusto, Roberto. (2014). "Automação Residencial Utilizando Arduino e Aplicação Web". Bachelor's degree Research
- Baron, Mauricio. (2013). "Desenvolvimento de Aplicativo Android para Controle de Dispositivos Eletroeletrônicos". Bachelor's degree Research
- Eletrogate (2017). "Site com tutoriais relacionados à Arduino e sensores " [on-line]. Available in “https://blog.eletrogate.com/;. Accessed in Mar., 15 of 2020.
- Felipeflop (2015). "Site with Arduino tutorials and public code modules " [on-line]. Available in “https://www.filipeflop.com/;. Accessed in Mar., 12 of 2020.
- Fritzing (2007). "Site para desenvolvimento e design de hardwares eletrônicos " [on-line]. Available in “https://fritzing.org/download/;. Accessed in Oct., 15 of 2020.
- Moura, Sandro & Santos, Thadeu. (2016). "Automação Residencial utilizando Arduíno e SO Android". Bachelor's degree ResearchSite com tutoriais relacionados à Arduino e sensores [on-line]. Available in “https://blog.eletrogate.com/”. Accessed in Mar., 15 of 2020.
- Tinkercad (2011). "Site para design de hardwares eletrônicos " [on-line]. Available in “https://www.tinkercad.com;. Accessed in Apr., 11 of 2020.
History
- 27th November, 2020 - Document creation
- 4th December, 2020 - Textual revision
- 6th December, 2020 - Revision and validation
- 8th December, 2020 - Document submit
agile and devops enthusiast; master in computer science and professor in technology courses; I have worked with projects and development for the telecommunication area
This member has not yet provided a Biography. Assume it's interesting and varied, and probably something to do with programming.
Low budget hardware enthusiast, video game lover and computer science student.


 General
  News
News  Suggestion
  Question
  Bug
Bug  Answer
  Joke
Joke  Praise
  Rant
Rant  Admin
Admin 


