Introduction
The main purpose of this article is to explain, how to create a simple Excel and MS Word Add-Ins using Visual Studio Tools for Office (VSTO).VSTO is available as an add-in Tool with Microsoft Visual Studio. Using Visual studio we can develop our own custom Controls for Office tools like Excel, Word and etc.
In my demo program I have Used Visual Studio 2010 and Office 2007.
In this article I will explain few basic things to create our own Custom Add-Ins for Excel and Word as fallows.
- Excel Add-Ins.
- Add text to any Excel selected active excel cell.
- Add Image to Excel from our Custom Control.
- Load data from Database and display the search result data in Excel.
- Word Add-Ins
- Export Word to PDF.
- Add Image to Word Document.
- Add Table to Word document.
Using the code
1) Creating Excel Add-Ins:
In my Example I have used Visual Studio 2010 and Office 2007.
To create our own Custom Control Add-Ins for Excel
Step1: Create new project and select Office 2007 Excel AddIn as below Image. Select Your Project Folder and Enter your Project Name

Step2: Now we can see the Excel ThisAddIn.Cs file be created in our project folder and we can find two default methods in this class as below image. “ThisAddIn_Startup” In this event we can display our own custom Control Add-Ins to Excel we can see detail in code part.
Step3: Add new UserControl to your project to create your own Custom Excel Control Add-In.
Right click your project->Click Add New Item->Add User Control and Name the control as you wish. Add all your Controls and design your user control as per your requirement.
In my example, Iam performing 3 types of action in User Controls
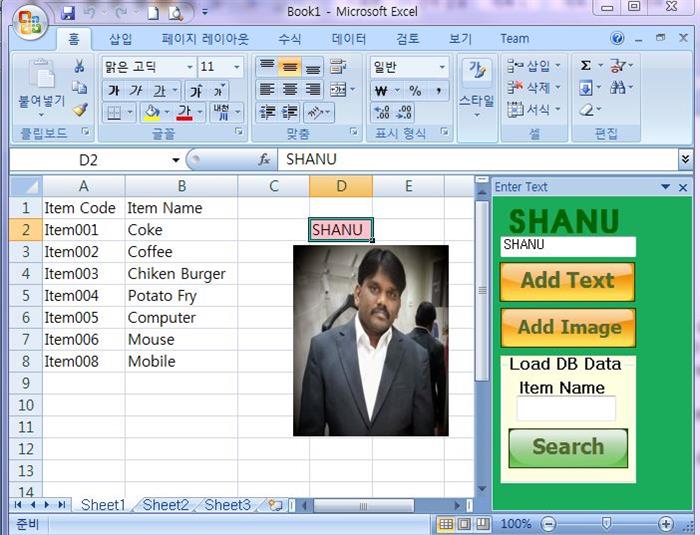
1) Add Text: In this button click event I will insert the text from the Text box to the Active Selected Excel Cell.Using “Globals.ThisAddIn.Application.ActiveCell” we can get the current active Excel cell.we store the result in Excel range and now using the range,value ,color we can set our own text and colors to the active Excel Cell.
private void btnAddText_Click(object sender, EventArgs e)
{
Excel.Range objRange = Globals.ThisAddIn.Application.ActiveCell;
objRange.Interior.Color = Color.Pink;
objRange.Borders.Color = Color.Red;
objRange.Borders.LineStyle = Excel.XlLineStyle.xlContinuous;
objRange.Value = txtActiveCellText.Text;
objRange.Columns.AutoFit();
}
2) Add Image: using the open file Dialog we can select our own image need to be added in Excel file.Using the Excel.Shape we can add our selected image to Excel file.
private void btnAddImage_Click(object sender, EventArgs e)
        {
            OpenFileDialog dlg = new OpenFileDialog();
            dlg.FileName = "*";
            dlg.DefaultExt = "bmp";
            dlg.ValidateNames = true;

               dlg.Filter = "Bitmap Image (.bmp)|*.bmp|Gif Image (.gif)|*.gif|JPEG Image (.jpeg)|*.jpeg|Png Image (.png)|*.png";

            if (dlg.ShowDialog() == System.Windows.Forms.DialogResult.OK)
            {

                Bitmap dImg = new Bitmap(dlg.FileName);

    Excel.Shape IamgeAdd = Globals.ThisAddIn.Application.ActiveSheet.Shapes.AddPicture(dlg.FileName,
        Microsoft.Office.Core.MsoTriState.msoFalse,
        Microsoft.Office.Core.MsoTriState.msoCTrue,
        20, 30, dImg.Width, dImg.Height);
            }
            System.Windows.Forms.Clipboard.Clear();
        }
3) Search and bind Db Data to Excel: Now we can create our own Custom Search control to be used in Excel to search our data from Db and bind the result to Excel file.
creating the table.
CREATE TABLE [dbo].[ItemMasters](
[Item_Code] [varchar](20) NOT NULL,
[Item_Name] [varchar](100) NOT NULL)
INSERT INTO [ItemMasters] ([Item_Code],[Item_Name])
VALUES ('Item001','Coke')
INSERT INTO [ItemMasters] ([Item_Code],[Item_Name])
VALUES ('Item002','Coffee')
INSERT INTO [ItemMasters] ([Item_Code],[Item_Name])
VALUES ('Item003','Chiken Burger')
INSERT INTO [ItemMasters] ([Item_Code],[Item_Name])
VALUES ('Item004','Potato Fry')
In button search click event we search for the data from database and bind the result to Excel cell using “Globals.ThisAddIn.Application.ActiveSheet.Cells” this will add the result to the active Excel sheet.
private void btnSearch_Click(object sender, EventArgs e)
        {
            try
            {
                System.Data.DataTable dt = new System.Data.DataTable();

                String ConnectionString = "Data Source=YOURDATASOURCE;Initial Catalog=YOURDATABASENAME;User id = UID;password=password";

                SqlConnection con = new SqlConnection(ConnectionString);
                String Query = " Select Item_Code,Item_Name FROM ItemMasters Where Item_Name LIKE '" + txtItemName.Text.Trim() + "%'";

                SqlCommand cmd = new SqlCommand(Query, con);
                cmd.CommandType = System.Data.CommandType.Text;
         System.Data.SqlClient.SqlDataAdapter sda = new System.Data.SqlClient.SqlDataAdapter(cmd);
                sda.Fill(dt);

                if (dt.Rows.Count <= 0)
                {
                    return;
                }

                Globals.ThisAddIn.Application.ActiveSheet.Cells.ClearContents();
                Globals.ThisAddIn.Application.ActiveSheet.Cells[1, 1].Value2 = "Item Code";
                Globals.ThisAddIn.Application.ActiveSheet.Cells[1, 2].Value2 = "Item Name";

                for (int i = 0; i <= dt.Rows.Count - 1; i++)
                {

          Globals.ThisAddIn.Application.ActiveSheet.Cells[i + 2, 1].Value2 = dt.Rows[i][0].ToString();

      Globals.ThisAddIn.Application.ActiveSheet.Cells[i + 2, 2].Value2 = dt.Rows[i][1].ToString();
                }
            }
            catch (Exception ex)
            {
            }
        }
Step 4: Now we have created our own User Control to be added in our Excel Add-Ins.To add this user control to our Excel Add-In as we have already seen that The Excel Addin Class “ThisAddIn.Cs” has start and stop event .using Office “CustomTaskpane” we can add our usercontrol to Excel as Add-In as below.
private Microsoft.Office.Tools.CustomTaskPane customPane;
   private void ThisAddIn_Startup(object sender, System.EventArgs e)
   {
       ShowShanuControl();
   }

   public void ShowShanuControl()
   {
       var txtObject = new ShanuExcelADDIn();
       customPane = this.CustomTaskPanes.Add(txtObject, "Enter Text");
       customPane.Width = txtObject.Width;
       customPane.Visible = true;
   }
Step 5: Run your program and now we can see our own user control has been added in Excel File as Add-Ins.
Next we see how to create Add-Ins for Word Document using Ribbon Control.
2) Creating Word Add-Ins:
In my Example I have used Visual Studio 2010 and Office 2007.
To create our own Custom Control Add-Ins for Word
Step1: Create new project and select Office 2007 Word AddIn as below Image. Select Your Project Folder and Enter your Project Name
Step2: Add new Ribbon Control to your project to create your own Word Control Add-In.
Right click your project->Click Add New Item->Add Ribbon Control and Name the control as you wish.
Add all your Controls and design your user control as per your requirement. By default in our Ribbon Control we can see a “RibbonGroup”.We can add all our controls to the Ribbon Group .Here in my example I have changed the Group Label Text as “SHANU Add-In” .I have added Three Ribbon Button Controls to the Group. We can add image to the Ribbon Button Controls and set the properties of the Button Control Size as “RibbobControlSizeLarge” .
Here I have added Three Button Controls for Export the Word as PDF, Add Image to Word and Add Table to Word File.
Step 3: Export to PDF File Button Click.
using the “Globals.ThisAddIn.Application.ActiveDocument.ExportAsFixedFormat” we can save the Word document to the PDF File. I have used the Save file dialog to save the pdf file in our selected path.
private void btnPDF_Click(object sender, RibbonControlEventArgs e)
        {
            SaveFileDialog dlg = new SaveFileDialog();
            dlg.FileName = "*";
            dlg.DefaultExt = "pdf";
            dlg.ValidateNames = true;
            if (dlg.ShowDialog() == System.Windows.Forms.DialogResult.OK)
            {
                Globals.ThisAddIn.Application.ActiveDocument.ExportAsFixedFormat(dlg.FileName, word.WdExportFormat.wdExportFormatPDF, OpenAfterExport: true);
            }
        }
Step 4: Add Image to Word
using the open file Dialog we can select our own image need to be added in Word file. Using the “Globals.ThisAddIn.Application.ActiveDocument.Shapes.AddPicture” Method we can add our selected image to Word file.
private void btnImage_Click(object sender, RibbonControlEventArgs e)
        {
            OpenFileDialog dlg = new OpenFileDialog();
            dlg.FileName = "*";
            dlg.DefaultExt = "bmp";
            dlg.ValidateNames = true;

        dlg.Filter = "Bitmap Image (.bmp)|*.bmp|Gif Image (.gif)|*.gif|JPEG Image (.jpeg)|*.jpeg|Png Image (.png)|*.png";

            if (dlg.ShowDialog() == System.Windows.Forms.DialogResult.OK)
            {
                Globals.ThisAddIn.Application.ActiveDocument.Shapes.AddPicture(dlg.FileName);
            }
        }
Step 5: Add Table to Word
Using the “Globals.ThisAddIn.Application.ActiveDocument.Tables” method we can add table to word file.In my example I have created 4 columns and 3 rows Table.
private void button1_Click(object sender, RibbonControlEventArgs e)
        {
            Globals.ThisAddIn.Application.ActiveDocument.Tables.Add(Globals.ThisAddIn.Application.ActiveDocument.Range(0, 0), 3, 4);
 Globals.ThisAddIn.Application.ActiveDocument.Tables[1].Range.Shading.BackgroundPatternColor = Microsoft.Office.Interop.Word.WdColor.wdColorSeaGreen;
            Globals.ThisAddIn.Application.ActiveDocument.Tables[1].Range.Font.Size = 12;
            Globals.ThisAddIn.Application.ActiveDocument.Tables[1].Rows.Borders.Enable = 1;
        }
Step 6: Run your program and now we can see our own Ribbon control has been added in Word File as Add-Ins.
History
ShanuWordAddInsV1.0.zip - 2015-06-26


 General
  News
News  Suggestion
  Question
  Bug
Bug  Answer
  Joke
Joke  Praise
  Rant
Rant  Admin
Admin 


