The discussions in the article and the sample application cover almost all major Angular routing strategies and navigation scenarios, based on which the centralized and feature-rich breadcrumbs are built. After reading the article and practicing the examples, developers can not only know how to add real breadcrumbs into their own Angular applications but also catch up with the details of Angular routing and navigation mechanisms. The source code files of the sample application with the Angular 9 CLI and ASP.NET Core 3.1 website are now available.
Introduction
The UI structure of the breadcrumbs on any serious website looks simple. But the underlying code logic, operation rules, and navigation workflow are not simple at all due to related routing complexities and navigation varieties. This article will demonstrate a sample application with full-featured breadcrumbs and discuss the resolutions of implementing and testing issues.
The sample application that can be downloaded with the above links is the modified version of the original Heroes Example from the Angular document Routing & Navigation. I wouldn’t like to reinvent wheels for creating my sample application from scratch. The Heroes Example covers most routing patterns and types, hence, can be a base source for adding breadcrumb features. It, however, is not enough for demonstrating the realistic breadcrumbs with complex navigation scenarios and workflow completeness. The modification tasks involve adding more pages with corresponding navigation routes, changing UI structures and styles, fixing active router link issues with custom alternatives, updating code logic for authenticated session creation and persistence, just to mention a few. Audiences who are familiar with the original Heroes Example can compare it with my modified version, this sample application, for more details.
Audiences may also bear below considerations in mind for the breadcrumbs when going through this article and playing the sample application.
- Navigation types that are commonly initiated with these structures:
- URL entry into the browser address bar
- Links from any defined menu or submenu
- Inline links on any page
- Breadcrumbs on top of the page content
- Browser back and forward buttons
- Browser back or forward history selection
- Browser refresh button
- Angular router features and routing strategies:
- Router element hierarchy
- Configurations and orders of routes
- URL segment, matrix, and query parameters
- Active router links and styles
- Route guards
- Primary and secondary routes
- Lazy-loading or dynamic-loading routes
The major sections and topics of the article are also listed here. Audiences can jump to any section or place to directly view the content.
Build and Run Sample Application
The downloaded sources contain two different Visual Studio solution/project types, ASP.NET Core 3.1 and Legacy ASP.NET 5. The former is recommended for running the sample application. The latter is also fully working if you need. The global installation of the node.js (recommended version 12.16.x LTS or above) is required to download the Angular and related libraries to your local machine. Please check the node.js documents for details. The global installation of the Angular CLI is optional since the application can use the local equivalents.
You may check the available versions of the TypeScript for Visual Studio in the C:\Program Files (x86)\Microsoft SDKs\TypeScript folder. Both ASP.NET Core and ASP.NET 5 types of the sample application set the version of TypeScript for Visual Studio to 3.7 in the TypeScriptToolsVersion node of SM.NgExDialog.Sample.csproj file. If you don't have version 3.7 installed, download the installation package from the Microsoft site.
-
You need to use the Visual Studio 2019 (version 16.4.x) on the local machine. The .NET Core 3.1 SDK is included in the Visual Studio installation and update.
-
Download and unzip the source code file to your local work space.
-
Go to physical location of your local work space, double click the npm_install.bat and ng_build_local.bat files sequentially under the SM.Breadcrumb.Web\AppDev folder. You can run the ng_build.bat, instead of the ng_build_local.bat, if you have installed the Angular 9 CLI globally on your machine.
Note: The ng build command (or running the ng_build_local.bat) may need to be executed every time after making any change in the TypeScript/JavaScript code, whereas the execution of npm install is just needed whenever there is any update with the node-module packages if the Visual Studio doesn't automatically update the node-module packages.
-
Open the solution with the Visual Studio 2019, and rebuild the solution with the Visual Studio.
-
Click the IIS Express toolbar command (or press F5) to start the sample application.
Breadcrumb_AspNet5_NgCli
-
Download and unzip the source code file to your local work space.
-
Go to the physical location of your local work space, double click the npm_install.bat and ng_build_local.bat files sequentially under the SM.Breadcrumb.Web\AppDev folder. You can run the ng_build.bat, instead of the ng_build_local.bat, if you have installed the Angular 9 CLI globally on your machine (also see the same NOTE for setting up the Breadcrumb_AspNetCore_NgCli project).
-
Open the solution with the Visual Studio 2019 or 2017 (Visual Studio 2015 with Update 3 or above also works) and rebuild the solution.
-
Click the IIS Express toolbar command (or press F5) to start the sample application.
The Breadcrumb_Scripts_AnyPlatform_Ng9.zip file contains only the client script source code folders and files. If you use the systems other than the Microsoft platform, you can copy the pure Angular source code files to your own website project, perform the necessary settings using the npm and Angular CLI commands, and then run the sample application on your systems.
If you make any change in the Angular components, templates, or CSS styles, make sure to clear the browser cache, rebuild the Angular CLI bundles if needed, and then refresh the page or restart the application.
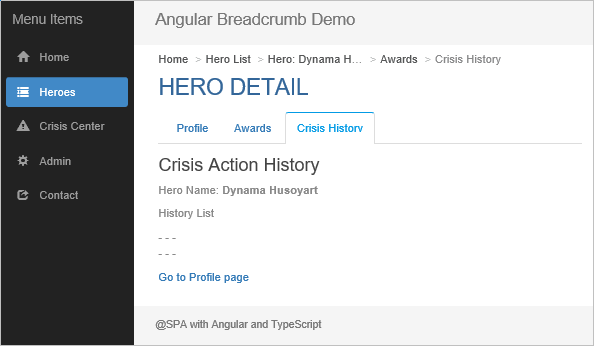
When the application is running, you can browse to pages with any navigation approach. Here is the screenshot example for the navigation to the Hero Detail related pages.
Breadcrumb Structures and Rules
The breadcrumb structures of the sample application are based on the route hierarchies and use cases. The primary route configurations for corresponding breadcrumbs can best be illustrated below. The diagram doesn’t include the Page Not Found primary route and Contact secondary route, which can be navigated from any other routes.

Based on the routes shown in the above diagram, we can further describe the rules for the breadcrumbs:
-
The breadcrumbs consist of branches of hierarchical routes. Each branch represents a series of pages with associated functionality. There are three primary breadcrumb branches in the sample application:
- Heroes
- Crisis Center
- Admin
-
The base items are those that always exist as leading items in each breadcrumb display list. The base item in the sample application is the Home. Any navigation starting from a new branch should re-build the breadcrumbs with the leading base item, or items. For example:
- Home > Hero List > Hero Detail …
- Home > Admin Dashboard > Manage Crises …
-
A breadcrumb item can be set for the inline command only and is not necessarily activated by the menu item. This kind of breadcrumb may be used for multiple branches and routes, such as the Task Board item:
- Home > Task Board > Hero List …
- Home > Task Board > Crisis List …
Or, the terminal route of Page Not Found:
- Home > Hero List > Page Not Found
- Home > Crisis List > Crisis Detail > Page Not Found
-
Items in a breadcrumb list within a particular branch should bear the hierarchical positions:
- The same item never appears twice and more.
- Any parent item is never shown after its child item.
- No cyclic item list should be allowed.
-
For any sub-menus or tabs built for child routes, the sequence of the sibling items is based on the order of the route activations. However, the default item should always be in the first place. For example, the Profile, Awards, and Crisis History are sibling items for the Hero Detail with the Profile as the default. The breadcrumbs can be constructed like these:
- Home > Hero List > Hero Profile > Awards > Crisis History
- Home > Hero List > Hero Profile > Crisis History > Awards
-
If redirecting from one branch to a page in another branch (cross-branch navigation), the breadcrumb item of the target page will be appended to the existing branch item list. The current page in the other route branch should either be a terminal route or have only downward navigation routes. There should also be no cyclic workflow between route branches. Here is a case example:
- Current breadcrumbs: Home > Admin Dashboard > Manage Heroes
- Click the View Hero Detail link on the page.
- Links to other sibling routes are available but Back to Hero List button is removed.
- Possible new breadcrumbs: Home > Admin Dashboard > Manage Heroes > Hero Profile > Crisis History
Please see the Cross-branch Navigation section for more details.
-
Among the breadcrumb item list, it’s unnecessary to display the Login (route-guarding component) as a navigable or executable item although it can be appended as a terminal read-only item when the page is rendered.
-
Any navigation with secondary route is excluded from the breadcrumb item list. A secondary-routing page is independent on any primary routing page or breadcrumb. In the sample application, when you click the Contact on the left menu, the secondary routing page is opened and kept there on any subsequent navigation operations until you have sent the contact message or cancelled it.
-
Any URL matrix or query parameters with the routes required for the next navigation request should not be lost when navigating with the breadcrumb commands. Please check the details in the Handling URL Parameters and Breadcrumb Navigation Commands sections.
-
The breadcrumb items and sequence persist, or are reloaded, for the pages whenever clicking the browser Back, Forward, or Refresh button, or even selecting any item from the session navigation history dropdown list by right-clicking the browser Back or Forward button. Please see the Browser-intrinsic Navigation section for details.
HTML Template for Breadcrumbs
The breadcrumb.component.html file just contains a few lines of the code.
<ul class="breadcrumb">
    <li *ngFor="let bcItem of breadcrumbList;
     let $index = index; let $last = last" title="{{bcItem.labelName}}">
        <a *ngIf="!$last" [ngClass]="{'active': $last}" class="cursor-pointer"
            (click)="openPageWithBreadcrumb($index)">{{bcItem.labelName}}</a>
        <span *ngIf="$last" class="active">{{bcItem.labelName}}</span>
    </li>
</ul>
The code snippet performs three main tasks:
-
Iterating and rendering the breadcrumb items from the breadcrumbList array with respective indexes that are passed to the openPageWithBreadcrumb() method for navigation actions.
-
Using the $last variable to conditionally style the executable or read-only items. The last item in the list is always read-only or disabled.
-
Adding the tool tips to items with the title attribute setting.
Note: The tool tips may not work for browsers on mobile devices.
In addition, the breadcrumb CSS class in the breadcrumb.component.css file specifies the maximum item display width when the text overflow occurs with the ellipsis character ( “…”).
.breadcrumb li {
    - - -
    max-width: 15rem;
    text-overflow: ellipsis;
    -ms-text-overflow: ellipsis
}
You can see the ellipsis example on the first screenshot.
Breadcrumb Item Object
The BreadcrumItem is the core object to receive the data from the data object configured for each activated route and then store the data during the processes. The instances of the object will be added into the array, breadcrumbList, which are rendered to the UI structures.
The BreadcrumbItem class is defined in the breadcrumb.component.ts file.
export class BreadcrumbItem {
    key: string = undefined;
    labelName: string = undefined;
    path: string = '';
    terminalOnly?: boolean = undefined;
    afterBaseOnly?: boolean = undefined;
    pathParamList?: Array<any> = [];
    queryParams?: any = undefined;
    fragment?: string = undefined;
}
The values of first five properties are populated with the static data entered from the route configurations. Here is the example of breadcrumb data settings for all child routes of the admin route.
{
    path: 'crises',
    component: ManageCrisesComponent,
    data: { breadcrumbItem: { key: 'ManageCrises', labelName: 'Manage Crises'} }
},
{
    path: 'heroes',
    component: ManageHeroesComponent,
    data: { breadcrumbItem: { key: 'ManageHeroes', labelName: 'Manage Heroes'} }
},
{
    path: '',
    component: AdminDashboardComponent,
    data: { breadcrumbItem: { key: 'AdminDashboard', labelName: 'Admin Dashboard'} }
}
The last three properties are used for storing and passing parameters which are dynamically added from the activated route processing logic. The topic of passing parameters with the breadcrumbs will be discussed in the Handling URL Parameters section.
Setting Base Breadcrumb Items
The base breadcrumb item, the Home, in the sample application, will be loaded when starting the site or clicking any main menu item for a primary route branch, or clicking the Home menu itself.
-
Clicking a menu item triggers the manuItemVisited event in the SideMenuComponent. Any menu item that doesn’t start with the base breadcrumb item won’t call the menuItemClicked method, such as the Contract menu that is for a secondary route linking to the Contact page.
@Output() menuItemVisited: EventEmitter<boolean> = new EventEmitter<boolean>();
menuItemClicked() {
    this.menuItemVisited.emit(true);
}
-
In the AppComponent, the parent of the SideMenuComponent, the onMenuItemVisited() method sets the global variable isMenuAction to true.
onMenuItemVisited($event) {
    glob.caches.isMenuAction = true;
}
-
In the BreadcrumbComponent, the base item is set and loaded based on the isMenuAction flag in the router’s NavigationEnd event.
bcInitItem: BreadcrumbItem = {
key: 'Home',
labelName: 'Home',
path: '/home'
};
ngOnInit() {
let pThis: any = this;
this.router.events.pipe
(filter(value => value instanceof NavigationEnd)).subscribe((value: any) => {
- - -
if (glob.caches.isMenuAction) {
glob.caches.isMenuAction = false;
pThis.loadBaseBreadcrumbList();
}
});
}
loadBaseBreadcrumbList() {
this.breadcrumbList.length = 0;
this.breadcrumbList.push(this.bcInitItem);
}
If only the base breadcrumb items need to be shown before the item for the current activated route in any occurrence, the afterBaseOnly property can be set to the breadcrumbItem object instance of the current activated route. Please see the example for the Login page in the Non-executable Terminal-only Breadcrumb Items section.
Some applications need more than one base breadcrumb item, and some even need different base breadcrumb items for particular branches. The implementation should easily be adjusted based on the above workflow.
Updating Breadcrumb Item List
The breadcrumbList array is dynamically updated in the NavigationEnd event for each activated route action.
Adding New Items
Any primary route that needs an associated breadcrumb should have the breadcrumbItem object set as a property of the data object in the route configuration file (see the previous section Breadcrumb Item Object). The breadcrumbItem instance can then be added into the breadcrumbList array with the recursive operations on currently activated route and its first child route down to the hierarchy tree. It’s unnecessary to use the for loop to iterate through the child routes horizontally since each navigation action only points to a corresponding target route at the first place no matter how many sibling items are there in that level. In addition, a secondary route is excluded from rendering a breadcrumb although it can be the element of multiple child routes in the same level.
If you are curious about the "first-child" scenarios of the route hierarchy tree, shown here are the router-state tree details for the activated route crisis-detail with the ':id' as the path.
The BreadComponent.refreshBreadcrumbs() method in the …/ClientApp/app/breadcrumb/breadcrumb.component.ts file conducts the logic for adding a new item into the breadcrumbs. The processes can better be interpreted by the pseudo-code list:
-
The activated route is passed to the refreshBreadcrumbs() method.
-
If the first child route is not null, then set it as the current route and continue, else exit method.
-
If the data.breadcrumbItem object instance is undefined, recursively call the refreshBreadcrumbs() method by passing the current route.
-
Repeat the calls until the route having the data.breadcrumbItem object instance is found.
-
Get the breadcrumbItem for the route and dynamically update values for needed properties, such as the path.
-
Insert the updated breadcrumbItem into the breadcrumbList array.
Removing Tailing Items
Whenever a navigation occurs back to any previous visited page, the breadcrumb for that previous page should become the current and also the last item in the breadcrumb list. Reconstructing the entire breadcrumb list every time is not an optimal solution since it requires saved navigation history records including all route paths and parameters. Removing the trailing items from the breadcrumbList array could easily be done in the breadcrumb’s on-click event method. But this couldn’t remove any trailing item when navigating to the previous-visited route using actions other than clicking the breadcrumb. Thus, the code for removing trailing items should best be written in the refreshBreadcrumbs() method. The trailing items after the current position of re-activated route can then be removed based on the index position of the breadcrumbItem with the key value.
if (this.breadcrumbList.length > 0) {
let bcKey: string = child.snapshot.data[this.routeDataName].key;
let bcIndex: number = this.getBreadcrumbPositionByKey(bcKey);
if (bcIndex >= 0) {
this.breadcrumbList.splice(bcIndex);
}
}
The method getBreadcrumbPositionByKey() is called to get the breadcrumb index position:
getBreadcrumbPositionByKey(key: string): number {
    let rtnIndex: number = -1;
    for (let idx: number = this.breadcrumbList.length - 1; idx >= 0; idx--) {
        if (this.breadcrumbList[idx].key == key) {
            rtnIndex = idx;
            break;
        }
    }
    return rtnIndex;
}
Re-adding or Keeping Current Breadcrumb?
You may notice that, in the above code logic, the trailing items including the current item itself are removed, and the current breadcrumb item is re-added again. Another option is to remove only the subsequent items, just keep the current one, and then exit the routine. The alternative code logic could be like this:
if (bcIndex >= 0) {
this.breadcrumbList.splice(bcIndex + 1);
return;
}
The code is neat and no re-adding current item is needed. However, for the route hierarchy with a URL segment parameter, such as “/crisis-center/2” (a parameter value as the route url value), the crisis-center route will automatically be processed again due to the parent-child dependency for this type of route configurations. As a result, the duplicated breadcrumb labeled with “Crisis List” will be added into the breadcrumbs like this:
Home > Crisis List > Crisis List > Crisis Detail…
The approach of removing and then re-adding the current breadcrumb item resolves the issue and works for all situations. It can also make sure that all newly-added breadcrumbs are up-to-date in case some data parameters have been changed after the item was originally added into the breadcrumb list.
Handling URL Parameters
An Angular application can have three types of parameters that are passed with URLs.
- URL segment value, such as “
crisis-center/2” - Matrix parameters, such as “
hero-list;id=12;foo=foo” - Query parameters, such as “
admin?sessionId=123456789”
When adding a breadcrumb item into the breadcrumb list, the URL parameters for the activated route should also be kept in the breadcrumbItem object instance for executing the navigation command later. The URL segment value can directly be saved to the route path so that the breadcrumb works without any additional code. The matrix and query parameters (also URL fragment), however, need to get values from the activated routes and set the values of the breadcrumbItem properties accordingly.
The sample application uses another intermediate object for the path and parameter data.
export class PathParams {
path: string = '';
pathParamList?: Array<any> = [];
queryParams?: any = undefined;
fragment?: string = undefined;
}
The getPathAndParams() method is called from the refreshBreadcrumbs() routine and the results are assigned to the breadcrumbItem that is then inserted into the breadcrumbList array. Please read the comments on the code lines to understand the processing logic.
refreshBreadcrumbs(route: ActivatedRoute,
pathParams: PathParams = { path: '', pathParamList: []}) {
- - -
pathParams = this.getPathAndParams(child, pathParams);
- - -
let breadcrumbItem: BreadcrumbItem = {
- - -
path: pathParams.path,
pathParamList: pathParams.pathParamList,
queryParams: pathParams.queryParams,
fragment: pathParams.fragment
};
this.breadcrumbList.push(breadcrumbItem);
- - -
}
getPathAndParams(route: ActivatedRoute, pathParams: PathParams): PathParams {
let thisPath: string = '';
thisPath = route.snapshot.url.map(segment => segment.path).join('/');
if (thisPath != '') {
let matParams: any = route.snapshot.url.map(segment => segment.parameters);
if (matParams.length > 0 && Object.getOwnPropertyNames(matParams[0]).length > 0) {
pathParams.pathParamList.push(thisPath);
let params: any = {};
for (let item of matParams) {
for (let prop of Object.keys(item)) {
params[prop] = item[prop];
}
}
pathParams.pathParamList.push(params);
}
if (route.snapshot.queryParamMap.keys.length > 0) {
pathParams.queryParams = {};
for (let key of route.snapshot.queryParamMap.keys) {
pathParams.queryParams[key] = route.snapshot.queryParamMap.get(key);
}
}
if (route.snapshot.fragment) {
route.fragment.subscribe(value => {
pathParams.fragment = value;
});
}
pathParams.path += `/${thisPath}`;
}
return pathParams;
}
Breadcrumb Navigation Commands
Since the breadcrumbs have the path and parameter values ready, we can execute the navigation commands by calling the router.navigate() method. As mentioned previously, clicking any breadcrumb on the page will call the openPageWithBreadcrumb() method and redirect to the target page of the activated route.
openPageWithBreadcrumb(index: number) {
let navigationExtras: NavigationExtras;
if (this.breadcrumbList[index].queryParams) {
navigationExtras = {
queryParams: this.breadcrumbList[index].queryParams
};
}
if (this.breadcrumbList[index].fragment) {
if (!navigationExtras) {
navigationExtras = {};
}
navigationExtras.fragment = this.breadcrumbList[index].fragment;
}
if (this.breadcrumbList[index].pathParamList &&
this.breadcrumbList[index].pathParamList.length > 0) {
if (navigationExtras) {
this.router.navigate(this.breadcrumbList[index].pathParamList, navigationExtras);
}
else {
this.router.navigate(this.breadcrumbList[index].pathParamList);
}
}
else {
if (navigationExtras) {
this.router.navigate([this.breadcrumbList[index].path], navigationExtras);
}
else {
this.router.navigate([this.breadcrumbList[index].path]);
}
}
}
The logic in the above method can be interpreted by these lines of notations:
-
If there are any query parameters or/and fragment, include these in the navigationExtra object instance that will then be the second parameter for calling the router.navigate().
-
If values of the pathParamList array with specifically formatted elements for the matrix parameters are passed from the original caller, set the array as the first parameter for calling the router.navigate().
-
Otherwise, call the router.navigate() with the regular path value.
Browser-intrinsic Navigation
The breadcrumbs should behave correctly for these browser-intrinsic navigation types if respective buttons are available:
- Refreshing the screen by clicking browser’s Refresh button.
- Simple history back by directly clicking the browser’s Back button.
- Simple history forward by directly click the browser’s Forward button.
- Selective history back or forward by right-clicking the browser’s Back or Forward button and select any item from the dropdown list.
Refreshing Browser Screen
Refreshing the current browser screen exactly repeats the existing activated route and URL but it does cause the problem of losing the component-level data. The breadcrumbList array and values in the BreadcrumbComponent doesn’t persist after the browser refreshing. A native JavaScript sessionStorage object instance is needed to cache the existing breadcrumbList array after every update of the array. The NavigationEnd event routine then needs to check and get the value of the array from the sessionStorage object instance to restore the existing breadcrumbList array for the normal breadcrumb display.
ngOnInit() {
let pThis: any = this;
this.router.events.pipe
(filter(value => value instanceof NavigationEnd)).subscribe((value: any) => {
- - -
if (pThis.breadcrumbList.length < 1 &&
window.sessionStorage.getItem('breadcrumbList') != null &&
window.sessionStorage.getItem('breadcrumbList') != '') {
pThis.breadcrumbList = JSON.parse(window.sessionStorage.getItem('breadcrumbList'));
}
pThis.refreshBreadcrumbs(rootRoute);
window.sessionStorage.setItem
('breadcrumbList', JSON.stringify(pThis.breadcrumbList));
});
- - -
}
Browsing Back, Forward, and History
For navigation with back, forward, or any history selection, it’s not possible to re-construct the breadcrumbs for the target history pages since some pieces of preceding navigation information may not always be available on the current page. The breadcrumbHistoryList object array is introduced to cache the browser navigation id, full URL, and breadcrumbList so that the entire breadcrumbs can be restored when being back or forward to any historic page. It’s feasible and practicable for doing this, thanks to the Angular router NavigationStart event that provides the id, url, navigationTrigger, and restoredState properties with which the non-imperative browser back/forward navigation types can be detected.
Details for how the features are implemented are described as follows:
-
Define two variables in the component-level:
navState: any = {};
breadcrumbHistoryList: Array<any> = [];
-
In the ngOnInit() routine, populate the navState object instance with the data obtained from the NavigationStart event.
this.router.events.pipe
(filter(value => value instanceof NavigationStart)).subscribe((value: any) => {
pThis.navState = {
id: value.id,
url: value.urlAfterRedirects,
navigationTrigger: value.navigationTrigger,
restoredState: value.restoredState
};
});
-
By the end of each navigation in the NavigationEnd event routine, add the current navigation id and constructed breadcrumbList array into the breadcrumbHistoryList. Note that the new deep-clone copy is needed for the cached breadcurmbList. Any back or forward action itself is also a new navigation with the id and breadcrumbList data saved.
let bcHistoryItem = {
id: pThis.navState.id,
breadcrumbList: glob.deepClone(pThis.breadcrumbList)
}
pThis.breadcrumbHistoryList.push(bcHistoryItem);
-
In the beginning of the NativationEnd event routine, check the navigationId and assign the matched data array to the current operative breadcrumbList.
if (pThis.navState.navigationTrigger == 'popstate' &&
pThis.navState.restoredState != null) {
for (let idx: number = pThis.breadcrumbHistoryList.length - 1; idx >= 0; idx--) {
if (pThis.breadcrumbHistoryList[idx].id ==
pThis.navState.restoredState.navigationId &&
pThis.breadcrumbHistoryList[idx].url == value.urlAfterRedirects) {
pThis.breadcrumbList = pThis.breadcrumbHistoryList[idx].breadcrumbList;
break;
}
}
}
-
All of the above code may not be enough. If the screen is refreshed, the breadcrumbHistoryList value would be lost whereas the navigation history records for the session are still there. The sessionStorage object is also needed for caching and restoring the breadcrumbHistoryList before and during the refreshing action, respectively.
The breadcrumbHistoryList is saved to the sessionStorage object instance after it is updated every time:
window.sessionStorage.setItem
('breadcrumbHistoryList', JSON.stringify(pThis.breadcrumbHistoryList));
The breadcrumbHistoryList is restored from the sessionStorage object instance when the screen refreshes:
if (pThis.breadcrumbHistoryList.length < 1 &&
window.sessionStorage.getItem('breadcrumbHistoryList') != null) {
pThis.breadcrumbHistoryList =
JSON.parse(window.sessionStorage.getItem('breadcrumbHistoryList'));
}
The above coding implementations resolve the issues of breadcrumbs with any browser-intrinsic navigation. We can now navigate back or forward, select any item from history list, or refresh screens any time and from any step.
Dynamically Changing Breadcrumb Labels
The breadcrumb label for the Hero Profile page is originally set to “Profile”. We would like to dynamically change it to the “Hero: <hero’s name>” after the data is available as shown in the first screenshot. This needs the message service and also the code updates with both the BreadcrumbComponent and component for the loaded page, for example, the HeroProfileComponent in the sample application.
-
In the BreadcrumbComponent, subscribe the message service “bcLabelOverwrite”, search passed breadcrumb key and requested labelName values from the breadcrumbList array, and then change existing labelName value to the requested one.
this.subscription_label =
this.messageService.subscribe('bcLabelOverwrite', (eventData) => {
for (let idx: number = pThis.breadcrumbList.length - 1; idx >= 0; idx--) {
if (pThis.breadcrumbList[idx].key == eventData.key) {
pThis.breadcrumbList[idx].labelName = eventData.labelName;
break;
}
}
});
-
In the HeroProfileComponent, send the breadcrumb key and requested labelName in the message service “bcLabelOverwrite” to the BreadcrumbComponent after obtaining the hero.name data.
if (pThis.hero.name) {
pThis.messageService.broadcast('bcLabelOverwrite',
{ key: 'HeroProfile', labelName: 'Hero: ' + pThis.hero.name });
}
Non-executable Terminal-only Breadcrumb Items
When opening the administration pages, the login authentication process is automatically conducted due to the route-guard action. On any administration page, however, it’s not meaningful to have the "Login" shown as executable item in the breadcrumb list since the login request is not imperative after the authenticated session has been established. The breadcrumb for the Login page may be displayed as read-only in the terminal position.
The Admin Dashboard page loaded after the login shows no "Login" breadcrumb in the list.
Such features are achieved by making these code changes:
-
Add the terminalOnly property into the breadcrumbItem object with the route configuration:
const authRoutes: Routes = [
    {
	    path: 'login',
	    component: LoginComponent,
	    data: { breadcrumbItem:
        { key: 'Login', labelName: 'Login', terminalOnly: true, afterBaseOnly: true } },
    }
];
-
In the BreadcrumbComponent.refreshBreadcrumbs() method, check and remove the last item having the terminalOnly property in the breadcrumbList before adding the subsequent breadcrumb:
if (this.breadcrumbList[this.breadcrumbList.length - 1].terminalOnly) {
    this.breadcrumbList.length = this.breadcrumbList.length - 1;
}
Another example of non-executable terminal-only breadcrumb item is that for the Page Not Found page. The terminalOnly attribute of the breadcrumbItem object needs to be specified in the configuration for the Page Not Found route. The BreadcrumbComponent will automatically treat the "Page Not Found" as the terminal breadcrumb item.
Cross-branch Navigation
The cross-branch navigation can be done by following the rules described in the list #6 of the Breadcrumb Structures and Rules section. To disable any upstream navigation and editable operations in the target branch, the matrix parameter crossBranch with the value "y" is passed from the original branch to the page and all its downstream pages of the target branch.
Described below is the example of redirecting from the Manage Crises page of Admin branch to the Crisis Detail page of Crisis Center branch.
-
When clicking the View Crisis Detail link on the Manage Crises page, the router.navigate() method is called with URL metrix parameters:
this.router.navigate(['crisis-center', { crossBranch: 'y' },
                       id.toString(), { crossBranch: 'y', segmentParam: 'y' }]);
-
We need only the Crisis Detail breadcrumb to be appended to the current breadcrumbList. However, if we do not write additional code pieces, the parent Crisis List will automatically be added before the Crisis Detail item (See the discussions before). Thus, additional code lines are added into the BreadcrumbComponent.refreshBreadcrumbs() method to bypass any parent route for the child route with the URL segment parameters.
let cbpRoute: ActivatedRoute = this.findCrossBranchSegmentParamRoute(child);
if (cbpRoute) {
this.refreshBreadcrumbs(child, pathParams);
return;
}
findCrossBranchSegmentParamRoute(route: ActivatedRoute): ActivatedRoute {
let child: ActivatedRoute;
if (route.firstChild) {
child = route.firstChild;
}
else {
return null;
}
if (child.snapshot.params['crossBranch'] == 'y' &&
child.snapshot.params['segmentParam'] == 'y') {
return child;
}
else {
this.findCrossBranchSegmentParamRoute(child);
}
}
-
The target CrisisDetailComponent receives the crossBranch parameter and sets the class level variable for the crossBranch flag.
this.route.paramMap.pipe(switchMap((params: ParamMap) => {
    this.crossBranch = params.get('crossBranch');
    return new Observable();
})).subscribe(item => {});
-
The template crisis-detail.component.html disables the editName field and also doesn’t render the Save and Cancel buttons. Thus the cross-branch page becomes read-only and no upstream operations continue from the page.
<div>
<label>Name:  </label>
<input [disabled]="crossBranch == 'y'" [(ngModel)]="editName" placeholder="name" />
</div>
<!--
<p *ngIf="crossBranch != 'y'" style="padding-top: 0.5rem;">
<button (click)="save()">Save</button>  
<button (click)="cancel()">Cancel</button>
</p>
-
The displayed breadcrumbs show the navigation traces beginning from the pages of Admin branch to the Crisis Detail page of the Crisis Center branch.
Regression Test Scenarios
It’s very necessary to regressively test a web application with such complex navigation approaches. Any navigation-related action in this sample application usually won’t cause errors since there is the “Page Not Found” page. Any test run will render one of the three results:
- Normal and correct target page
- Incorrect target page
- “Page Not Found” page
The test runs for the navigation tree could be vertical (within a route branch), horizontal (between route branches), or mix of the two. The actions could also be randomly or deliberately taken for any available navigation options on any particular page.
Listed below are just several regression test cases with mouse clicking for all listed items. You can watch the navigation results after each action.
-
Home -- (left menu) Heroes -- (hero list) Hero -- (hero detail) Crisis History -- (browser) Refresh -- (breadcrumb) Hero xxx… -- (browser) Back -- (browser) Forward -- (hero detail) Award -- (breadcrumb) Hero List -- (hero list) Go to sidekicks -- (breadcrumb) Hero List -- (left menu) contact -- (hero list) Hero -- (breadcrumb) Home -- (left menu) Crisis Center -- (contact) Cancel -- Continue with any available action.
-
Home -- (home) Click Here to Open Task Board -- (task board) Open Crisis Center -- (left menu) Heroes -- (browser) Back -- (crisis list) Crisis Item -- (crisis) Click here for helps -- (breadcrumb) Crisis List -- (browser) Back -- (breadcrumb) Crisis Detail -- (crisis) Edit Name and then Save -- (browser) Back -- (browser) Refresh -- (breadcrumb) Crisis List -- (browser) Back -- (crisis detail) Cancel -- (left menu) Admin -- (browser) Right-click Back and select any historic item -- Continue with any available action.
-
Home -- (left menu) Admin -- (login) Login -- (left menu) Home -- (browser) Back -- (admin) Manage Heroes -- (admin) Manage Crises -- (breadcrumb) Manage Heroes -- (browser) Back -- (browser) Refresh -- (admin) Logout -- (popup) Cancel -- (admin) Logout -- (popup) OK -- (left menu) Crisis Center -- (browser) Back -- (login) Login -- (admin) Manage Crises -- (manage crises) View Crisis Detail -- (crisis detail) Click here for helps -- (breadcrumb) Admin Dashboard -- Continue with any available action.
Audiences can do whatever you would like on any available options on the pages. Any report on bugs and incorrect results from your test is welcome.
Porting Breadcrumb Component to Your Own Applications
The breadcrumb.component.ts file with its template and CSS is a standalone code unit that can easily be added into your own projects even for the platform other than using the Microsoft techniques and Visual Studio. You also need to take some dependent files for the component in addition to the Angular library and its dependent files. The bootstrap and hero-specific style files used by the sample application are not required by the breadcrumbs per se.
For your own applications, import the component and service files to build the breadcrumbs similar to those shown in the sample application. All below files are in the .../ClientApp/app/ folder:
- breadcrumb/breadcrumb.component.ts
- breadcrumb/breadcrumb.component.html
- breadcrumb/breadcrumb.component.css
- services/message-subject.service.ts
- services/globals.ts
You can then add the breadcrumbItem object with the properties and values into the data object in the route configuration definitions for any of your breadcrumbs. You may also change the code in other pages if some features are used, such as dynamically replacing the breadcrumb labels.
- 3/6/2019
- 3/14/2019
- Added standalone client-script-only source code especially for developers who use the systems other than the Microsoft platform
- Updated descriptions in the Build and Run Sample Application section
- 12/13/2019
- Updated the sample application with Angular 8 CLI and Bootstrap 4.3 CSS
- Added source code with the ASP.NET Core 3.0 website for the Visual Studio 2019
- Added descriptions on setting up the sample application with the ASP.NET Core 3.0
- If needed, you can download the previous source code with Angular 7 CLI and Bootstrap 3.3 CSS: Breadcrumb_Ng7_Cli_All.zip
- 3/1/2020
- Updated the sample application with Angular 9 CLI
- Updated the ASP.NET Core project type to version 3.1 website for the Visual Studio 2019
- Edited sample application setup descriptions.
- If needed, you can download the previous source code with Angular 8 CLI: Breadcrumb_All_Ng8_Cli.zip
Shenwei is a software developer and architect, and has been working on business applications using Microsoft and Oracle technologies since 1996. He obtained Microsoft Certified Systems Engineer (MCSE) in 1998 and Microsoft Certified Solution Developer (MCSD) in 1999. He has experience in ASP.NET, C#, Visual Basic, Windows and Web Services, Silverlight, WPF, JavaScript/AJAX, HTML, SQL Server, and Oracle.


 General
  News
News  Suggestion
  Question
  Bug
Bug  Answer
  Joke
Joke  Praise
  Rant
Rant  Admin
Admin 


