This article guides to implement a web-based application using Vue.js. These are beginner level guidelines to know the communication between the client side and server side. We will configure the setup and how to use Vue.Js which is a JavaScript framework for client side development. Server side part will be covered by Dot NET Core MVC. Let's see how to setup Vue.Js with Dot NET Core.
Coverage Topic
- Vue.js install and basic setup
- Dot NET Core download and setup
- ASP.NET Core SPA Template
- Node.js and NPM setup
- Fundamental Knowledge of Package Installer (NPM, Bower, Yarn)
- Basic knowledge of Web-pack, Grunt or Gulp
- Introduction of Type-Script, Babel
- Setup Dot Core MVC and NPM
- Use of Axios-Package
- Setup Web-pack Task Runne
VUE.JS Introduction
It is a JavaScript framework for single-page-applications (SPA) development. This JavaScript framework is similar to Angular, React.js and Knockout. Each of these has a different focus and you will have to decide which one is good for you. It depends on your situations. If you have to play with dynamic DOM manipulation, then React.js is good. If you need data-driven CRUD operations, then Angular is good. The position of Vue.Js is in between these situations; but still it likes to deal with DOM. These are just my personal opinions.
DOT NET Core
I don't need to introduce the Dot NET Framework. But this time, Dot NET Core starts to bring the revolution into the future. Yes, I'm talking about the cross-platform. If you are targeting to run your application on multiple platform like Windows, Mac and Linux, then Dot NET Core is perfect. Because it focuses on the micro-services and another consideration if you like docker-containers. You know that containers is light weight comparing to virtual machine (VM).
Download and Installation of Visual Studio 2017
ASP.NET Core Spa Template
You will get single page application templates with ASP.NET Core 2.0 by default.
You can also install ASP.NET Core SPA Templates. This template is compatible with ASP.NET Core 1.1 for Angular, Aurelia, Knockout, React, React+Redux, Vue.js. Find the given link to download the template. (http://vsixgallery.com/extension/4336beed-a389-4f86-9138-40d258e78ccf/)

You can also download the Vue.js Pack 2017 for HTML Intelligence and code snippets (https://marketplace.visualstudio.com/items?itemName=MadsKristensen.VuejsPack-18329)
Fundamental Knowledge and Setup
Node.js
Node.js is open source command line tool. It uses the Google V8 JavaScript engine to execute the code. You can download it. (https://nodejs.org/en/download/)
Node Package Manage (NPM)
NPM is a command-line utility. You can use it for installing 3rd party package, version management and dependency management. You will be asked to install NPM with Node.js installation setup. If you want to install NPM then, don't forget to install Node.js. It is recommended to install Node.js to run NPM.
Command line:
- Install NPM:
npm install -g npm - To update:
npm update -g - To see the installed version:
npm -v
Bower, Yarn
Bower and Yarn are similar to NPM. You can use either NPM or Yarn or Bower. For package installation, Yarn sometimes few seconds faster, then NPM; it depends on the situation.
Web-pack, Grunt or Gulp
If you ask me, what is Web-pack? I'll be silent. Let's see one situation where web-pack will provide you the solution.
- End-User: I like your T-Shirt. How did you get that?
- Eva.js: My boyfriend John gift me this one.
- End-User: Okay, talk to John and ask him.
- Eva.js: Hi hun! Where did you buy cool T-Shirt?
- John.js: I have bought it from an online store.
So, the end-user sends one more Http-requests to get the expected result. It means, there is a dependency graph where Eva.js calls John.js.
Now if we merge both of these JS files into one bundle, then a single http-request is okay to find the file.
So, you need web-pack to make those bundles. You can concat, minify or uglify your JS files using web-pack.
- Concatenation is appending all of the files into one large file.
- Minification is removing unnecessary whitespace and character without changing the functionality.
- Uglification is converting the code in such a format that it will be difficult to understand.
Gulp/Grunt
Gulp or Grunt are similar to web-pack. You can concat, minify or uglify your JS and CSS files using these.
Web-Pack vs. Gulp/Grunt
Web-Pack
Gulp/Grunt
Type-Script
ECMAScript is the standard for the JavaScript. All of the browsers still don't support new standard. Type-Script works like a transpiler that compiles and converts it from (say, es-2016 or es-2017 to es5) java-script code. Finally, it makes browser compatibility.
If you come from .NET background Engineer, then I would say, it has added some beauty to write JavaScript like - namespaces, interfaces, generics, access-modifiers, null check, etc. You will feel like you are in the .NET home.
Babel
Babel is also a JavaScript transpiler that compiles and converts old ES5 JavaScript to make browser compatible.
Install VUE-CLI
- First, you have to make sure that Node.js and NPM are already installed on our system.
- Use the following command to install the Vue CLI globally on the local system:
npm install -g vue-cli
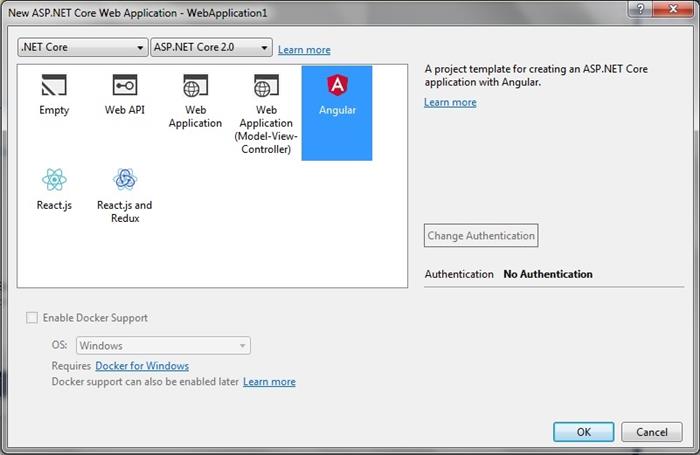
Setup Dot Net Core MVC and NPM
- Create a new .NET Core project with MVC
- Select .NET Core > ASP.NET Core Web Application
- Select Web Application (MVC):
Manage Client-side Packages with Bower or NPM or Yarn in ASP.NET Core
If you choose the MVC template, then it automatically uses Bower for client-side package installation.
Removing Default Bower from the Project
I will use NPM for this demo project. To remove the Bower from the project:
- Remove - lib folder. You will find it into the wwwroot folder.
- Remove bower.json configuration file.
- Finally, unload and then again reload the project.
Adding NPM Clients-side Package Installer into the Project
Add the package.json file into your project. Add this file by right clicking on the solution and search npm. You will get the npm Configuration File.
After adding the file, unload and reload the project. You will see the npm folder into the Dependencies.
Axios-Package
In this project, I’ll use axios-package for http client request. This is a promise-based http client. Use ‘npm install axios’ to install this package.
package.json
You can copy and paste the contents into the package.json file and Visual-Studio will restore all of the packages for you.
{
  "name": "Rony.DotNetCore.HelloWorld",
  "version": "0.0.0",
  "devDependencies": {
    "@types/requirejs": "^2.1.28",
    "axios": "^0.16.2",
    "babel-core": "^6.26.0",
    "babel-loader": "^7.1.2",
    "babel-preset-env": "^1.6.0",
    "babel-preset-es2015": "^6.24.1",
    "bootstrap": "^4.0.0-beta",
    "bootstrap-material-design": "4.0.0-beta.3",
    "css-loader": "^0.28.7",
    "fuse.js": "^3.2.0",
    "jquery": "^3.2.1",
    "material-design-colors": "^1.0.2",
    "moment": "^2.19.1",
    "numbro": "^1.11.0",
    "popper.js": "^1.12.5",
    "style-loader": "^0.19.0",
    "url-loader": "^0.6.2",
    "vue": "2.4.4",
    "vue-loader": "^13.0.5",
    "vue-template-compiler": "2.4.4",
    "webpack": "^3.6.0"
  }
}
tsconfig.json for Type-Script
To avoid the extra complexity, I did not add the type-script into this project. I have used babel. Because here my primary goal is not to show the transpiler. But if you want to add type-script, then you have to add tsconfig.json file into the project with the following contents and change the target version according to your need.
{
"compilerOptions": {
"allowSyntheticDefaultImports": true,
"experimentalDecorators": true,
"module": "es2015",
"moduleResolution": "node",
"target": "es2015",
"removeComments": true,
"sourceMap": true,
"skipDefaultLibCheck": true,
"types": [ "requirejs" ]
},
"compileOnSave": true,
"exclude": [
"bin",
"node_modules"
]
}
After adding the tsconfig.json file, you have to change HelloWorld.cshtml.js to HelloWorld.cshtml.ts. Finally, you are ready to use type script into your ts file.
Setup VUE.JS With Web-Pack in Dot NET Core MVC
If you did not install the web-pack, then install (nmp install webpack –g) it. Now add a webpack.config.js file into your project. Here, we will setup the entry point of the js files.
entry: {
        app: './wwwroot/js/site.js',
        HelloWorld: './Views/Home/HelloWorld.cshtml.js',
        EmployeeIndex: './Views/Home/EmployeeIndex.cshtml.js
    }
We need to setup the output directory to drop the bundle js files.
output: {
        publicPath: "/js/",
        path: path.join(__dirname, '/wwwroot/js/'),
        filename: '[name].bundle.js'
    }
The full configuration is given below. You can copy and paste into your webpack.config.js file and change according to your need.
"use strict";
const path = require('path');
const webpack = require('webpack');
module.exports = {
entry: {
app: './wwwroot/js/site.js',
HelloWorld: './Views/Home/HelloWorld.cshtml.js',
EmployeeIndex: './Views/Home/EmployeeIndex.cshtml.js'
},
plugins: [
new webpack.ProvidePlugin({
'$': 'jquery',
jQuery: 'jquery',
'window.jQuery': 'jquery',
Popper: ['popper.js', 'default'],
moment: 'moment',
axios: 'axios',
numbro: 'numbro'
}),
new webpack.optimize.UglifyJsPlugin()
],
output: {
publicPath: "/js/",
path: path.join(__dirname, '/wwwroot/js/'),
filename: '[name].bundle.js'
},
module: {
rules: [
{
test: /\.js$/,
loader: 'babel-loader',
exclude: /(node_modules)/,
query: {
presets: ['es2015']
}
},
{
test: /\.ts$/,
exclude: /node_modules|vue\/src/,
loader: "ts-loader",
options: {
appendTsSuffixTo: [/\.vue$/]
}
},
{
test: /\.css$/,
loaders: ['style-loader', 'css-loader']
},
{
test: /\.(png|jpg|gif)$/,
use: {
loader: 'url-loader',
options: {
limit: 8192
}
}
},
{
test: /\.vue$/,
loader: 'vue-loader',
}
]
},
resolve: {
alias: {
vue: 'vue/dist/vue.js'
},
extensions: ['.js', '.vue']
}
};
Setup Webpack Task Runner
You need Web-pack Task Runner to compile and bundle the js files. You can also compile directly from command line. In that case, you don’t need webpack task runner. Anyway, if you want to install, then go to the download link and install it. After installation, you will find the given window in your project.
If you need to change your JS files, then it will be compiled automatically by this tool. You can even run it manually. To run it manually, go to the left side of the Task Runner Explorer. Select the Run and right click on the mouse button, then you will find the run and Bindings options. Click on the Run. Wait few seconds, you will get the result.
Short Demo Project Vue.js with Dot Net Core MVC
I have created a very light project to show you the only configuration and how it works. You can create a Dot NET core MVC Application project. To setup the project, follow the previous steps given above to configure the application.
Hello-World View Page
In this project, I have added a ‘HelloWorld.cshtml’ View page and ‘HelloWorld.cshtml.js’ into the View>Home directory.
In the HelloWorld.cshtml file, I have added two variables like message and twoWayBindingMessage to show you - how we can bind and communicate Vue.js to View.
@{
    ViewData["Title"] = "Hello World - Page";
}
<h4>@ViewData["Title"]</h4>
<h3>@ViewData["Message"]</h3>

    <div id="view">
        <span>One way binding message:{{message}}</span>
            <br /><hr />
            <span>2-way binding msg: {{twoWayBindingMessage}}</span><br />
            <br/>
            <input type="text" v-model="twoWayBindingMessage">
    </div>

<script src="~/js/HelloWorld.bundle.js" asp-append-version="true"></script>
Here, the message variable with double curly-braces, is a one way static binding. You can use Dynamic Binding if you want. End of this file, there is a JavaScript bundle file which is added from the output directory.
The HelloWorld.cshtml.js’ js file contains the given lines. You will find the variables into the data of the vue object.
import Vue from "vue";
document.addEventListener('DOMContentLoaded', function (event) {
    let view = new Vue({
        el: document.getElementById('view'),
        mounted: function () { },
        data: {
            message: "One-way binding msg",
            twoWayBindingMessage:"Type here ..."
        }
    });
});
How to Submit the Form
I have added ‘EmployeeIndex.cshtml’ View page and ‘EmployeeIndex.cshtml.js’ into the View>Home directory. Here, I have added few lines of code to show you how we can post data using axios. Rest of the get, put or delete methods are similar.
In the EmployeeIndex.cshtml file, add the contents that are given below:
@{
  ViewData["Title"] = "Add Employee";
}
<h3>@ViewData["Title"]</h3>
<h3>@ViewData["Message"]</h3>

@{
    ViewData["Title"] = "Add Employee";
}
<h3>@ViewData["Title"]</h3>
<h3>@ViewData["Message"]</h3>

<div id="view">
    <form>
        <div class="form-group">
            <label for="FirstName">First Name</label>
            <input type="text" class="form-control"
            id="firstName" name="firstName"
            v-model="firstName" placeholder="firstName ">
        </div>
        <div class="form-group">
            <label for="LastName">Last Name</label>
            <input type="text" class="form-control"
            id="lastName" name="lastName"
            v-model="lastName" placeholder="Last Name">
        </div>
        <div class="form-group">
            <label for="address">Address</label>
            <textarea class="form-control" rows="3"
            id="address" name="address"
            v-model="address" placeholder="Address"></textarea>
        </div>
        <button v-on:click="addEmployee">Add Employee</button>
    </form>
</div>

<script src="~/js/EmployeeIndex.bundle.js"></script>
I have added the given content into the EmployeeIndex.cshtml.js file. If you need new methods for put, get, delete, etc., you can add that into the methods:{…}:
import Vue from "vue";
import http from 'axios';

document.addEventListener('DOMContentLoaded', function (event) {
    let view = new Vue({
        el: document.getElementById('view'),
        mounted: function () { },
        data: {
            firstName: "",
            lastName: "",
            address:"",
            message: "This is a simple message from vue"
        },
        methods:
        {
            addEmployee: function () {
                try {
                    var url = '/Home/EmployeeIndex/';
                    var data = {
                        "firstName": this.firstName,
                        "lastName": this.lastName,
                        "address": this.address
                    };
                    var self = this;
                    http.post(url, data)
                        .then(function (response) {
                            console.log("successfully added!");
                        })
                        .catch(function (error) {
                            console.log(error);
                        });
                } catch (ex) {
                    console.log(ex);
                }

               return false;
            },
        }
    });
});
On the top of the file, I have imported the vue and axios.
import Vue from "vue";
import http from 'axios';
To post the data, I have used http.post(url, data) method from axios.
Now, run the project and type some values for firstName, lastName and address. If you click on the Add-Employee button, then you can pass these values from client side to the controller.
There are many ways to configure and setup your project. I have added a tiny demo project with this article. In the demo, I have included very simple and basic code; but you can use separate files for the template and the component file to implement client side development.
Lazy software engineer, don’t believe in hard work.


 General
  News
News  Suggestion
  Question
  Bug
Bug  Answer
  Joke
Joke  Praise
  Rant
Rant  Admin
Admin 


